
Getting started
Getting started with Cast AI Anywhere
Cast AI Anywhere brings powerful cost optimization features to any Kubernetes environment. This guide walks you through the initial setup process to onboard your cluster and start optimizing.
RecommendedThe easiest way to connect a Cast AI Anywhere cluster is with the castctl CLI. If you already have it installed and authenticated, run:
castctl cluster connect --provider anywhereIf you don't have castctl yet, see the Connect using the castctl CLI guide for installation and authentication steps.
Prerequisites
Before you begin, ensure you have:
-
jq– a lightweight command-line JSON processor. For more details, see the jq documentation. -
kubectl(v. 1.29+) – a Kubernetes command-line tool that allows running commands against Kubernetes clusters. For more details, see kubectl. -
helm(v. 3.14.0+) – a command-line tool that simplifies deploying applications and services to Kubernetes clusters. For more details, see helm. -
A Cast AI account (if you don't have one, sign up here)
Connect your cluster
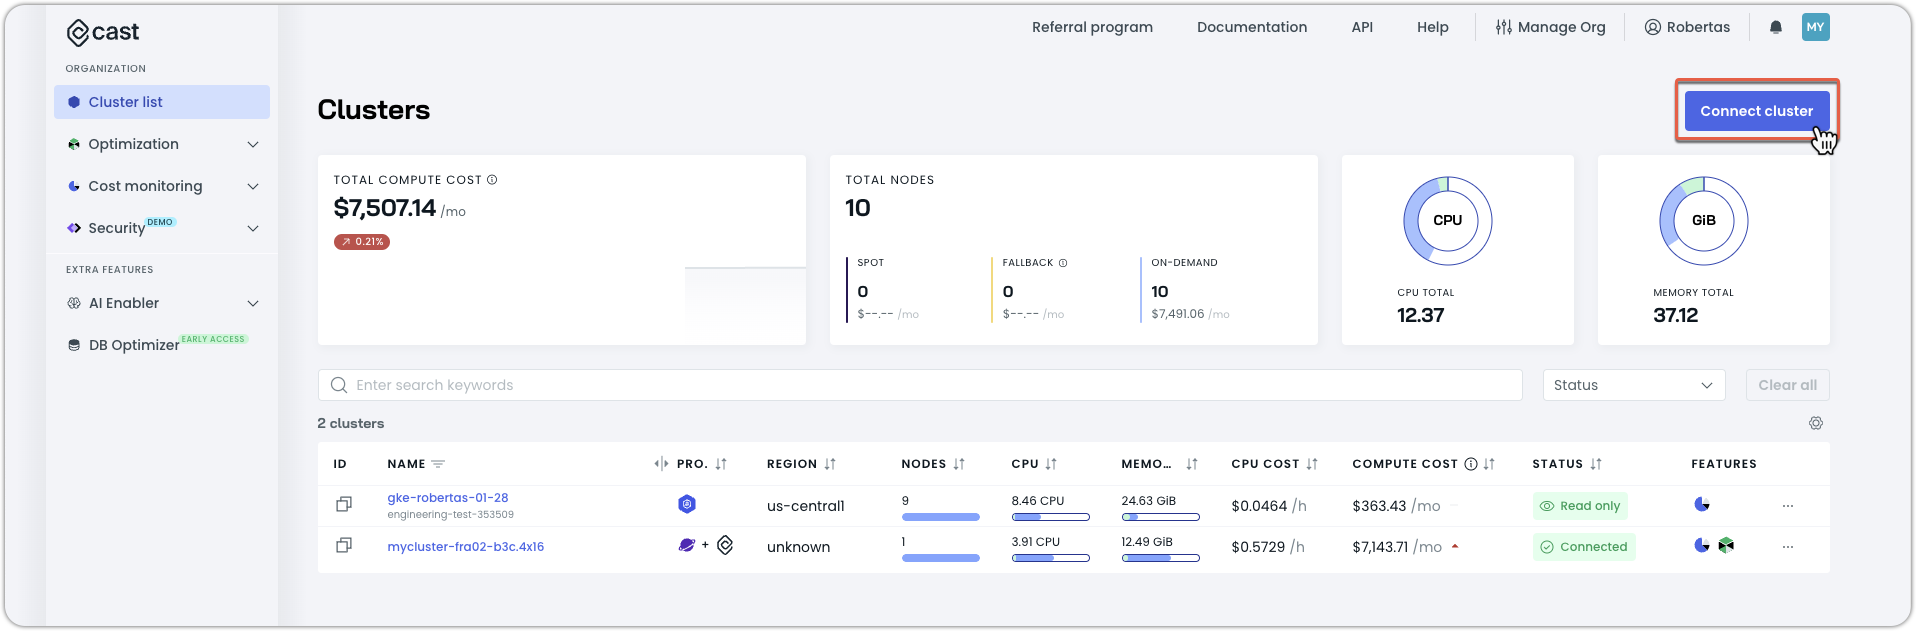
- Log in to the Cast AI console
- Click Connect cluster in the top right corner:
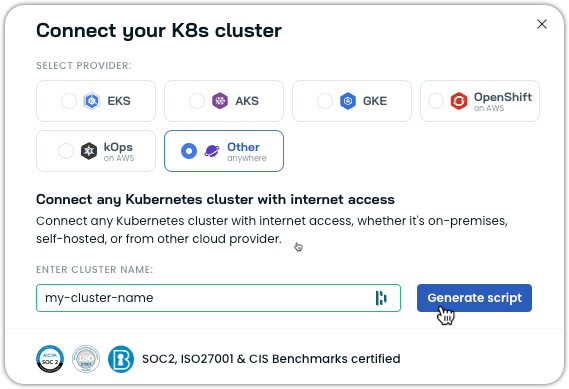
- Select Anywhere as your provider, then manually enter your cluster name and click on Generate script:
- Copy the generated script and run it in your terminal or cloud shell:
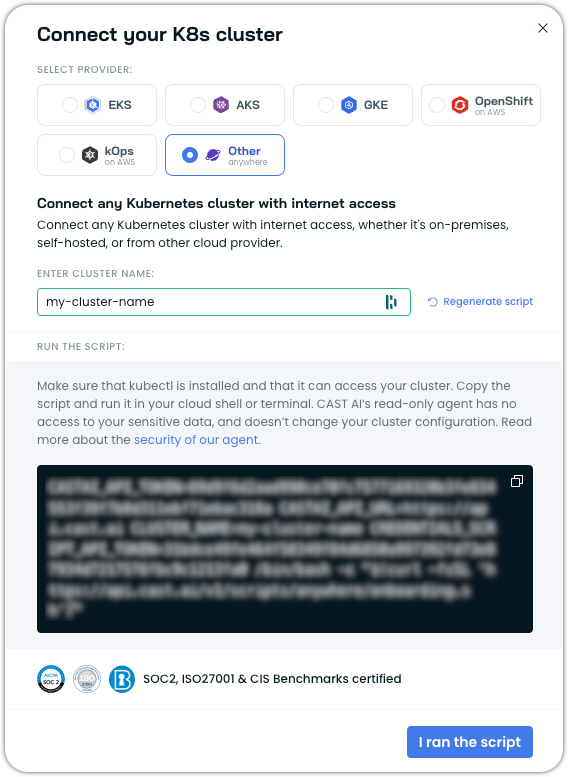
This will install the Cast AI components required by Cast AI Anywhere:
- Cast AI Agent
- Cluster Controller
- Workload Autoscaler
- Evictor
Configure cost settings
Cast AI Anywhere provides cost visibility for your cluster using two methods: automatic detection for supported environments and manual configuration for all other cases.
Automatic cost detection
For certain cluster types, Cast AI Anywhere automatically detects your underlying cloud provider and applies real cloud provider pricing for cost reporting. This provides immediate cost visibility without requiring manual price inputs.
Cast AI automatically detects and applies real cloud provider pricing for Anywhere clusters running on:
- Amazon Web Services (AWS)
- Google Cloud Platform (GCP)
- Microsoft Azure
- Oracle Cloud Infrastructure (OCI)
Common scenarios include:
- Oracle Cloud clusters (OCI)
- kOps clusters hosted on AWS
- Kubernetes clusters on GCP Compute Engine
- Self-managed clusters on Azure VMs
When automatic detection is available for your cluster, cost data will be calculated automatically based on detected infrastructure pricing. No additional configuration is needed.
Provider detection and pricingWhen Cast AI detects your underlying cloud provider, it automatically uses real cloud prices for cost calculations and reporting. Note that the UI currently displays the provider as "UNKNOWN" for Anywhere clusters, but pricing detection happens automatically in the background. You can verify that actual cloud pricing is being applied by checking your Cost Monitoring reports or using the Cast AI API.
Manual cost configuration
For clusters where automatic detection is not available, you can manually configure normalized resource costs. This ensures accurate cost tracking regardless of your infrastructure environment.
Automatic pricing overrideIf you manually configure custom costs for an Anywhere cluster, those values will be automatically replaced when Cast AI successfully detects your underlying cloud provider (AWS, GCP, Azure, or Oracle). Detection-based pricing uses public cloud list prices and takes precedence over manually configured values.
Negotiated cloud discountsAutomatic price detection currently uses public cloud list prices. If your organization has negotiated discounts with your cloud provider, Cast AI's cost estimates will reflect list prices rather than your actual discounted rates. Support for applying custom discounts through the Price Adjustments feature is planned for future releases.
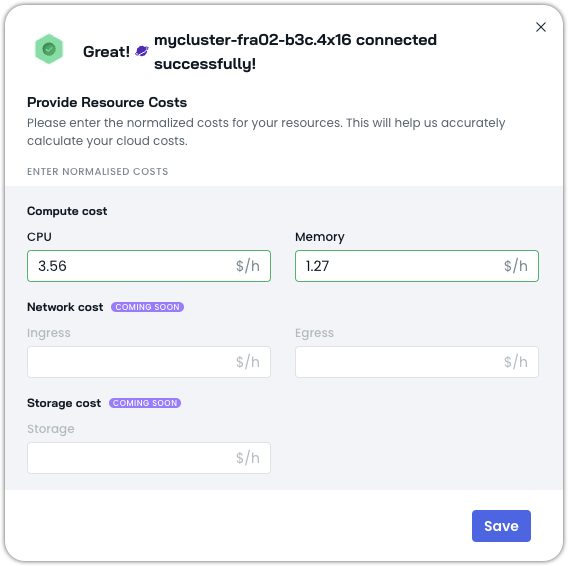
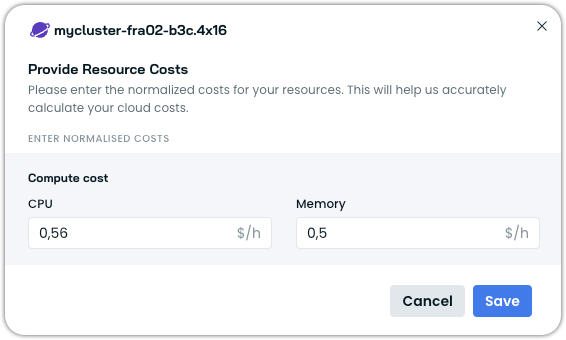
During initial connection
When your cluster first connects successfully and automatic detection is unavailable, you'll be prompted to enter your normalized compute resource costs. In this dialog, you can specify:
- CPU cost per hour
- Memory cost per hour
Adjusting costs later
You can modify resource costs at any time:
- Find your Cast AI Anywhere cluster in the cluster list
- Click the three dots in the cluster's row
- Select Adjust costs:

- Enter your updated normalized costs in the configuration modal
- Click Save to apply the changes
These cost settings help Cast AI calculate your potential savings accurately and make optimal scaling decisions. Update these values whenever your actual infrastructure costs change.
Cost detection methodsAutomatic cost detection is expanding to support additional cloud providers and Kubernetes distributions. If your cluster type doesn't currently support automatic detection, manual configuration ensures you still receive accurate cost visibility and optimization recommendations.
Review your available savings
After connecting your cluster and configuring resource costs, Cast AI analyzes your current cluster state to identify optimization opportunities. At this stage, you can view your available savings report.
- Select your Anywhere cluster from the list
- Click Available savings in the sidebar navigation to see a detailed breakdown of optimization opportunities:
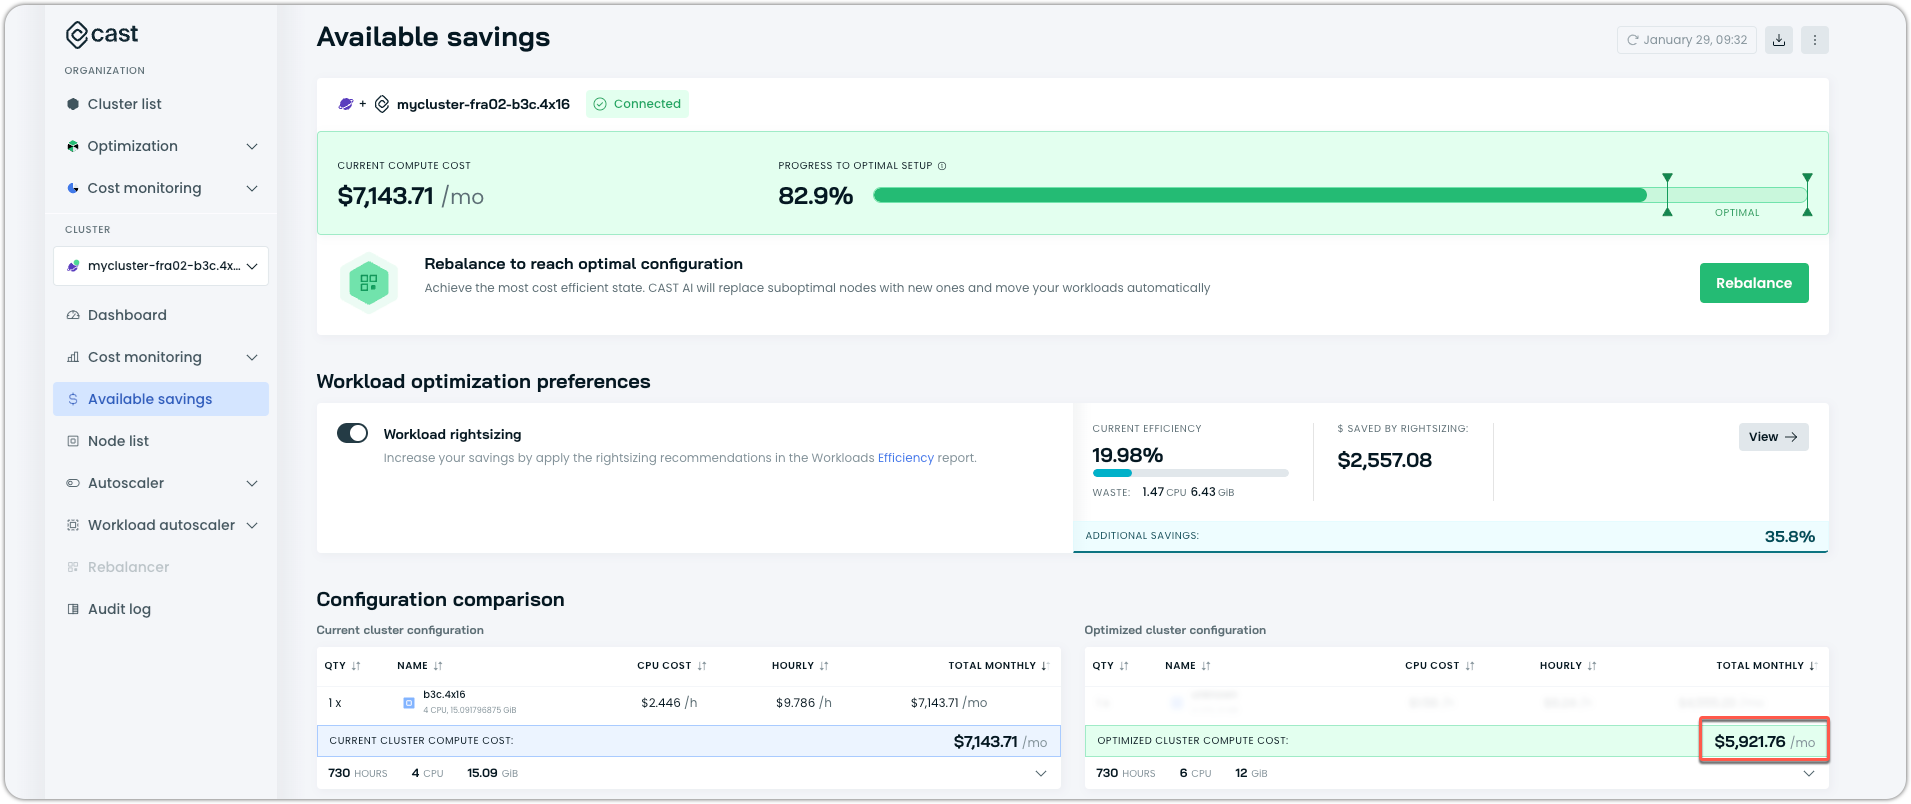
This initial analysis helps you understand the potential impact of Cast AI's optimization features and prioritize which optimizations to enable first.
For more information on the Available Savings report, see Available Savings. Note that this report's capabilities will be limited due to the nature of Cast AI Anywhere clusters.
NoteThe savings calculations are based on the resource costs you configured. Keep these values up to date to ensure accurate savings estimates.
To implement these savings, proceed with enabling workload optimization and resource consolidation features as outlined in the following sections.
Step 4: Configure optimization features
Cast AI Anywhere provides two main optimization capabilities that you can enable independently:
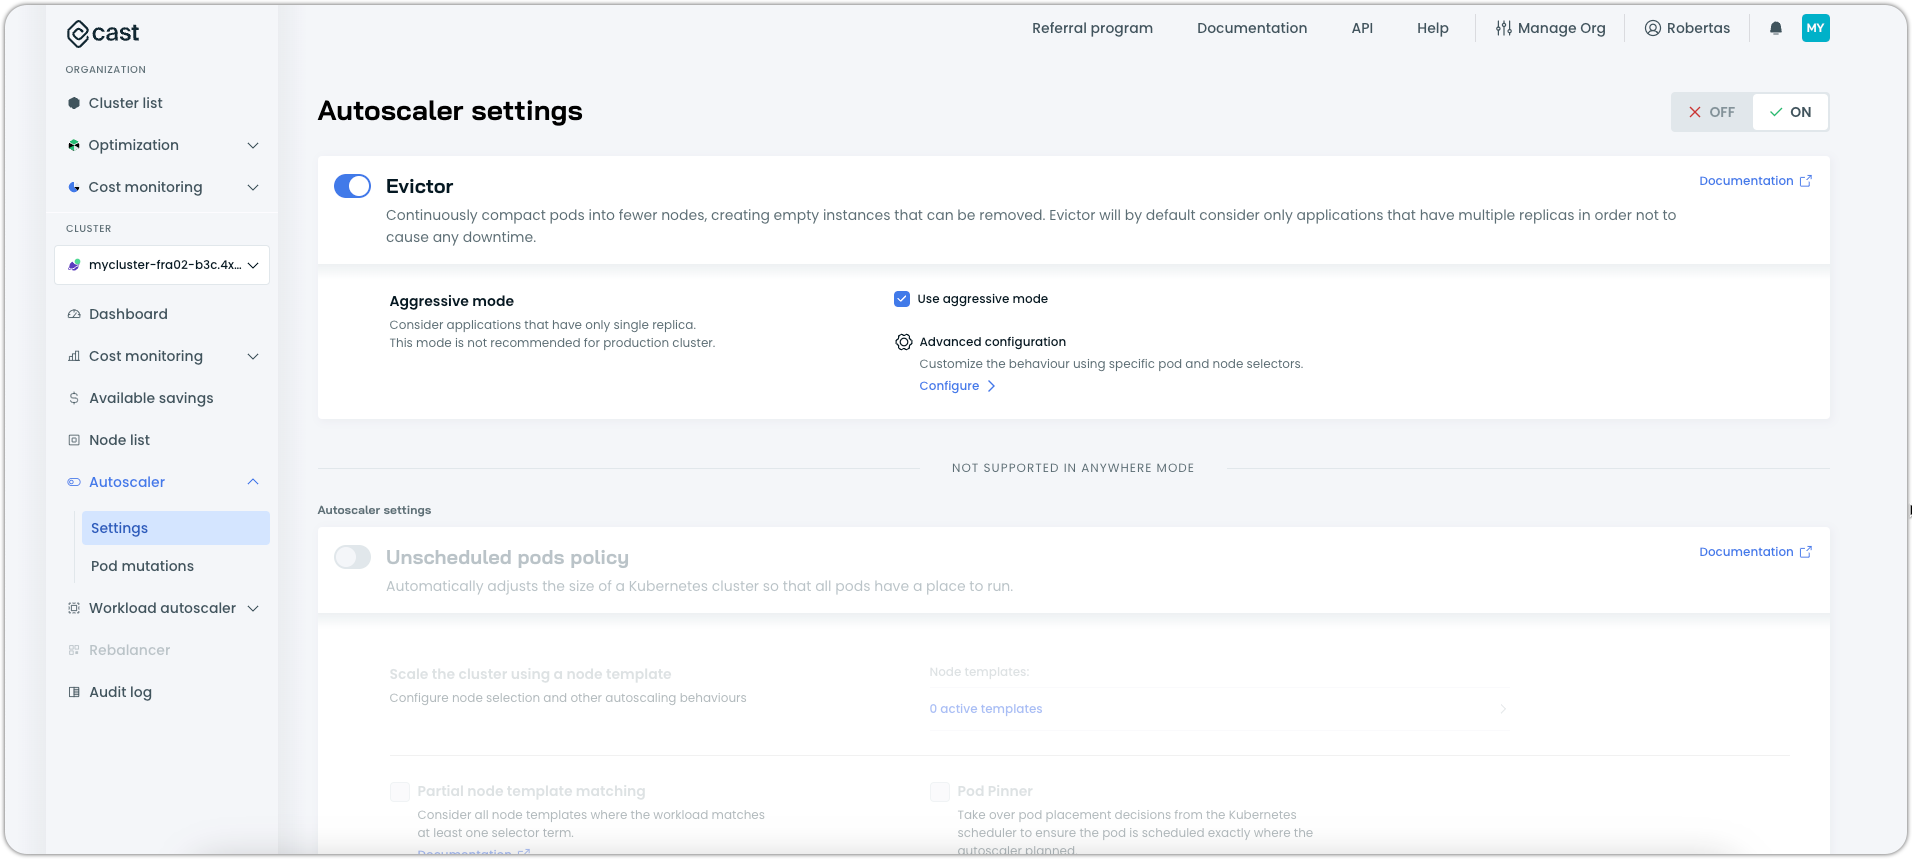
Resource consolidation
- Navigate to Autoscaler > Settings
- Toggle Evictor to the On position, as it will be disabled at first by default. Optionally, enable the Aggressive mode. Save the changes. For more information on configuring the Evictor, see Evictor.
Workload optimization
Cast AI Anywhere offers our powerful workload autoscaling capabilities, including both Vertical and Horizontal Workload Autoscaling, which work out of the box. This feature automatically adjusts your workload's resource requests and replica counts based on actual usage patterns, helping to:
- Optimize resource allocation
- Prevent overprovisioning
- Handle traffic spikes efficiently
- Reduce unnecessary costs
Workload Autoscaler comes pre-configured with default policies. You can optimize your workloads immediately by creating and configuring scaling policies to match your needs.
To learn how to set up and configure workload autoscaling for your environment, visit our workload autoscaling documentation.
Step 5: Monitor your costs and savings
Cast AI Anywhere provides cost monitoring capabilities based on the normalized resource costs you configured earlier. While some advanced cost monitoring features available in standard Cast AI deployments aren't accessible for Anywhere clusters, you can still track key metrics:
- Navigate to Cost Monitoring to view:
- Total compute costs calculated from your configured CPU and memory pricing
- Resource utilization trends
- Cost breakdowns by workload and namespace
- Efficiency reports highlighting optimization opportunities
For the most accurate tracking, ensure your configured resource costs reflect your actual infrastructure expenses. This helps Cast AI provide meaningful optimization recommendations and accurately measure your savings.
Available featuresSome advanced cost monitoring features like cloud provider-specific cost breakdowns are not available for Cast AI Anywhere clusters. The reports focus on compute costs based on your configured resource pricing.
For more information on how to best leverage Cast AI's cost monitoring capabilities, see Introduction to Cost Monitoring.
Step 6: Set up Pod mutations
Cast AI Anywhere can automatically mutate your Pod configurations through our Pod mutation feature. This is especially useful if you want to easily add workload autoscaling labels and annotations to existing pods in your cluster.
To learn how to set up Pod mutations and use them effectively in your environment, check out our detailed Pod mutations documentation.
NotePod mutations are optional but recommended for efficiently managing or migrating your existing workloads at scale.
Next steps
After completing the initial setup:
- Configure scaling policies for your workloads
- Set up alert notifications for important events
- Join our Slack community for support and updates
Troubleshooting
Prerequisites errors
Missing jq utility
The installation script requires the jq command-line JSON processor. If you see this error:
Error: jq is not installedInstall jq based on your operating system:
# For Debian/Ubuntu
apt-get install jq

# For Red Hat/CentOS
yum install jq

# For macOS
brew install jq
Component verification
Verify the Cast AI components are running properly:
# Check component status
kubectl get pods -n castai-agent

# Should show component pods in Running state:
NAME                                          READY   STATUS    RESTARTS      AGE
castai-agent-cpvpa-597c687958-9gq4p           1/1     Running   0             125m
castai-agent-d5b774c7b-mrc7h                  2/2     Running   0             125m
castai-agent-d5b774c7b-wv9p5                  2/2     Running   0             125m
castai-cluster-controller-df4cdfb85-8gdr4     0/2     Pending   0             34m
castai-cluster-controller-df4cdfb85-mxmwq     2/2     Running   0             34m
castai-evictor-567fcbf597-rndxr               1/1     Running   0             6s
castai-evictor-cpvpa-7cf448446b-hqbk2         1/1     Running   0             10s
castai-pod-mutator-568b6dcfd4-5bmsf           1/1     Running   1 (22m ago)   22m
castai-pod-mutator-568b6dcfd4-mxtkp           0/1     Pending   0             22m
castai-workload-autoscaler-59b7d58954-47pdk   1/1     Running   1 (34m ago)   34m
Some timeout errors you might encounter may not be critical for the operation or completion of component installation.
Cordoned Nodes Not Being Deleted
When using Cast AI Anywhere, you may encounter a situation where cordoned nodes remain in your cluster without being deleted automatically. This occurs because Cast AI Anywhere relies on your existing cluster autoscaler to detect and remove empty nodes from both Kubernetes and your infrastructure.
Resolution
Adjust your cluster autoscaler's configuration to delete empty nodes more quickly. The specific configuration varies by platform.
Example: OVH Cloud Managed Kubernetes
kubectl patch nodepool node-pool --type="merge" --patch='{"spec": {"autoscaling": {"scaleDownUnneededTimeSeconds": 60, "scaleDownUnreadyTimeSeconds": 60, "scaleDownUtilizationThreshold": "0.3"}}}'This configuration changes:
scaleDownUnneededTimeSeconds: Time before an empty node is considered for removal (set to 60 seconds)scaleDownUnreadyTimeSeconds: Time before an unready node is considered for removal (set to 60 seconds)scaleDownUtilizationThreshold: Node utilization threshold that triggers scaling down (set to 30%)
NoteConfiguration parameters and commands may differ depending on your cloud provider or cluster management solution. Consult your provider's documentation for specific guidance.
Updated 5 days ago