
Workload Autoscaler configuration
Workload Autoscaling can be configured in different ways to suit your specific needs. You can configure scaling policies using the Cast AI console, API, or Terraform. To override settings for individual workloads, use workload annotations.
Components
Workload Autoscaler consists of two Helm charts that work together to provide optimization capabilities:
- castai-workload-autoscaler – The main component that generates and applies resource recommendations to your workloads
- castai-workload-autoscaler-exporter – Collects workload metrics from your cluster to support recommendation generation, including custom metrics for JVM heap scaling, PSI pressure, and startup failure detection
Both components are installed automatically during cluster onboarding when Workload Autoscaler is selected. The exporter currently collects probe failure metrics by default.
Upgrading
NoteSome of the Helm commands below use the
--reset-then-reuse-valuesflag, which requires Helm v3.14.0 or higher.
To upgrade all Cast AI components, including Workload Autoscaler and its exporter:
helm repo update castai-helm
helm upgrade castai castai-helm/castai -n castai-agent --reset-then-reuse-values
Upgrade with Helm test enabled
To verify the deployment's functionality during an upgrade, you can enable Helm's built-in testing mechanism. This ensures both the reconciliation loop and admission webhook are working correctly:
Configuration-only changesThe commands in this section upgrade all components in the umbrella chart, not just Workload Autoscaler. To change configuration without upgrading component versions, pin the chart to your current version by adding
--version <your-current-chart-version>to the command. Runhelm list -n castai-agentto check your current version.
helm repo update castai-helm
helm upgrade castai castai-helm/castai -n castai-agent \
  --reset-then-reuse-values \
  --set autoscaler.castai-workload-autoscaler.test.enabled=true
Upgrade with memory limits & Helm test enabled
For clusters with high workload counts or complex scaling requirements, you may need to adjust memory limits to prevent OOM kills. This command combines memory limit configuration with Helm testing:
helm repo update castai-helm
helm upgrade castai castai-helm/castai -n castai-agent \
  --reset-then-reuse-values \
  --set autoscaler.castai-workload-autoscaler.resources.limits.memory=5Gi \
  --set autoscaler.castai-workload-autoscaler.resources.requests.memory=5G \
  --set autoscaler.castai-workload-autoscaler.test.enabled=true
Enable whitelisting mode
Whitelisting mode provides fine-grained control over which workloads are managed by Workload Autoscaler. When enabled, only workloads explicitly labeled for optimization will have recommendations applied.
To enable whitelisting mode:
helm repo update castai-helm
helm upgrade castai castai-helm/castai \
  -n castai-agent \
  --reset-then-reuse-values \
  --set autoscaler.castai-workload-autoscaler.workloadWhitelistingEnabled=true
With whitelisting enabled, workloads require the workload-autoscaler.cast.ai/enabled: "true" label to have recommendations applied. See Whitelisting mode for details.
Rollback to a previous version
If you encounter issues after an upgrade, you can roll back to a previous version using the following steps:
Check release history
Before rolling back, check the current release history to identify available versions:
helm history castai -n castai-agentRollback to a specific version
Once you've identified the desired version from the history, execute the rollback. Replace [VERSION] with the desired revision number:
helm rollback castai [VERSION] -n castai-agentThis will restore the Cast AI release to the specified version.
Verify the deployment
After an upgrade or rollback, confirm that the deployment is running correctly:
kubectl get pods -n castai-agent
kubectl logs -l app=castai-workload-autoscaler -n castai-agent
ArgoCD compatibility
If you are using ArgoCD and managing each component as a separate Helm release, you may need to disable Helm test hooks to prevent sync issues. The Workload Autoscaler includes a test hook that verifies its basic functionality, but this can cause problems with ArgoCD, as it does not fully support Helm test hooks. To disable test hook creation, set test.enabled=false.
For new installations:
helm install castai-workload-autoscaler castai-helm/castai-workload-autoscaler \
  -n castai-agent \
  --set test.enabled=false
For upgrades:
helm repo update castai-helm
helm upgrade -i castai-workload-autoscaler castai-helm/castai-workload-autoscaler \
  -n castai-agent \
  --reset-then-reuse-values \
  --set test.enabled=false
This option is available from version 0.1.75 (appVersion v0.27.3) onwards.
Sidecar container support
Workload Autoscaler supports optimization of Kubernetes native sidecar containers, which are init containers with restartPolicy: Always. This enables optimization of containers that run alongside your main application containers, such as logging agents or other monitoring tools.
Version requirements for sidecar support
To optimize sidecar containers, ensure you have the following minimum component versions:
| Component | Minimum Version |
|---|---|
| castai-workload-autoscaler | v0.56.0 (helm chart 0.1.126 or later) |
| castai-evictor | helm chart 0.33.61 or later |
| Kubernetes | v1.29+ (native sidecar support beta) |
📘 Note
Kubernetes native sidecar containers became stable in v1.33 and are available in beta since v1.29. The SidecarContainers feature gate is enabled by default in Kubernetes v1.29+.
What are sidecar containers?
Sidecar containers are special init containers that have restartPolicy: Always set:
apiVersion: apps/v1
kind: Deployment
metadata:
  name: myapp
  labels:
    app: myapp
  annotations:
    workloads.cast.ai/configuration: |
      vertical:
        optimization: on
spec:
  replicas: 1
  selector:
    matchLabels:
      app: myapp
  template:
    metadata:
      labels:
        app: myapp
    spec:
      containers:
        - name: myapp
          image: alpine:latest
          command: ['sh', '-c', 'while true; do echo "app running" >> /opt/data.txt; sleep 5; done']
          resources:
            requests:
              cpu: 500m
              memory: 1Gi
          volumeMounts:
            - name: data
              mountPath: /opt
      initContainers:
        - name: sidecar
          image: alpine:latest
          restartPolicy: Always  # This makes the init container into a sidecar
          command: ['sh', '-c', 'tail -F /opt/data.txt']
          resources:
            requests:
              cpu: 100m
              memory: 128Mi
          volumeMounts:
            - name: data
              mountPath: /opt
      volumes:
        - name: data
          emptyDir: {}
Common examples include Istio service mesh proxies (istio-proxy containers), logging agents that collect and forward application logs, or monitoring sidecars that collect metrics.
How sidecar optimization works
This is how Workload Autoscaler detects sidecar containers in your workloads and optimizes them:
- Workload Autoscaler automatically identifies containers in the
initContainerssection withrestartPolicy: Always - Collects CPU and memory usage metrics for sidecar containers alongside main containers
- Generates resource recommendations for both sidecar and main containers
- Applies resource optimizations either during natural Pod restarts or immediately (including in-place resizing) based on your scaling policy
- Works with Cast AI Evictor and Rebalancer - when pods are moved or rebalanced, sidecar containers receive updated resource requests based on the latest recommendations
Integration with service meshes
Dynamically injected containers
By default, Workload Autoscaler optimizes containers that are injected during runtime via mutating admission webhooks (such as those injected by Istio's mutating webhook), even if they are not explicitly defined in the original pod specification.
Unlike native Kubernetes sidecar containers (defined in the pod spec as initContainers with restartPolicy: Always), dynamically injected containers are added by third-party mutating admission webhooks at pod creation time. This is why the default castai-workload-autoscaler helm chart includes webhook.reinvocationPolicy=IfNeeded — it ensures Cast AI's webhook runs after injection webhooks to properly handle the injected containers in their final state.
TipIf you want to exclude specific application containers or native sidecar containers from optimization, you can use container exclusions in your scaling policy to prevent named containers from being scaled. If you need to disable injected container optimization entirely, contact Cast AI support.
Istio integration
Starting with Istio v1.27, the istio-proxy sidecar uses native sidecar containers by default (init containers with restartPolicy: Always).
Other service meshes
Cast AI supports sidecar optimization for any service mesh or sidecar implementation that uses Kubernetes native sidecar containers with restartPolicy: Always.
Predictive workload scaling
Predictive workload scaling adds another layer of automation to the Workload Autoscaler by using Machine Learning (ML) to forecast future resource needs based on historical usage patterns. Instead of reacting to usage changes after they occur, predictive scaling proactively adjusts resources before anticipated traffic increases or decreases.
Benefits and limitations
Predictive scaling is designed for workloads with consistent, repeatable patterns. The system forecasts CPU usage up to 3 days in advance and updates predictions every 30 minutes.
Key benefits:
- Proactive scaling before traffic spikes
- Reduced over-provisioning during predictable low-traffic periods
- Automatic adaptation when workload patterns change
- 15% safety buffer to prevent under-provisioning
Limitations:
- CPU only – Memory and custom metrics are not yet supported
- No HPA support – Workloads with Horizontal Pod Autoscaling are excluded
- Fixed safety buffer – 15% overhead is non-configurable
- Savings not yet tracked – Predictive workload savings are not reflected in dashboard metrics
How it works
Traditional vertical autoscaling operates reactively, adjusting resources based on historical usage patterns. While this approach works well for stable workloads, it presents challenges for workloads with predictable, time-based traffic patterns. Resources remain allocated during predictable usage dips, the system cannot preemptively scale before known traffic increases, and each predictable dip represents potential savings that reactive systems cannot capture.
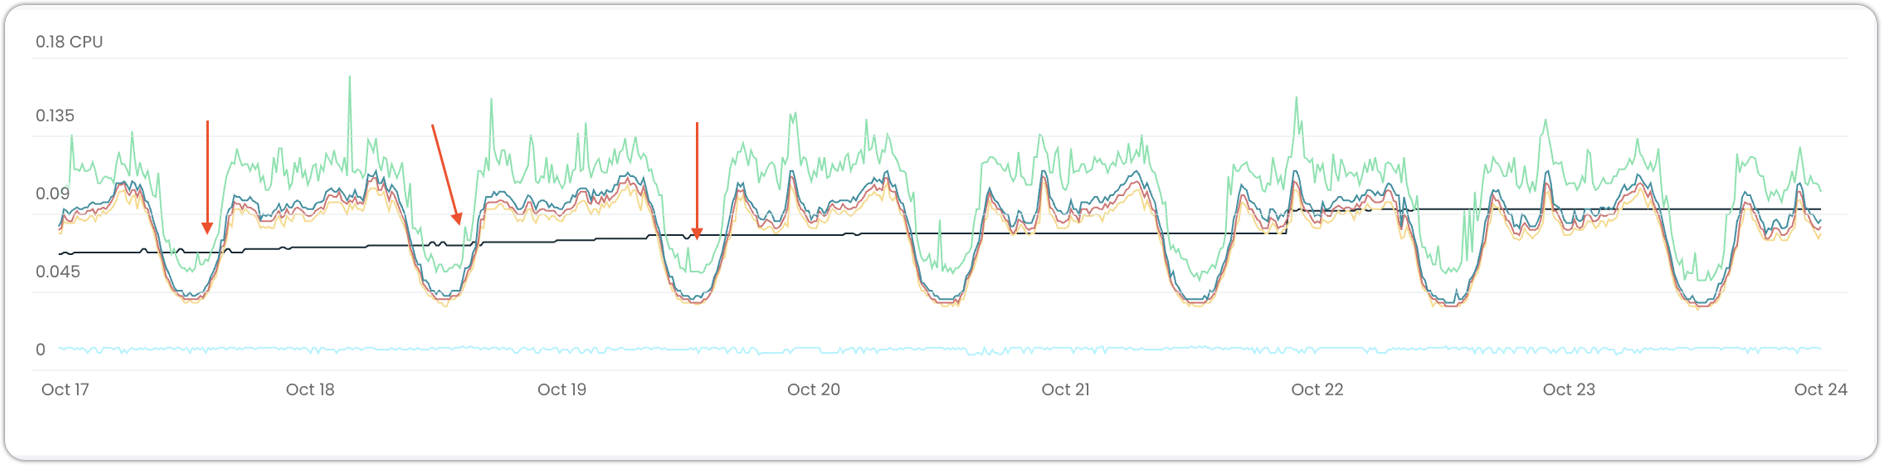
Graph showing missed optimization opportunities
Predictive scaling addresses these issues through pattern-based forecasting. The system analyzes workload usage over time (with a minimum of 5 days of data required) to identify repeatable patterns, then uses these patterns to forecast CPU usage. Recommendations are generated based on predicted future usage rather than waiting for changes to occur, with a 15% safety buffer automatically applied.
When predictive scaling is enabled, CPU recommendations shift from reactive to proactive, while memory recommendations continue using standard logic. The system continuously evaluates whether workloads remain predictable and automatically reverts to standard behavior if patterns are lost, requiring no manual intervention.
Prerequisites
Your workload must meet these requirements to be eligible for predictive scaling:
- Predictable resource usage – Must exhibit clear, repeatable patterns (consistent daily or weekly cycles)
- Historical data – Workload must run for at least 5 days to gather sufficient pattern data
- Vertical scaling enabled – Predictive scaling requires vertical scaling to be enabled
- No horizontal scaling – HPA must be disabled or have equal min/max replicas
While Kubernetes 1.33+ is not a hard requirement, it is highly recommended to utilize in-place resizing in conjunction with predictive scaling, which reduces the number of workload restarts in the cluster.
Identifying eligible workloads
Predictive scaling is disabled by default and requires explicit opt-in. To identify workloads suitable for predictive scaling:
- Navigate to Workload autoscaler > Optimization
- Use the Predictive scaling quick filter to view eligible workloads

The Optimization overview includes a Predictive scaling widget showing:
- Total number of predictable workloads detected
- Count of workloads with predictive scaling enabled versus those eligible
- Quick action to enable predictive scaling for all eligible workloads

Enabling predictive scaling
Via annotations
Predictive scaling can be enabled for any workload using annotations, even if it's not currently eligible. When enabled on a non-eligible workload, the system continues to use standard vertical scaling until the workload meets eligibility requirements. Once the workload becomes predictable, predictive scaling activates automatically without additional configuration. This allows you to enable predictive scaling preemptively rather than monitoring workloads for eligibility.
The system continuously monitors enabled workloads and automatically switches between predictive and standard scaling as patterns appear and disappear, requiring no manual intervention.
Add the predictive scaling configuration to your workload annotations:
apiVersion: apps/v1
kind: Deployment
metadata:
  name: my-workload
  annotations:
    workloads.cast.ai/configuration: |
      vertical:
        optimization: on
        predictiveScaling:
          cpu:
            enabled: true
spec:
  # ... rest of deployment spec
ImportantThe
vertical.optimization: onsetting is required – predictive scaling cannot work without vertical optimization enabled.
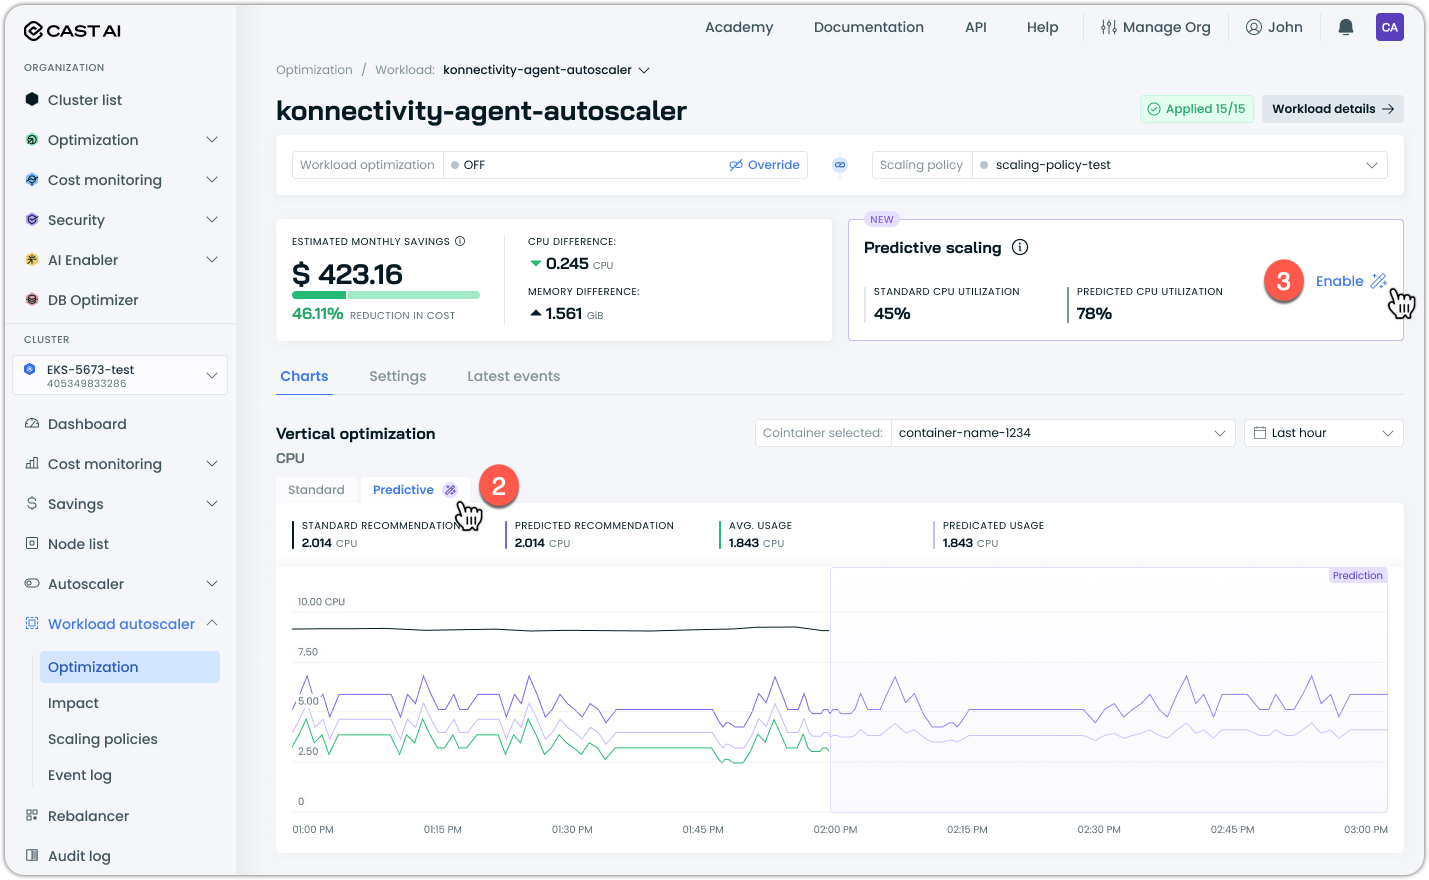
Via Console UI
There are multiple ways to enable predictive scaling for a workload or multiple workloads in the Console. Here is an example:
- Navigate to the workload page in Workload Autoscaler
- Review the prediction graph showing forecasted versus current recommendations
- Click Enable to turn on predictive scaling for the workload
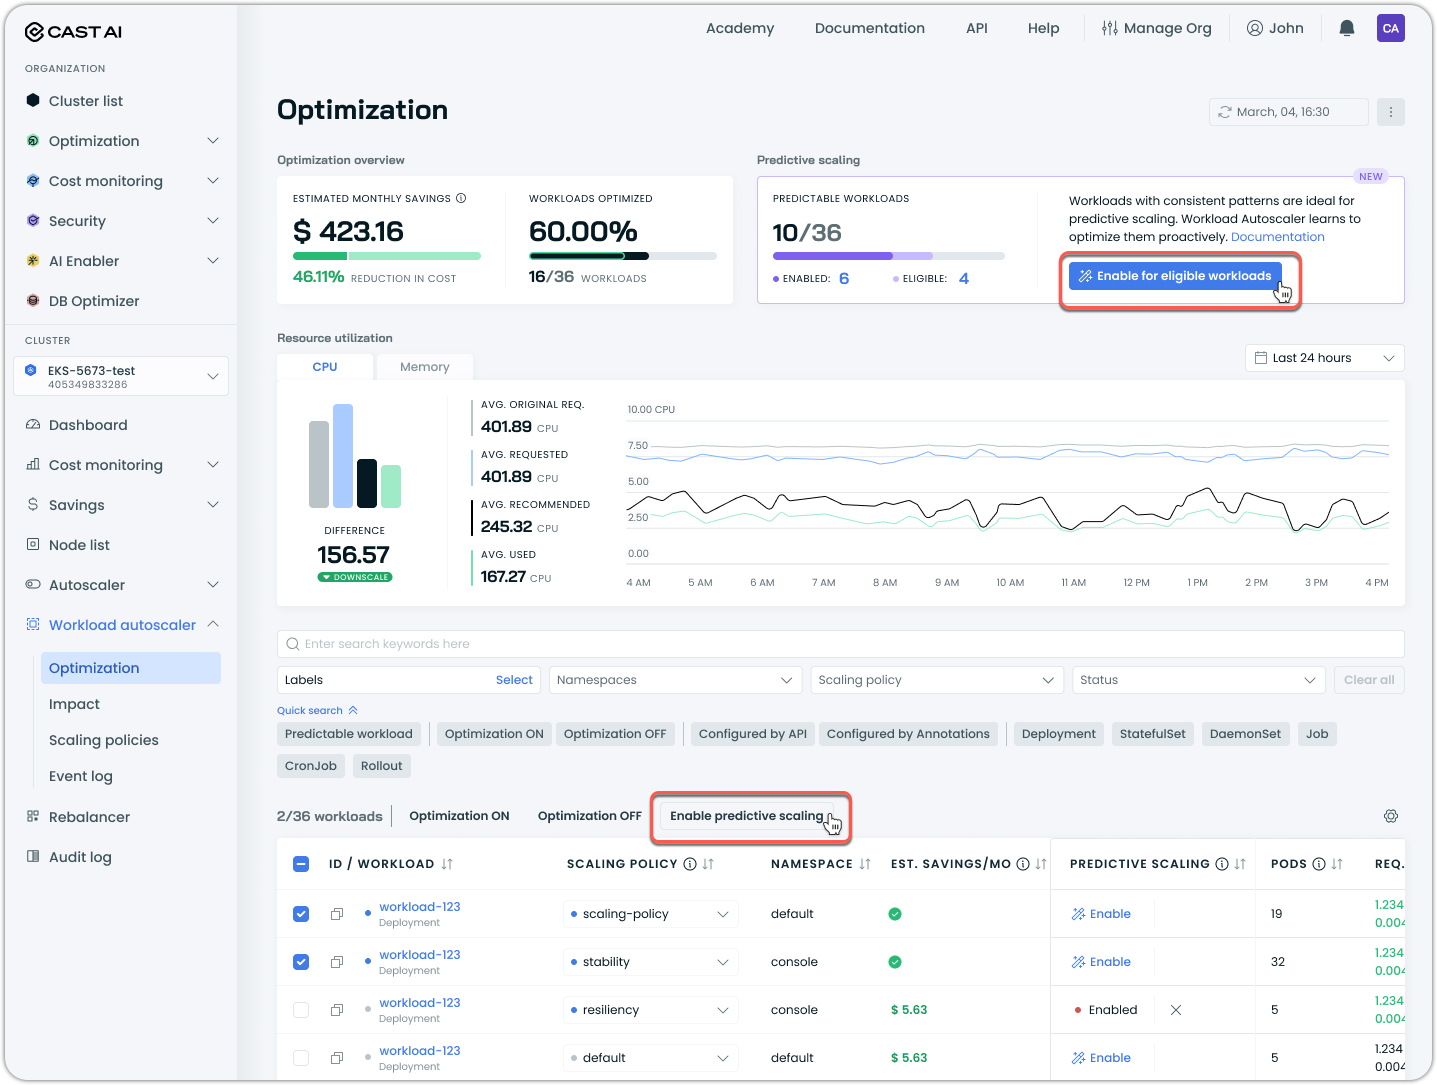
To enable predictive scaling in bulk:
- Filter for predictable workloads using the Predictable workloads quick filter
- Click Enable for eligible workloads in the predictive scaling widget to enable it for all eligible workloads, or alternatively, select the specific workloads you wish to enable it for post-filtering and click Enable predictive scaling above the table:
Advanced configuration
Advanced configuration options provide fine-tuned control over Workload Autoscaler behavior for specific requirements. These settings are configured at the cluster level via Helm values and affect all workloads in the cluster.
Whitelisting mode
Whitelisting mode allows you to explicitly control which workloads receive automated optimization. When enabled at the cluster level, Workload Autoscaler continues to generate recommendations for all eligible workloads but only applies them to workloads with the appropriate label.
How it works
- Enable cluster-wide: Set
workloadWhitelistingEnabled: truein Helm values - Label workloads: Add
workload-autoscaler.cast.ai/enabled: "true"to workload pods (spec.template.metadata.labels) and controllers (metadata.labels)
Recommendations are generated for all workloads, but only applied to labeled ones.
Configuration
Enable via Helm:
helm upgrade castai castai-helm/castai \
  -n castai-agent \
  --reset-then-reuse-values \
  --set autoscaler.castai-workload-autoscaler.workloadWhitelistingEnabled=true
Label workloads for optimization:
apiVersion: apps/v1
kind: Deployment
metadata:
  name: my-app
  labels:
    workload-autoscaler.cast.ai/enabled: "true"
spec:
  template:
    metadata:
      labels:
        workload-autoscaler.cast.ai/enabled: "true"
    spec:
      containers:
        - name: app
# container spec...Version requirements
Minimum required component versions:
castai-workload-autoscaler: v0.58.3 (Helm chart 0.1.131 or later)
ResourceQuota-aware scaling
ResourceQuota-aware scaling allows Workload Autoscaler to upscale workloads within the available Kubernetes ResourceQuota capacity in their namespace. When enabled, the autoscaler checks quota headroom before applying recommendations and uses an admission webhook as a secondary safeguard to prevent quota violations at pod creation time.
For details on how ResourceQuota constraints affect recommendations, see ResourceQuota integration.
Configuration
Enable ResourceQuota-aware scaling via Helm values:
helm upgrade castai castai-helm/castai \
  -n castai-agent \
  --reset-then-reuse-values \
  --set autoscaler.castai-workload-autoscaler.resourceQuotaAwareScaling.enabled=true \
--set autoscaler.castai-workload-autoscaler.resourceQuotaAwareScaling.headroomPercent=10| Value | Type | Default | Description |
|---|---|---|---|
resourceQuotaAwareScaling.enabled | boolean | false | Enables ResourceQuota-aware scaling for the cluster. When true, the autoscaler checks namespace quota capacity before applying upscaling recommendations. |
resourceQuotaAwareScaling.headroomPercent | integer | 10 | Percentage of the ResourceQuota hard limit to reserve as a buffer. The autoscaler will not recommend resource values that would use more than 100 - headroomPercent percent of the quota. For example, the default of 10 means the autoscaler will not use more than 90% of the hard limit. |
Tuning headroom
Start with the default headroom of 10%. If you observe quota violations in namespaces with many concurrently-scaling workloads, increase the headroom to provide a larger buffer. For example, a namespace with 20+ workloads scaling simultaneously may benefit from a headroom of 20–30%.
Version requirements
Minimum required component version:
castai-workload-autoscaler: v0.82.0 (Helm chart version 0.1.170)
Available workload settings
The following settings are available in Cast AI scaling policies. To override these settings for individual workloads, use annotations.
- Automation - on/off marks whether Cast AI should apply or just generate recommendations. This is the only setting that can also be toggled per-workload via the Cast AI console.
- Scaling policy- allows for the selection of policy names. It must be one of the policies available for a cluster.
- Recommendation Percentile - which percentile Cast AI will recommend, looking at the last day of the usage. The recommendation will be the average target percentile across all pods spanning the recommendation period. Setting the percentile to 100% will no longer use the average of all pods but the maximum observed value over the period.
- Overhead - marks how many extra resources should be added to the recommendation. By default, it's set to 10% for memory and 10% for CPU.
- Optimization Threshold - When automation is enabled, how much of a difference should there be between the current pod requests and the new recommendation so that the recommendation can be applied immediately? Defaults to 10% for both memory and CPU.
- Workload Autoscaler constraints - sets the minimum and maximum values for resources, which will dictate that Workload Autoscaler cannot scale CPU/Memory above the max or below the minimum limits. The limit is set for all containers.
- Ignore startup metrics - allows excluding a specified duration of startup metrics from recommendation calculations for workloads with high initial resource usage (e.g., Java applications). Only affects Vertical Autoscaling decisions.
- Look-back period - defines a custom timeframe (between 24 hours and 7 days) the Workload Autoscaler uses to observe CPU and memory usage when calculating scaling recommendations. It can be set separately for CPU and memory.
NoteIt is recommended to wait for a week before enabling Workload Autoscaling for "all workloads", so that the system has understanding how the resource consumption varies on weekdays and weekends.
Recommendation apply type
| Setting Name | Description | Possible Values | Default Value |
|---|---|---|---|
| Apply type | Controls how and when the Workload Autoscaler applies recommendations to workloads. | immediate, deferred | immediate |
Immediate mode
When set to immediate, the Workload Autoscaler proactively implements resource optimization. The system monitors your workloads and applies new resource recommendations when they exceed the configured thresholds. This approach prioritizes rapid resource optimization, automatically triggering pod restarts to implement the new allocations.
- Apply recommendations as soon as they exceed the configured thresholds
- Trigger pod restarts to implement the new resource allocations immediately
How immediate mode applies recommendations
When immediate mode applies a recommendation, the Workload Autoscaler updates annotations on the pod spec template of your workload (Deployment, StatefulSet, etc.). This annotation change triggers the Kubernetes controller to perform a rollout, replacing pods with new ones that have the updated resource requests applied via the Cast AI mutating webhook.
Because the Kubernetes controller manages the actual pod replacement:
- Rollout strategies are respected: The controller follows whatever rollout strategy you have configured (e.g.,
RollingUpdate,Recreate). - Pod Disruption Budgets are honored: Any PDBs configured for your workloads will be enforced during optimization cycles.
- Workload-specific behavior applies: StatefulSets, Deployments, and other controller types each follow their native update mechanisms.
Single-replica deployments with RollingUpdateFor single-replica Deployments using
strategy.type: RollingUpdatewith default settings, Kubernetes roundsmaxSurge: 25%up to 1 andmaxUnavailable: 25%down to 0. This means Kubernetes launches a replacement pod first and only terminates the original after the new pod is ready—avoiding downtime natively without requiring Cast AI's zero-downtime feature. Workloads withstrategy.type: Recreateor explicitmaxUnavailable: 1settings will experience brief downtime during recommendation application.
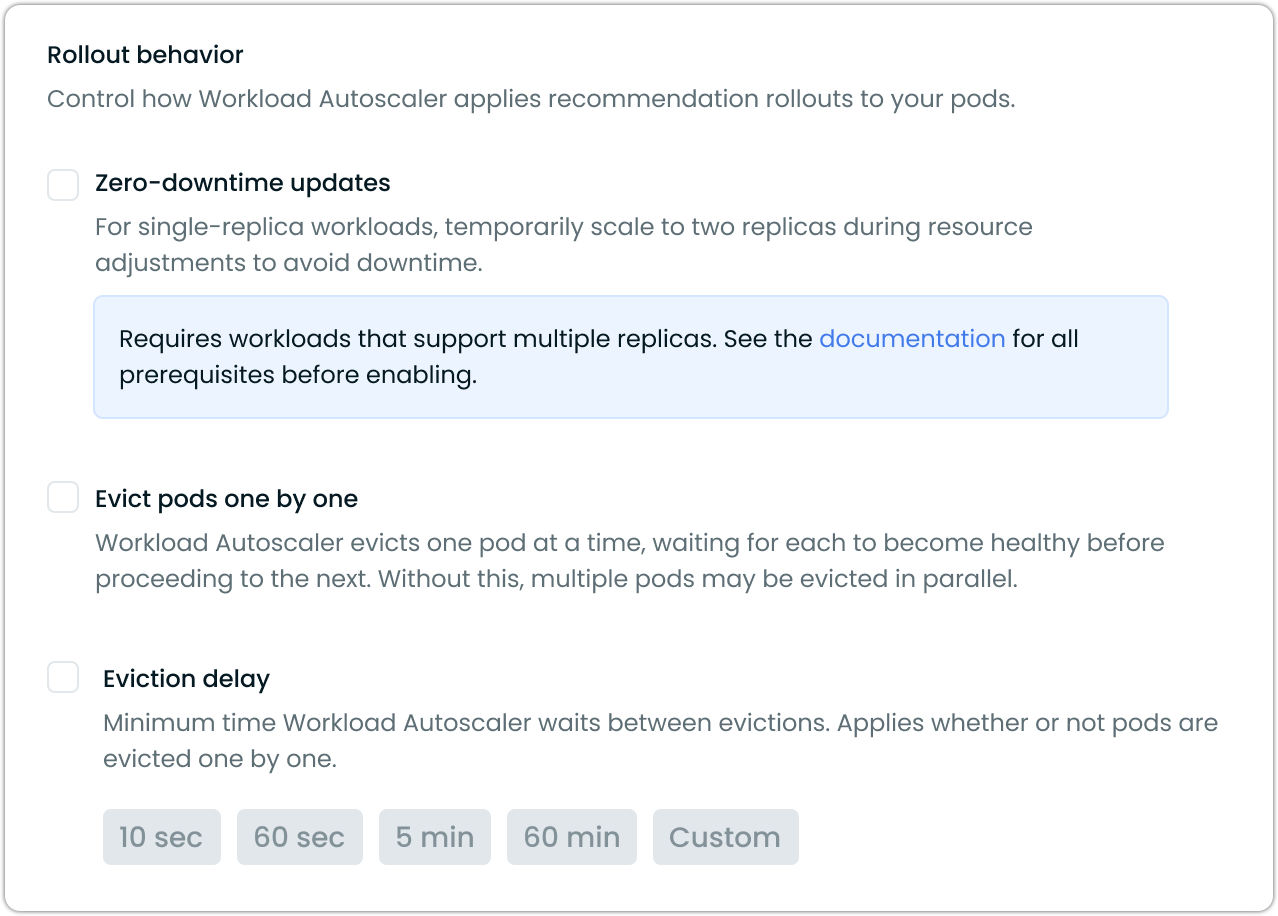
Rollout behavior
When using immediate mode, you can control how Workload Autoscaler rolls out recommendations to your pods. Under Advanced settings, the Rollout behavior section groups all three controls: Zero-downtime updates for single-replica workloads, Evict pods one by one to minimize disruption during resource adjustments, and Eviction delay to pace how often Workload Autoscaler evaluates the next eviction.
Zero-downtime updates
The Workload Autoscaler provides a zero-downtime update mechanism for single-replica workloads. This feature enables resource adjustments without service interruptions by temporarily scaling to two replicas during updates.
How it works
When enabled, this setting:
- Temporarily scales single-replica deployments to two replicas
- Applies resource adjustments to the new pods
- Waits for the new pod to become healthy and ready
- Scales back to one replica, removing the original pod
Thus, it maintains continuous service availability throughout the process. This setting is especially valuable for applications where even brief interruptions could cause failed requests or other issues.
Configuring zero-downtime updates
You can enable this feature in your vertical scaling policy settings:
- Navigate to the Workload Autoscaler → Scaling policies section
- Edit an existing policy or create a new one
- Under Advanced settings, locate the Rollout behavior section
- Check Zero-downtime updates
- Save the policy
Prerequisites
For zero-downtime updates to work effectively, your workloads must meet these requirements:
- This feature is only applicable to Deployment resources that support running as multi-replica
- Running with a single replica (replica count = 1)
- Deployment's rollout strategy allows for downtime
- It works with the immediate apply type and is not needed for deferred mode
- Must not use PersistentVolumeClaims (PVCs)
- It requires
workload-autoscalercomponent version v0.35.3 or higher
For workloads with unacceptable interruptions, this setting provides a way to achieve continuous availability without permanently increasing replica counts and associated costs.
When zero-downtime updates are unnecessary
The zero-downtime updates feature temporarily scales your workload to two replicas during updates. However, this may not be necessary if your Deployment already uses strategy.type: RollingUpdate with default settings.
With Kubernetes defaults:
maxSurge: 25%rounds up to 1 for single replicasmaxUnavailable: 25%rounds down to 0 for single replicas
This configuration naturally creates a "surge-first" update pattern where Kubernetes launches a replacement pod before terminating the original.
Enable zero-downtime updates if:
- Your Deployment uses
strategy.type: Recreate - You have explicitly set
maxUnavailableto a value that allows termination before replacement (e.g.,maxUnavailable: 1) - Your rollout strategy configuration causes downtime during updates
Evict pods one by one
When Evict pods one by one is enabled, immediate mode applies recommendations as follows:
- Sequential processing: The system applies the recommendation to a single pod at a time
- Health verification: Waits for each pod to become healthy and ready before proceeding
- Gradual rollout: Moves to the next pod only after the previous one is successfully running
- Automatic recovery: If a pod fails to start, the rollout pauses until the workload recovers
This ensures gradual rollouts and maintains service availability throughout the resource adjustment process.
You can enable this feature through the Cast AI console:
- Navigate to Workload Autoscaler → Scaling policies
- Select or create a policy with When to apply changes set to Immediately
- Under Advanced settings, locate Rollout behavior
- Check Evict pods one by one
- Save the policy
You can also configure this setting using annotations:
apiVersion: apps/v1
kind: Deployment
metadata:
  name: my-app
  annotations:
    workloads.cast.ai/configuration: |
      vertical:
        optimization: on
        applyType: immediate
      rolloutBehavior:
        type: NoDisruption
        preferOneByOne: true
        delaySeconds: 120
spec:
  # deployment spec...
For more information on configuring workloads via annotations, see Annotations reference.
Eviction delay
Eviction delay sets a minimum wait time between evictions while Workload Autoscaler rolls out a recommendation. The delay applies whether or not Evict pods one by one is enabled — it controls how often Workload Autoscaler evaluates the next eviction during any rollout.
You can enable this feature through the Cast AI console:
- Navigate to Workload Autoscaler → Scaling policies
- Select or create a policy with When to apply changes set to Immediately
- Under Advanced settings, locate Rollout behavior
- Check Eviction delay and select a preset (10 sec, 60 sec, 5 min, 60 min) or enter a custom value
You can also configure this setting using the rolloutBehavior.delaySeconds annotation. See Annotations reference for details.
Supported workload types
The one-by-one restart feature works with the following workload types:
- Deployments
- StatefulSets
- ReplicaSets
- ArgoCD Rollouts
Not supported: Bare pods, CronJobs, Jobs, and other non-replicated workloads.
Version requirements
To use the one-by-one eviction feature, ensure you have the following minimum versions:
| Component | Minimum Version |
|---|---|
| castai-workload-autoscaler | v0.57.0 |
| Helm chart | 0.1.127 |
Considerations and limitations
When using one-by-one eviction, be aware of these considerations:
Rollout duration: For workloads with many replicas (100+), the gradual rollout process may take longer depending on pod startup time. This is expected behavior as each pod must become healthy before the next one is processed.
Mid-rollout recommendations: If a new recommendation is generated while a rollout is in progress, it takes precedence. For example, if half the pods have been updated with an immediate recommendation and a deferred recommendation is then issued, the rollout will stop. The new deferred recommendation will be applied to the remaining pods only during their natural restarts.
Failed pod scenarios: If a pod fails to start during the rollout (for example, due to image pull errors or application crashes), the entire rollout pauses until the workload recovers. This prevents further disruption but requires manual intervention to resolve the underlying issue.
OOM kills and surge handling: When enabled, OOM kill responses and surge-triggered adjustments also follow the one-by-one pattern, which may delay the system's response to these events.
Deferred mode
When set to deferred, the Workload Autoscaler takes a non-disruptive approach to resource optimization. Rather than forcing changes immediately, the system stores recommendations and waits for natural pod lifecycle events to apply them. When pods restart for other reasons—such as application deployments, scaling events, or node maintenance—the pending recommendations are seamlessly applied.
- Store recommendations, but do not forcibly apply them
- Apply recommendations only when pods naturally restart (e.g., during deployments, scaling events, or node maintenance)
Recommendation annotations in different scaling modes
When the Workload Autoscaler applies recommendations to your workloads, it adds annotations to track when and which recommendations have been applied.
| Annotation | Description |
|---|---|
autoscaling.cast.ai/vertical-recommendation-hash | A hash value representing the applied recommendation. This annotation appears on all workloads with applied recommendations, regardless of the scaling mode. |
autoscaling.cast.ai/recommendation-applied-at | A timestamp indicating when the recommendation was actively applied to the workload. This annotation only appears on workloads using the immediate apply type. |
Scaling mode behavior
-
Immediate mode: Both annotations will be present. The
recommendation-applied-atannotation captures the exact time when the recommendation was applied, and pod restarts were triggered. -
Deferred mode: Only the
vertical-recommendation-hashannotation will be present. Since recommendations are only applied during natural pod restarts in deferred mode (without forcing controller restarts), therecommendation-applied-atannotation is not added. You can determine when the recommendation was applied by looking at the pod's creation timestamp, as this corresponds to when the pod naturally restarted and incorporated the recommendation.
In-place resizing
Kubernetes v1.33+ EnhancementOn clusters supporting in-place pod resizing, both immediate and deferred modes can leverage this capability to reduce disruption during resource optimization.
When running on Kubernetes v1.33+ with in-place resizing enabled:
Enhanced immediate mode:
- Attempts in-place resizing first for compatible pods
- Minimizes pod restarts when resize policies and resource constraints allow
- Falls back to pod restart if in-place resizing fails or enters a pending state
- Reduces disruption during optimization when possible
Enhanced deferred mode:
- Can apply recommendations through in-place resizing during natural pod restarts
- Skips containers requiring restarts for specific resources
The apply mode setting works the same way, but the underlying implementation automatically uses the most appropriate method (in-place resizing or pod restart) based on cluster capabilities and pod configuration.
Recommendation percentile
The recommendation percentile setting determines how conservatively the Workload Autoscaler allocates resources based on the workload's historical usage patterns. It defines how close recommendations should be to observed workload resource usage, with higher percentiles leading to more generous resource allocations.
The recommendation percentile represents the statistical threshold used when analyzing workload resource usage. For example:
- A p80 (80th percentile) setting for CPU means the recommendation will ensure sufficient resources to handle 80% of all observed load scenarios.
- A max (100th percentile) memory setting means recommendations will account for the absolute highest observed memory usage.
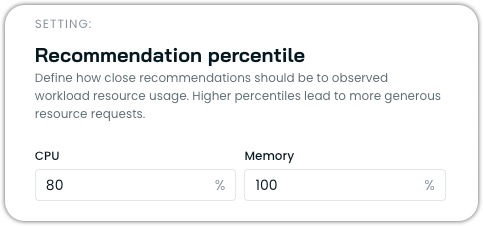
Configuring percentiles
You can configure different percentile values for CPU and memory independently:
- CPU Percentile: Typically set at p80 (default), can range from p50 to max
- Memory Percentile: Typically set at max (default) or p99, rarely lower
The recommendation is calculated using the average target percentile across all pods spanning the recommendation period. When you set the percentile to "max" (100%), the system will use the maximum observed value over the period instead of the average across pods.
Resource overhead
Resource overhead allows you to add a buffer to the recommendations generated by the Workload Autoscaler. This buffer provides extra capacity for your workloads to handle unexpected load increases without immediately triggering scaling events.
Resource overhead is a percentage value that is added to the recommended resource requests. For example, if the recommended CPU usage for a workload is 100m and you set a CPU overhead of 10%, the final recommendation will be 110m.
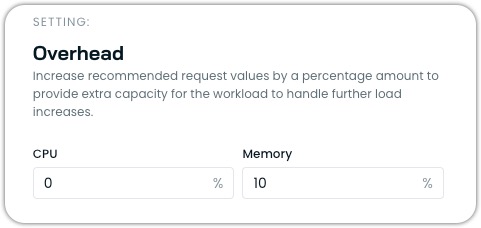
Configuring resource overhead
You can configure different overhead values for CPU and memory:
- CPU Overhead: Typically set between 10% (default) and 20%.
- Memory Overhead: Typically set between 10% (default) and 30%.
Properly configured overhead helps prevent out-of-memory (OOM) events and CPU throttling while maintaining cost efficiency.
Limitations
- Overhead cannot exceed 250% (2.5), as extremely high values could lead to significant resource waste.
- When both Vertical Autoscaling and Horizontal Autoscaling are enabled, memory overhead can still be configured as usual, but CPU overhead settings are ignored as the system automatically balances vertical and horizontal scaling.
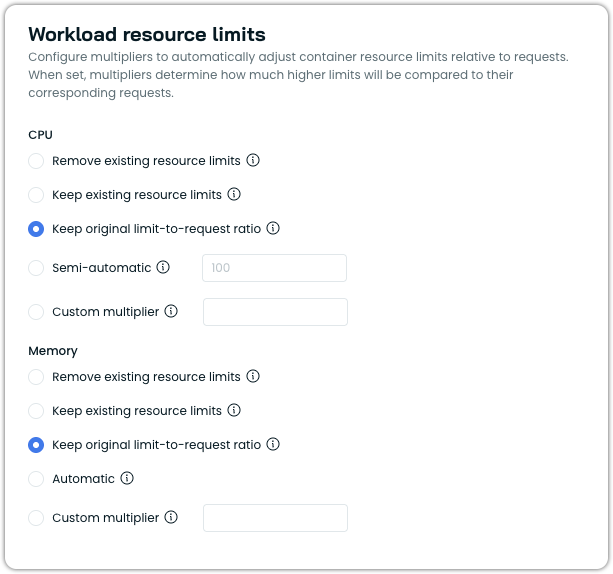
Workload resource limits
Workload resource limits allow you to configure how container resource limits are managed relative to the resource requests that Workload Autoscaler optimizes. This feature provides fine-grained control over the relationship between requests and limits, ensuring your workloads have the right balance of resource guarantees and constraints.
In Kubernetes, each container can specify both resource requests (guaranteed resources) and resource limits (maximum allowed resources). The Workload Autoscaler primarily optimizes resource requests based on actual usage patterns, but the workload resource limits setting determines how container limits are handled during this optimization.
Configuration options
You can configure resource limits separately for CPU and memory.
CPU limit options
- Remove limits: Removes any existing resource limits from containers, including those specified in your workload manifest.
- Keep existing resource limits: Preserves the existing limits as defined in the workload manifest without modification.
- Keep original limit-to-request ratio: Scales limits proportionally with recommended requests, preserving the original limit-to-request ratio from the workload manifest. For example, if the original limit is 2× the request, the updated limit stays 2× the new request. If the workload has no existing CPU limit, this option falls back to the default behavior (no limit).
- Semi-automatic: Sets CPU limits as a multiple of requests when workloads already have CPU limits defined and those existing limits are lower than the calculated result. Otherwise, limits remain unchanged.
- Custom multiplier: Sets CPU limits as a multiple of requests for all workloads (e.g.,
2.0means limits = requests × 2).
Memory limit options
- Automatic (default): Automatically sets memory limits to 1.5x requests (with a minimum of 128MiB) when limits are lower than this value. If existing limits are higher, they remain unchanged.
- Remove limits: Removes any existing resource limits from containers, including those specified in your workload manifest.
- Keep existing resource limits: Preserves existing resource limits as defined in your workload manifest without modification.
- Keep original limit-to-request ratio: Scales limits proportionally with recommended requests, preserving the original limit-to-request ratio from the workload manifest. For example, if the original limit is 2× the request, the updated limit stays 2× the new request. If the workload has no existing memory limit, a default 1.5× multiplier is applied to the recommended request. The 128MiB minimum memory limit applies.
- Custom multiplier: Set memory limits as a multiple of the requests (e.g.,
2.0means limits = requests × 2).
Impact on resource management
The relationship between requests and limits affects how Kubernetes schedules and manages your workloads:
- Scheduling: Pods are scheduled based on requests, not limits.
- CPU Throttling: Containers using more CPU than their limit will be throttled.
- OOM Kills: Containers exceeding memory limits will be terminated (OOM killed), as they cannot burst past the limit.
Even though Cast AI does not recommend using resource limits on workloads actively managed by Workload Autoscaler, properly configured limits can prevent problems from neighboring workloads and provide predictable performance.
Limitations
- The multiplier value must be greater than or equal to
1.0 - When setting a custom multiplier, Workload Autoscaler will never reduce existing limits below the calculated value (limits = requests × multiplier)
- Workload Autoscaler enforces a minimum memory limit of 128MiB whenever it calculates a memory limit (Automatic, Custom multiplier, Semi-automatic, and Keep original limit-to-request ratio modes). This floor prevents unreasonably low memory allocations.
LimitRange integration
The Workload Autoscaler respects Kubernetes LimitRanges when generating resource recommendations. This ensures that optimized workloads comply with namespace-level resource policies and remain schedulable.
Supported LimitRange types:
- Container: Fully supported for all constraint types (min, max, default, ratios)
- Pod: Not supported (coming in future releases)
When LimitRanges are present, the autoscaler may generate non-optimal recommendations to maintain compliance with the defined constraints. This trade-off prioritizes workload schedulability over absolute optimization.
NoteLimitRange constraints take precedence over Workload Autoscaler settings when conflicts arise. The most restrictive constraint is always applied.
ResourceQuota integration
The Workload Autoscaler respects Kubernetes ResourceQuotas when generating and applying resource recommendations. When ResourceQuota-aware scaling is enabled, and at least one ResourceQuota exists in a workload's namespace, the autoscaler constrains its recommendations to stay within quota limits. This prevents pod admission failures caused by recommendations that would exceed the namespace's available quota capacity.
ResourceQuota-aware scaling uses a best-effort approach with a configurable headroom buffer. The autoscaler checks available quota capacity before applying recommendations and reserves a percentage of the quota's hard limit as headroom. This headroom absorbs potential race conditions when multiple workloads in the same namespace scale concurrently.
How to enable
To enable ResourceQuota-aware scaling, see ResourceQuota-aware scaling in the Advanced configuration section.
How requests are handled
When a ResourceQuota defines requests.cpu or requests.memory constraints, the autoscaler allows upscaling requests up to the available quota headroom threshold. Downscaling requests below the current values is always allowed, regardless of the ResourceQuota configuration.
If a recommendation would push the namespace's total request usage beyond the headroom threshold, Workload Autoscaler caps the recommendation to stay within the available capacity.
How limits are handled
When a ResourceQuota defines limits.cpu or limits.memory constraints, Workload Autoscaler preserves or restores original limits to prevent pod admission failures. If a recommendation removes a limit (for example, due to a scaling policy configured with noLimit), the original limit from the workload spec is restored. If a recommendation increases a limit above its original value, the limit is capped at the original value. Downscaling to a value below the original value is always allowed.
Scope matching
The system evaluates ResourceQuota scopes and scope selectors to determine which quotas apply to a given workload. A ResourceQuota only constrains a workload when both are in the same namespace, and all scope conditions match. The following scopes are evaluated:
- NotBestEffort / BestEffort: Workloads managed by Workload Autoscaler always have resource requests set, so they match
NotBestEffortquotas and do not matchBestEffortquotas. - Terminating / NotTerminating: Evaluated based on whether the workload has an active deadline set. Standard Deployments and StatefulSets match
NotTerminating. - PriorityClass: Evaluated against the workload's
priorityClassNameusing the scope selector's operator (In,NotIn,Exists,DoesNotExist).
When a ResourceQuota uses multiple scope selectors, all selectors must match for the quota to apply (AND logic).
Visibility
When ResourceQuota corrections are applied to a recommendation, the details are recorded in the Workload Autoscaler Event Log. Open the event details to see which resources were adjusted and why in the recommendation. Each correction entry includes the recommended value, the original spec value, and the final applied value.
{
  "message": "Resource quota corrections applied",
  "args": {
    "cpuRequestReason": "capped_to_original_due_to_resource_quota",
    "cpuRecommendedRequest": "200m",
    "cpuOriginalSpecRequest": "100m",
    "cpuFinalRequest": "100m",
    "memoryLimitReason": "preserved_due_to_resource_quota",
    "memoryRecommendedLimit": "not set",
    "memoryOriginalSpecLimit": "500Mi",
    "memoryFinalLimit": "500Mi"
  }
}
Sync cadence
ResourceQuotas are synced every 20 minutes per cluster, with near-immediate reactivity for quota changes within a namespace. Recommendations are regenerated every 30 minutes. Thus, when a ResourceQuota is added or modified, recommendations stabilize within approximately 50 minutes.
Limitations
- Race conditions: Multiple workloads in the same namespace can receive recommendations concurrently. The headroom percentage absorbs this in most cases, but namespaces with many concurrently-scaling workloads may need a higher headroom value.
- HPA interaction: The system does not apply corrections when HPA creates new pods. If a ResourceQuota is tight, new HPA-created pods may be rejected. However, because Workload Autoscaler respects the headroom threshold, quota capacity intended for horizontal scaling is preserved.
- DaemonSets: DaemonSets are excluded from ResourceQuota-aware scaling.
NoteFor full optimization, Cast AI recommends removing ResourceQuotas from namespaces where Workload Autoscaler is actively managing workloads. ResourceQuotas constrain the autoscaler's ability to right-size workloads for both cost and performance.
Ignore startup metrics
Some workloads, notably Java and .NET applications, may have increased resource usage during startup that can negatively impact vertical autoscaling recommendations. To address this, Cast AI allows you to ignore startup metrics for a specified duration when calculating these recommendations.
You can configure this setting in the Cast AI console under the Advanced Settings of a vertical scaling policy:

Startup metrics at the vertical scaling policy level
- Enable the feature by checking the "Ignore workload startup metrics" box.
- Set the duration to exclude from vertical autoscaling recommendation generation after a workload starts (between 2 and 60 minutes).
This feature helps prevent inflated vertical scaling recommendations and unnecessary pod restarts caused by temporary resource spikes during application initialization. The startup metrics exclusion only applies to vertical autoscaling - horizontal autoscaling (HPA) will still respond normally to resource usage during startup.
You can also configure this setting via the API or Terraform.
Related featureThe configured startup period also determines the duration of the startup phase in startup recommendations — a feature that applies original CPU requests during pod initialization to prevent slow starts and HPA spikes.
Change sensitivity
Change sensitivity determines when the Workload Autoscaler applies resource recommendation changes to your workloads. The sensitivity represents the minimum percentage difference between current resource requests and new recommendations that triggers an update.
Workload Autoscaler offers two sensitivity options in the UI:
- Percentage: A fixed threshold value that applies equally to all workloads
- Dynamic: An adaptive threshold that automatically adjusts based on workload size
Dynamic vs percentage sensitivity
Percentage sensitivity
A percentage sensitivity applies the same fixed percentage to all workloads regardless of their size. For example, with a 10% sensitivity:
- A workload requesting 100m CPU will only be scaled if the new recommendation differs by at least 10m
- A workload requesting 10 CPUs will only be scaled if the new recommendation differs by at least 1 CPU
While this is straightforward, it can be less optimal for workloads of varying sizes.
Dynamic sensitivity (recommended)
The dynamic sensitivity automatically adjusts based on workload size, providing more appropriate scaling behavior:
- For small workloads: Uses a higher threshold percentage to prevent frequent, insignificant updates
- For large workloads: Uses a lower threshold percentage to enable meaningful optimizations
This helps prevent unnecessary pod restarts for small workloads while ensuring larger workloads are also efficiently optimized.
Recommendations
For most users, we recommend using the Dynamic sensitivity setting, as it provides appropriate thresholds across workloads of all sizes and requires no manual tuning or maintenance.
The Percentage sensitivity setting is best suited for workloads of similar sizes and behavior when they are managed by the same scaling policy.
Configuring change sensitivity in policies
You can configure change sensitivity through the scaling policy settings:
- Navigate to Workload Autoscaler → Scaling Policies
- Select an existing policy or create a new one
- Click When to apply changes → Advanced Settings to expand additional options
- Under Change sensitivity, select your preferred strategy:
- Percentage: Enter a fixed percentage value
- Dynamic: Use the adaptive algorithm (recommended option)
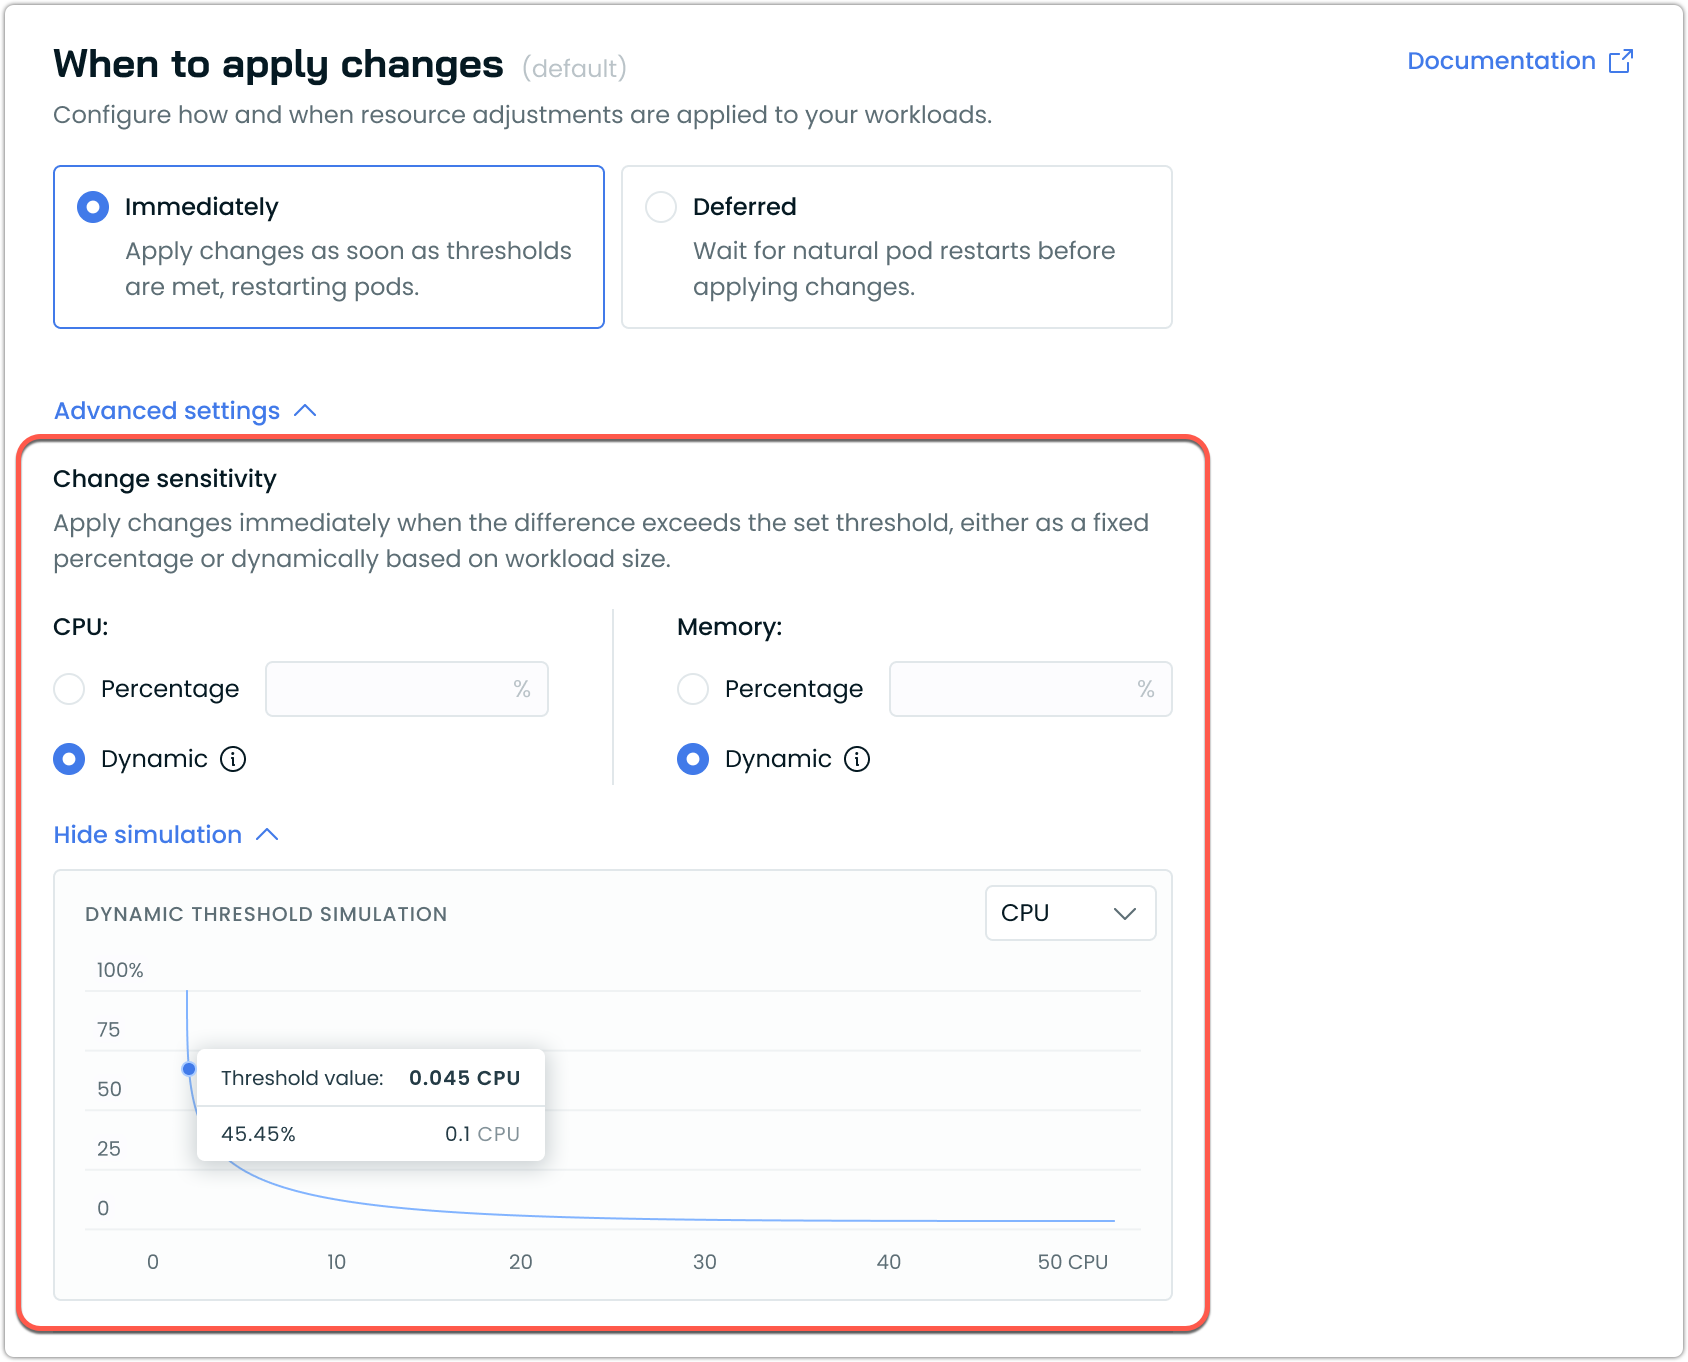
Dynamic Sensitivity Simulation
The UI includes a sensitivity simulation graph that shows how the dynamic threshold changes based on workload size. This visualization helps you understand how the sensitivity percentage varies as resource requests increase.
Key elements of the simulation:
- The X-axis represents resource requests (CPU or memory)
- The Y-axis represents the threshold percentage
- The curve shows how the threshold decreases as resource size increases
You can toggle between CPU and memory views using the dropdown.
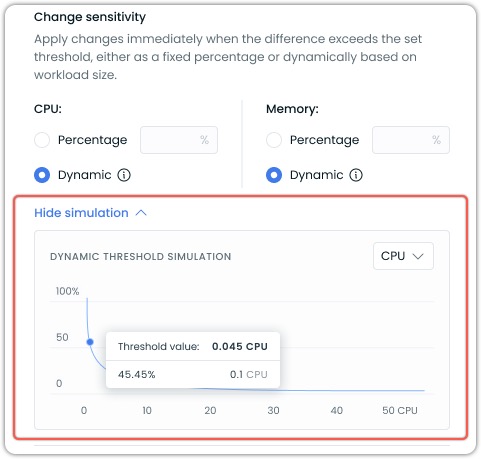
The threshold value indicator shows the exact sensitivity percentage that would apply to a specific resource request amount. For example, in the screenshot above, a request of 0.1 CPU would have a threshold of 45.45%. Meaning it would need to change by that amount to trigger a change.
Advanced configuration options
While the UI offers simplified access to dynamic sensitivity settings, power users can access additional customization options through annotations. These advanced options include:
- Custom adaptive thresholds with configurable parameters
- Independent sensitivity settings for CPU and memory
- Fine-tuning of the adaptive algorithm formula
For details on these advanced options, refer to our Annotations reference documentation.
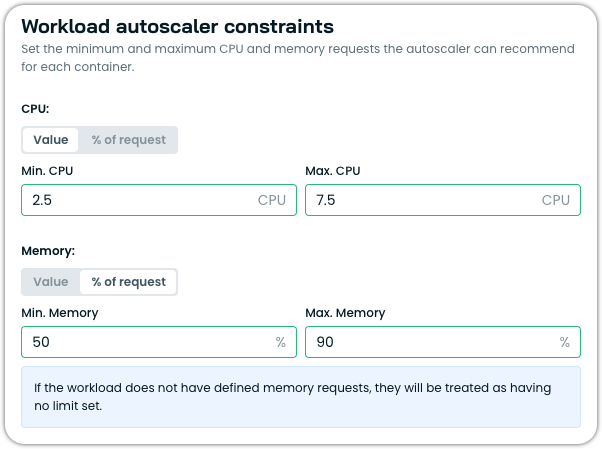
Workload Autoscaler constraints
Workload Autoscaler constraints allow you to set minimum and maximum resource limits that the Workload Autoscaler will respect when generating and applying recommendations. These constraints act as guardrails to prevent resources from being scaled too low or too high, ensuring your workloads maintain appropriate resource boundaries.
These constraints work in conjunction with Kubernetes LimitRanges. When both are present, the most restrictive constraint is applied. LimitRange constraints take precedence over Workload Autoscaler constraints when conflicts arise.
Workload Autoscaler constraints define the allowed resource scaling range for each container managed by the autoscaler. By setting these constraints, you can:
- Prevent resources from being scaled below a functional minimum
- Limit maximum resource allocation to control costs
- Customize scaling boundaries for each container individually
Constraint types
Each constraint (min or max) can be set using one of two modes, selectable via the Value or % of request toggle in the UI:
| UI mode | Annotation type | Description |
|---|---|---|
| Value | constant | An absolute Kubernetes resource value (e.g., 500m, 2Gi). |
| % of request | percentageOfOriginal | A percentage of the workload's original resource request (e.g., 90 = 90% of original). |
Note% of request requires the workload to have defined resource requests. If a workload does not have defined requests, the constraint will be treated as having no limit set. This mode is not supported for custom workloads or injected containers.
Configuration options
Constraints can be configured at two levels:
- Policy-level constraints
Policy-level constraints apply to all workloads associated with a scaling policy. These constraints serve as default guardrails for all containers managed by that policy.
You can set:- Global minimum CPU and memory limits
- Global maximum CPU and memory limits
- Container-level constraints
For more granular control, you can specify constraints for individual containers within a workload using annotations. Container-specific constraints override policy-level constraints when both are defined.
Container constraints include:- Minimum and maximum CPU resources
- Minimum and maximum memory resources
Use cases
Workload Autoscaler constraints are valuable in multiple scenarios.
Setting minimum CPU/memory resources ensures business-critical services never scale below functional thresholds. Some applications (like JVM-based services) need a certain amount of memory to function, so setting a minimum for them will prevent performance issues on cold starts.
Setting maximum CPU/memory resources is typically done for reasons such as:
- Cost control: Limiting maximum resources prevents unexpected cost increases
- Compliance: Enforcing organizational policies about resource consumption limits
Limitations
When configuring container-specific constraints, the container name must match exactly what's defined in the pod specification.
Example
For workloads with multiple containers with different resource profiles, you can set specific constraints for each using annotations:
workloads.cast.ai/configuration: |
  vertical:
    containers:
      app-server:
        cpu:
          constraints:
            min:
              type: constant
              value: 500m
            max:
              type: constant
              value: 2000m
        memory:
          constraints:
            min:
              type: constant
              value: 1Gi
            max:
              type: constant
              value: 4Gi
      metrics-sidecar:
        cpu:
          constraints:
            min:
              type: constant
              value: 10m
            max:
              type: constant
              value: 100m
        memory:
          constraints:
            min:
              type: constant
              value: 64Mi
            max:
              type: constant
              value: 256Mi
This allows for precise control over scaling boundaries for each container within your pod.
NoteContainer constraints apply to application containers (
spec.containers[]) and native sidecar containers (spec.initContainers[]withrestartPolicy: Always). Traditional initContainers that run during pod startup are not optimized by Workload Autoscaler.
Look-back period
The look-back period defines the timeframe the Workload Autoscaler uses to observe CPU and memory usage when calculating scaling recommendations. This feature allows you to customize the historical data window used for generating recommendations, which can be particularly useful for workloads with atypical resource usage patterns.
You can configure the look-back period in the Cast AI console under Advanced Settings of a vertical scaling policy:
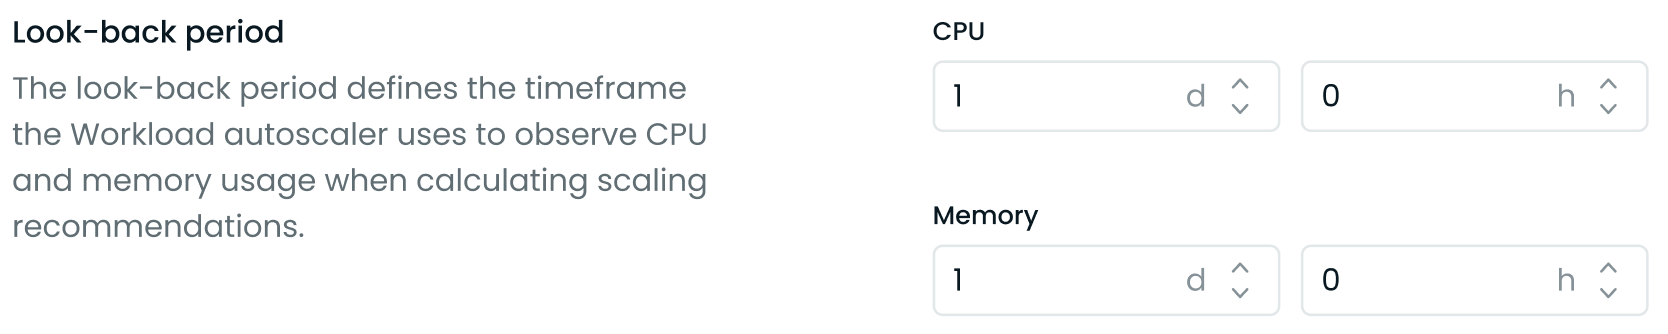
Look-back period in Advanced Settings
- Set the look-back period for CPU and memory separately.
- Specify the duration in days (d) and hours (h). The minimum allowed period is 3 hours, and the maximum is 7 days.
This feature allows you to:
- Adjust the recommendation window based on your workload's specific resource usage patterns.
- Account for longer-term trends or cyclical resource usage in your applications.
You can configure this setting at different levels:
- Policy-level: Apply the setting to all workloads assigned to a specific scaling policy.
- Individual workload-level: Configure the setting for a specific workload using annotations to override policy-level settings.
The look-back period can also be configured via Annotations, the API, or Terraform.
Choosing the correct look-back period
The optimal look-back period largely depends on your workload's resource usage patterns. Most applications benefit from a shorter look-back period of 1-2 days. This approach works particularly well for standard web applications, capturing daily usage patterns while maintaining high responsiveness to changes. Shorter periods enable more aggressive optimization and often lead to higher savings.
Some workloads, however, require longer observation periods of 3-7 days. Applications with significant differences between weekday and weekend usage patterns benefit from a 7-day period to capture these weekly variations. Batch processing jobs that run every few days need a look-back period that covers at least one full job cycle to prevent potential out-of-memory (OOM) situations.
Common use cases and recommended periods:
- High-frequency trading or real-time applications: 3-6 hours for rapid scaling response
- Standard web applications: 1-2 days capture daily patterns while maintaining responsiveness to changes
- Batch processing jobs: Set to cover at least one full job cycle to account for periodic resource spikes
- Weekend-sensitive workloads: 7 days to capture both weekday and weekend patterns
- Variable workloads: Start with 1-2 days and adjust based on observed scaling behavior
TipFor workloads with variable or uncertain patterns, start with a shorter period and adjust based on observed behavior. The key is to match the look-back period to your application's actual resource usage patterns – whether that's daily consistency, weekly cycles, or periodic processing jobs.
Resource-specific optimization
When configuring vertical scaling, you can enable or disable CPU and memory optimization independently while still receiving recommendations for both resources. Even when optimization is disabled for a resource, Workload autoscaler continues to generate recommendations but won't apply them automatically. This setting can be configured at the vertical policy level. To override it for individual workloads, use annotations.

Selective resource optimization controls in the vertical scaling policy settings
NoteAt least one resource type must remain enabled - you cannot disable both CPU and memory optimization simultaneously.
Version requirements
The minimum required workload-autoscaler component version to use this feature is v0.23.1.
Configuration options
At the policy level, you can configure resource-specific optimization through:
- The Cast AI console UI using the resource checkboxes
- The Cast AI API or Terraform
To override this setting for individual workloads, use annotations:
workloads.cast.ai/configuration: |
  vertical:
    memory:
      optimization: off
For detailed reference information on Workload Autoscaler annotations, see Configuration via annotations.
Container exclusions
You can exclude specific containers from automatic optimization within a scaling policy. Excluded containers retain their current resource settings and are not scaled by the Workload Autoscaler. Recommendations are still generated and visible in the event log and the workload detail view.
This setting is configured under the Selective optimization section of a vertical scaling policy, alongside the resource selection (CPU/Memory) described above.
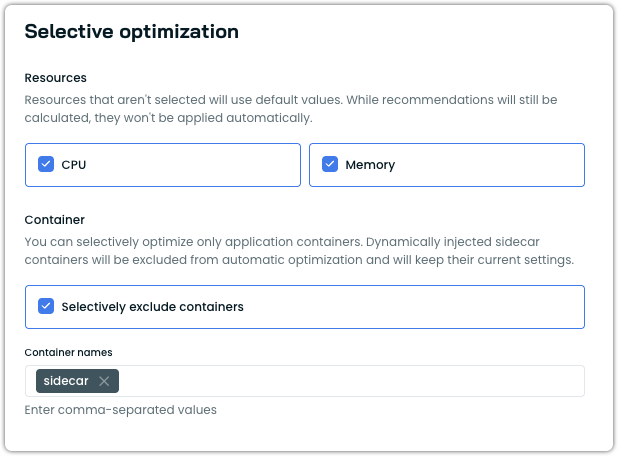
Container exclusion settings under Selective optimization
Note
excludedContainerstargets containers explicitly defined in your pod spec, such as application containers or native Kubernetes sidecar containers. For information on dynamically injected containers, see Sidecar container support.
Configuring container exclusions
To exclude containers from optimization in the Cast AI console:
- Navigate to Workload Autoscaler → Scaling policies.
- Edit an existing policy or create a new one.
- Under the Vertical Rightsizing tab, locate the Selective optimization section.
- In the Container subsection, enable Selectively exclude containers.
- Enter the exact container names to exclude, separated by commas.
- Save the policy.
Container exclusions can also be configured via annotations:
workloads.cast.ai/configuration: |
  vertical:
    excludedContainers:
      - istio-proxy
      - logging-agent
For the full annotation reference, see vertical.excludedContainers.
HPA converter
When Cast AI adjusts a workload's CPU or memory requests, any existing HPA with percentage-based utilization targets can drift — a "50% CPU" target changes meaning when the underlying request changes. The HPA converter prevents this by converting utilization targets into fixed absolute values derived from the workload's original requests.
The converter is designed for workloads that have their own HPA while Cast AI handles only vertical optimization. If Cast AI's horizontal autoscaling is also enabled for the workload, Cast AI already manages the HPA directly and the converter is not needed.
For a detailed explanation of the conversion formula, supported metric types, behavior, and monitoring, see HPA converter in the available settings reference.
Enabling the HPA converter
To enable via scaling policy:
- Navigate to Workload Autoscaler → Scaling policies.
- Edit an existing policy or click Create scaling policy.
- Under the Vertical Rightsizing tab, scroll to HPA converter.
- Enable the Enable HPA converter toggle.
- Save the policy.
To enable via workload annotation:
workloads.cast.ai/configuration: |
  vertical:
    optimization: true
    hpaConverters:
      - type: AverageValueFromOriginalRequests
For the full annotation reference, see vertical.hpaConverters.
Version requirements
| Component | Minimum version |
|---|---|
castai-workload-autoscaler | v1.0.11 |
In-Place Pod Resizing
Kubernetes v1.33+ FeatureThis feature requires Kubernetes v1.33+ with Cast AI Workload Autoscaler v0.53.0 or later.
Cast AI Workload Autoscaler leverages Kubernetes in-place pod resizing when available, minimizing disruption during resource adjustments. This feature reduces pod restarts in many scenarios while maintaining the same level of resource efficiency. When in-place resizing cannot be applied, the system gracefully falls back to the configured apply mode.
Automatic enablement
When enabled, in-place resizing is automatically used when all conditions are met:
- Kubernetes cluster v1.33 or later
- Cast AI Workload Autoscaler v0.53.0 or later
- Pods and containers support in-place resizing
- In-place resizing is enabled via Helm configuration
Apply mode compatibility
In-place resizing works with both immediate and deferred apply modes.
Immediate mode with in-place resizing
When using immediate mode on clusters that support in-place resizing:
- In-place attempt: Workload Autoscaler first attempts to resize the pod in-place
- Restart when necessary: Container restarts may occur when resize policies require it, resource constraints prevent immediate resizing, or changes cannot be applied in-place
- Graceful fallback: If in-place resizing fails or enters a pending state, the system falls back to the traditional pod restart approach through controller updates
- Memory protection: Memory limits are never decreased during in-place operations to prevent application issues
Deferred mode with in-place resizing
For deferred mode, Cast AI can optionally apply recommendations through in-place resizing during natural pod lifecycle events:
- Natural restart detection: When pods restart for other reasons (deployments, scaling, etc.)
- In-place opportunity: If the pod supports in-place resizing, Cast AI attempts to apply recommendations without additional restart
- Restart scenarios: Containers may still restart if their resize policy requires it or if the resource change cannot be applied in-place
- Additional limitations: Containers with
RestartRequiredresize policy are skipped during deferred in-place operations to avoid unnecessary restarts
Configuration options
Control in-place resizing behavior through Helm values:
helm upgrade castai castai-helm/castai \
  -n castai-agent \
  --reset-then-reuse-values \
  --set autoscaler.castai-workload-autoscaler.inPlaceResizeEnabled=true \
  --set autoscaler.castai-workload-autoscaler.inPlaceResizeDeferredEnabled=true
Compatibility and limitations
In-place resizing respects all Kubernetes limitations:
- QoS class preservation: Pods maintain their original Quality of Service class
- Memory decrease restrictions: Memory limits cannot be decreased without container restart
- Container type restrictions: Only regular containers and sidecar containers support in-place resizing
- Platform limitations: Windows pods, pods with swap memory, and pods with static resource policies are excluded
When in-place resizing cannot be used, Cast AI Workload Autoscaler automatically falls back to the configured apply mode behavior (immediate or deferred pod restart).
Custom workload support
When a natively supported workload is skipped
Workload Autoscaler only mutates workloads when it is confident the change won't conflict with another controller. To stay safe, it ignores any Deployment or StatefulSet whose metadata.ownerReferences field is set, because the referenced owner may reconcile the object with custom logic (for example, an operator that resizes volumes, repairs nodes, or rewrites the spec on its own).
This commonly affects workloads managed by operators, such as:
- Elasticsearch (StatefulSets created by the ECK operator)
- Cassandra / k8ssandra (StatefulSets created by the K8ssandra operator)
- RabbitMQ, Kafka, and other stateful services driven by a custom controller
- Any in-house controller that owns its Deployments or StatefulSets
If a workload shows up in Cost Monitoring → Workloads but not in the Workload Autoscaler view, an owner reference is the most likely cause. Cost Monitoring only reads resource usage and is not affected by this rule; Workload Autoscaler needs to write to the object and avoids workloads whose parent might overwrite the change.
Opting an owner-controlled workload in
If you've confirmed that autoscaling won't conflict with the parent controller — for example, the controller reconciles but doesn't touch spec.template.spec.containers[*].resources, or you've coordinated with the owning team — add the workloads.cast.ai/custom-workload label to the pod template to opt the workload into autoscaling. The full procedure is described under Label-based workload selection below.
The supported apply modes are still determined by the workload's controller kindAdding the custom workload label tells Workload Autoscaler to manage the workload, but the supported apply modes (Immediate vs. Deferred) are determined by the workload's controller kind and the agent version. See Apply modes for custom workloads.
Workload Autoscaler supports the scaling of custom workloads through label-based selection. This allows autoscaling for:
- Bare pods (pods without controllers)
- Pods created programmatically (as Spark Executors or Airflow Workers).
- Jobs (Note: CronJobs are natively supported as of
workload-autoscalerv0.44.3) - Workloads with custom controllers not natively supported by Cast AI
- Groups of related workloads that should be scaled together
Workload Autoscaler will track and scale these workloads based on resource usage patterns, applying the same autoscaling policies and recommendations as standard workloads.
Label-based workload selection
To enable autoscaling for custom workloads, add the workloads.cast.ai/custom-workload label to the Pod template specification. This is crucial - the label must be present in the Pod template, not just on the controller.
The label value must conform to RFC 1123 DNS subdomain and label name restrictions imposed by Kubernetes, meaning it must:
- Contain only lowercase alphanumeric characters or '-'
- contain at most 63 characters
- Start and end with an alphanumeric character
- Not contain underscores (_) or other special characters
apiVersion: v1
kind: Pod
metadata:
  labels:
    workloads.cast.ai/custom-workload: "my-custom-workload"
spec:
  containers:
    - name: app
Workloads with the same label value will be treated as a single workload for autoscaling purposes. The value acts as a unique identifier for the workload group.
Workloads are uniquely identified by their:
- Namespace
- Label value
- Controller kind
Apply modes for custom workloads
Custom workloads support different recommendation apply modes depending on their controller type and workload-autoscaler version:
Immediate mode support
Requirements:
workload-autoscalerversion >= 0.41.2- The Pod's direct parent controller must be either a ReplicaSet or a StatefulSet
Custom workloads support immediate apply mode when the Pod's direct parent controller is a ReplicaSet or StatefulSet, allowing recommendations to be applied immediately rather than waiting for natural pod restarts.
This supports controller hierarchies such as:
- Pod/s → ReplicaSet → Deployment → Custom resource
- Pod/s → StatefulSet → Custom resource
In-place resizing supportWith Kubernetes 1.33+, clusters that have in-place resizing enabled can apply resource recommendations to custom workloads with reduced pod disruption, even when using immediate apply mode. This allows the Workload Autoscaler to attempt modifying resource requests on running pods directly, providing faster optimization when resize policies and resource constraints allow.
Deferred mode fallback
Custom workloads automatically fall back to deferred mode when:
- The Pod's direct parent controller is not a ReplicaSet or a StatefulSet (e.g., bare Pods, Jobs, CronJobs)
- The
workload-autoscalerversion is older than v0.41.2
Configuring custom workloads via annotations
Regarding custom workload discovery, Cast AI configuration annotations must also be specified either in the Pod template specification or at the top level of the manifest.
The placement of the configuration annotations for each Kind:
- For deployments: Place annotations in the
spec.template.metadata.annotations
apiVersion: apps/v1
kind: Deployment
metadata:
  name: custom-managed-app
spec:
  template:
    metadata:
      annotations:
        workloads.cast.ai/configuration: | # Configuration annotation in pod template spec
          scalingPolicyName: custom
          vertical:
            optimization: on
      labels:
        workloads.cast.ai/custom-workload: "custom-controlled-app"
    spec:
      containers:
        - name: app
# Container spec...- For jobs: Place both the custom workload label and all configuration annotations in the Pod template specification (
spec.template.metadata):
apiVersion: batch/v1
kind: Job
metadata:
  name: batch-job
spec:
  template:
    metadata:
      labels:
        workloads.cast.ai/custom-workload: "batch-processor"
      annotations:
        workloads.cast.ai/configuration: | # Configuration annotation in pod template spec
          scalingPolicyName: custom
          vertical:
            optimization: on
    spec:
      containers:
        # Container spec...
Configuring autoscaling behavior
Both labels and annotations used to configure autoscaling behavior must be specified in the Pod template specification, not on the controller or running Pod.
Key points about label-based workload configuration:
- Workloads are grouped per controller kind (deployments and StatefulSets with the same label will be treated as separate workloads)
- For grouped workloads, the newest/latest matching controller's pod template configuration is used as the workload specification
- Only workloads with the
workloads.cast.ai/custom-workloadlabel will be discovered for custom workload autoscaling - The label value must be unique for each distinct workload or group of workloads you want to scale together
- All configuration labels and annotations must be specified in the Pod template specification
Examples
Scale a bare pod:
apiVersion: v1
kind: Pod
metadata:
  labels:
    workloads.cast.ai/custom-workload: "standalone-pod"
  annotations:
    workloads.cast.ai/configuration: | # Configuration annotation in pod template spec
      scalingPolicyName: custom
      vertical:
        optimization: on
spec:
  containers:
    - name: app
      # Container spec...
Group related jobs:
apiVersion: batch/v1
kind: Job
spec:
  template:
    metadata:
      labels:
        workloads.cast.ai/custom-workload: "batch-processors"
      annotations:
        workloads.cast.ai/configuration: | # Configuration annotation in pod template spec
          scalingPolicyName: custom
          vertical:
            optimization: on
    spec:
      containers:
        - name: processor
          # Container spec...
Scale workloads with custom controllers:
apiVersion: apps/v1
kind: Deployment
metadata:
  name: custom-managed-app
  ownerReferences: # Custom controller resource
    - apiVersion: customcontroller.example.com/v1alpha1
      kind: CustomResourceType
      name: custom-resource
      uid: abc123
      controller: true
spec:
  template:
    metadata:
      annotations:
        workloads.cast.ai/configuration: | # Configuration annotation in pod template spec
          scalingPolicyName: custom
          vertical:
            optimization: on
      labels:
        workloads.cast.ai/custom-workload: "custom-controlled-app"
    spec:
      containers:
        - name: app
          # Container spec...
The Workload Autoscaler will track and scale workloads with custom controllers based on resource usage patterns, applying the same autoscaling policies and recommendations as standard workloads, except:
- These workloads are only scaled vertically using Vertical Pod Autoscaling (VPA)
- Only the deferred recommendation mode is supported
Container grouping for dynamic containers
Starting with workload-autoscaler v0.33.0, Cast AI Workload Autoscaler supports grouping dynamically created containers with similar names into a single logical container for resource recommendation purposes. This is meant to be done for workloads that generate containers with auto-generated names containing a common pattern (typically in the form of a suffix), such as batch jobs or Tekton pipelines.
For upgrading your workload-autoscaler version to leverage this feature, see upgrading instructions.
Container grouping annotation
To group containers with similar naming patterns, you can add the containersGrouping section to your workload configuration annotation:
workloads.cast.ai/configuration: |
  containersGrouping:
    - key: name
      operator: contains
      values: ["data-processor"]
      into: data-processor
Once configured, the workload usage will appear stable in the Cast AI console under one container name, making it easier to track resource usage patterns and apply consistent optimization recommendations.
Configuration options
For the most up-to-date information on workload autoscaling annotation configuration options, always refer to Configuration via Annotations.
| Field | Type | Required | Description |
|---|---|---|---|
key | string | Yes | The attribute used to match containers. Currently only supports name which refers to the container name property. |
operator | string | Yes | Defines how the key is evaluated against the values list. Currently only supports contains. |
values | array | Yes | A list of string values used for matching against the key with the specified operator. Must contain at least one item. |
into | string | Yes | The target container name into which matching containers should be grouped for workload optimization purposes. |
Use case example
This feature is meant to be used for workloads that create containers with auto-generated names based on a common pattern. For example, a TaskRun in Tekton might create containers with names like:
step-data-processor-167588-0-0-m9cun-0step-data-processor-167589-0-0-m9cun-0step-data-processor-167590-0-0-m9cun-0
ImportantWithout container grouping, the workload autoscaler would treat each of these as completely separate, thus interfering with metrics collection and making it difficult to establish meaningful resource usage patterns and generate accurate recommendations for scaling.
By using the container grouping feature, you can consolidate all these containers under a single logical name (e.g., data-processor), allowing the Workload Autoscaler to provide more accurate and stable resource recommendations.
Complete example
Here's a complete example showing how to configure container grouping for a Tekton TaskRun:
apiVersion: tekton.dev/v1beta1
kind: TaskRun
metadata:
  name: example-taskrun
spec:
  # TaskRun specifications
  podTemplate:
    metadata:
      labels:
        workloads.cast.ai/custom-workload: "team-neptune-data-processing-batch-job"
      annotations:
        workloads.cast.ai/configuration: |
          containersGrouping:
            - key: name
              operator: contains
              values: ["data-processing-batch-job"]
              into: data-processing-batch-job
    # Other pod template specifications
In this example:
- The workload is identified by the custom workload label
team-neptune-data-processing-batch-job. - Any container with a name containing the string
data-processing-batch-jobwill be grouped into a logical container nameddata-processing-batch-job. - The Workload Autoscaler tracks resource usage and generates recommendations for this logical container group rather than for each individual container.
Scaling job workloads
Custom job-like workloadsIf you have custom workloads that behave like Jobs but use different Kubernetes kinds (e.g., Spark executors, GitLab runners), see Job-like custom workloads for configuration options.
The Workload Autoscaler can automatically manage resources for Job workloads when they're labeled as custom workloads. CronJobs, on the other hand, are supported and optimized natively by Workload Autoscaler.
To enable automatic scaling for your Jobs that is uniquely optimized for those types of workloads, add the custom workload label to your Job specifications:
# For Jobs (custom workload configuration required)
apiVersion: batch/v1
kind: Job
spec:
  template:
    metadata:
      labels:
        workloads.cast.ai/custom-workload: "batch-processor"
      annotations:
        workloads.cast.ai/configuration: |
          scalingPolicyName: custom
          vertical:
            optimization: on
    spec:
      containers:
        - name: processor
          # Container spec...
# For CronJobs (native support as of v0.44.3)
apiVersion: batch/v1
kind: CronJob
spec:
schedule: "*/10 * * * *"
jobTemplate:
spec:
template:
metadata:
annotations:
workloads.cast.ai/configuration: |
scalingPolicyName: custom
vertical:
optimization: on
spec:
containers:
- name: processor
# Container spec...Once labeled, the Workload Autoscaler will uniquely recognize these workloads, begin tracking your Jobs' resource usage patterns, and generate scaling recommendations different from those for other workloads.
Creating scaling policies for Jobs
Different types of Jobs benefit from different scaling configurations. For best results, set up separate vertical scaling policies to match your Job frequency patterns.
-
Group similar Jobs together
Create dedicated scaling policies for Jobs with similar patterns. For example, put all your hourly Jobs under one policy and daily Jobs under another. That is because the optimal settings for scaling jobs of different frequencies will differ (e.g., have different look-back periods configured). -
Consider Job duration
Very short-lived Jobs (running for just seconds) might be better served with fixed resource allocations rather than automatic scaling.
NoteTo reach full recommendation confidence, a job needs to run at least 3 times within the configured look-back period.
Job-like custom workloads
Some custom workloads behave like Kubernetes Jobs even though they're created as Pods or other resource types by custom controllers. These workloads run sporadically, often for just a few minutes, then disappear from the cluster. Examples include Spark executors, GitLab runners, and workflow engines.
Cast AI's Workload Autoscaler recognizes these patterns and treats job-like custom workloads differently from continuous workloads:
Key differences for job-like workloads:
- Confidence building: Only requires 3 runs within the look-back period
- CRD retention: Recommendation CRDs stay in the cluster for the full look-back period even when no pods are running
Auto-discovered job-like workloads
The Workload Autoscaler automatically identifies and treats the following custom workloads as job-like:
- Tekton TaskRuns - Identified by
tekton.dev/v1beta1.TaskRunkind - Argo Workflows - Identified by
argoproj.io/v1alpha1.Workflowkind - GitLab runner pods - Identified by the
job.runner.gitlab.com/idannotation - Apache Spark workloads - Identified by
spark-role=driverorspark-role=executorlabels
NoteAuto-discovered job-like workloads still require the
workloads.cast.ai/custom-workloadlabel to be managed by the Workload Autoscaler.
Manually marking workloads as job-like
For workloads not automatically detected, you can explicitly mark them as job-like using the schedule.type configuration:
apiVersion: v1
kind: Pod
metadata:
  labels:
    workloads.cast.ai/custom-workload: "job-like-pod"
  annotations:
    workloads.cast.ai/configuration: |
      schedule:
        type: jobLike
      vertical:
        optimization: on
spec:
  containers:
    - name: app
      # Container spec...
You can also explicitly mark auto-discovered workloads as continuous if needed:
apiVersion: v1
kind: Pod
metadata:
  labels:
    workloads.cast.ai/custom-workload: "continous-gitlab-runner"
  annotations:
    job.runner.gitlab.com/id: "123456"  # Would normally be auto-discovered as job-like
    workloads.cast.ai/configuration: |
      schedule:
        type: continuous  # Override auto-discovery
      vertical:
        optimization: on
spec:
  containers:
    - name: app
      # Container spec...
For more information on configuring job-like custom workloads via annotations, see the Annotations reference.
GitLab CI Runner Integration
When using Cast AI's workload autoscaling with GitLab CI runners, you must properly configure custom workload labels to enable optimization. Here's how to set it up.
Configuring GitLab Runner
Add the custom workload label to your GitLab runner configuration in the config.toml file:
[[runners]]
  [runners.kubernetes]
    namespace = "{{.Release.Namespace}}"
    image = "alpine"
    [runners.kubernetes.pod_labels]
      # Use CI_JOB_NAME_SLUG and CI_PROJECT_ID for unique workload identification
      ["workloads.cast.ai/custom-workload"] = "${CI_JOB_NAME_SLUG}-${CI_PROJECT_ID}"
Automatic job-like detectionGitLab runner pods are automatically detected and treated as job-like workloads when they contain the
job.runner.gitlab.com/idannotation andworkloads.cast.ai/custom-workloadlabel. This means they'll only need 3 runs within the configured look-back period to gain full confidence, making them easier to optimize.
Important Considerations
These are some of the considerations around best practices when implementing custom workload logic with GitLab runners that should help avoid potential issues:
-
Label naming restrictions: The custom workload label value must conform to Kubernetes naming conventions (RFC 1123).
-
Using GitLab CI variables: When constructing the custom workload label, use GitLab's predefined variables that are already sanitized:
CI_JOB_NAME_SLUG: A lowercase, sanitized version ofCI_JOB_NAMECI_PROJECT_ID: The unique ID of the project
-
Shared runners: For environments with shared runners across multiple projects, using a combination of
CI_JOB_NAME_SLUGandCI_PROJECT_IDhelps ensure unique workload identification per project and job type.
Example configuration
Here's a complete example of a GitLab runner configuration with workload autoscaling enabled:
[[runners]]
  [runners.kubernetes]
    namespace = "{{.Release.Namespace}}"
    image = "alpine"
    [runners.kubernetes.pod_annotations]
      "workloads.cast.ai/configuration" = "vertical:\n  optimization: on\n"
    [runners.kubernetes.pod_labels]
      "workloads.cast.ai/custom-workload" = "${CI_JOB_NAME_SLUG}-${CI_PROJECT_ID}"
This configuration ensures the following key requirements:
- Each job type per project gets its own workload optimization profile
- Label values comply with Kubernetes naming requirements
For more information about available GitLab CI variables, refer to the GitLab CI/CD predefined variables documentation.
Configuration via API/UI
The Cast AI console provides an intuitive interface for configuring workload optimization settings at the scaling policy level. Through the web-based UI, you can adjust autoscaling behavior, set resource constraints, configure recommendation thresholds, and monitor optimization performance in real-time. You can also toggle optimization on or off for individual workloads.
For a comprehensive overview of all configurable parameters and their impact on workload optimization, see Available settings.
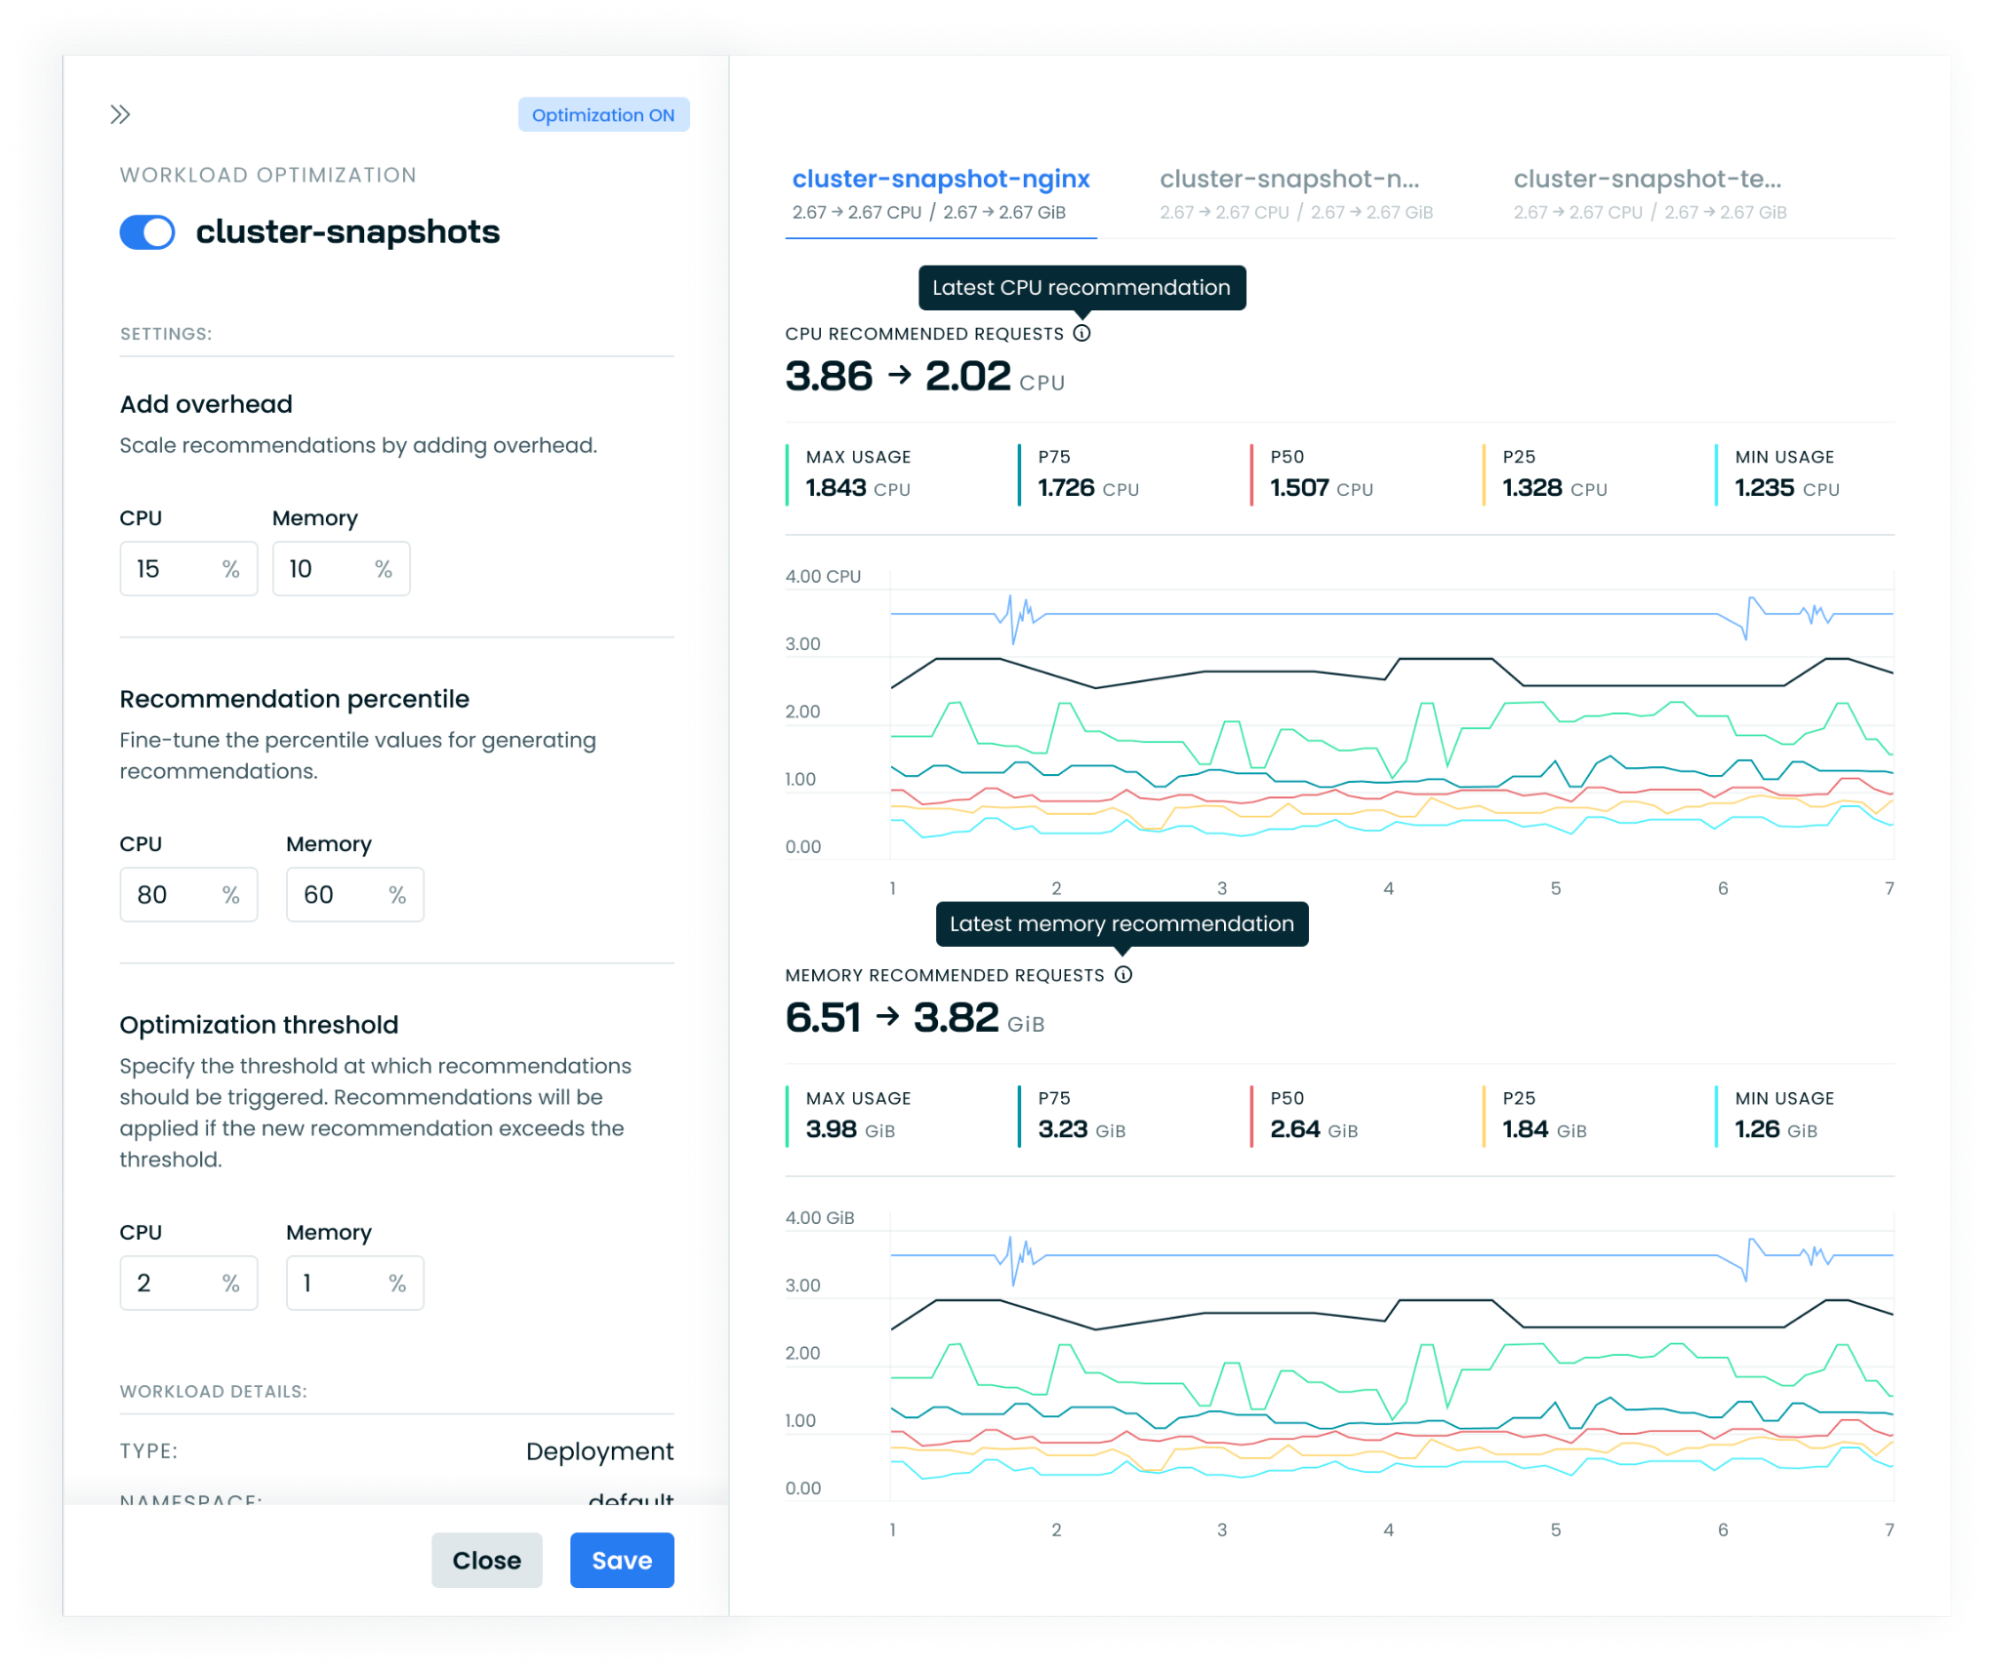
Configuration via Annotations
Cast AI Workload Autoscaler supports comprehensive configuration through Kubernetes annotations, enabling fine-grained control at the workload level. This method allows you to define optimization settings directly in your Kubernetes manifests, providing seamless integration with GitOps workflows and infrastructure-as-code practices.
When the workloads.cast.ai/configuration annotation is detected on a workload, it takes precedence over scaling policy settings for that specific workload. This approach enables centralized policy management while maintaining flexibility for workloads with unique requirements.
For complete annotation syntax, configuration examples, and detailed field references, see the Workload Autoscaler Annotations Reference.