Pod mutations

What are pod mutations?

Pod mutations is a Cast AI feature that simplifies Kubernetes workload configuration and helps optimize cluster resource usage. It allows you to define templates that automatically modify pod specifications when they are created, reducing manual configuration overhead and ensuring consistent pod scheduling across your cluster.

Why use pod mutations?

Managing Kubernetes workloads at scale presents several challenges:

  • Complex Configuration Requirements: As clusters grow, manually configuring pod specifications becomes increasingly time-consuming and error-prone. Each workload may need specific labels, tolerations, and node selectors to ensure proper scheduling and resource allocation.

  • Legacy System Integration: When onboarding existing clusters to Cast AI, workloads sometimes need to be reconfigured to take full advantage of cost optimization features. This traditionally requires updating deployment manifests, which can be automated using pod mutations.

  • Resource Fragmentation: Without standardized pod configurations, clusters can become fragmented with too many node groups, leading to inefficient resource utilization and increased costs.

Pod mutations address all of these challenges.

How it works

Pod mutations allow you to define templates that automatically modify pod specifications when they are created. These templates can:

  • Apply labels and tolerations
  • Configure node selectors and affinities
  • Link pods to specific Node Templates
  • Consolidate multiple Node Templates
  • Set Spot Instance preferences

The pod mutations controller, called the pod mutator, runs in your cluster and monitors pod creation events. When a new pod matches a mutation's configured filters, the controller automatically applies that mutation. Note that only one mutation can be applied to any given pod - if multiple mutations match a pod's filters, the most specific filter match will be used.

Installation

Install using the console

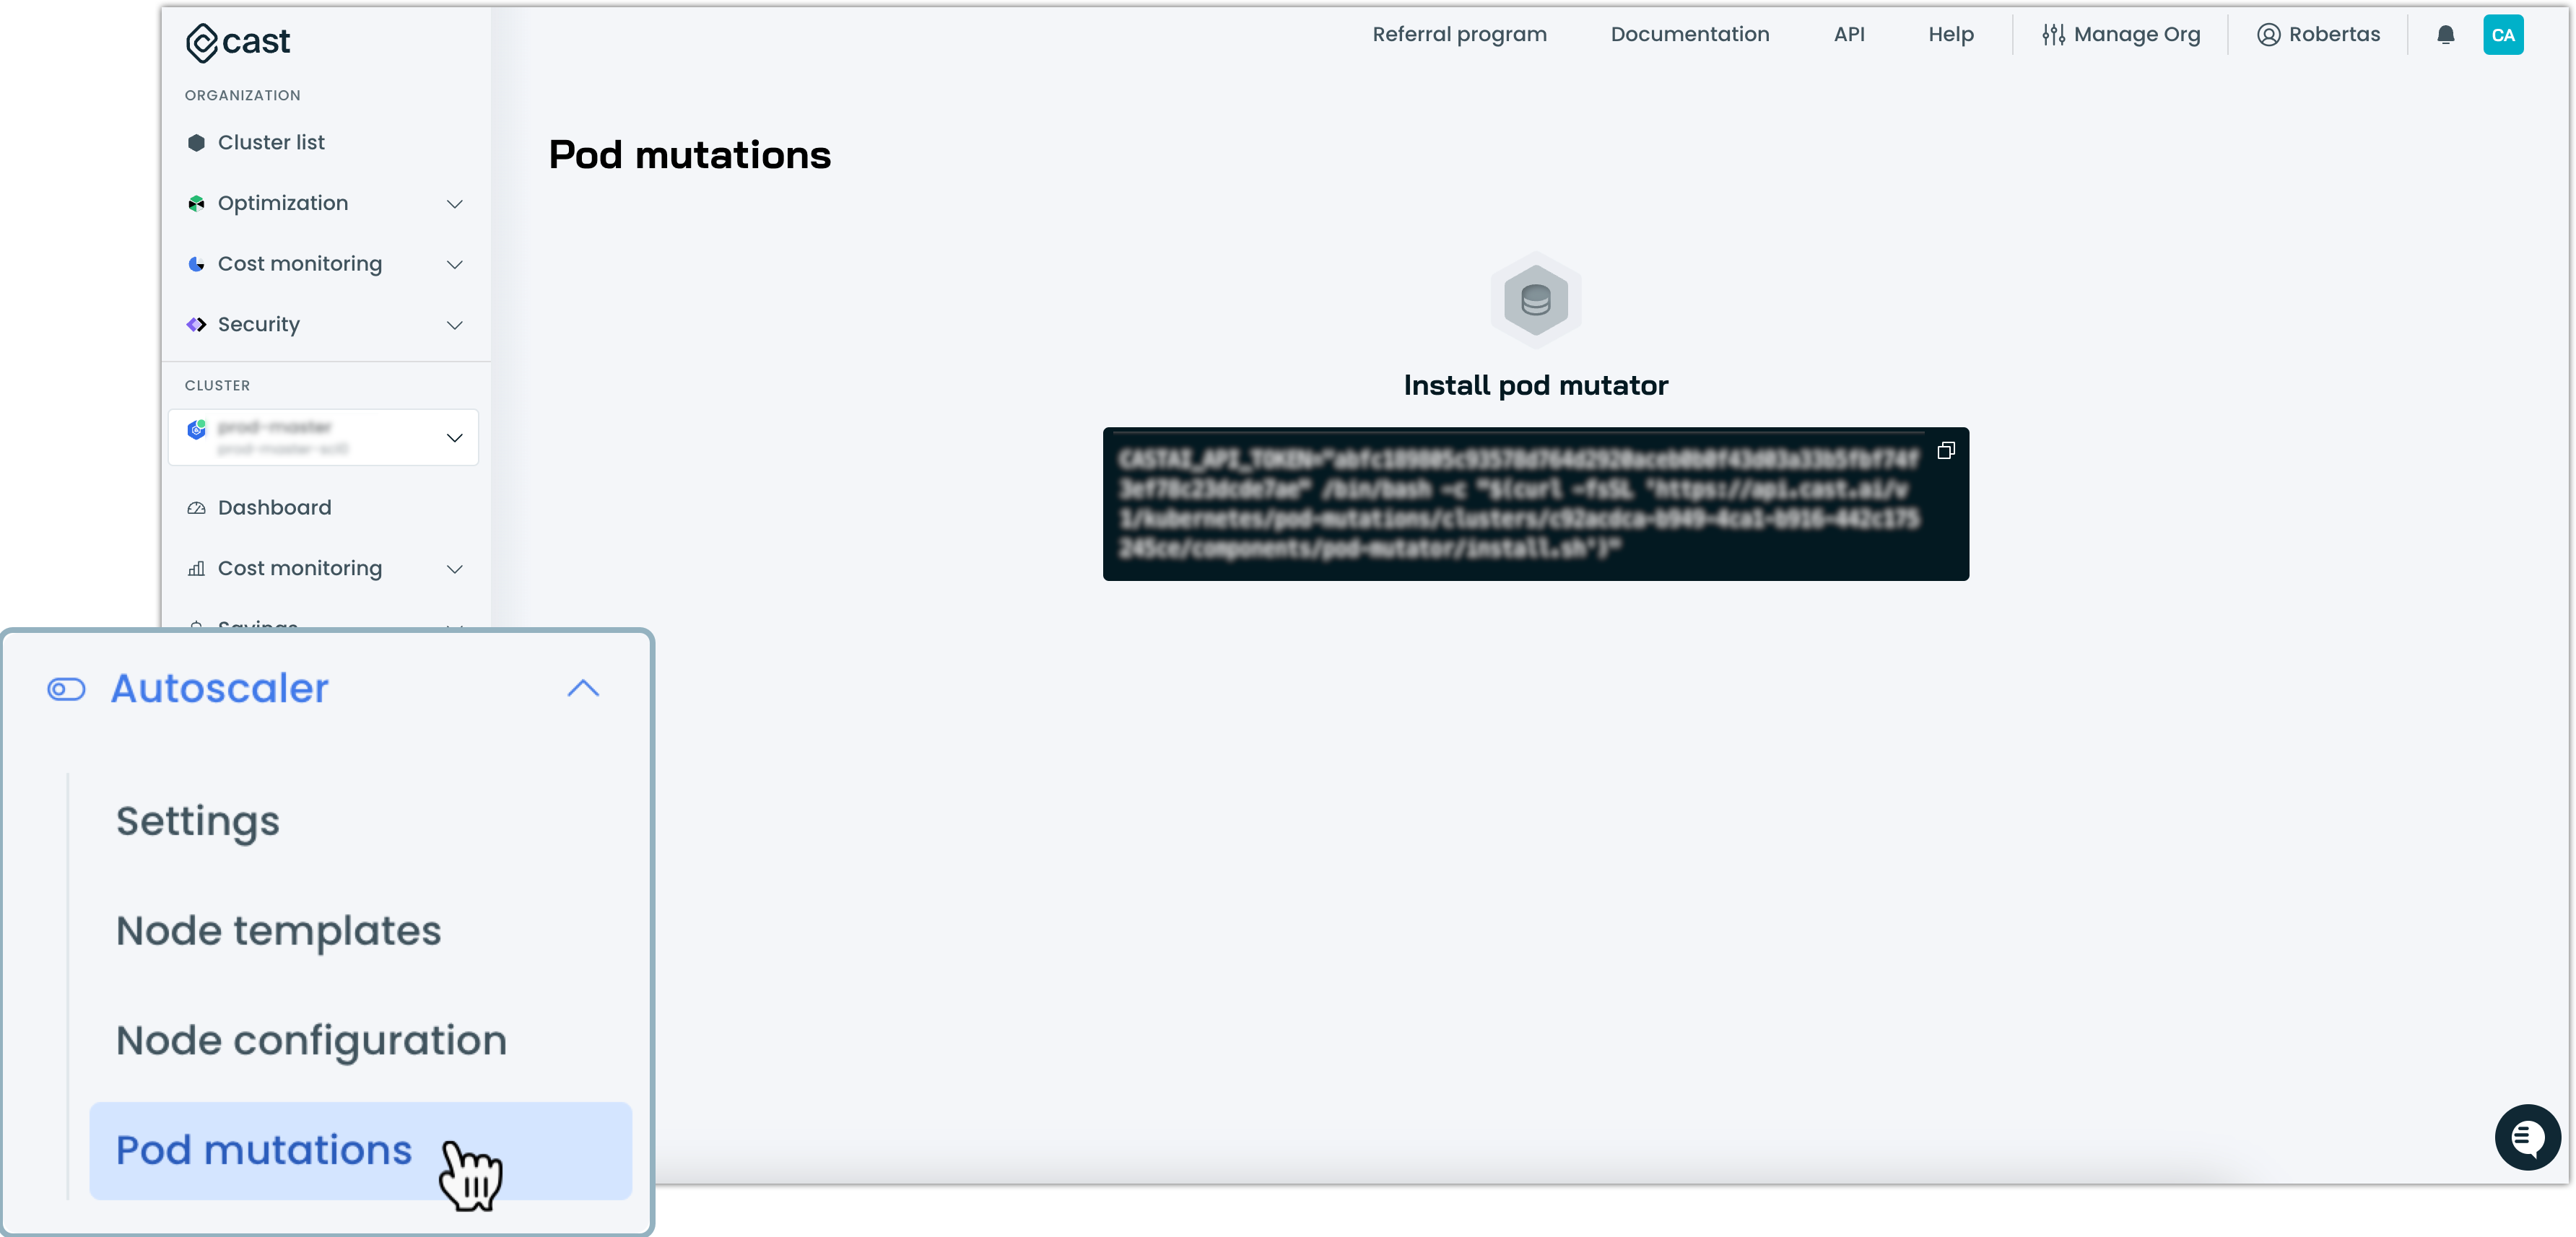
  1. Upon selecting a cluster from the cluster list, head over to Autoscaler --> Pod mutations in the sidebar.
  2. If you have not installed the pod-mutator controller, you will be prompted with a script you need to run in your cluster's cloud shell or terminal.

Install using Helm

  1. Add the Cast AI Helm repository:
helm repo add castai-helm https://castai.github.io/helm-charts
helm repo update
  1. Install the pod mutations controller:
helm repo add castai-helm https://castai.github.io/helm-charts
helm upgrade -i --create-namespace -n castai-agent pod-mutator \
castai-helm/castai-pod-mutator \
--set castai.apiUrl="https://api.cast.ai" \ 
--set castai.apiKey="${API_KEY}" \
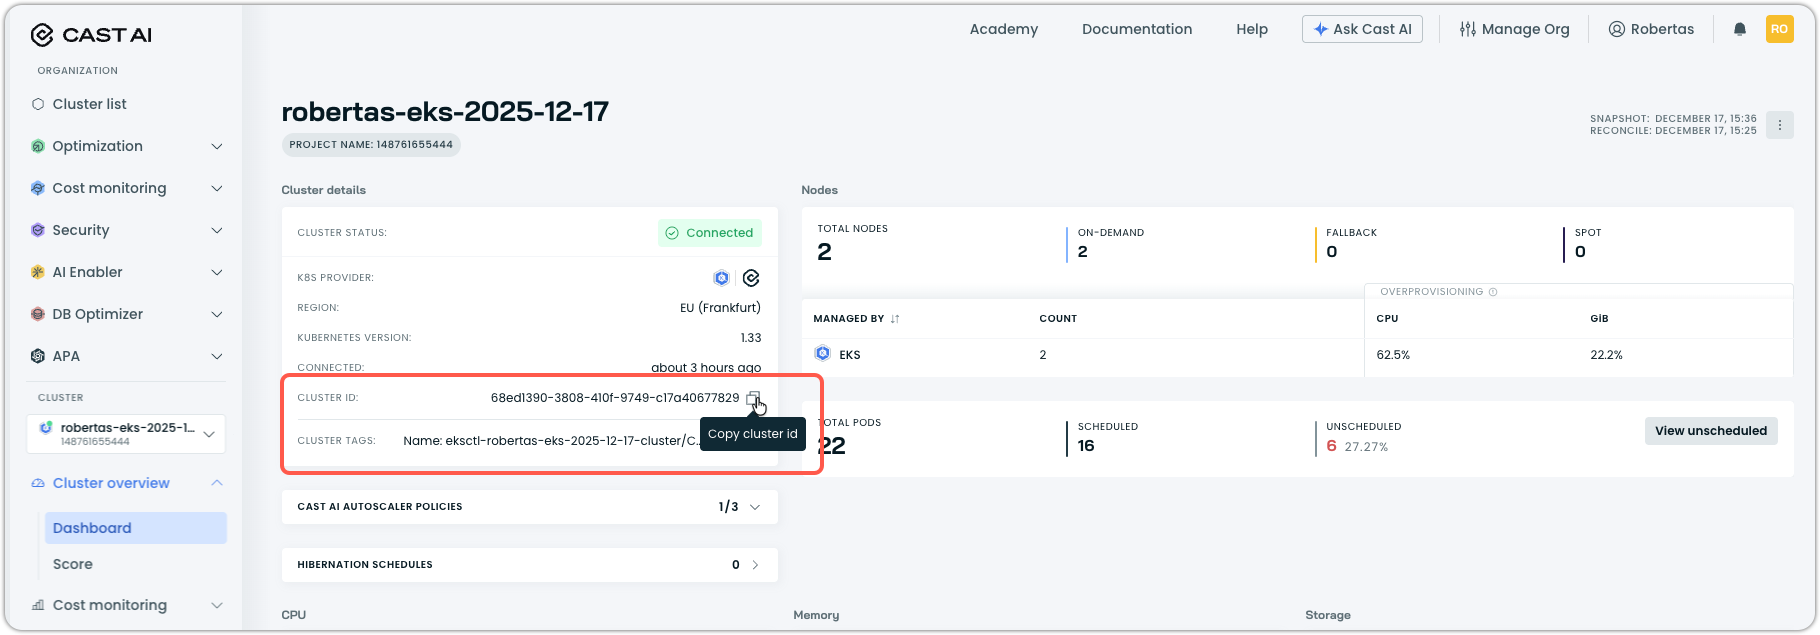
--set castai.clusterID="${CLUSTER_ID}"
📘

Note

Prior to Pod Mutator version v0.0.26, an additional parameter --set castai.organizationID="${ORGANIZATION_ID}" was required. If you're using a fixed Pod Mutator version older than v0.0.26, you'll still need to include this parameter.

Advanced installation options

The pod mutator supports the configuration of its webhook reinvocation policy. This controls whether the pod mutator should be reinvoked if other admission plugins modify the pod after the initial mutation.

helm upgrade -i --create-namespace -n castai-agent pod-mutator \
castai-helm/castai-pod-mutator \
--set castai.apiUrl="https://api.cast.ai" \ 
--set castai.apiKey="${API_KEY}" \
--set castai.clusterID="${CLUSTER_ID}" \
--set webhook.reinvocationPolicy="IfNeeded" # Set to "Never" by default
📘

Note

Prior to Pod Mutator version v0.0.26, an additional parameter --set castai.organizationID="${ORGANIZATION_ID}" was required. If you're using a fixed Pod Mutator version older than v0.0.26, you'll still need to include this parameter.

The reinvocationPolicy can be set to:

  • Never (default): The pod mutator will only be called once during pod admission
  • IfNeeded: The pod mutator may be called again if other admission plugins modify the pod after the initial mutation

Setting reinvocationPolicy to IfNeeded is useful when you have multiple admission webhooks that may interact with each other. For example:

  1. Pod mutator adds its mutations
  2. Another webhook modifies the pod
  3. Pod mutator is invoked again to ensure its mutations are properly applied

However, if you want changes made by other webhooks to persist, setting reinvocationPolicy to IfNeeded may be counterproductive since the pod mutator will override any modifications that fall under its control when it's reinvoked. Consider your specific use case and the interaction between different webhooks in your cluster before changing this setting from its default value.

Creating pod mutations

Pod mutations can be defined through multiple methods:

  • Using the Cast AI console interface
  • Via the PodMutations API
  • As Kubernetes Custom Resources using Terraform or other Kubernetes management tools

Each mutation consists of:

  • A unique name
  • Object filters to select targeted pods
  • Mutation rules defining what changes to apply
  • Node Template configurations (optional)
  • Spot Instance preferences (optional)

Object filters and targeting

Label vs annotation targeting

Pod mutations only work with labels, not annotations. When configuring object filters, ensure you use labels to target pods.

Workload type targeting

Pod mutations target workloads based on their Kubernetes kind. Use the following kinds for different workload types:

Workload TypeKind to UseDescription
JobsJobFor batch processing workloads
CronJobsCronJobFor scheduled recurring jobs
Bare PodsPodFor standalone pods without a controller
DeploymentsDeploymentFor applications with multiple replicas
StatefulSetsStatefulSetFor stateful applications

Label placement for Deployments

When targeting Deployments with labels, place the label at the pod template level (spec.template.metadata.labels), not at the Deployment level (metadata.labels).

Correct placement:

apiVersion: apps/v1
kind: Deployment
metadata:
  name: single-replica-app
spec:
  replicas: 1
  template:
    metadata:
      labels:
        single-replica: "true"  # Place label here (pod template)

Multiple mutations for complex scenarios

Pod mutation selection works as an AND operation between namespaces and labels, not OR. For scenarios where you need to target workloads based on either namespace OR labels, create separate mutations.

Example: Target both namespace-based AND label-based workloads

Create two separate mutations:

Mutation 1 - Namespace-based:

{
  "name": "system-namespaces",
  "objectFilter": {
    "namespaces": ["kube-system", "argocd"]
  },
  "nodeSelector": {
    "scheduling.cast.ai/node-template": "system-workloads"
  }
}

Mutation 2 - Label-based:

{
  "name": "specific-labels",
  "objectFilter": {
    "labels": {
      "app.kubernetes.io/name": "castai-agent"
    }
  },
  "nodeSelector": {
    "scheduling.cast.ai/node-template": "system-workloads"
  }
}

Console example

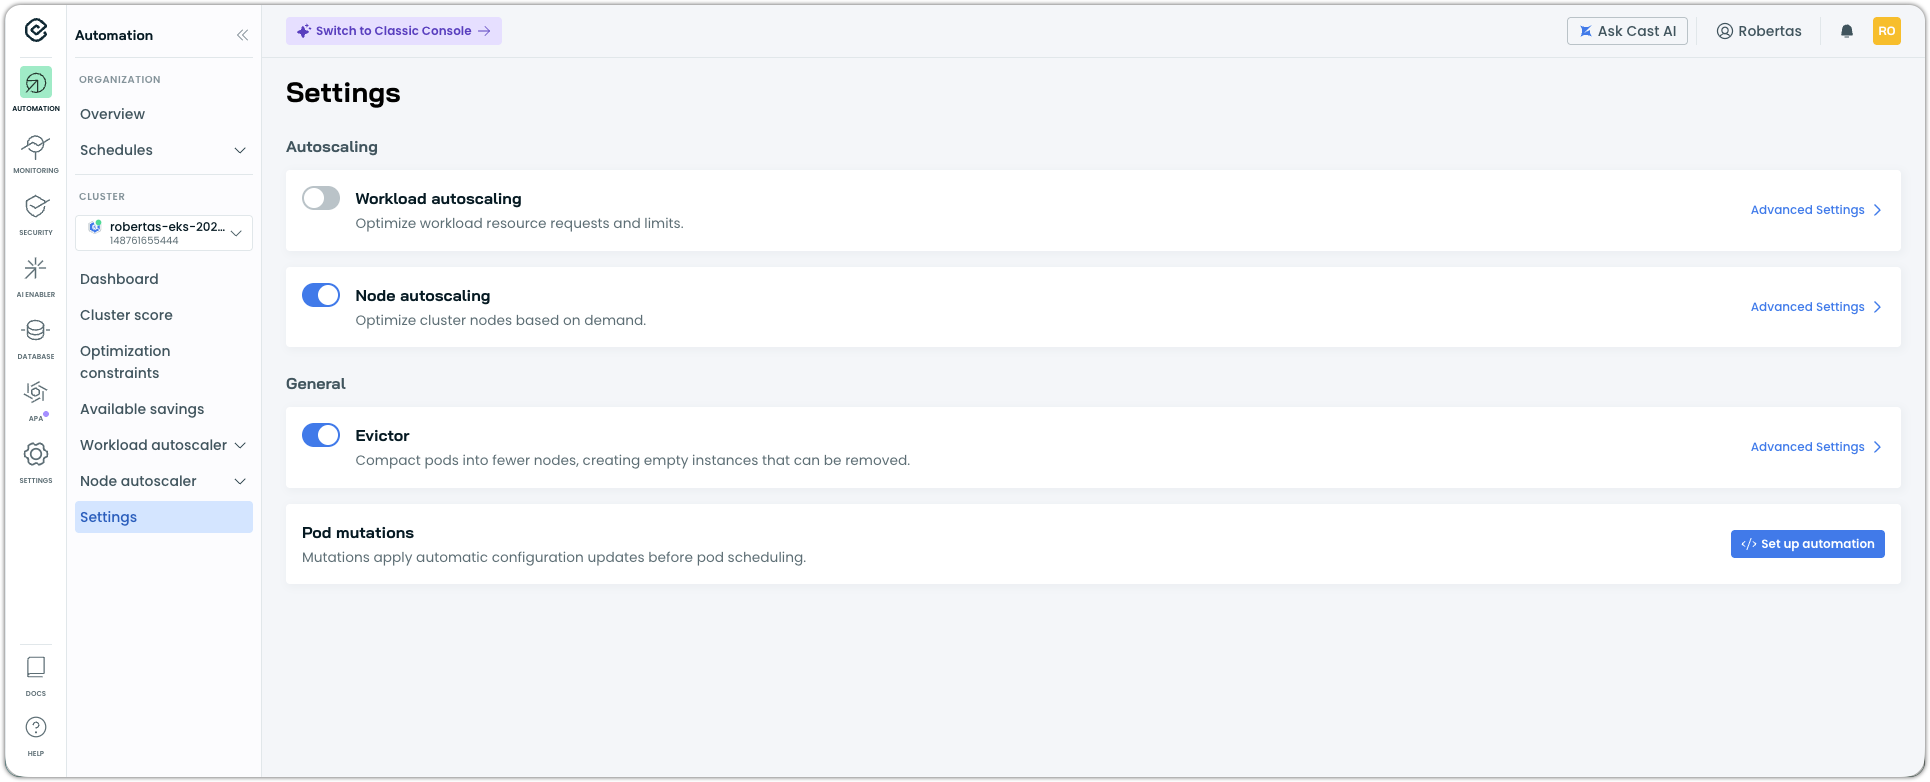
After installing the pod-mutator controller in your cluster, you'll have access to the pod mutations in your console:

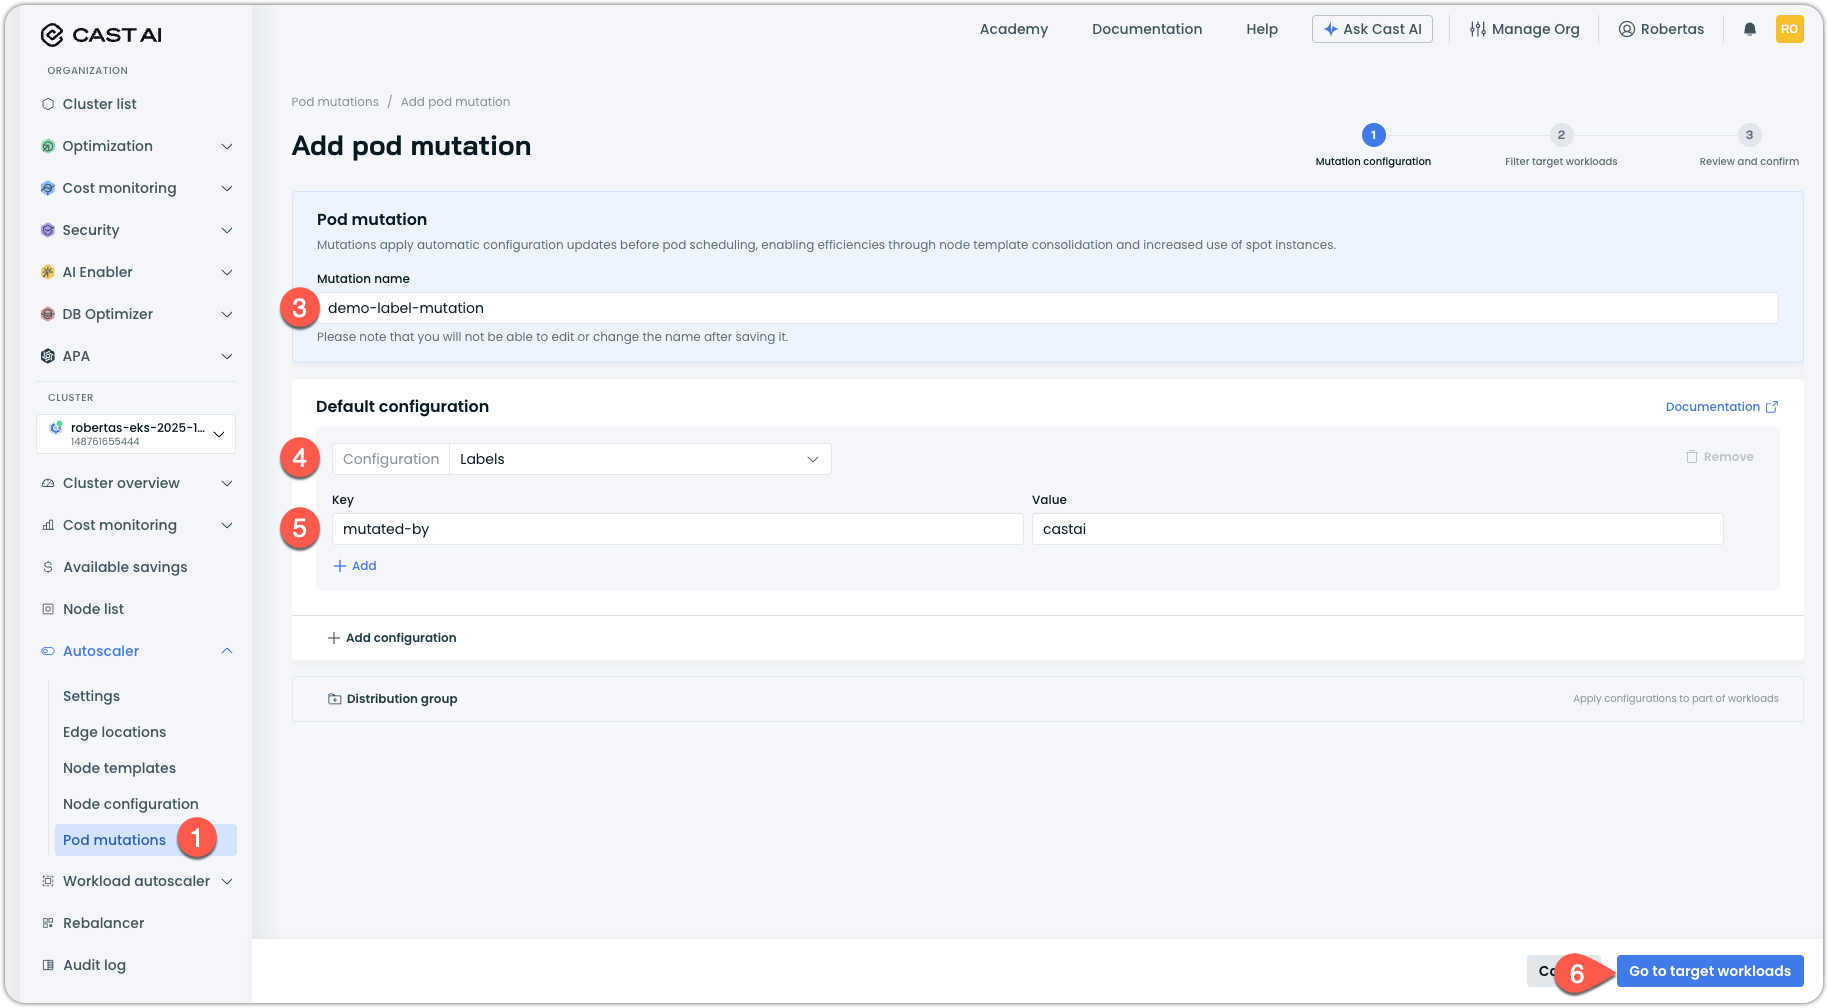
To create a new mutation template, simply click on Add template in the top-right, which will open the drawer in which you can define the configuration of your mutation.

  1. Begin by giving your mutation template a name:
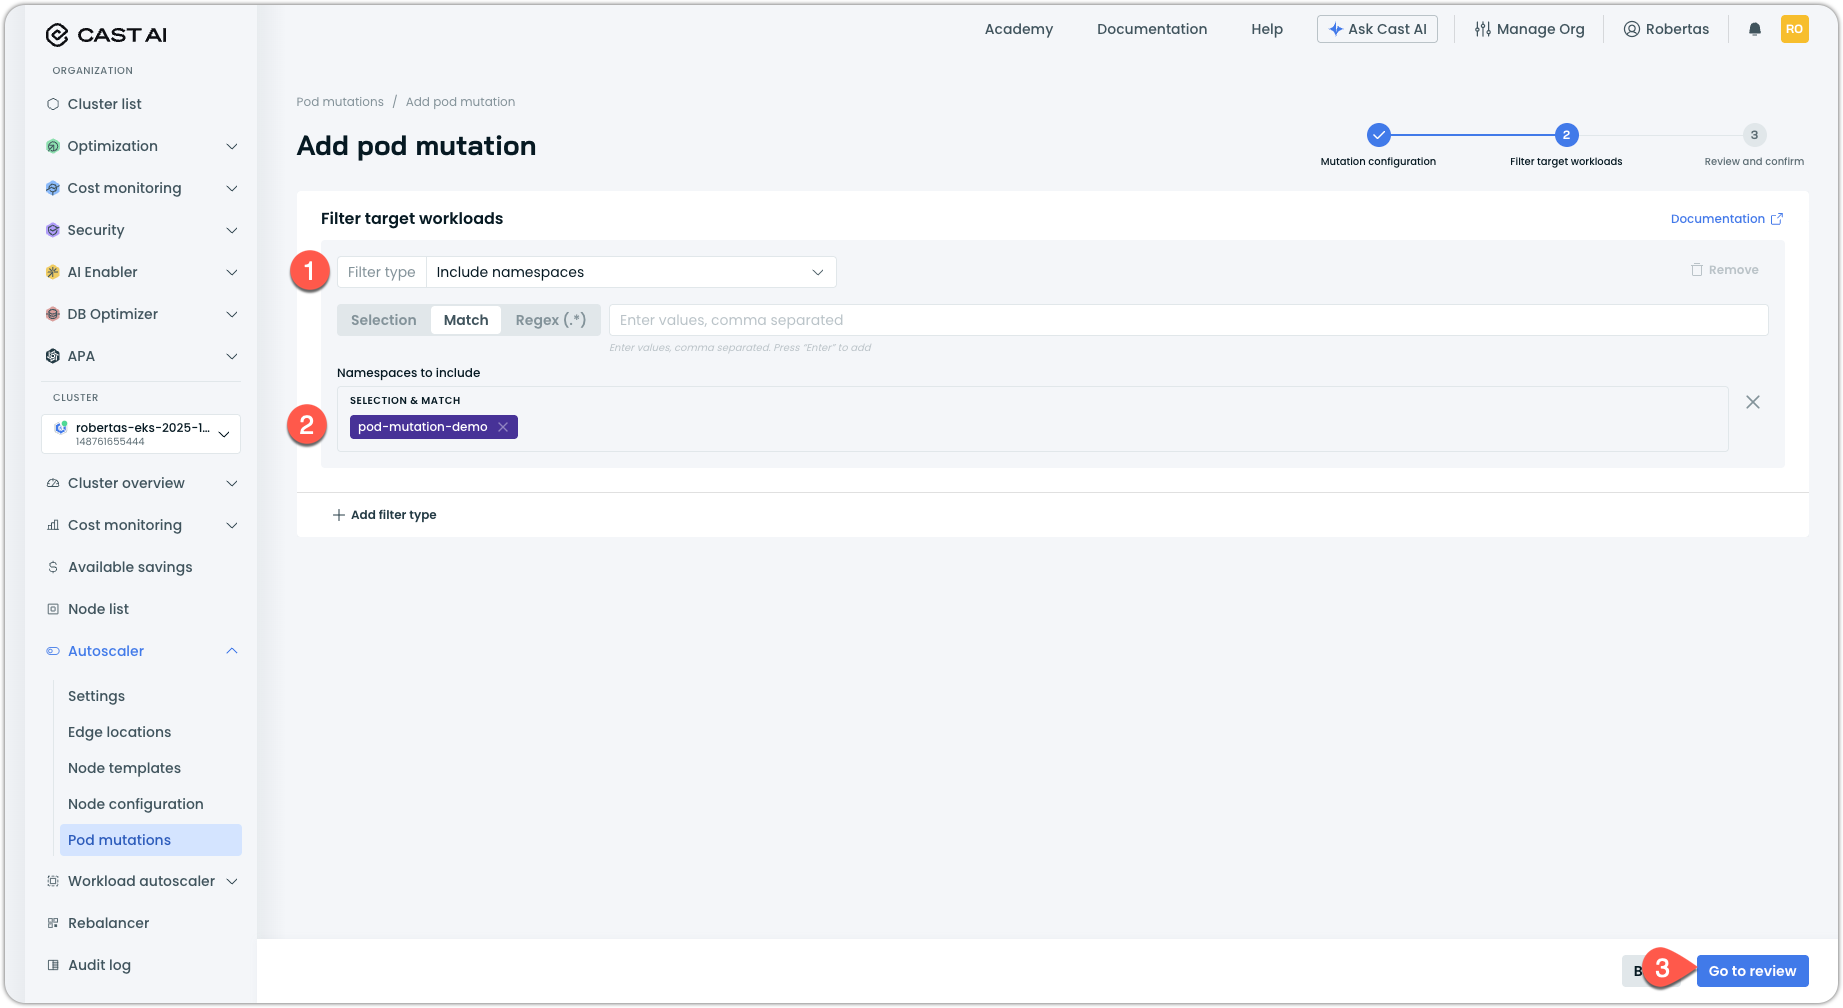
  1. Then, define the filters by which the mutation candidate pods ought to be discovered by the controller:
  1. Configure your desired mutation configuration:
  1. Finally, choose the Spot settings most appropriate for this template before hitting Create:

The console UI offers a helping hand when creating mutations by means of tooltips and a live preview of what your configuration will look like:

API example

Here's an example pod mutation API request that applies labels and tolerations to specific workloads:

{
  "objectFilter": {
    "names": [
      "app1",
      "app2"
    ],
    "namespaces": [
      "production"
    ]
  },
  "labels": {
    "environment": "production"
  },
  "spotType": "UNSPECIFIED_SPOT_TYPE",
  "name": "production-mutation",
  "organizationId": "fhytif73-f95f-44de-ad4b-f7898ce5ee42",
  "clusterId": "11111111-1111-1111-1111-111111111111",
  "enabled": true,
  "tolerations": [
    {
      "key": "scheduling.cast.ai/node-template",
      "operator": "Equal",
      "value": "production-template",
      "effect": "NoSchedule"
    }
  ]
}

Use the CreatePodMutation endpoint to experiment with your own pod mutations via API.

Terraform example

The castai-pod-mutator Helm chart installs a Kubernetes Custom Resource Definition (CRD) for the PodMutation kind. Pod mutation rules can then be added to a cluster as Kubernetes objects using Terraform or other Kubernetes management tools.

For the latest Terraform examples, see our GitHub repository.

📘

Note on UI sync

Pod mutations created as Custom Resources in Kubernetes using Terraform or other tools will sync to the Cast AI console with a slight delay (approximately 3 minutes). They will appear with a (Custom Resource in cluster) suffix in the name to indicate they are managed outside the console.

Important considerations:

  • These synced mutations cannot be edited through the Cast AI console – any attempt to edit will fail with an error
  • All modifications must be made through Terraform
  • Changes to the Custom Resource will be reflected in the UI after the sync delay

Here's an example Terraform configuration that creates a pod mutation:

# The castai-pod-mutator helm chart installs Kubernetes Custom Resource Definition (CRD) for the kind 'PodMutation'.
# Pod mutation rules can then be added to a cluster as plain Kubernetes object of this kind.
#
# You should use a name that is *not* shared by a mutation created via Cast AI console.
# In such cases, custom resource mutation will be shadowed by the mutation created via the console.
resource "kubernetes_manifest" "test_pod_mutation" {
  manifest = {
    apiVersion = "pod-mutations.cast.ai/v1"
    kind       = "PodMutation"
    metadata = {
      name = "test-pod-mutation"
    }
    spec = {
      filter = {
        # Filter values can be plain strings or regexes.
        workload = {
          namespaces = ["production", "staging"]
          names      = ["^frontend-.*$", "^backend-.*$"]
          kinds      = ["Pod", "Deployment", "ReplicaSet"]
        }
        pod = {
          # labelsOperator can be "and" or "or"
          labelsOperator = "and"
          labelsFilter = [
            {
              key   = "app.kubernetes.io/part-of"
              value = "platform"
            },
            {
              key   = "tier"
              value = "frontend"
            }
          ]
        }
      }
      restartPolicy = "deferred"
      patches = [
        {
          op    = "add"
          path  = "/metadata/annotations/mutated-by-pod-mutator"
          value = "true"
        }
      ]
      spotConfig = {
        # mode can be "preferred-spot", "optional-spot", or "only-spot"
        mode                   = "preferred-spot"
        distributionPercentage = 50
      }
    }
  }
}

Important considerations when using Terraform:

  1. Naming conflicts: Use unique names that don't conflict with mutations created via the Cast AI console
  2. Console visibility: Terraform-created mutations will appear in the Cast AI UI with a (Custom Resource in cluster) suffix after a 3-minute sync delay
  3. Read-only in UI: Console-synced Custom Resource mutations cannot be edited through the UI - all changes must be made via Terraform
  4. Management: Choose either Terraform or console management for each mutation to avoid conflicts

You can also manage pod mutations using other Kubernetes management tools like kubectl, Helm charts, or GitOps workflows by applying the same Custom Resource format.

Node Template consolidation

One powerful feature of pod mutations is the ability to consolidate multiple Node Templates. This helps reduce cluster fragmentation by allowing pods to schedule across multiple Node Template configurations.

When consolidating Node Templates:

  1. Specify the Node Templates to consolidate
  2. The controller converts individual node selectors and tolerations into node affinity rules
  3. Pods can then be scheduled on any node created by the specified templates

Example consolidation configuration:

{
  "objectFilter": {
    "namespaces": [
      "production"
    ]
  },
  "name": "production-mutation",
  "nodeTemplatesToConsolidate": [
    "template-1",
    "template-2"
  ]
}

Spot Instance configuration

🚧

Notice

If you are using the deprecated Spot-webhook, make sure to remove it before using pod mutations for Spot Instance configuration management. The two solutions are incompatible.

Pod mutations support three Spot Instance modes, and they can specify a percentage-based distribution between Spot and On-Demand instances.

Interaction with other admission controllers

Pod mutations can interact with other admission controllers in your cluster. If you're using Cast AI's pod-node-lifecycle feature alongside pod mutations, they may conflict when both try to manage Spot Instance scheduling. Symptoms include unwanted spot tolerations being added to pods or node selectors for Spot Instances appearing when not configured.

To resolve conflicts, either migrate to pod mutations for Spot Instance management and disable pod-node-lifecycle, or configure pod-node-lifecycle to ignore pods managed by mutations using label selectors.

Example pod-node-lifecycle exclusion:

ignorePods:
  - labelSelector:
      matchExpressions:
        - key: app.kubernetes.io/name
          operator: In
          values:
            - emissary-ext
            - castai-agent
            - castai-cluster-controller

Spot Distribution Percentage

When configuring Spot settings for your pod mutations, you can specify what percentage of pods should receive Spot-related configuration versus remaining on On-Demand instances.

  • A setting of 50% means that approximately half of your pods will receive the selected Spot configuration (optional, preferred, or use-only), while the other half will be scheduled on On-Demand instances
  • The higher the percentage, the more pods will receive Spot-related configurations
  • The lower the percentage, the more pods will remain on On-Demand instances

For example, with a 75% Spot distribution setting:

  • 75% of pods will be scheduled according to your chosen Spot behavior (optional, preferred, or use-only)
  • 25% of pods will be scheduled on On-Demand instances

The mutation controller makes this determination when pods are created, applying Spot-related mutations to the configured percentage of pods while leaving the remainder configured for On-Demand instances.

📘

Note on rapid scaling

When a deployment scales up instantaneously, for example, from 0 to 10 replicas at once, the pod mutator may not achieve the exact configured Spot/On-Demand distribution (e.g., 60/40) immediately. This happens because the controller must make placement decisions for each pod independently, without knowing the outcome of other pods being created at the same time. While the initial distribution might be skewed, the system is designed to self-correct and converge toward the configured ratio over time as pods are deleted, recreated, or scaled more gradually.

Spot Distribution Options

Combined with the distribution percentage, you can select one of three Spot behavior options:

ModeDescription
Spot Instances are optionalAllows scheduling on either Spot or On-Demand instances to fulfill the selected Spot percentage. If both are available, there is no preference between instance types.
Use only Spot InstancesStrictly maintains the selected Spot/On-Demand ratio. If Spot Instances are unavailable, deployment will fail for the Spot portion.
Spot Instances are preferredTargets the selected Spot percentage with Spot Instances but automatically falls back to On-Demand instances if Spot becomes unavailable. Will attempt to rebalance back to Spot when available.
📘

Note

The actual distribution may vary slightly from the configured percentage, especially with small pod counts or simultaneous pod creation. For very low replica counts, the system prioritizes maintaining the minimum On-Demand percentage. For example, with a single pod and any Spot distribution below 100%, the pod will be scheduled on On-Demand to ensure the minimum On-Demand percentage is maintained. The distribution may also drift over time as pods are deleted and recreated through the normal application lifecycle, but the system is designed to be self-healing, meaning it will attempt to restore the desired distribution whenever new pods are created.

Example Configuration

{
  "name": "production-spot-mutation",
  "organizationId": "org-12345",
  "clusterId": "cluster-67890",
  "enabled": true,
  "objectFilter": {
    "namespaces": [
      "production"
    ]
  },
  "spotType": "PREFERRED_SPOT",
  "spotDistributionPercentage": 75
}

This configuration creates a mutation that:

  1. Applies to all pods in the "production" namespace
  2. Sets 75% of pods to use Spot Instances with fallback to On-Demand if unavailable
  3. Keeps 25% of pods on On-Demand instances at all times

Combining percentage-based distribution with different Spot behavior options allows you to create deployment strategies that balance cost savings with application reliability requirements.

Advanced Configuration with JSON Patch

The Pod Mutations feature supports advanced configuration using JSON Patch, allowing for precise control over pod specifications beyond what's available through the standard UI options.

What is JSON Patch?

JSON Patch is a format for describing changes to a JSON document, defined in RFC 6902. In Kubernetes, it allows for complex modifications to pod specifications through a series of operations such as add, remove, replace, move, copy, and test.

For more information about JSON Patch operations, refer to Kubernetes documentation.

When to Use JSON Patch

Consider using JSON Patch when:

  • You need to modify parts of a pod specification not covered by the standard UI options
  • You want to perform multiple transformations in a specific order
  • You're implementing complex mutation logic that combines adding, removing, and modifying fields
  • You need to remove specific elements from arrays or nested structures

Configuring JSON Patch

To configure a JSON Patch:

  1. In the pod mutation configuration, expand the "JSON Patch (advanced)" section:

  2. Enter your JSON Patch operations in the drawer editor

  3. Review the patch for errors before applying

🚧

Warning

JSON Patch operations take precedence over UI-defined settings. If there's a conflict between your patch operations and UI configurations, the patch operations will be applied.

JSON Patch Structure

A JSON Patch consists of an array of operations, where each operation is an object with the following properties:

  • op: The operation to perform (add, remove, replace, move, copy, or test)
  • path: A JSON pointer to the location in the document where the operation is performed
  • value: The value to use for the operation (for add and replace)
  • from: A JSON pointer for the move and copy operations

Common Examples

Add Node Selector

When you need to ensure pods are scheduled on specific nodes with certain characteristics, adding a node selector is the way to go:

[
  {
    "op": "add",
    "path": "/spec/nodeSelector",
    "value": {
      "scheduling.cast.ai/node-template": "high-performance"
    }
  }
]

This patch adds a node selector that directs pods to nodes using the "high-performance" node template, which might be optimized for CPU-intensive workloads.

🚧

Warning

This patch will replace any existing nodeSelector entirely. If you want to preserve existing nodeSelectors, use the method below.

Add a Single Node Selector Key-Value

To add a single nodeSelector key-value pair while preserving existing ones:

[
  {
    "op": "add",
    "path": "/spec/nodeSelector/scheduling.cast.ai~1node-template",
    "value": "high-performance"
  }
]

Note the special syntax with the tilde character (~1), which is used to escape the forward slash in the key name. However, this patch will fail if the nodeSelector object doesn't already exist in the pod specification.

Replace Toleration Effect

If you need to modify how pods tolerate node taints, you can replace specific fields within existing tolerations:

[
  {
    "op": "replace",
    "path": "/spec/tolerations/0/effect",
    "value": "NoSchedule"
  }
]

This patch changes the effect of the first toleration to "NoSchedule", ensuring pods won't be scheduled on nodes with matching taints rather than potentially being evicted later.

Remove a Specific Array Element

Sometimes, you need to remove specific configuration elements that are no longer needed or might conflict with your intended setup:

[
  {
    "op": "remove",
    "path": "/spec/tolerations/2"
  }
]

This patch removes the third(0, 1, 2, [...]) toleration in the tolerations array, which might be necessary when transitioning workloads between different node types or environments.

Remove by Key

When you need to remove a specific key from a map or object:

[
  {
    "op": "remove",
    "path": "/spec/nodeSelector/environment"
  }
]

This patch removes the "environment" key from nodeSelector while preserving other nodeSelector entries.

Remove a Specific Value from an Array

For more complex scenarios where you need to target array elements based on their content rather than position:

[
  {
    "op": "test",
    "path": "/spec/tolerations/0/key",
    "value": "node-role.kubernetes.io/control-plane"
  },
  {
    "op": "remove",
    "path": "/spec/tolerations/0"
  }
]

This two-step patch first verifies that the first toleration matches a specific control plane role, then removes it if the test passes.

Complex Example: Replace Node Affinity and Add Toleration

For comprehensive pod scheduling adjustments that require multiple coordinated changes:

[
  {
    "op": "remove",
    "path": "/spec/affinity"
  },
  {
    "op": "add",
    "path": "/spec/nodeSelector",
    "value": {
      "scheduling.cast.ai/node-template": "custom-template"
    }
  },
  {
    "op": "add",
    "path": "/spec/tolerations/-",
    "value": {
      "key": "scheduling.cast.ai/node-template",
      "operator": "Equal",
      "value": "custom-template",
      "effect": "NoSchedule"
    }
  }
]

This multi-operation patch completely reconfigures pod scheduling by removing any existing node affinity rules, setting a node selector for a custom template, and adding a matching toleration.

Example replacing values for the native Azure key: agentpool

The operation below uses the move and replace operators to modify Pod scheduling key values from the system nodepool in Azure to CAST nodeTemplate. In this example, the key is changed from agentpool to dedicated. The new NodeTemplate in CAST requires this label to schedule pods correctly.

[
  {
    "op": "move",
    "from": "/metadata/labels/agentpool",
    "path": "/metadata/labels/dedicated"
  },
  {
    "op": "move",
    "from": "/spec/nodeSelector/agentpool",
    "path": "/spec/nodeSelector/dedicated"
  },
  {
    "op": "replace",
    "path": "/spec/tolerations/[key=agentpool]/key",
    "value": "dedicated"
  },
  {
    "op": "replace",
    "path": "/spec/affinity/nodeAffinity/requiredDuringSchedulingIgnoredDuringExecution/nodeSelectorTerms/*/matchExpressions/[key=agentpool]/key",
    "value": "dedicated"
  },
  {
    "op": "replace",
    "path": "/spec/affinity/nodeAffinity/preferredDuringSchedulingIgnoredDuringExecution/*/preference/matchExpressions/[key=agentpool]/key",
    "value": "dedicated"
  }
]

This multi-operation will avoid pod scheduling into system nodePool in Azure.

JSON Patch Limitations

  • JSON Patch operations apply to the pod template, not directly to the running pods
  • Some Kubernetes fields are immutable and cannot be changed after creation
  • Patches that would result in invalid pod specifications will be rejected

Limitations

  • Mutations only apply to newly created pods. Similarly, mutation changes don't affect existing pods until they are recreated.
  • Only one mutation can be applied to a pod. When multiple mutations have matching filters for a pod, Cast AI selects the mutation with the most specific filter (for example, a filter on pod name is more specific than a filter on namespace). We recommend using mutually exclusive filters rather than relying on this specificity ranking.
  • Some pod configurations cannot be modified. Refer to the information above on what can be modified. Anything that is not mentioned is beyond the scope of pod mutations now.
  • Scaling policies are evaluated every 30 seconds. As a result, changes to resource requests or limits may not be applied immediately.

Troubleshooting

Verify controller status

Check if the pod-mutator controller is running:

kubectl get pods -n castai-agent -l app=pod-mutator

Check controller logs

View logs for mutation activity:

kubectl logs -n castai-agent -l app=pod-mutator

Common issues

  1. Mutations not applying: Verify the object filters match your pods, and the controller is running

  2. Configuration conflicts: Check for conflicting mutations targeting the same pods

  3. Invalid mutations: Ensure mutation specifications follow the correct format

  4. Mutations not applying correctly with multiple webhooks: If you have multiple admission webhooks in your cluster that modify pods, you may need to set webhook.reinvocationPolicy="IfNeeded" during installation to ensure the pod mutator can properly apply its mutations after other webhooks make changes. Check the pod mutator logs for any signs of mutation conflicts or ordering issues.

  5. Mutations not applying to Deployments: Verify labels are placed at spec.template.metadata.labels, not at the Deployment level

  6. Unexpected Spot Instance scheduling: Check for conflicts with pod-node-lifecycle or other admission controllers

  7. Labels not working for targeting: Confirm you're using labels, not annotations, for pod selection

For additional help, contact Cast AI support or visit our community Slack channel.