
Evictor
Learn how to enable and configure Cast AI's Evictor, a bin-packing component that continuously compacts pods into fewer nodes for cost savings.
Evictor continuously compacts pods into fewer nodes, creating empty nodes that can be removed following the Node deletion policy. This mechanism is called "bin-packing."
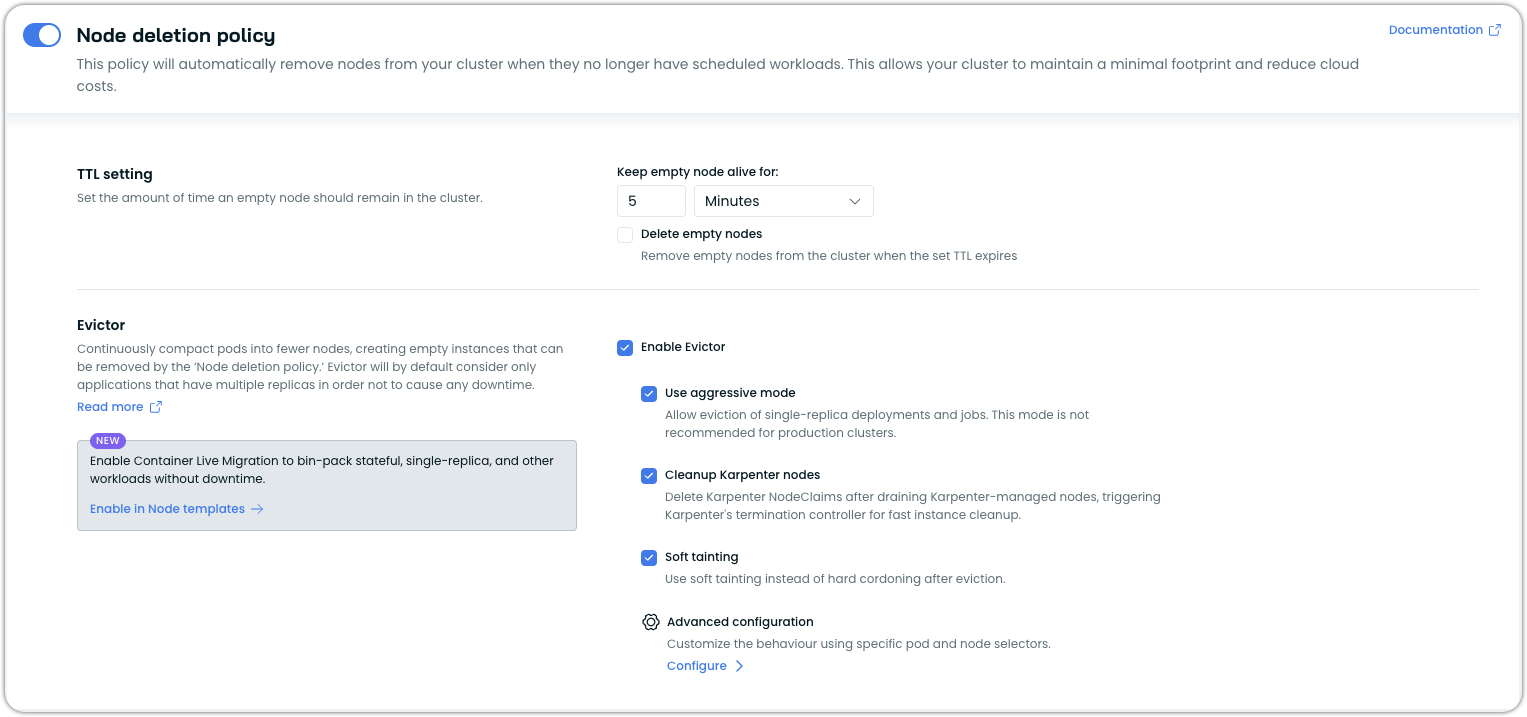
To prevent downtime, Evictor will only target applications with multiple replicas. However, you can override this by enabling the aggressive mode. When activated, Evictor will also consider applications with only a single replica. It is important to note that this mode is not advised for use in production clusters.
Before enabling Evictor in productionEvictor works by evicting pods and removing nodes. Workloads that do not follow Kubernetes best practices may experience unexpected downtime when Evictor is active. Before enabling Evictor on a production cluster, review the following:
- PodDisruptionBudgets (PDBs) must be configured for all critical workloads. Without a PDB, Evictor may evict all pods of a deployment simultaneously. See PodDisruptionBudgets in the Kubernetes documentation.
imagePullPolicy: Alwaysintroduces scheduling delays during pod restarts on new nodes. UsingIfNotPresentis recommended unless you have a specific reason to always pull.- Startup probes are a best practice for services with slow initialization (e.g. JVM-based applications). Without them, Kubernetes may route traffic to a pod before it is ready following a reschedule.
- Stateful workloads (databases, caches, message queues) should be reviewed individually. Ensure data replication is in place and that the workload can tolerate pod restarts before enabling Evictor.
We recommend enabling and validating Evictor in a non-production environment before rolling it out to production clusters.
How does Evictor work?
Evictor automatically follows the sequence of steps below:
- First, it identifies underutilized nodes as candidates for eviction.
- Then it automatically moves pods to other nodes using the most appropriate method available. For eligible workloads, Evictor will attempt Container Live Migration for zero-downtime optimization. For non-eligible workloads, it uses traditional pod eviction. Learn more about the bin-packing mechanism here.
- Once the node is empty after draining, it gets deleted immediately from the cluster via the Node deletion policy (which should be enabled). Node TTL settings do not apply to Evictor-managed node removals.
- Evictor returns to the first step, constantly looking for nodes that are good candidates for eviction.
NoteEvictor does not use percentage-based utilization thresholds. Instead, it considers the overall cluster capacity and workload distribution when making eviction decisions. This means that even a node with high utilization might be evicted if its workloads can be efficiently redistributed across other nodes with sufficient capacity.
Container Live Migration integration
Evictor seamlessly integrates with Cast AI's Container Live Migration feature to enable zero-downtime workload optimization. When both features are enabled, Evictor automatically uses the most appropriate method for moving workloads:
Migration decision logic
When Evictor identifies bin-packing opportunities, it follows this decision process:
- Check live migration eligibility: Evictor first checks if workloads have the
live.cast.ai/migration-enabled=truelabel - Attempt live migration: For eligible workloads, Evictor initiates live migration to preserve runtime state and network connections
- Fallback to eviction: If live migration fails for any reason, Evictor falls back to traditional pod eviction and still completes its bin-packing operation
- Preserve critical workloads: Workloads with
autoscaling.cast.ai/removal-disabledlabels are recovered on the original node if migration fails
Workload label matrix
Evictor respects multiple labels that control migration and eviction behavior:
| live.cast.ai/migration-enabled | autoscaling.cast.ai/removal-disabled | autoscaling.cast.ai/live-migration-disabled | Evictor action |
|---|---|---|---|
true | true | false (or missing) | Live migrate the workload, but do not fallback to traditional eviction if it fails; restore the pod on the source node instead |
true | true | true | Do nothing (workload protected) |
true | false (or missing) | true | Evict the pod using traditional eviction |
true | false (or missing) | false (or missing) | Live migrate the workload, if it fails, fallback to traditional eviction |
false | true | (ignored) | Do nothing (workload protected) |
false | false | (ignored) | Evict the pod using traditional eviction |
true (StatefulSet) | false (or missing) | false (or missing) | Live migrate the workload. If migration fails and no disposable flag is set, do NOT fallback to eviction; keep pod on source node |
Label descriptions:
live.cast.ai/migration-enabled=true: Automatically applied by the live controller to eligible workloadsautoscaling.cast.ai/removal-disabled=true: Prevents eviction and ensures recovery on the original node if migration failsautoscaling.cast.ai/live-migration-disabled=true: Forces traditional eviction instead of attempting live migration- For StatefulSets with Container Live Migration enabled: Migration is attempted automatically for eligible workloads. If migration fails and no
disposableflag is set, pods remain on the source node without fallback to eviction.
Enabling Container Live Migration with Evictor
Container Live Migration is enabled through node template configuration and requires compatible infrastructure. See the Container Live Migration getting started guide for complete setup instructions.
For existing clusters with Evictor already installed: You'll need to update the Evictor configuration to enable live migration support:
Configuration-only changesThis command upgrades all components in the umbrella chart, not just Evictor. To change configuration without upgrading component versions, pin the chart to your current version by adding
--version <your-current-chart-version>to the command. Runhelm list -n castai-agentto check your current version.
helm upgrade castai castai-helm/castai -n castai-agent \
  --reset-then-reuse-values \
  --set autoscaler.castai-evictor.liveMigration.enabled=true
For newly connected clusters: Evictor will automatically include live migration support when installed as part of the cluster onboarding process if Container Live Migration is enabled in your node templates.
Evictor operating modes
Evictor operates in three distinct modes, each providing different levels of optimization and cluster targeting:
Default mode
Default mode targets every eviction-friendly pod and node in the cluster, whether the nodes were provisioned by Cast AI or not. This mode adheres to conservative rules to minimize downtime and only considers pods that meet specific safety criteria.
When Container Live Migration is enabled, default mode will attempt to live-migrate multi-replica workloads and use traditional eviction for single-replica applications.
Aggressive mode
Aggressive mode targets every eligible pod and node in the cluster, regardless of replica count. This includes:
- Single replica pods
- Jobs
This mode may occasionally cause minor interruptions to applications.
It does not target:
- Pods with PVCs
- Bare pods
- StatefulSets
When Container Live Migration is enabled, aggressive mode attempts to live-migrate all eligible workloads, including single-replica deployments. This maximizes cost optimization opportunities while minimizing downtime through live migration.
Aggressive ModeIn more fault-tolerant systems, you can achieve even higher waste reduction by turning the aggressive mode on. In this scenario, Evictor will bin-pack not only multi-replica applications but single-replica ones as well.
Note: If you have a
jobpod running on a node to be evicted, that job will get interrupted unless it's eligible for live migration.Note: The
removal-disabledannotation only protects running Job pods. Once a Job pod enters a terminal phase (Succeeded, Failed, or Completed), the annotation no longer prevents node eviction. To reliably protect nodes hosting Jobs, apply the annotation or label to the node itself, or use Advanced Configuration with appropriate selectors.Note: Aggressive mode does not affect how
StatefulSetsare handled, meaning Evictor follows the default behavior.
Scoped mode
Scoped mode restricts Evictor to target only Cast AI-created nodes in the cluster, providing granular control over which infrastructure components can be optimized.
When to use scoped mode
Scoped mode is useful in scenarios where:
- You want to maintain existing node groups while optimizing only the Cast-managed infrastructure
- You're gradually migrating from traditional node groups to Cast node templates
- You need to ensure certain workloads remain on specific, non-Cast-managed nodes
How scoped mode works
In scoped mode, Evictor will only consider nodes for eviction that have the label:
provisioner.cast.ai/managed-by=cast.aiThis ensures that:
- Only nodes created and managed by Cast AI are subject to bin-packing optimization
- Existing node groups and manually managed nodes remain untouched
- You maintain full control over which parts of your infrastructure are optimized
Enabling scoped mode
Scoped mode can only be enabled through Helm parameters and is not available through the Cast AI console interface.
To configure Evictor to run in scoped mode, add the scopedMode=true parameter to the Helm installation command:
helm upgrade castai castai-helm/castai -n castai-agent \
  --reset-then-reuse-values \
  --set autoscaler.castai-evictor.dryRun=false \
  --set autoscaler.castai-evictor.scopedMode=true
Existing Evictor installations will be upgraded to run in scoped mode after running the command as well.
Node identification in scoped mode
You can identify which nodes will be targeted by scoped mode by checking for the Cast AI management label:
kubectl get nodes -l provisioner.cast.ai/managed-by=cast.aiNodes without this label will be excluded from Evictor's optimization process when running in scoped mode.
Post-eviction options
After draining a node, Evictor can be configured to handle the resulting empty node in different ways.
Soft tainting
Requires Evictor Helm chart version castai-evictor-0.33.193 or later.
Check your current Evictor Helm chart version
helm ls -n castai-agentBy default, Evictor uses a hard cordon flow: after draining a node, the node remains cordoned and fully blocked from receiving new pods until it is deleted. Soft tainting changes this completion behavior.
When soft tainting is enabled, Evictor completes the drain phase identically to the default flow, but instead of leaving the node cordoned, it:
- Removes the
NoScheduletaint - Uncordons the node
- Applies a
PreferNoScheduletaint (evictor.cast.ai/evicted) and sets aneviction-status=doneannotation - Signals the Cast AI Autoscaler to delete the node
The PreferNoSchedule taint is a hint to the Kubernetes scheduler to avoid the node, but not a hard block. The node remains available as a safety net: if the Cast AI Autoscaler has not yet deleted it and the cluster suddenly needs capacity, workloads can still schedule onto it.
If new pods land on the node before it is deleted, Evictor detects this on its next cycle, removes the soft taint and annotation, and returns the node to normal operation.
When to use soft tainting
Soft tainting is most useful in clusters where Evictor operates alongside a third-party autoscaler such as Cluster Autoscaler, where node deletion after eviction can be delayed. In the default hard cordon flow, a drained node is completely unavailable to new scheduling even while it waits to be removed — which can cause the autoscaler to provision additional capacity unnecessarily. Soft tainting allows the node to absorb new workloads in the interim, reducing unnecessary scale-out.
To enable soft tainting:
helm upgrade castai castai-helm/castai -n castai-agent \
  --reset-then-reuse-values \
  --set autoscaler.castai-evictor.dryRun=false \
  --set autoscaler.castai-evictor.softTainting.enabled=true
Clean up Karpenter nodes
Requires Evictor Helm chart version castai-evictor-0.33.196 or later.
Check your current Evictor Helm chart version
helm ls -n castai-agentThis option applies to clusters running Evictor alongside open-source Karpenter without Cast AI for Karpenter. When enabled, Evictor deletes the NodeClaim object after draining a Karpenter-managed node, which triggers Karpenter's own termination controller and results in faster instance cleanup at the cloud provider level.
Without this option, Karpenter relies on its regular reconciliation loop to detect and remove drained nodes, which can introduce delays. Enabling Karpenter node cleanup bypasses that wait.
NoteIf you are using Cast AI for Karpenter, node deletion is handled by Karpenter through the Kentroller component and does not require this option.
To enable Karpenter node cleanup:
helm upgrade castai castai-helm/castai -n castai-agent \
  --reset-then-reuse-values \
  --set autoscaler.castai-evictor.dryRun=false \
  --set autoscaler.castai-evictor.karpenterNodeCleanup.enabled=true
How Evictor avoids downtime
Evictor follows certain rules to avoid downtime. For the node to be considered a candidate for possible removal due to bin-packing, all of the Pods running on the node must meet the following criteria:
- A Pod must be replicated: it should be managed by a
Controller(e.g.ReplicaSet,ReplicationController,Deployment) that has more than one replica (see Overrides). - A Pod that is not part of a
StatefulSetunless: (a) marked or targeted as disposable via label/annotation/Advanced Configuration, or (b) when Container Live Migration is enabled and the pod meets Container Live Migration eligibility criteria. - A pod must not be marked as non-evictable (see Overrides).
- All static Pods (YAMLs defined in the node's
/etc/kubernetes/manifestsby default) are considered evictable. DaemonSetPods are not evicted by Evictor. WhileDaemonSetPods may appear in Evictor logs during the eviction planning phase, they are skipped during actual eviction. DaemonSet Pods use node affinity tied to specific nodes, so evicting them would not result in rescheduling. These Pods are cleaned up automatically by Kubernetes as part of the node deletion process.- Configure PodDisruptionBudgets (PDBs) for all critical workloads. Evictor always respects PDBs — this protection remains in place regardless of other settings, such as disposable Pods or aggressive mode. Without a PDB, there is no guarantee that at least one replica of a multi-replica workload will remain available during bin-packing. A PDB with
minAvailable: 1(or an equivalentmaxUnavailablesetting) is the minimum recommended configuration for production workloads.
Override Evictor rules for pods and nodes
| Annotation/Label | Target | Type | Description |
|---|---|---|---|
autoscaling.cast.ai/removal-disabled="true" | Node Pod | Annotation / Label | Evictor won't try to evict a node with this annotation/label or a node running a pod annotated/labeled with this value. |
autoscaling.cast.ai/disposable="true" | Pod | Annotation / Label | Evictor will treat the Pod as evictable despite any of the other rules. With Container Live Migration enabled on StatefulSets, this flag enables fallback-to-eviction behavior if migration fails. |
autoscaling.cast.ai/live-migration-disabled="true" | Pod | Annotation / Label | Forces traditional eviction instead of attempting live migration for eligible workloads |
cluster-autoscaler.kubernetes.io/safe-to-evict="false" | Pod | Annotation | Evictor won't try to evict a pod annotated with this value. |
cluster-autoscaler.kubernetes.io/safe-to-evict="true" | Pod | Annotation | Evictor will treat the Pod as evictable despite any of the other rules |
beta.evictor.cast.ai/disposable="true" (deprecated) | Pod | Annotation | Evictor will treat this Pod as Evictable despite any of the other rules. |
beta.evictor.cast.ai/eviction-disabled="true" (deprecated) | Node Pod | Annotation / Label | Evictor won't try to evict a node with this annotation or a node running a pod annotated with this value. |
Pod phase requirements for annotations
Protection annotations such as autoscaling.cast.ai/removal-disabled only apply to pods that are currently running. Once a pod enters a terminal phase (Succeeded, Failed, or Completed), Evictor no longer considers its annotations when evaluating whether a node can be evicted.
This behavior is particularly relevant for Jobs and CronJobs. If a Job pod completes while Evictor is evaluating node candidates, the pod's annotation no longer protects the node from eviction. To protect nodes hosting Job workloads throughout their full lifecycle, use one of these approaches:
Option 1: Apply the annotation to the node
kubectl annotate nodes <node-name> autoscaling.cast.ai/removal-disabled="true"Node-level annotations remain in effect regardless of pod phase.
Option 2: Use Advanced Configuration to target nodes by label
evictionConfig:
  - nodeSelector:
      labelSelector:
        matchLabels:
          node-type: workflow-runner
    settings:
      removalDisabled:
        enabled: true
This approach protects all matching nodes, independent of the state of any individual pod.
Examples of override commands
Annotate a pod so Evictor won't evict a node running an annotated pod (this can also be applied to a node).
kubectl annotate pods <pod-name> autoscaling.cast.ai/removal-disabled="true"Label or annotate a node to prevent the eviction of pods as well as the removal of the node (even when it's empty):
kubectl label nodes <node-name> autoscaling.cast.ai/removal-disabled="true"kubectl annotate nodes <node-name> autoscaling.cast.ai/removal-disabled="true"Force traditional eviction instead of live migration for specific workloads:
kubectl annotate pods <pod-name> autoscaling.cast.ai/live-migration-disabled="true"You can also annotate a pod to make it disposable, irrespective of other criteria that generally make it unevictable. Here is an example of a disposable pod manifest:
kind: Pod
metadata:
  name: disposable-pod
  annotations:
    autoscaling.cast.ai/disposable: "true"
spec:
  containers:
    - name: nginx
      image: nginx:1.14.2
      ports:
        - containerPort: 80
      resources:
        requests:
          cpu: '1'
        limits:
          cpu: '1'
Due to the applied annotation, the pod will be targeted for eviction even though it has not been replicated.
Eviction of StatefulSet pods
The support for eviction of StatefulSet pods was added in 0.26.3 Helm release and requires Helm release update due to RBAC changes (adding additional read permissions for PersistentVolume, PersistentVolumeClaim and StorageClass).
StatefulSet behavior without Container Live Migration
Evictor excludes StatefulSet pods from eviction by default. However, StatefulSet pods have to be explicitly marked or targeted as disposable so that Evictor can consider them for eviction. The eviction of StatefulSet pods can be disruptive to the application and should be used cautiously. The StatefulSet pods should have Kubernetes probes that reflect the application state and a PodDisruptionBudget configured to minimize the impact of evictions.
StatefulSet behavior with Container Live Migration enabled
NoteThis behavior requires Evictor Helm chart version
0.33.158or later.
When Container Live Migration is enabled in your cluster, StatefulSet pod handling changes significantly:
Automatic migration eligibility: StatefulSet pods that meet Container Live Migration eligibility criteria are automatically considered for live migration without requiring the disposable flag. The live controller will label eligible StatefulSet pods with live.cast.ai/migration-enabled=true.
Migration failure behavior: If live migration fails for a StatefulSet pod:
- Without disposable flag: The pod remains on the source node. Evictor will NOT fallback to traditional eviction. The source node stays active.
- With disposable flag set: Evictor falls back to traditional pod eviction. Note that pods marked as disposable will always be evicted (whether migration is attempted and fails, or if Container Live Migration is not enabled).
Key implications:
- StatefulSet pods with Container Live Migration eligibility are automatically protected from disruptive evictions when migration fails
- The
disposableflag is no longer required for StatefulSets to be considered for optimization when Container Live Migration is enabled - Setting
disposable="true"explicitly opts into the fallback-to-eviction behavior
Best PracticeWith Container Live Migration enabled, you no longer need to mark StatefulSet pods as disposable for them to be optimized. The system will automatically attempt migration for eligible workloads while protecting them from disruptive evictions if migration fails. Only use the
disposableflag if you explicitly want fallback-to-eviction behavior.
Marking StatefulSet pods for eviction (legacy behavior)
For clusters without Container Live Migration or when you want to force eviction behavior, StatefulSet pods can be marked or targeted for eviction by:
-
Labeling or annotating the pod using:
autoscaling.cast.ai/disposable="true"Note: Pods marked as disposable will always be evicted. With Container Live Migration enabled, migration is attempted first; if it fails, the pod is evicted. Without Container Live Migration, the pod is evicted directly.
-
Targeting all StatefulSet pods using a pod selector in the Advanced Configuration:
evictionConfig: - podSelector: kind: StatefulSet settings: disposable: enabled: true -
Targeting replicated StatefulSet pods using a pod selector in the Advanced Configuration:
evictionConfig: - podSelector: kind: StatefulSet replicasMin: 2 settings: disposable: enabled: true -
Targeting labeled StatefulSet pods using a pod selector in the Advanced Configuration:
evictionConfig: - podSelector: kind: StatefulSet labelSelector: matchLabels: app.kubernetes.io/name: database settings: disposable: enabled: true -
Targeting all pods (including StatefulSet pods) running on a targeted node using a node selector in the Advanced Configuration:
evictionConfig:
  - nodeSelector:
      labelSelector:
        matchLabels:
          app.kubernetes.io/name: castai-node
    settings:
      disposable:
        enabled: true
ImportantWhen using Advanced Configuration to set
disposable: enabled: truefor StatefulSets, these pods will always be evicted. In a Container Live Migration-enabled cluster, migration is attempted first, but if it fails the pod is evicted. Without Container Live Migration, the pod is evicted directly.
Configuration
A list of configuration settings can be found at: helm-charts/castai-evictor
Resource management for large clusters
Evictor's memory requirements grow with the number of nodes it manages. On small clusters the default resource allocation is sufficient, but on clusters with hundreds of nodes the evictor pod can exhaust its memory limit during large drain cycles and get OOMKilled. Cast AI addresses this through a dedicated CPVPA instance that automatically adjusts evictor resources as the cluster scales.
How CPVPA scales evictor memory
A Cluster Proportional Vertical Pod Autoscaler (castai-evictor-cpvpa) runs alongside the evictor and adjusts its memory requests and limits based on the current number of nodes. The scaling formula is stored in the castai-evictor-autoscaler ConfigMap in the castai-agent namespace:
kubectl get configmap castai-evictor-autoscaler -n castai-agent -o yamlThe ConfigMap data looks like this (showing Helm chart defaults):
{
  "castai-evictor": {
    "requests": {
      "memory": {
        "base": "200Mi",
        "max": "24Gi",
        "step": "256Mi",
        "nodesPerStep": 20
      }
    },
    "limits": {
      "memory": {
        "base": "2Gi",
        "max": "24Gi",
        "step": "256Mi",
        "nodesPerStep": 20
      }
    }
  }
}
Field reference:
| Field | Description |
|---|---|
base | Minimum memory value, applied when the cluster has few or no nodes |
max | Hard ceiling — CPVPA will not set memory above this value |
step | Amount of memory added per nodesPerStep nodes |
nodesPerStep | Number of nodes per memory increment |
How the formula works: memory = round_up(nodeCount / nodesPerStep) × step, floored at base and capped at max.
For example, with the defaults (step: 256Mi, nodesPerStep: 20) and 150 nodes: round_up(150/20) × 256Mi = 8 × 256Mi = 2048Mi ≈ 2Gi requests. If step is too large relative to nodesPerStep, the result can exceed max on large clusters and CPVPA caps immediately, skipping the gradual scaling entirely.
NoteCPVPA polls every 5 minutes. Changes to the ConfigMap are picked up automatically — no evictor restart is needed.
Tuning CPVPA for your cluster size
The Helm chart defaults (step: 256Mi, nodesPerStep: 20, max: 24Gi) work well for clusters up to a few hundred nodes. At 500+ nodes, the step size becomes too coarse — the formula can jump to max in a single increment, eliminating gradual scaling.
| Cluster size | requests.step | requests.nodesPerStep | Change needed? |
|---|---|---|---|
| < 500 nodes | 256Mi | 20 | No — use Helm defaults |
| 500+ nodes | 128Mi | 10 | Yes — reduce step to track growth gradually |
For the limits section, use the same step and nodesPerStep values as requests. The base and max fields do not usually need adjustment.
To apply changes:
kubectl edit configmap castai-evictor-autoscaler -n castai-agentEdit the JSON values in the evictor-autoscaler key and save. CPVPA will apply the new values within the next poll cycle (up to 5 minutes).
CPVPA update behavior
Each time CPVPA recalculates a new memory value, it updates the evictor Deployment spec. Kubernetes treats any spec change as a rolling update trigger: the current evictor pod is terminated and a new one is created. On a cluster where node count fluctuates frequently, this can cause repeated pod replacements that look like crashes in kubectl get pods output but are actually controlled rollouts.
To confirm CPVPA is the source: run kubectl describe deployment castai-evictor -n castai-agent and look for ScalingReplicaSet events in the Events section. If they appear on a ~5-minute cadence, CPVPA recalculations are triggering the rollouts.
If repeated rollouts are disruptive after the cluster has stabilized, temporarily scale CPVPA down to freeze the current memory values:
kubectl scale deployment castai-evictor-cpvpa -n castai-agent --replicas=0Once the evictor is stable, restore CPVPA:
kubectl scale deployment castai-evictor-cpvpa -n castai-agent --replicas=1Advanced configuration
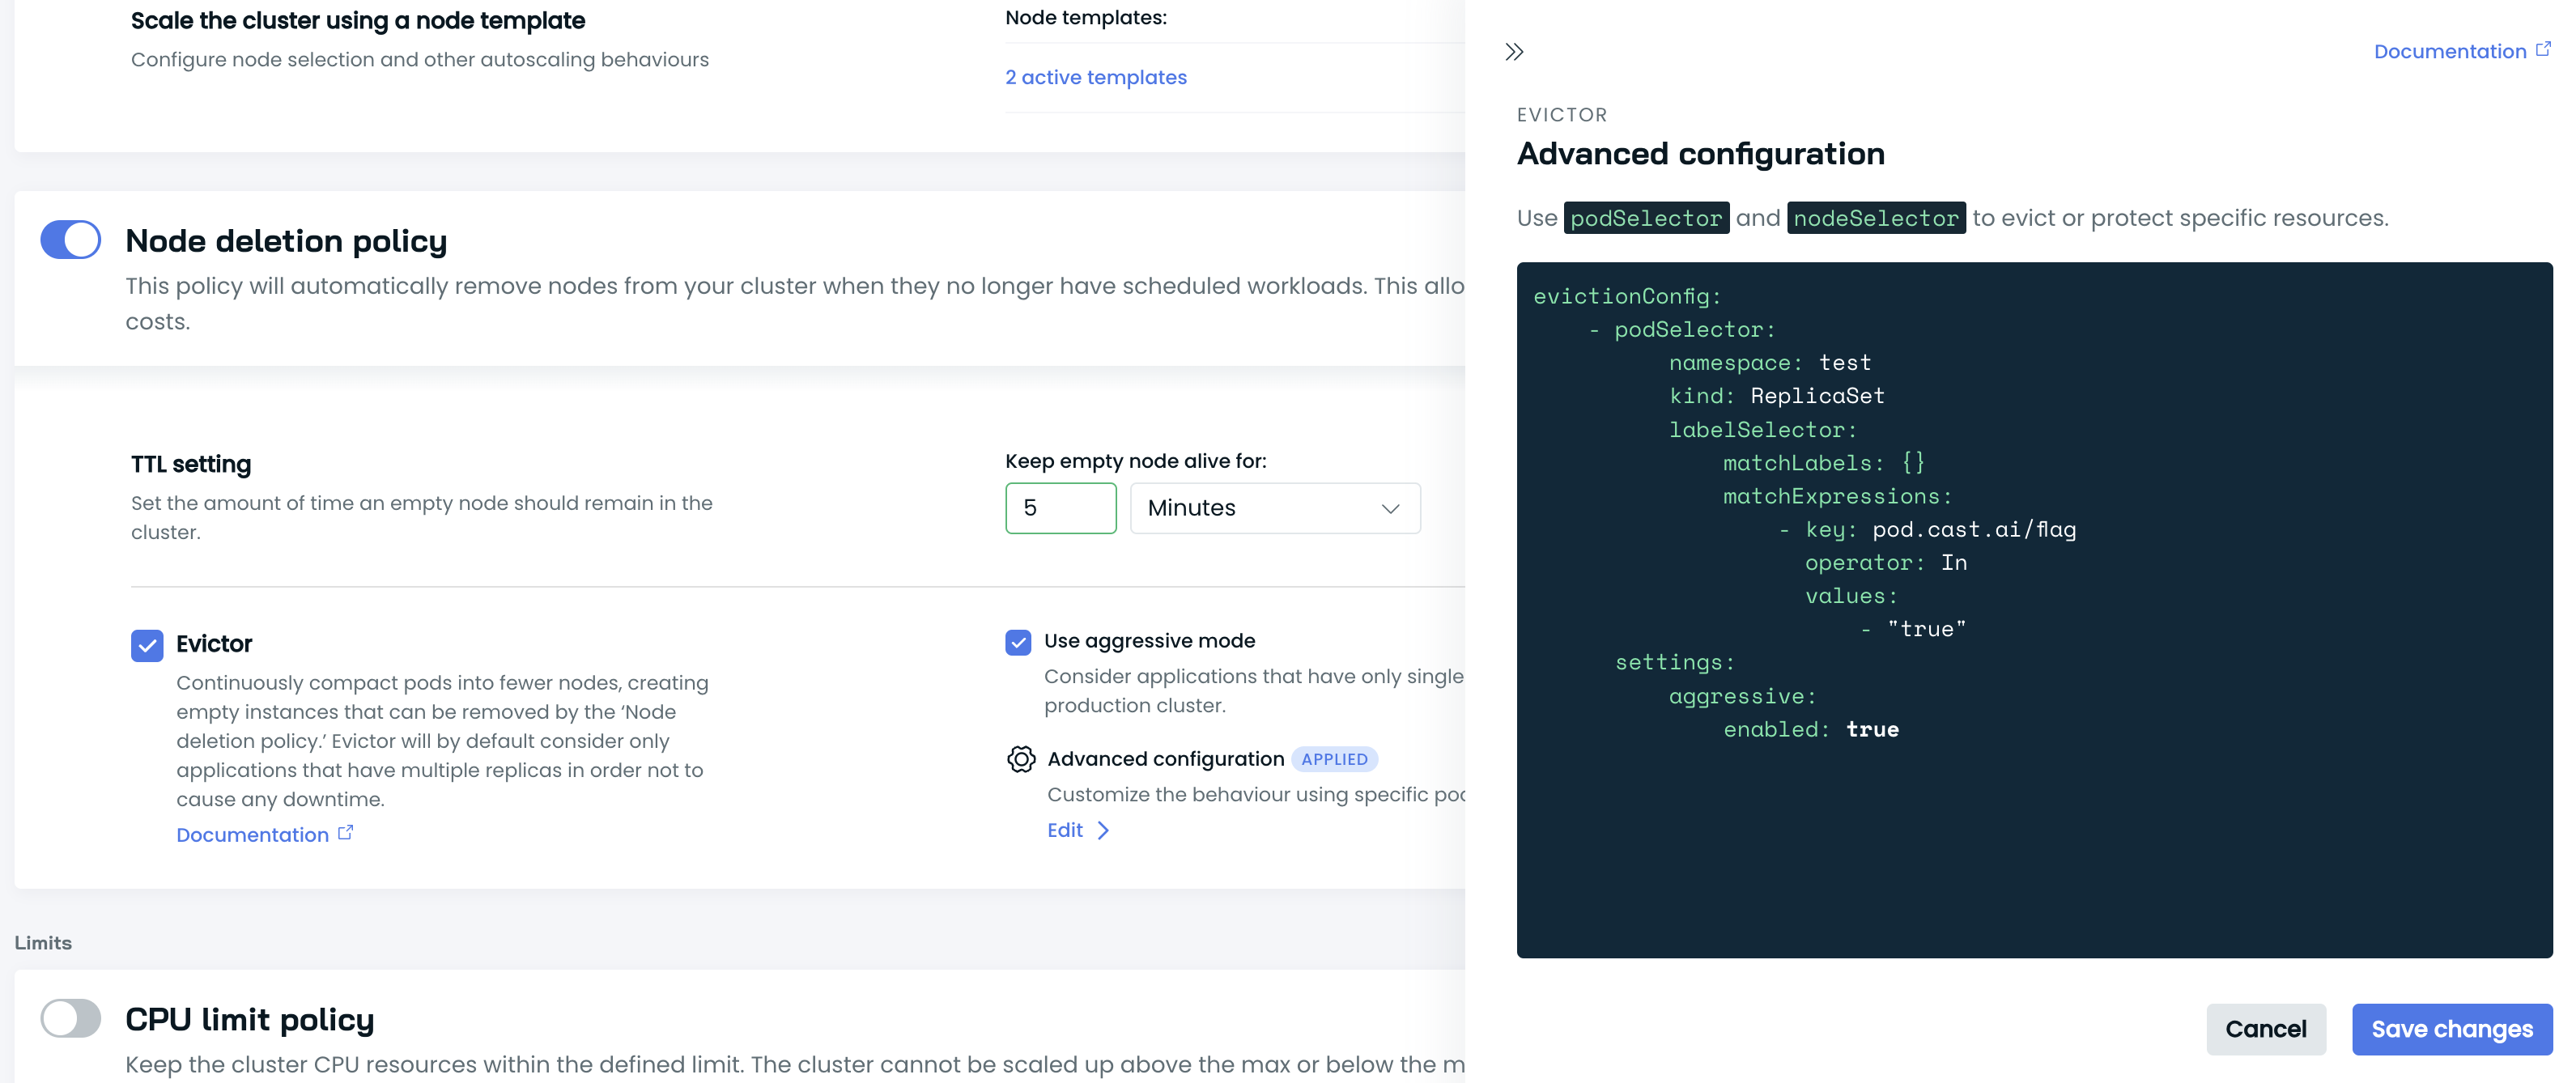
Advanced configuration can be utilized for more granular optimization, allowing specific resources to be targeted or shielded from eviction. Users can provide additional rules for Evictor, enabling it to target particular nodes and/or pods.
Managed by Cast AI vs. self-managed configuration
Evictor can operate in two modes:
-
Managed by Cast AI (
charts.cast.ai/managed: "true"): Cast AI manages the Evictor deployment — syncing policies configured in the console and overriding any manual changes to the Evictor ConfigMap. You configure Evictor through the Cast AI console. -
Self-managed (
charts.cast.ai/managed: "false"): You manage the Evictor configuration directly by modifying the ConfigMap, and your changes persist. Cast AI does not override settings. The Cast AI console cannot be used to configure Evictor in this mode.
What Cast AI manages in managed mode
In managed mode, Cast AI keeps Evictor in sync with your console settings:
- Configuration stays in sync — Any policies you set in the Cast AI console are applied to Evictor automatically. Manual edits to the Evictor ConfigMap will be overwritten the next time Cast AI syncs.
Upgrading to a version that requires new permissionsOccasionally, a new version of Evictor introduces functionality that requires additional Kubernetes permissions. In those cases, the new functionality will not work until you apply the updated permissions. Cast AI provides a Helm chart to do this — contact support or check the release notes for instructions when a permissions update is required.
ArgoCD compatibility
Cast AI will not manage Evictor if the deployment has ArgoCD annotations or labels. This is detected automatically — no configuration is needed on your part.
If you are using ArgoCD and want Cast AI to manage Evictor, you need to exclude the Evictor deployment from ArgoCD's sync scope. As long as ArgoCD controls the deployment, Cast AI management is inactive regardless of the managedByCASTAI Helm value.
Example configuration labels:
labels:
  app.kubernetes.io/instance: "castai-evictor"
  app.kubernetes.io/managed-by: "Helm"
  app.kubernetes.io/name: "castai-evictor"
  app.kubernetes.io/version: "v1"
  charts.cast.ai/managed: "true" # set to "false" to self-manage Evictor
  helm.sh/chart: "castai-evictor-0.31.20"
{
"labels": {
"app.kubernetes.io/instance": "castai-evictor",
"app.kubernetes.io/managed-by": "Helm",
"app.kubernetes.io/name": "castai-evictor",
"app.kubernetes.io/version": "v1",
"charts.cast.ai/managed": "true",
"helm.sh/chart": "castai-evictor-0.31.20"
}
}Switching between managed and self-managed modes
Method 1: using the Helm value
To switch between managed and self-managed modes, use the managedByCASTAI Helm value:
# Switch to self-managed mode
helm upgrade castai castai-helm/castai -n castai-agent \
  --reset-then-reuse-values \
  --set autoscaler.castai-evictor.managedByCASTAI=false

# Switch to managed mode
helm upgrade castai castai-helm/castai -n castai-agent \
  --reset-then-reuse-values \
  --set autoscaler.castai-evictor.managedByCASTAI=true
ImportantDirectly changing the
charts.cast.ai/managedlabel on the deployment is not recommended. Such changes will be reset during the next Helm upgrade unless themanagedByCASTAIvalue matches what's set on the deployment. Always use the Helm value to ensure consistent behavior.
Method 2: Uninstall and reinstall
For a clean slate, you can uninstall and reinstall Evictor:
From self-managed to managed:
Disable the current self-managed Evictor:
helm upgrade castai castai-helm/castai -n castai-agent \
  --reset-then-reuse-values \
  --set autoscaler.castai-evictor.enabled=false
Option 1: Enable Evictor through the Cast AI console UI:
Navigate to Autoscaler settings and enable the Node deletion policy with Evictor.
Option 2: Re-enable with managedByCASTAI=true:
helm upgrade castai castai-helm/castai -n castai-agent \
  --reset-then-reuse-values \
  --set autoscaler.castai-evictor.enabled=true \
  --set autoscaler.castai-evictor.dryRun=false \
  --set autoscaler.castai-evictor.managedByCASTAI=true
From managed to self-managed:
Disable the current managed Evictor:
helm upgrade castai castai-helm/castai -n castai-agent \
  --reset-then-reuse-values \
  --set autoscaler.castai-evictor.enabled=false
Re-enable with managedByCASTAI=false
helm upgrade castai castai-helm/castai -n castai-agent \
  --reset-then-reuse-values \
  --set autoscaler.castai-evictor.enabled=true \
  --set autoscaler.castai-evictor.dryRun=false \
  --set autoscaler.castai-evictor.managedByCASTAI=false
Use case examples
Evictor Advanced Configuration use case for marking Job kind pods as removalDisabled if matchers are fulfilled:
evictionConfig:
  - podSelector:
      namespace: "namespace"
      kind: Job
      labelSelector:
      	matchLabels:
          pod.cast.ai/name: "cron-job"
          app.kubernetes.io/active: "true"
    settings:
      removalDisabled:
        enabled: true
Marking pods of the Job kind in a namespace as removalDisabled:
evictionConfig:
  - podSelector:
      namespace: "namespace"
      kind: Job
    settings:
      removalDisabled:
        enabled: true
Protecting nodes that host workflow Jobs (such as Argo Workflows) by applying removalDisabled at the node level:
evictionConfig:
  - nodeSelector:
      labelSelector:
        matchLabels:
          node-type: workflow-runner
    settings:
      removalDisabled:
        enabled: true
NoteApplying
removalDisabledto a node rather than a pod ensures protection even after Job pods complete. Pod-level protection only takes effect while the pod is in a running phase.
Marking node as disposable:
evictionConfig:
  - nodeSelector:
      labelSelector:
        matchLabels:
          app.kubernetes.io/name: castai-node
          app.kubernetes.io/instance: instance
    settings:
      disposable:
        enabled: true
Disposing pod(s) using disposable flag:
evictionConfig:
  - podSelector:
      namespace: "replicaset-ns"
      kind: ReplicaSet
      labelSelector:
        matchExpressions:
          - key: pod.cast.ai/flag
            operator: In
            values:
              - "true"
    settings:
      disposable:
        enabled: true
Applying aggressive mode even if Evictor is running without aggressive mode turned on:
evictionConfig:
  - podSelector:
      namespace: "namespace"
      kind: ReplicaSet
      labelSelector:
        matchExpressions:
          - key: pod.cast.ai/flag
            operator: In
            values:
              - "true"
    settings:
      aggressive:
        enabled: true
Selectors
Selectors specify criteria for matching specific resources, e.g., pods or nodes. If the selector satisfies the rules, the eviction mode specified in the settings is applied. If no matches are found or if matches are found with the eviction mode enabled flag set to false, default Evictor rules will be applied for a pod or node selector.
| Selector | Target | Supported Keys |
|---|---|---|
| podSelector | Pod | namespace, kind, labelSelector |
| nodeSelector | Node | labelSelector |
Selector Keys
Selectors have specific matchers to decide if the targeting mode should be applied to the resource. matchLabels and matchExpressions follow the same structure as in Kubernetes, documentation
| Name | Type | Description |
|---|---|---|
| namespace | string | Specifies the namespace to match the pod. When not specified, it defaults to target pods across all namespaces. |
| kind | string | Pod owner kind matcher. |
| labelSelector | object | Holds matchLabels and matchExpressions array of label keys, operators, and values. |
Settings
Settings hold one of the supported targeting modes, and if that mode is enabled.
| Name | Supported Targeting Modes | Mode Enable Key |
|---|---|---|
| settings | removalDisabled, aggressive, disposable | enabled |
Targeting Modes
Targeting mode - specifies the eviction type for the matched resource. The selected mode takes precedence and overrides the default Evictor behavior.
| Name | Description |
|---|---|
| removalDisabled | Resource is not removed |
| aggressive | Apply aggressive mode to the targeted resource |
| disposable | A resource is eligible to be removed |
Note
aggressivetargeting works the same as turning it on from the console, but only for a certain pod or node. Ifaggressivemode is turned on in the console and specified in the advanced configuration, it won't have any additional behavior.
Targeting Mode Keys
| Name | Type | Description |
|---|---|---|
| enabled | boolean | Specifies whether to apply the selector if a match is successful |
How to pass Advanced Configuration
Standard installation flow
You can pass the advanced configuration using the console interface when Cast AI manages the chart.
During Evictor's initialisation, CM (ConfigMap) is created under the castai-agent namespace with castai-evictor-config name.
Edit castai-evictor-config CM data, under config.yaml: | part with wanted evictionConfig YAML format contents, e.g.:
apiVersion: v1
kind: ConfigMap
metadata:
  name: "castai-evictor-config"
  labels:
    helm.sh/chart: castai-evictor-1
    app.kubernetes.io/name: castai-evictor
    app.kubernetes.io/instance: release-name
    app.kubernetes.io/version: "version"
    app.kubernetes.io/managed-by: Helm
data:
  config.yaml: |
    evictionConfig:
      - nodeSelector:
          labelSelector:
            matchLabels:
              app.kubernetes.io/name: castai-node
              app.kubernetes.io/instance: instance
        settings:
          removalDisabled:
            enabled: true
      - podSelector:
          namespace: "namespace"
          kind: ReplicaSet
          labelSelector:
            matchLabels:
              pod.cast.ai/name: castai-pod
        settings:
          disposable:
            enabled: true
      - podSelector:
          namespace: "namespace"
          kind: ReplicaSet
          labelSelector:
            matchExpressions:
              - key: pod.cast.ai/flag
                operator: In
                values:
                  - "true"
              - key: pod.cast.ai/name
                operator: Exists
            matchLabels:
              pod-label: "pod-label-value"
        settings:
          disposable:
            enabled: true
NoteThe
"charts.cast.ai/managed"flag must be set tofalseto prevent Cast AI from managing it. If not, Cast AI will override all values.
Manual installation
To pass Evictor Advanced Configuration with manual Evictor installation, you can provide a path to the created YAML file through Helm, by setting the file location flag or using the set flag.
--set-file customConfig=<path_to_file>--set customConfig="<config_string>"Installation and configuration
Which upgrade method to useThe Helm commands on this page use the umbrella chart (
castai-helm/castai) by default. If you need to use a different method:
- castctl: To upgrade all Cast AI components at once without managing Helm flags:
This preserves your existing configuration. See the castctl documentation for installation and authentication instructions.castctl castware upgrade- Individual charts: If you installed each component as a separate Helm release (e.g., for ArgoCD or custom GitOps), replace the release name and chart reference with the component-specific ones (e.g.,
castai-workload-autoscalerandcastai-helm/castai-workload-autoscaler) and remove theautoscaler.castai-workload-autoscaler.value prefix.Not sure which method you used? Run
helm list -n castai-agent. A single release namedcastaimeans umbrella chart; separate releases likecastai-workload-autoscalermean individual charts.
By default, Evictor is automatically installed when a cluster is onboarded to Cast AI with automation enabled. Most customers will have Evictor running without needing manual installation.
Validate in a lower environment firstBefore enabling Evictor on a production cluster, we strongly recommend enabling it first on a staging or development environment with representative workloads. This allows you to verify that all critical workloads have PDBs configured, identify any single-replica deployments that would be affected, and confirm that pod startup times are compatible with the default
nodeGracePeriodMinutesvalue. See Before enabling Evictor in production for the full readiness checklist.
Managing Evictor through the console
For clusters managed by Cast AI, you can enable and configure Evictor through the Cast AI console interface. This allows you to:
- Enable/disable Evictor
- Configure aggressive mode
- Enable soft tainting
- Enable Karpenter node cleanup
- Set advanced configuration rules
NoteScoped mode cannot be configured through the console and requires Helm parameters.
Manual installation
To manually install Evictor:
helm repo add castai-helm https://castai.github.io/helm-charts
helm upgrade castai castai-helm/castai -n castai-agent \
  --reset-then-reuse-values \
  --set autoscaler.castai-evictor.dryRun=false
Installation with different modes
Aggressive mode:
helm upgrade castai castai-helm/castai -n castai-agent \
  --reset-then-reuse-values \
  --set autoscaler.castai-evictor.dryRun=false \
  --set autoscaler.castai-evictor.aggressiveMode=true
Scoped mode:
helm upgrade castai castai-helm/castai -n castai-agent \
  --reset-then-reuse-values \
  --set autoscaler.castai-evictor.dryRun=false \
  --set autoscaler.castai-evictor.scopedMode=true
Combined modes:
helm upgrade castai castai-helm/castai -n castai-agent \
  --reset-then-reuse-values \
  --set autoscaler.castai-evictor.dryRun=false \
  --set autoscaler.castai-evictor.aggressiveMode=true \
  --set autoscaler.castai-evictor.scopedMode=true
Additional configuration options
By default, Evictor will only impact nodes older than 5 minutes. To change the grace period before a node can be considered for eviction, set the nodeGracePeriodMinutes parameter:
helm upgrade castai castai-helm/castai -n castai-agent \
  --reset-then-reuse-values \
  --set autoscaler.castai-evictor.dryRun=false \
  --set autoscaler.castai-evictor.nodeGracePeriodMinutes=10
Default grace period may be too short for productionThe default
nodeGracePeriodMinutesvalue of 5 minutes means Evictor can begin targeting a node just 5 minutes after it is provisioned. For most production workloads this is sufficient, but if your applications have slow startup times — for example, JVM-based services, large model servers, or workloads that pull large container images — pods may not be fully ready before Evictor considers the node for eviction.If you observe workloads being disrupted shortly after node provisioning, increase
nodeGracePeriodMinutesto a value that accounts for your worst-case pod startup time.
Performance tuning for large clusters
On clusters with many nodes, two additional settings control how aggressively Evictor processes drain cycles. The defaults are tuned for small-to-medium clusters and can cause kube-apiserver pressure or overlapping drain cycles on larger ones.
maxTargetNodesPerCycle
Controls how many nodes Evictor targets in a single drain cycle. Higher values increase throughput but generate more parallel Kubernetes API calls simultaneously. On large clusters, high parallelism can saturate the kube-apiserver and cause drain operations to time out.
helm upgrade castai castai-helm/castai -n castai-agent \
  --reset-then-reuse-values \
  --set autoscaler.castai-evictor.dryRun=false \
--set autoscaler.castai-evictor.maxTargetNodesPerCycle=10| Cluster size | Recommended value |
|---|---|
| < 200 nodes | 20 (default) |
| 200–500 nodes | 10 |
| 500+ nodes | 5 |
cycleInterval
Controls how frequently Evictor starts a new evaluation and drain cycle. The default 1m means a new cycle begins every minute, even if the previous one has not finished. On large clusters, overlapping cycles multiply API pressure and cause drain operations to be canceled mid-flight as the evictor shuts down to start the next cycle.
helm upgrade castai castai-helm/castai -n castai-agent \
  --reset-then-reuse-values \
  --set autoscaler.castai-evictor.dryRun=false \
--set autoscaler.castai-evictor.cycleInterval=10m| Cluster size | Recommended value |
|---|---|
| < 200 nodes | 1m (default) |
| 200–500 nodes | 5m |
| 500+ nodes | 10m |
Troubleshooting
Evictor is not allowed to be turned on
If you see the message "Evictor is installed, but it is not managed by Cast AI" in the console:
- Evictor is unavailable on the policies page because Cast AI detected an existing Evictor installation that was manually (self-managed) installed.
Cast AI will not try to manage Evictor settings or upgrades in such a scenario.
To resolve this, you have two options:
-
Switch to Cast AI managed mode:
helm upgrade castai castai-helm/castai -n castai-agent \
  --reset-then-reuse-values \
  --set autoscaler.castai-evictor.managedByCASTAI=true
This allows Cast AI to manage Evictor configurations and upgrade to the most recent version.
-
Keep self-managed mode:
If you want to manage Evictor yourself, maintain the self-managed configuration. The helm chart values can contain the same configurations available in the UI.
How to check the logs
To check Evictor logs, run the following command:
kubectl logs -l app.kubernetes.io/name=castai-evictor -n castai-agentManually upgrade Evictor
Check the Evictor version you are currently using:
helm ls -n castai-agentUpdate the Helm chart repository to make sure that your Helm command is aware of the latest charts:
helm repo updateInstall the latest Evictor version:
helm upgrade castai castai-helm/castai -n castai-agent \
  --reset-then-reuse-values \
  --set autoscaler.castai-evictor.dryRun=false
Check whether the Evictor version was changed:
helm ls -n castai-agentVerifying scoped mode operation
To verify that scoped mode is working correctly:
-
Check Evictor configuration:
kubectl get configmap castai-evictor-config -n castai-agent -o yaml -
Monitor Evictor logs for scoped mode indicators:
kubectl logs -l app.kubernetes.io/name=castai-evictor -n castai-agent | grep "scoped_mode=true" -
Verify node targeting:
kubectl get nodes -l provisioner.cast.ai/managed-by=cast.ai
Evictor pods are OOMKilled
Symptoms: Evictor pod exits with an OOMKilled reason; kubectl describe pod shows the memory limit was exceeded; the pod restarts with increasing backoff delay.
Diagnosis:
- Check the current memory allocation on the evictor pod:
kubectl describe pod -l app.kubernetes.io/name=castai-evictor -n castai-agent - Check the CPVPA scaling configuration:
kubectl get configmap castai-evictor-autoscaler -n castai-agent -o yaml - Compare the current node count against the
step/nodesPerStepvalues. If the formula's result equalsmax, CPVPA already hit the ceiling — increasingmaxor reducingstepis needed.
Cause: CPVPA is scaling memory too coarsely for the cluster size. A step value that is too large relative to nodesPerStep causes the formula (round_up(nodeCount / nodesPerStep) × step) to exceed max in a single increment on large clusters, meaning CPVPA jumps straight to the ceiling and provides no headroom for actual memory growth. The evictor then runs at or near its limit and gets OOMKilled during large drain cycles.
Fix: Reduce step and, if necessary, nodesPerStep so that CPVPA tracks memory demand more gradually. See Tuning CPVPA for your cluster size for recommended values.
Evictor pods restart repeatedly without OOMKill
Symptoms: Evictor pods are replaced every few minutes; kubectl get pods -n castai-agent shows a new pod while the previous one terminates; kubectl logs --previous on the old pod shows a clean shutdown (not a panic or crash); kubectl describe deployment castai-evictor -n castai-agent shows repeated ScalingReplicaSet events.
Cause: CPVPA recalculates memory values every ~5 minutes as node count changes. Each recalculation that produces a different value modifies the evictor Deployment spec, which Kubernetes treats as a rolling update — terminating the current pod and creating a new one. This is expected behavior, not a crash, but it can be disruptive on volatile clusters where node count fluctuates continuously.
Fix:
- Reduce the
stepvalue in thecastai-evictor-autoscalerConfigMap. A smaller step means CPVPA produces the same value across more poll cycles, reducing how often the Deployment spec changes. - If the cluster has stabilized and rollouts are still occurring frequently, temporarily scale CPVPA to 0 to freeze the current memory values:
Restore CPVPA once you have confirmed stability:
kubectl scale deployment castai-evictor-cpvpa -n castai-agent --replicas=0kubectl scale deployment castai-evictor-cpvpa -n castai-agent --replicas=1
Evictor drain cycles stall with context canceled errors
Symptoms: Evictor logs contain repeated context canceled or waiting for pod <name> in namespace <ns> termination: context canceled messages; kubectl logs --previous shows the evictor shut down mid-drain; audit logs show 429 responses from the pod eviction API.
Diagnosis — distinguish PDB violations from apiserver throttling:
Fetch audit logs around the time of the restart and filter for 429 responses from the eviction endpoint. If the response body contains "reason":"TooManyRequests" and "message":"Cannot evict pod as it would violate the pod's disruption budget", the 429s are PDB violations — not kube-apiserver rate limiting. These are distinct failure modes with different remediation paths.
Contributing factors:
maxTargetNodesPerCycleis high, generating many simultaneous drain operations that each hold their own context. When the cycle timeout is reached, all in-flight contexts are canceled together.cycleIntervalis short, causing a new cycle to start before the previous one completes. The previous cycle's context is then canceled to make way for the next.- Workloads have PDBs where
minAvailableequals the full replica count (zero pods may be disrupted), blocking eviction entirely until a replacement pod is scheduled and ready on another node.
Fix:
- Reduce parallel drain activity:
helm upgrade castai castai-helm/castai -n castai-agent \ --reset-then-reuse-values \ --set autoscaler.castai-evictor.dryRun=false \ --set autoscaler.castai-evictor.maxTargetNodesPerCycle=10 \ --set autoscaler.castai-evictor.cycleInterval=10m - Review strict PDB configurations. A PDB with
minAvailable: Nwhere N equals the total replica count allows zero pods to be disrupted at any time. Relax these tominAvailable: N-1ormaxUnavailable: 1for workloads where brief disruption is acceptable:Check any PDB wherekubectl get pdb -AALLOWED DISRUPTIONSis0while the evictor is active on those nodes.
Updated yesterday