
Node templates
What are node templates?
Node templates are a key part of the Autoscaler component. They allow users to define virtual buckets of constraints and properties for nodes to be added to the cluster during upscaling. Users can:
- Specify various constraints to limit the inventory of instance types to be used.
- Select a preferred instance resource offering (e.g., build a spot-only cluster without the need for specific tolerations or selectors).
- Define how Cast AI should manage Spot Instance interruptions.
- Specify labels and taints to be applied to the nodes.
- Link a Node configuration to be applied when creating new nodes.
- Enable Container Live Migration for zero-downtime workload optimization.
When a user enables Cast AI, the default Node template is created in the cluster. This template is essential and serves as the default Autoscaler behavior. In addition to the default template, users can set up multiple templates to suit their specific use cases.
| Feature | Default Node Template | Custom Node Template |
|---|---|---|
| Name | default-by-castai. | Custom (user-defined). |
| Creation | Mandatory. Created by Cast AI during cluster onboarding. | Optional. Created by the user. |
| Deletion | Can't be deleted or otherwise removed. | Can be deleted. |
| Activation | On by default. Can be disabled. | Can be disabled. |
| Usage in Autoscaling | Used when workloads are not explicitly designated to trigger cluster upscaling through other Node templates. | Activated by workloads utilizing autoscaling labels that are also defined in the Node template. |
| Renaming | Can't be renamed. | Can't be renamed after creation. |
| Setting as default | Is the default by design. Cannot be changed to non-default. Disabling it is recommended if you no longer wish to use it. | Cannot be set as default. Attempts to set isDefault=true via API will not update the template. |
NoteFor the Cast AI autoscaler to function, the Unscheduled Pods policy and at least one Node template (default or not) must be enabled.
Main attributes
The table below outlines the Node template attributes and their availability across different cloud providers.
| Attribute | Description | Availability per Cloud provider |
|---|---|---|
| Custom labels and taints | Choose this if custom labels or taints should be applied on the nodes created by Cast AI. Based on the selected properties, | All |
| Node configuration link | By default, Node templates mostly focus on the type of resources that need to be scheduled. To learn how to configure the scheduling of your resources and how to use other kinds of attributes on provisioned nodes, see | All |
| Target capacity reservations | Select one or more AWS capacity reservations (ODCRs or Capacity Blocks) for the autoscaler to target when provisioning nodes. Selecting a reservation locks the instance type and AZ to match the reservation's constraints. Nodes are tainted with reserved=only:NoSchedule. See Target capacity reservations. | AWS EKS only |
| Container Live Migration | Enable zero-downtime workload optimization through container live migration. When enabled, this feature automatically installs the live migration controller and configures nodes with specialized VPC CNI for TCP preservation.
| AWS EKS only |
| Resource offering | This attribute tells the Autoscaler which node resource offering (spot or on-demand) it should create. There is an option to configure both offerings, in which case workloads targeted to run on spot nodes must be marked accordingly. Check this guide. Additional configuration settings available when you want the Autoscaler to use Spot nodes:
| All |
| Processor architecture | You can select Azure only. To provision ARM nodes, ensure that they are supported in the region and quota for | All |
| GPU-enabled instances | Choose this attribute to run workloads only on GPU-enabled instances. Once you select it, Instance constraints get enhanced with GPU-related properties. If you are unable to select this attribute in the console, there likely are no GPUs in the region of your cluster. See your CSP's documentation for reconciling what GPUs are available in which regions: | AWS, GCP |
| GPU sharing | Enable GPU time-slicing to allow multiple workloads to share physical GPUs. Configure the number of shared clients per GPU (1-48). Currently supported on AWS EKS with Bottlerocket AMI only. For complete GPU setup and sharing configuration, see GPU instances. | AWS, GCP |
| Apply Instance constraints | Apply additional constraints on instances to be selected, such as:
| All |
| Set up instance family prioritization | Custom priority order can be defined in cases where it is preferred that the Autoscaler prioritize certain instance families when creating new nodes. The priority queue is organized into tiers, each representing a set of instance families. The Autoscaler will attempt to find an instance type from the highest available tier before moving down to the next one. Instance families within the same priority tier are treated equally. Instance family prioritization takes precedence over commitment-based instance selection. If a priority tier specifies a family that is not covered by a commitment, the Autoscaler still selects from that tier first. To maximize commitment utilization and align with priority preferences, place commitment-covered families in the highest-priority tier. When no instance families from the priority queue are available, the Autoscaler will fall back to its default behavior, which includes prioritizing commitment-covered instances. | All |
| Custom instances | The Autoscaler will consider GCP custom VM types in addition to predefined machines. The extended memory setting will allow the Autoscaler to determine whether a custom VM with increased memory per vCPU would be optimal. | GCP |
| Set CPU limit | Controls the total CPU cores for nodes provisioned with this template. | All |
Container Live Migration configuration
When you enable Container Live Migration in a node template, Cast AI automatically:
- Configures nodes with the necessary runtime components
- Sets up the specialized VPC CNI for TCP preservation
Important considerations for CLM
Processor architecture: Configure your node template for a single processor architecture (either AMD64 or ARM64, not "Any"). Live migration cannot occur between nodes with different architectures. Set the processor architecture to a specific value rather than selecting "Any."
Instance type compatibility: Configure your node template to include only instance types from the same generation family. For example:
- Compatible: c5 with r5, m5 (same generation)
- Incompatible: c3 with c5 (different generations)
Infrastructure requirements: Ensure your cluster meets all Container Live Migration requirements before enabling this feature.
Integration with Evictor: When both CLM and Evictor are enabled, Evictor automatically attempts live migration for eligible workloads before falling back to traditional eviction.
Processor Architecture Support
Cast AI supports different processor architectures across cloud providers through node templates. You can create architecture-specific node templates or multi-architecture templates that include both x86 and ARM options.
| Cloud Provider | x86-64 (AMD64) | ARM64 | Notes |
|---|---|---|---|
| AWS EKS | ✓ | ✓ | ARM instances use AWS Graviton processors |
| GCP GKE | ✓ | ✓ | ARM support is available through T2A instances |
| Azure AKS | ✓ | ✓* | *ARM support requires additional configuration |
Using ARM on AKS
Cast AI supports ARM-based instances on Azure AKS. This feature currently requires:
- Feature flag enablement for your organization (contact Cast AI support)
- Specific configuration steps for your environment
- Deployment in an ARM-supported Azure region
- Quota for required ARM SKUs (such as
Standard_D2ps_v5)
There may be additional costs associated with ARM image storage.
Contact Cast AI support for detailed guidance on implementing ARM support for your AKS clusters.
Create a Node template
You have the following options to create Node templates:
- Create Node template through the API
- Create Node template through the UI (Cluster → Autoscaler → Node templates)
- Generate templates automatically – Use Cast AI's auto-generation feature
- Terraform
When you create a Node template, you may want to associate it with a Node configuration for provisioning nodes. You can achieve this by linking the template with a custom or default Node configuration.
Auto-generating Node templates
Cast AI can automatically generate optimized node templates based on your cluster's workloads and requirements.
How auto-generation works
- Analysis: Cast AI analyzes your current cluster workloads
- Generation: Multiple template suggestions are created
- Review: You can review each suggested template and its configuration
- Selection: Choose which templates to add to your cluster
- Customization: Edit template names before finalizing; settings can only be edited after adding the templates to your cluster
Using auto-generation
To use the node template auto-generation:
-
Navigate to Cluster → Autoscaler → Node templates
-
Click Create template → Generate templates
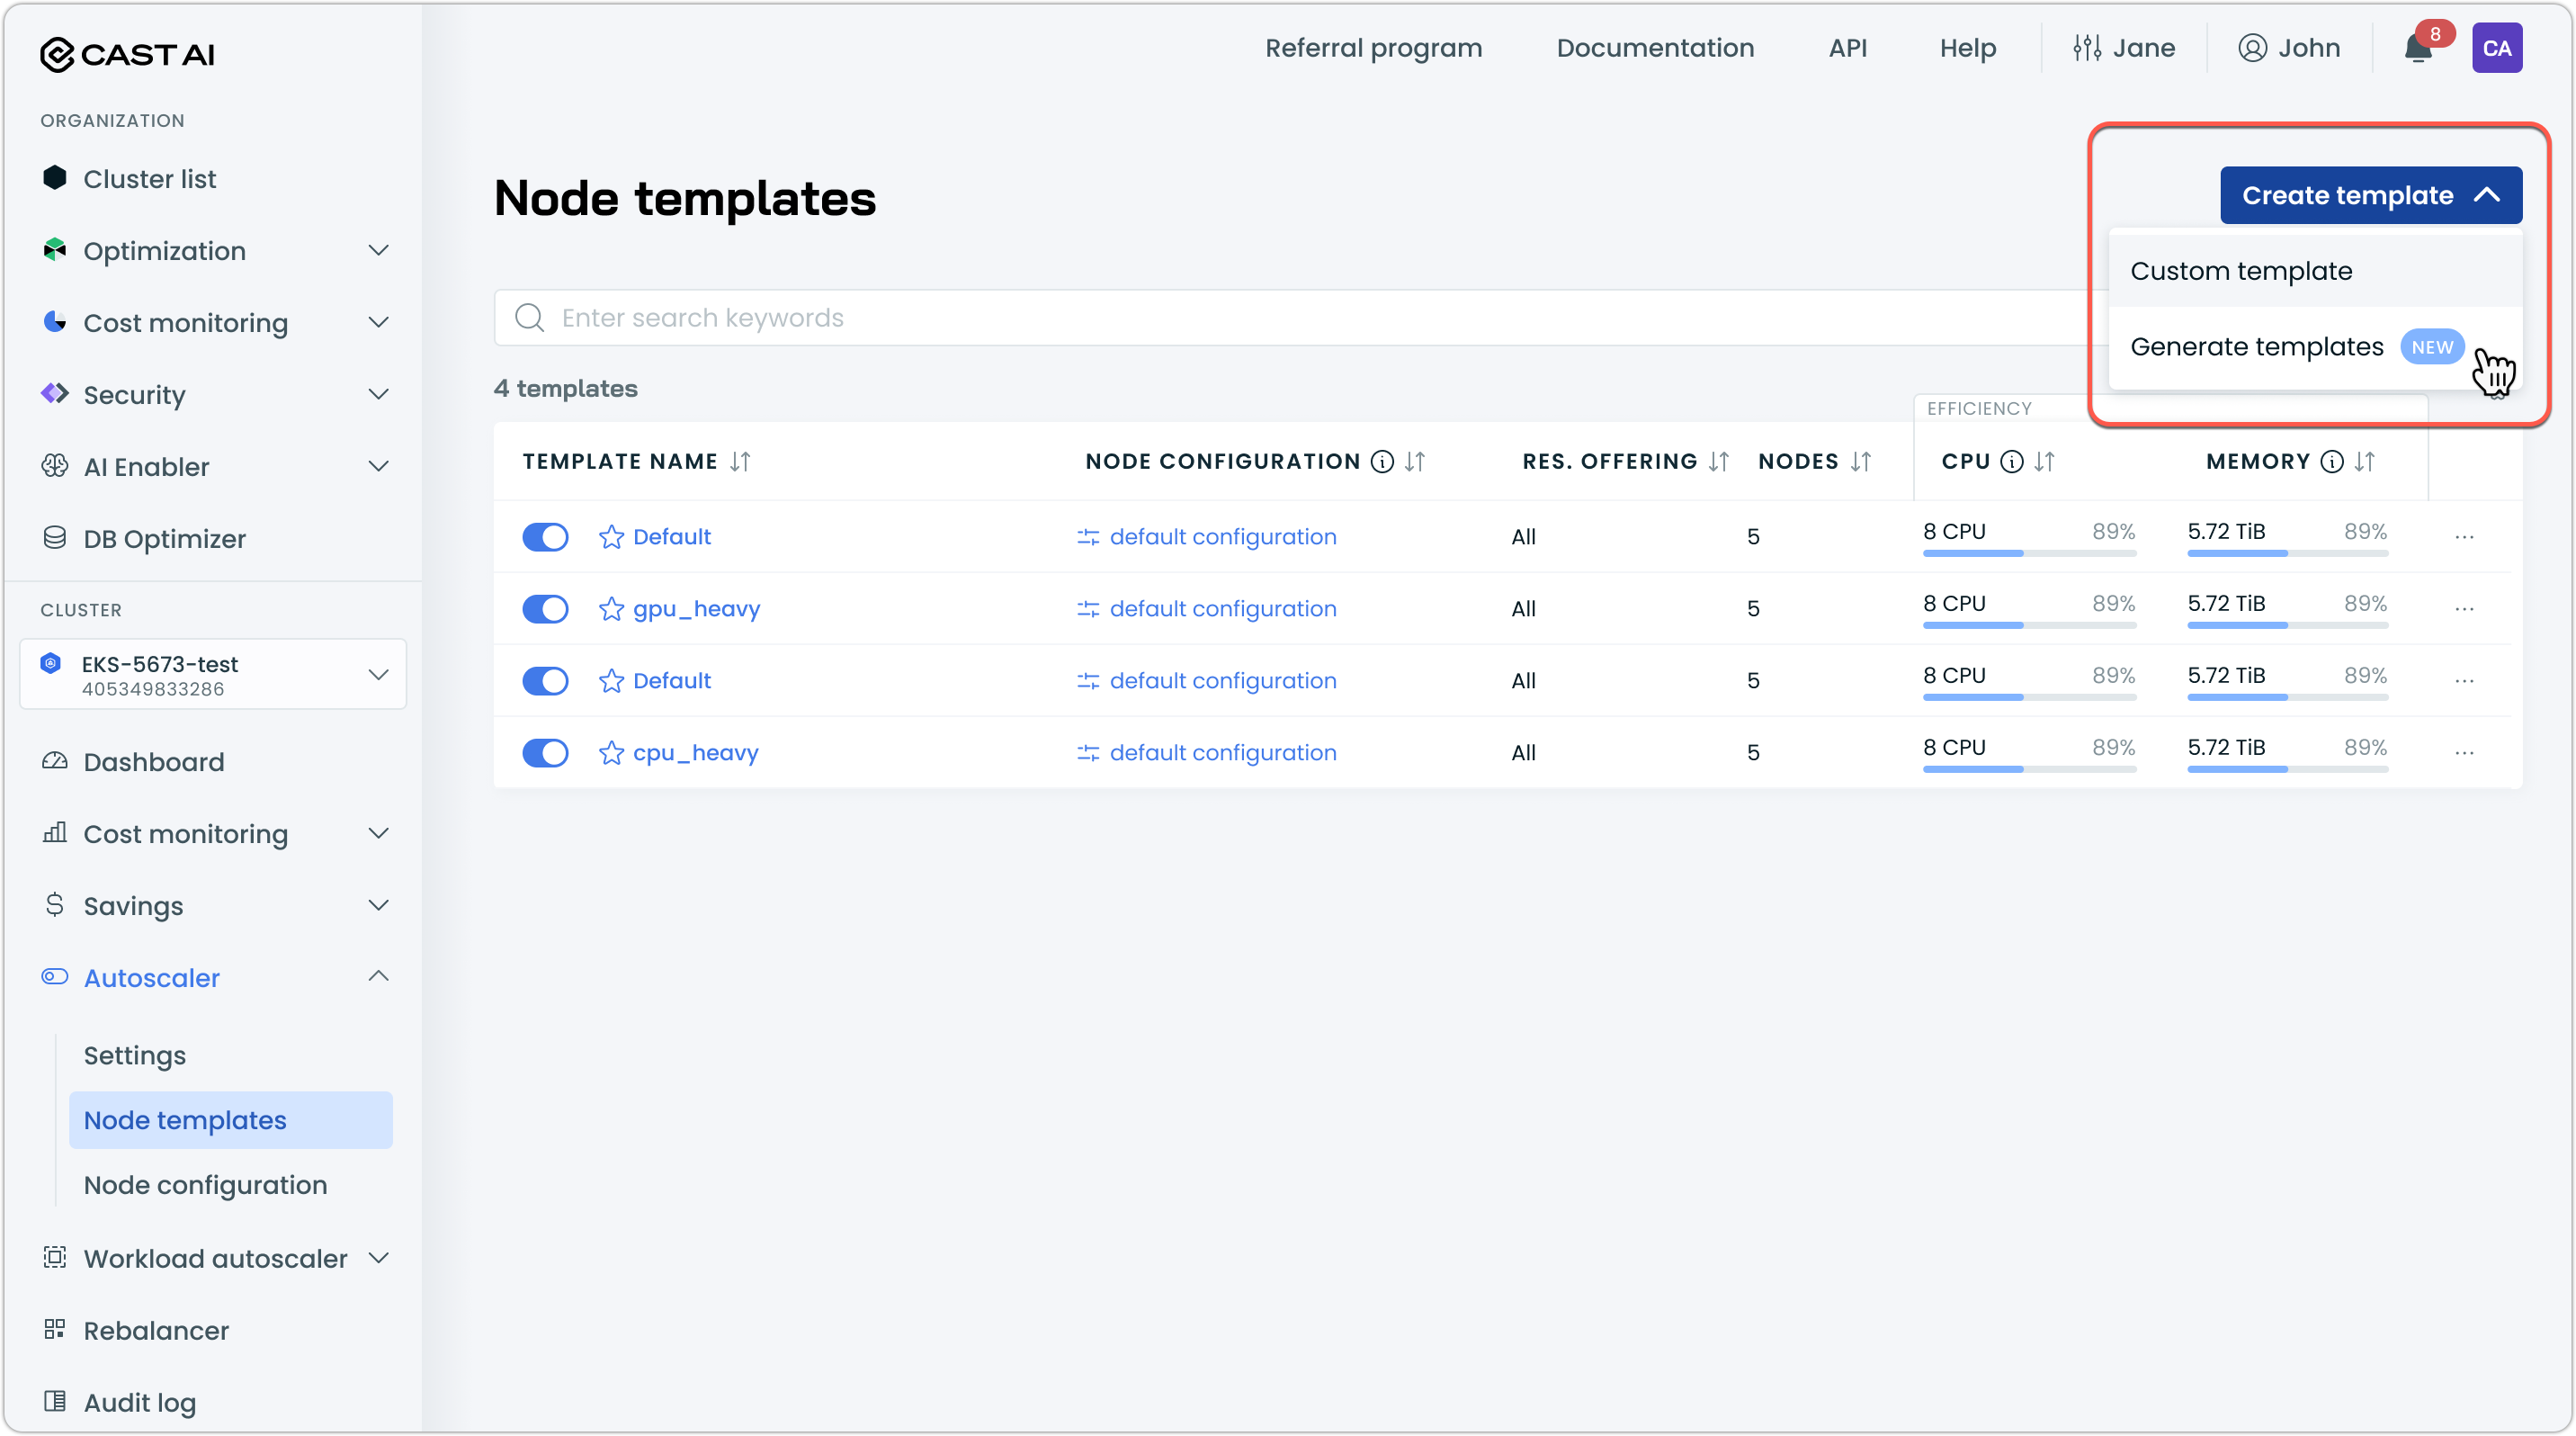
-
Review the suggested templates in the preview and select the ones you want to add to your cluster. If necessary, customize template names.

-
Click Add templates to create the selected templates
Auto-generated templates are created in a disabled state, to allow you to configure them before enabling.
API access
You can also generate templates programmatically using the Generate Node Templates API.
Using the shouldTaint flag
shouldTaint flagWhile creating a Node template, you can choose whether the nodes created by the Cast AI Autoscaler should be tainted. This is controlled through shouldTaint property in the API payload.
When shouldTaint is set to falseSince no taints will be applied on the nodes created by Cast AI, any pods being deployed to the cluster, even the ones without
nodeSelector, might get scheduled on these nodes. This effect might not always be desirable.
When shouldTaint is set to true
shouldTaint is set to trueapiVersion: v1
kind: Pod
metadata:
name: busybox-sleep
spec:
nodeSelector:
scheduling.cast.ai/node-template: spark-jobs
tolerations:
- key: scheduling.cast.ai/node-template
value: spark-jobs
operator: Equal
effect: NoSchedule
containers:
- name: busybox
image: busybox:1.28
args:
- sleep
- "1200"When shouldTaint is set to false
shouldTaint is set to falseapiVersion: v1
kind: Pod
metadata:
name: busybox-sleep
spec:
nodeSelector:
scheduling.cast.ai/node-template: spark-jobs
containers:
- name: busybox
image: busybox:1.28
args:
- sleep
- "1200"Using nodeSelector
nodeSelectorYou can use nodeSelector to schedule pods on the nodes created using the template. By default, you construct nodeSelector using the template name. However, you can opt for a custom label if it suits your use case better.
Using a Node template name in nodeSelector
nodeSelectorapiVersion: v1
kind: Pod
metadata:
name: busybox-sleep
spec:
nodeSelector:
scheduling.cast.ai/node-template: spark-jobs
containers:
- name: busybox
image: busybox:1.28
args:
- sleep
- "1200"
Recommended: usescheduling.cast.ai/node-templatefor explicit template selectionWhen a pod specifies
scheduling.cast.ai/node-template: <name>in itsnodeSelectorornodeAffinity, the autoscaler uses that as a direct, unambiguous template selection. It does not evaluate the template's custom labels at all, and thePartial node template matchingsetting has no effect.This is the most reliable way to bind a workload to a specific node template. It avoids any ambiguity that can arise when matching is based solely on custom labels — for example, when only a subset of the template's custom labels is specified on the pod.
Custom labels defined on the template will still be applied to the provisioned node, and the pod's remaining
nodeSelectorentries will be satisfied by the Kubernetes scheduler as usual.
Using multiple custom labels in nodeSelector
nodeSelectorIn case you have a Node template with multiple custom labels custom-label-key-1=custom-label-value-1 and custom-label-key-2=custom-label-value-2. You can schedule your pods on a node created using that Node template by providing nodeSelector with all the custom labels as described below:
apiVersion: v1
kind: Pod
metadata:
  name: busybox-sleep
spec:
  nodeSelector:
    custom-label-key-1: custom-label-value-1
    custom-label-key-2: custom-label-value-2
  containers:
    - name: busybox
      image: busybox:1.28
      args:
        - sleep
        - "1200"
Using nodeAffinity
nodeAffinityYou can use nodeAffinity to schedule pods on the nodes created using the template. By default, you construct nodeAffinity using the template name. However, you may use a custom label to better fit your use case. The only supported nodeAffinity operator is In.
Using the Node template name in nodeAffinity
nodeAffinityapiVersion: v1
kind: Pod
metadata:
name: busybox-sleep
spec:
affinity:
nodeAffinity:
requiredDuringSchedulingIgnoredDuringExecution:
nodeSelectorTerms:
- matchExpressions:
- key: scheduling.cast.ai/node-template
operator: In
values:
- "spark-jobs"
containers:
- name: busybox
image: busybox:1.28
args:
- sleep
- "1200"Using a Node template's custom labels in nodeAffinity
nodeAffinityIn case you have a Node template with multiple custom labels custom-label-key-1=custom-label-value-1 and custom-label-key-2=custom-label-value-2. You can schedule your pods on a node created using that Node template by providing nodeAffinity with all the custom labels as described below:
apiVersion: v1
kind: Pod
metadata:
  name: busybox-sleep
spec:
  affinity:
    nodeAffinity:
      requiredDuringSchedulingIgnoredDuringExecution:
        nodeSelectorTerms:
          - matchExpressions:
            - key: custom-label-key-1
              operator: In
              values:
                - "custom-label-value-1"
            - key: custom-label-key-2
              operator: In
              values:
                - "custom-label-value-2"
  containers:
    - name: busybox
      image: busybox:1.28
      args:
        - sleep
        - "1200"
Using a mix of nodeAffinity and nodeSelector
nodeAffinity and nodeSelectorIn case you have a Node template with multiple custom labels custom-label-key-1=custom-label-value-1 and custom-label-key-2=custom-label-value-2, you can schedule your pods on a node created using that Node template by providing nodeAffinity and nodeSelector with all the custom labels as described below:
apiVersion: v1
kind: Pod
metadata:
  name: busybox-sleep
spec:
  affinity:
    nodeAffinity:
      requiredDuringSchedulingIgnoredDuringExecution:
        nodeSelectorTerms:
          - matchExpressions:
            - key: custom-label-key-1
              operator: In
              values:
                - "custom-label-value-1"
  nodeSelector:
    custom-label-key-2: custom-label-value-2
  containers:
    - name: busybox
      image: busybox:1.28
      args:
        - sleep
        - "1200"
More Specific Requirements/Constraints
Templates also support further instance type selection refinement via additional nodeAffinity/ nodeSelector values. This can be done if the additional constraints don't conflict with the template constraints.
Here's an example with some assumptions:
- The template has no constraints;
- The template is named my-template;
- The template has custom labels enabled, and they are as follows:
product: "my-product"
team: "my-team"
Here's an example deployment that would further specify what a pod supports/needs:
apiVersion: apps/v1
kind: Deployment
metadata:
  name: my-deployment
  labels:
    app: nginx
spec:
  replicas: 2
  selector:
    matchLabels:
      app: my-app
  template:
    metadata:
      labels:
        app: my-app
    spec:
      affinity:
        nodeAffinity:
          requiredDuringSchedulingIgnoredDuringExecution:
            nodeSelectorTerms:
            - matchExpressions:
              - key: "team"
                operator: In
                values: ["my-team"]
                # Pick only nodes that are compute-optimized
              - key: "scheduling.cast.ai/compute-optimized"
                operator: In
                values: ["true"]
                # Pick only nodes that are storage-optimized
              - key: "scheduling.cast.ai/storage-optimized"
                operator: In
                values: ["true"]
      nodeSelector:
        # template selector (can also be in affinities)
        product: "my-product"
        team: "my-team"
        # Storage optimized nodes will also have a taint, so we need to tolerate it.
      tolerations:
        - key: "scheduling.cast.ai/storage-optimized"
          operator: Exists
          # toleration for the template
        - key: "scheduling.cast.ai/node-template"
          value: "my-template"
          operator: "Equal"
        effect: "NoSchedule"
      containers:
      - name: nginx
        image: k8s.gcr.io/nginx-slim:0.8
        ports:
        - containerPort: 80
        resources:
          requests:
            cpu: 700m
            memory: 700Mi
          limits:
            memory: 700Mi
Using this example, you'd get a storage-optimized, compute-optimized node on a template that doesn't have those requirements for the whole pool.
Note: If a template has one of those constraints (on the template itself), there is currently no ability to loosen requirements for some pods based on their nodeAffinity/ nodeSelector values.
Per-workload hardware constraints without a custom templateIf you only need to restrict hardware for a single workload — not an entire node pool — you can use Cast AI's hardware scheduling labels (
scheduling.cast.ai/cpu-manufacturer,scheduling.cast.ai/instance-family,scheduling.cast.ai/instance-cpu, and others) directly in the workload'snodeSelectorornodeAffinity. Cast AI will provision a matching node using the default template. See Pod placement — scheduling by hardware characteristics.
Node template matching
The autoscaler uses two distinct paths to match a pending pod to a node template:
1. Explicit template selector (recommended)
If the pod's nodeSelector or nodeAffinity contains the key scheduling.cast.ai/node-template, the autoscaler performs a direct name lookup — it matches the pod to the template whose name equals the selector value. The template's custom labels are not evaluated, and the Partial node template matching setting has no effect on this path. This is the most predictable matching behavior and is the recommended approach for binding workloads to a specific template.
2. Custom label matching
If the pod does not use scheduling.cast.ai/node-template, the autoscaler attempts to match the pod to a template based on the template's Custom labels. By default, workloads must specify node selectors or affinity that match all terms defined in the Node template's Custom labels. If at least one term is not matched, then the Node template is not considered.
A workload can match multiple Node templates. In such cases, the templates are scored primarily by the number of terms that the Node template contains (there are additional scoring criteria). The greater the number of terms, the higher the score.
Partial Node template matching
Partial matching allows workloads to specify at least one of all terms of the Node template for it to be considered when provisioning a node for the workload. To enable partial Node template matching, go to Autoscaler settings, navigate to Unscheduled pods policy, and select Partial node template matching.
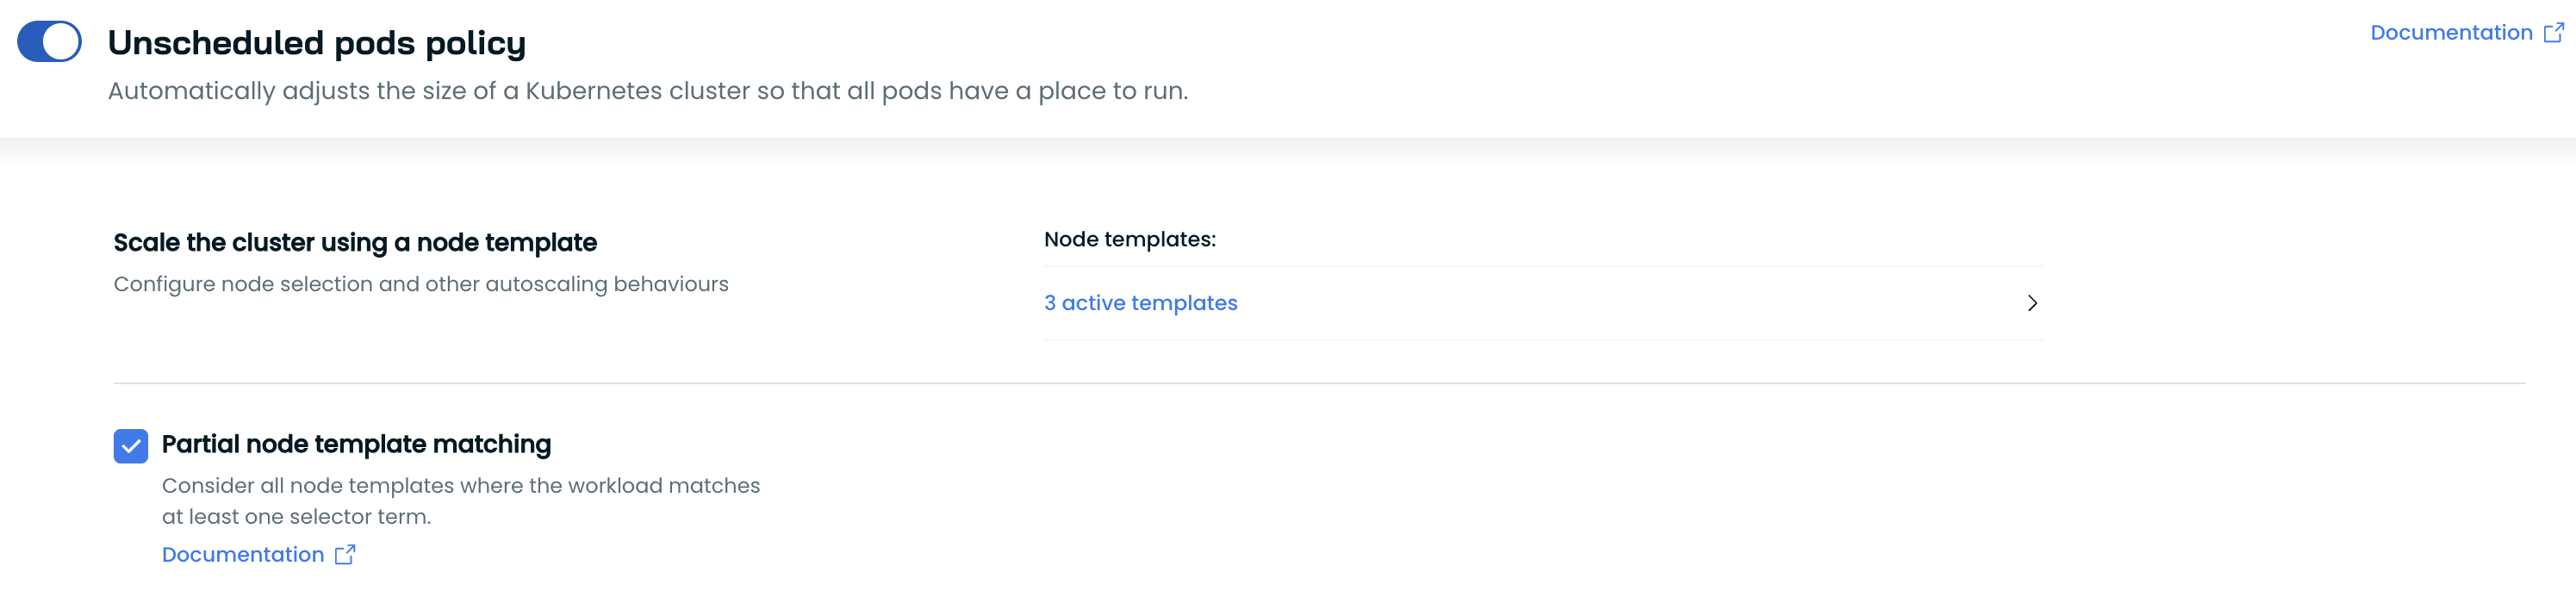
When partial matching is enabled, the Unscheduled Pods Policy Applied event will include information on how the Node template was selected. This can be used to troubleshoot autoscaler decisions.
Node template selection
When multiple Node templates are matched, they are sorted, and the first one is selected to create a node for the workload. The sorting criteria, in order of their priority, are:
- Node templates where all terms were matched are sorted higher.
- The count of matched terms, in descending order.
- The average price per CPU of instance types within the Node template, in descending order.
- The name of the template, in alphabetical order.
Node template CPU limit
You can enable and configure CPU limits on node templates to control the total number of CPU cores provisioned during cluster upscaling and rebalancing. When configured, the total number of CPU cores of all nodes provisioned using that template will not exceed the specified limit.
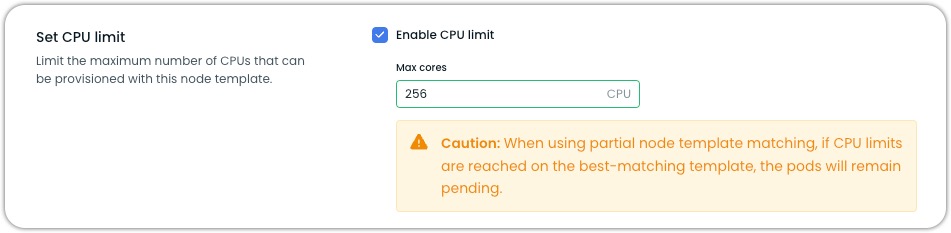
CautionWhen using partial node template matching, it's important to note that if CPU limits are reached on the best-matching template, the pods will remain pending. This can impact your cluster's ability to schedule workloads effectively.
To set a CPU limit:
- Enable the CPU limit toggle
- Enter the maximum number of CPU cores allowed to provision for nodes under this template
Impact on Autoscaler
When a CPU limit is configured, the autoscaler will only provision nodes up to the specified CPU limit when responding to unscheduled pods. If pods cannot be scheduled due to the CPU limit, they will receive a pod event indicating that autoscaling failed due to the node template CPU limit.
Impact on Rebalancing
During rebalancing, the total CPU count may temporarily exceed the configured limit. However, after rebalancing, the final cluster state will respect the configured CPU limits.
Spot Reliability Configuration
Spot Reliability uses machine learning to identify and select more reliable Spot Instances, reducing interruption frequency for your workloads. This feature analyzes historical Spot Instance data to predict which instance types are likely to run longer before being interrupted.
Configuration
Configure Spot Reliability when creating or updating a node template by including these parameters in the constraints object:
{
    "name": "reliable-spot-template",
    "isEnabled": true,
    "constraints": {
        "spot": true,
        "enableSpotReliability": true,
        "spotReliabilityPriceIncreaseLimitPercent": 20
    }
}
Parameters
| Parameter | Type | Required | Description | Range |
|---|---|---|---|---|
enableSpotReliability | boolean | Yes | Enables ML-based, reliable Spot Instance selection | true/false |
spotReliabilityPriceIncreaseLimitPercent | integer | Yes | Maximum price increase tolerance for reliability | 0-100 |
Support of Dedicated (Sole tenant) nodes
This is a new feature currently supported only on GKE clustersPlease note that the sole tenancy node group must be shared with the GKE cluster's project or organization.
Dedicated nodes (also known as Sole tenant nodes) are dedicated hosts in the customer's cloud account that can host VMs that are used in the Kubernetes clusters. The setup for GKE clusters can be found in the Google Cloud documentation.
Cast AI Autoscaler can be instructed to prefer dedicated hosts until capacity is available when the following parameters are set in the Node template:
| Attribute | Description |
|---|---|
| Affinity | The affinity rules required for choosing the node dedicated note group. It is constructed using: Key Value
|
| azName | The availability zone of the dedicated node group |
| InstanceTypes | Instance types of the dedicated node group |
Example of configuration setup in the API response:
    "dedicatedNodeAffinity": [
      {
        "instanceTypes": [
          "c2-node-60-240"
        ],
        "name": "test-nodegroup",
        "affinity": [
          {
            "operator": "IN",
            "key": "stnodegroup",
            "values": [
              "test-group"
            ]
          },
          {
            "operator": "IN",
            "key": "compute.googleapis.com/project",
            "values": [
              "test-123"
            ]
          }
        ],
        "azName": "europe-west1-b"
Please note that all constraints configured in the node template will be respected (e.g., the minimum CPU minCPU set to 16).
Once the dedicated host capacity is saturated, Cast AI will not add additional dedicated hosts to the node group. Instead, it will return to multi-tenant instances configured in the Node template. During the fallback to multi-tenant instances, the same availability zone will be selected as configured in the dedicatedNodeAffinity.
NoticeCurrently, the Rebalancer does not simulate the deletion of instances running on dedicated nodes; therefore, rebalancing the whole cluster might produce some suboptimal results.
Target capacity reservations
AWS onlyCapacity reservation targeting is currently available for AWS EKS clusters only.
You can configure a Node Template to target one or more AWS capacity reservations: On-Demand Capacity Reservations (ODCRs) or EC2 Capacity Blocks for ML. When the autoscaler detects pending pods matching a Node Template with capacity reservation targeting, it provisions nodes into the reserved capacity first, up to the reserved instance count.
To target capacity reservations:
- Create or edit a Node Template.
- In the Target capacity reservations section, click + Add.
- Select one or more reservations from the Capacity reservation dropdown. Each entry shows the reservation name and its current status (Active or Expired).
- Click Save changes.
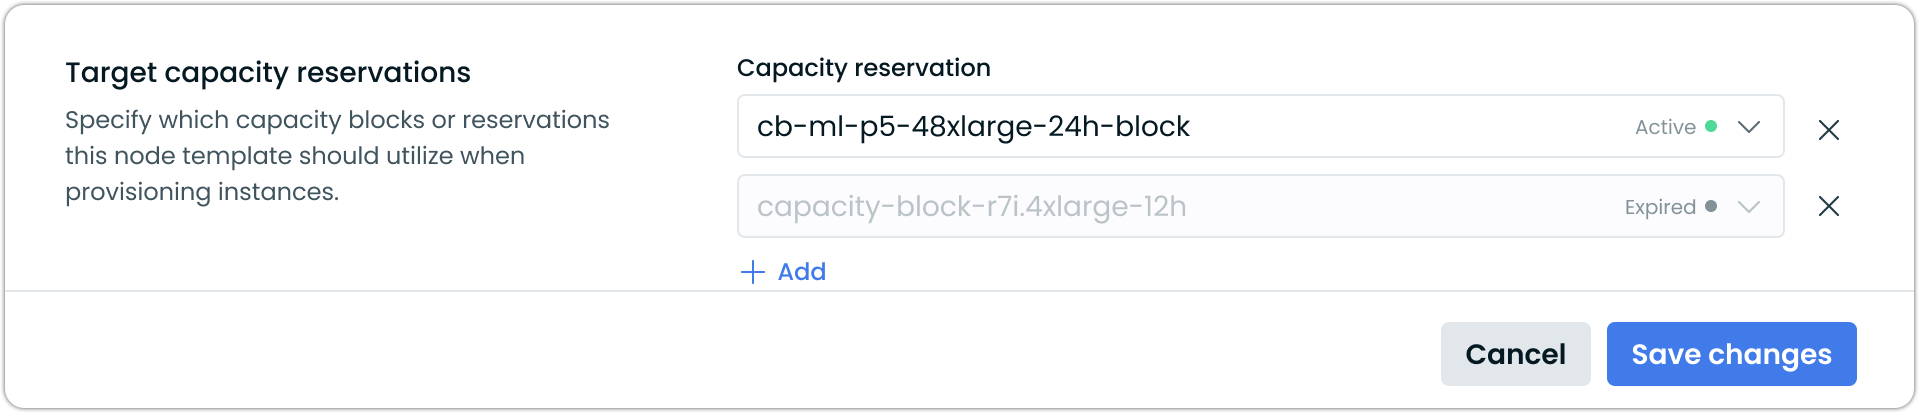
Target capacity reservations section in a Node Template
Auto-populated constraints
When you select a capacity reservation, Cast AI automatically populates and locks the following constraints from the reservation:
Instance type — Set to the reservation's instance type (for example, p5.48xlarge). This field cannot be changed while the reservation is targeted.
Availability Zone — Set to the reservation's AZ. This field cannot be changed while the reservation is targeted.
These inherited constraints ensure that the Node Template only provisions nodes compatible with the reservation. To change these constraints, remove the reservation targeting first.
You can still configure all other Node Template settings, including Node Configuration, custom labels, taints, and fallback purchase options (On-Demand or Spot).
Taints and tolerations
Nodes provisioned from a capacity reservation are automatically tainted with reserved=only:NoSchedule. Your workloads must include a matching toleration to be scheduled on these nodes:
tolerations:
  - key: "reserved"
    value: "only"
    operator: "Equal"
    effect: "NoSchedule"
This taint ensures only workloads explicitly configured for reserved capacity are placed on these nodes.
Fallback behavior
If the targeted reservation is fully utilized or unavailable, the autoscaler evaluates the fallback options configured on the Node Template:
If On-Demand or Spot is enabled, the autoscaler provisions using those options as usual, following the standard candidate ordering.
If no fallback options are configured, pods remain pending until capacity becomes available in the reservation.
You can target multiple capacity reservations on a single Node Template. If one reservation is exhausted, the autoscaler moves to the next before considering non-reserved options.
Multiple Node Templates targeting the same reservation
Multiple Node Templates can target the same capacity reservation. Cast AI tracks utilization across all Node Templates and clusters. Since AWS enforces capacity limits at the reservation level, over-assignment may cause provisioning attempts to fail when the reservation is already fully utilized.
For complete documentation on capacity reservations, see AWS capacity reservations.
High availability
Maintaining minimum nodes per template
While Cast AI doesn't directly support setting a minimum node count per template, you can maintain a fixed number of nodes using a helper deployment. This is useful for maintaining a fixed set of nodes at all times for specific workloads.
Implementation
You can maintain a minimum number of nodes by creating a helper deployment. This deployment uses minimal resources to keep nodes active without affecting your actual workloads:
- Places one pod per node using
podAntiAffinity - Uses the desired node template via
nodeSelector - Prevents node removal using Cast AI's removal-disabled label:
autoscaling.cast.ai/removal-disabled: "true"
Use this helper deployment with the desired node template for which you always wish to have a fixed number of nodes.
Helper deployment
This is an example of a helper deployment that maintains 6 nodes for a specific template:
apiVersion: apps/v1
kind: Deployment
metadata:
  name: min-nodes-nt1 # Replace `nt1` with node template name
  namespace: kube-system
  labels:
    app.kubernetes.io/name: min-nodes-nt1 # Replace `nt1` with node template name
    autoscaling.cast.ai/removal-disabled: "true"
spec:
  replicas: 6  # This sets the minimum number of nodes; modify as needed
  selector:
    matchLabels:
      app.kubernetes.io/name: min-nodes-nt1 # Replace `nt1` with node template name
      autoscaling.cast.ai/removal-disabled: "true"
  strategy:
    type: Recreate
  template:
    metadata:
      labels:
        app.kubernetes.io/name: min-nodes-nt1 # Replace `nt1` with node template name
        autoscaling.cast.ai/removal-disabled: "true"
    spec:
      affinity:
        podAntiAffinity:
          requiredDuringSchedulingIgnoredDuringExecution:
          - topologyKey: kubernetes.io/hostname
            labelSelector:
              matchLabels:
                app.kubernetes.io/name: min-nodes-nt1 # Replace `nt1` with node template name
      nodeSelector:
        scheduling.cast.ai/node-template: nt1  # Specify your node template name here
      # Add required tolerations if using a spot-only node template
      tolerations:
        - key: scheduling.cast.ai/spot
          operator: Exists
      containers:
      - name: placeholder
        image: busybox
        command: ["sh", "-c", "tail -f /dev/null"]
        resources:
          requests:
            memory: 10Mi
This helper deployment works by:
- Creating lightweight placeholder pods that consume minimal resources
- Using
podAntiAffinityto ensure one pod per node - Targeting your specific node template using
nodeSelector - Preventing node removal with the
autoscaling.cast.ai/removal-disabledlabel set totrue - Including spot tolerations if the node template is configured for spot-only instances (optional)
Depending on your requirements, modify this helper deployment manifest to suit your desired node count.
Updated 4 days ago