
Node configuration
What is Node configuration?
The Cast AI provisioner allows you to set node configuration parameters that the platform will apply to provisioned nodes. Node configuration on its own does not influence workload placement. Its sole purpose is to apply user-provided configuration settings on the node during the provisioning process.
A cluster can have multiple Node Configurations linked to various Node Templates. However, you can select only one node configuration, which Cast AI Autoscaler will use as the default.
NoteYou can link node configuration to multiple node templates, but one node template can have just a single node configuration link.
You can manage node configurations via UI:Autoscaler>Node configuration, API or Terraform.
Shared configuration options
The following table provides a list of supported cloud-agnostic configuration parameters:
| Configuration | Description | Default value |
|---|---|---|
| Root volume ratio | CPU to storage (GiB) ratio | 1 CPU: 0 GiB |
| Initial disk size | The base size of the disk attached to the node | 100 GiB |
| Image | Image to be used when building a Cast AI provisioned node. See virtual machine image choice below for cloud-specific behaviors. | The latest available for Kubernetes release, based on an OS chosen by Cast AI |
| SSH key | Base64-encoded public key or AWS key ID | "" |
| Subnets | Subnet IDs for Cast AI provisioned nodes | All subnets pointing to NAT/Internet Gateways inside the cluster's VPC |
| Instance tags | Tags/VM labels to be applied on Cast AI provisioned nodes | "" |
| Kubelet configuration | A set of values that will be added or overwritten in the Kubelet configuration | JSON |
| Init script | An additional configuration for the node. It can be a bash script or settings in a format depending on the cloud and other settings | "" |
Instance type compatibility and limitations
When configuring nodes in Cast AI, certain instance types may have limitations or specific requirements based on their underlying hardware architecture and features. Understanding these limitations is crucial for proper cluster configuration.
Instance Type Identification
You can identify instance types and their underlying architecture through:
- Cloud Service Provider (CSP) documentation for each instance family
- Instance type naming patterns
- CLI commands, which vary for each CSP
AWS Nitro System
The AWS Nitro System is Amazon's virtualization infrastructure that provides enhanced networking, high-performance storage, and improved security features. Instance types based on the Nitro system have different capabilities compared to non-Nitro instances.
AWS Bottlerocket Images
Bottlerocket is a Linux distribution designed and optimized for container orchestration. It contains only the essential components required for this purpose, minimizing the attack surface and enforcing container best practices.
Bottlerocket has specific instance type requirements and limitations.
NoteWhen using Bottlerocket AMIs, ensure your node templates include only Nitro-based instance types. Non-Nitro instances are not supported and will fail to provision.
EKS-specific subnet rules
NoteIn EKS only subnets which match one of the rules below are allowed to be added to Node Configuration:
- association with a route table that has a 0.0.0.0/0 route to Internet Gateway, it's known as a public subnet. Subnet also must have "MapPublicIpOnLaunch: true" set
- association with a route table that has a 0.0.0.0/0 route to Transit Gateway, it's known as a private subnet
- association with a route table that has a 0.0.0.0/0 route to NAT Gateway, it's known as a private subnet
If Cast AI cannot detect a routable subnet (a subnet that has access to the Internet), you can add a tag
cast.ai/routable=trueto the subnet. Cast AI will then consider a subnet with this tag as having Internet access.
Some configuration options are cloud provider-specific. See the table below:
EKS-specific configuration options
| Configuration | Description | Default value |
|---|---|---|
| Security groups | Security group IDs for nodes provisioned in Cast AI. | and Cast AI SG |
| Instance profile ARN | This is the instance profile ARN for Cast AI provisioned nodes. It is not recommended that you share this profile with EKS-managed (shared) node pools. | cast-<cluster-name>-eks-<cluster-id> (only the last 8 digits of the cluster ID) |
| Dns-cluster-ip | Override the IP address to be used for DNS queries within the cluster. Supports both IPv4 and IPv6 formats. | "" |
| Container runtime | Container runtime engine selection: Docker or | Unspecified |
| Docker configuration | A that will be overwritten in the Docker daemon configuration. | JSON |
| Volume type | EBS volume type to be used for provisioned nodes. | gp3 |
| Volume IOPS | EBS volume IOPS value to be used for provisioned nodes. | 3000 |
| KMS Key ARN | Customer-managed KMS encryption key to be used when encrypting EBS volumes. | Unspecified |
| Volume throughput | EBS volume throughput in MiB/s to be used for provisioned nodes. | 125 |
Use v1 | IMDSv1 and v2 are enabled by default; otherwise, only IMDSv2 will be allowed. (For IMDSv2 as Required use False). | True |
| Target Groups | A list of Arn and port (optional). New instances will automatically be registered for all given load balancer target groups upon creation. | Unspecified |
| Image Family | The OS family used when provisioning nodes. Possible values: FAMILY_AL2, FAMILY_AL2023, FAMILY_BOTTLEROCKET. Note:FAMILY_AL2 is being deprecated with Kubernetes v1.33. New deployments should use FAMILY_AL2023 or FAMILY_BOTTLEROCKET. Container Live Migration requiresFAMILY_AL2023. | Amazon Linux 2023 (FAMILY_AL2023) for Kubernetes v1.33+ clusters.Amazon Linux 2 ( FAMILY_AL2) for Kubernetes v1.32 and below |
| Max Pods Formula | Dynamic formula to calculate the max pods restriction on the node's section for tips on using this field correctly. | Unspecified (uses EKS default) |
| Threads per CPU | Controls whether simultaneous multithreading (SMT) is disabled on worker nodes. When Hyper-Threading is disabled, vCPUs will equal the number of physical cores. | Enabled (checkbox unchecked; hyper-threading enabled) |
| Node Group ARN | Specifies a dedicated IAM role ARN to be used when creating temporary managed node groups (such as during cluster hibernation resume). Required for clusters where the node IAM role is granted cluster access via the aws-auth ConfigMap, to prevent IAM role removal from the ConfigMap when temporary node groups are deleted. Not required when node IAM roles use EKS access entries for authentication. Despite its name, this field expects an IAM role ARN, not a node group ARN. This field is only available via Terraform (node_group_arn) or API (nodeGroupArn). | Unspecified |
Important: AWS is ending support for Amazon Linux 2 (AL2) with Kubernetes v1.32Starting with Kubernetes v1.33, only AL2023 and Bottlerocket AMIs will be supported by AWS for EKS. This change has the following implications:
- Cast AI-managed nodes already default to AL2023 on clusters running Kubernetes 1.33 or higher
- Existing AL2-based nodes won't be automatically upgraded - manual migration is required
- The upgrade deadline, based on AWS's initial guidance, is expected to be around November 2025
- Container Live Migration requires AL2023 and is not compatible with AL2 or Bottlerocket
To prepare for this change, we recommend:
- Update your Node Configuration to use
FAMILY_AL2023for Container Live Migration compatibility, orFAMILY_BOTTLEROCKETfor security-focused workloads- Test the new OS images in non-production environments first
- Plan a gradual migration of your production workloads before the deadline
Do not hesitate to contact Cast AI Customer Success for any additional guidance and support.
Warm pool compatibilityCast AI does not support managing nodes provisioned from AWS Auto Scaling warm pools. If your EKS cluster uses warm pools for faster node provisioning, those nodes should be managed directly through AWS tools rather than through Cast AI.
KMS key for EBS volume
The key that you provide for the encryption of EBS volume must have the following policy:
  {
            "Sid": "Allow access through EBS for all principals in the account that are authorized to use EBS",
            "Effect": "Allow",
            "Principal": {
                "AWS": "*"
            },
            "Action": [
                "kms:ReEncrypt*",
                "kms:GenerateDataKey*",
                "kms:Encrypt",
                "kms:DescribeKey",
                "kms:Decrypt",
                "kms:CreateGrant"
            ],
            "Resource": "*",
            "Condition": {
                "StringEquals": {
                    "kms:CallerAccount": "<<account_ID>",
                    "kms:ViaService": "ec2.REGION.amazonaws.com"
                }
            }
}
module "kms" {
  source = "terraform-aws-modules/kms/aws"

  description = "EBS key"
  key_usage   = "ENCRYPT_DECRYPT"

  # Policy

  key_statements = [
    {
      sid =  "Allow access through EBS for all principals in the account that are authorized to use EBS",
      principals = [
        {
          type        = "AWS"
          identifiers = ["*"]
        }
      ]
      actions = [
        "kms:Encrypt",
        "kms:Decrypt",
        "kms:ReEncrypt*",
        "kms:GenerateDataKey*",
        "kms:CreateGrant",
        "kms:DescribeKey"
      ],
      resources =  ["*"],
      conditions = [
        {

          test     = "StringEquals"
          variable = "kms:ViaService"
          values   = [
            "ec2.${var.cluster_region}.amazonaws.com",
          ]
        },
        {
          test     = "StringEquals"
          variable = "kms:CallerAccount"
          values   = [
            data.aws_caller_identity.current.account_id
          ]
        }
      ]}
  ]

# Aliases
  aliases = ["mycompany/ebs"]

  tags = {
    Terraform   = "true"
    Environment = "dev"
  }
}
Load balancer target group prerequisites
To use load balancer target groups with Cast AI-managed nodes, you need to:
- Configure the appropriate IAM permissions
- Specify target groups in your node configuration
Required IAM permissions
The Cast AI IAM role requires additional permissions to register and deregister nodes with target groups. Add the following IAM policy:
{
    "Version": "2012-10-17",
    "Statement": [
        {
            "Sid": "castai-target-group",
            "Effect": "Allow",
            "Action": [
                "elasticloadbalancing:RegisterTargets",
                "elasticloadbalancing:DeregisterTargets"
            ],
            "Resource": "arn:aws:elasticloadbalancing:<region>:<account>:targetgroup/*/*"
        }
    ]
}
Note
- This example policy allows access to all target groups. For enhanced security, replace the wildcards
*with specific target group ARNs.- If your cluster uses IPv6, ensure your nodes have the necessary IPv6 address assignment permissions configured. See the AWS documentation for IPv6 networking and Cast AI cloud permissions documentation.
How target groups work
- When specified in the node configuration, new instances are automatically registered with the load balancer target groups upon creation
- Without proper permissions, nodes will still be created but won't be registered with target groups
- If registration fails, you'll receive a notification detailing which target groups weren't updated
Using IP prefix delegation with Cast AI
Prefix delegation mode in AWS CNI is a way to increase pod density on instances beyond the normal limits. Cast AI detects when this setting is turned on in the CNI and adjusts the calculations about subnet and node capacity accordingly. See AWS documentation for more information on how the setting affects IP address management.
If prefix delegation is used, a Maximum Pods formula should be set to properly configure the kubelet's maximum pod count. See Prefix delegation formula below for the default formula that matches AWS recommendations. This can be adjusted if needed (for example, to reserve an IP for extra ENIs on the nodes for other purposes). If the formula is not set, it is possible to see lower pod density than expected, even though there are sufficient IP slots available on the node.
Container Live Migration compatibilityContainer Live Migration supports both standard and prefix delegation networking configurations. When using prefix delegation with CLM, ensure your node configuration maintains consistent networking setup across all CLM-enabled nodes.
Maximum Pods formula
The Maximum Pods formula dynamically determines the maximum number of pods that can run on a node in your EKS cluster. This calculation serves two primary purposes:
- It informs the
kubeletabout the maximum number of pods that can be hosted on a node. - It assists the Cast AI Autoscaler in planning and optimizing cluster resources.
You can optimize your cluster's pod distribution and resource utilization by fine-tuning this formula.
When using AWS CNI for IP address management, setting a static value for max pods directly in the kubelet configuration is not recommended. The same node configuration is usually used for different instance types, and the max pods differ per instance type. Use the Maximum Pods formula to make the value dynamic while still configuring the kubelet accordingly or remove the setting from the kubelet's configuration (the value will be calculated dynamically at node bootstrap time by default).
Formula variables
Maximum Pods formulas are constructed using the following variables:
| Variable | Description | Range/Value | Default |
|---|---|---|---|
NUM_IP_PER_PREFIX | Number of IPv4 addresses per prefix. Affects calculation when using prefix delegation. Specified as a parameter in the node configuration. | 0-256 | 1 |
NUM_MAX_NET_INTERFACES | Maximum number of network interfaces. | Instance-specific | N/A |
NUM_IP_PER_INTERFACE | Number of IPv4 addresses per interface. | Instance-specific | N/A |
NUM_CPU | Number of CPUs. | Instance-specific | N/A |
NUM_RAM_GB | Amount of RAM in GB. | Instance-specific | N/A |
Cast AI provides several preset formulas by default from which to choose.
Example formulas
The Maximum Pods formula can be tailored to different cluster configurations and requirements. Here are some common examples:
Default EKS formula
NUM_MAX_NET_INTERFACES * (NUM_IP_PER_INTERFACE - 1) + 2This is often the default formula for EKS clusters. It calculates the maximum pods based on available network interfaces and IPs, reserving one IP per interface and adding 2 for system pods.
Prefix delegation formula
NUM_MAX_NET_INTERFACES * (NUM_IP_PER_INTERFACE - 1) * NUM_IP_PER_PREFIX + 2This formula accounts for the additional IPs available through prefix delegation. Since the values of the formula can get unrealistically high for large instance types, Cast AI provides a preset that also puts a reasonable upper limit:
math.least((NUM_MAX_NET_INTERFACES - 1) _ (NUM_IP_PER_INTERFACE - 1) _ NUM_IP_PER_PREFIX + 2, 300)
NoteThe 300-pod cap is a safeguard against node instability that can occur with extremely high pod counts. While AWS instances can theoretically support higher IP counts, running hundreds of pods on a single node can lead to resource constraints and performance issues, especially for the kubelet process. AWS's own calculator caps at 250 pods for similar stability reasons.
If your workload is specifically designed to handle higher pod densities and you have tested node stability at these counts, you can create a custom formula without this cap using the API or Terraform.
NoteAWS prefix delegation is not supported on non-Nitro instance types. If you're using prefix delegation in your cluster, ensure your node templates exclude non-Nitro instance families. This limitation applies regardless of which autoscaling solution you use, as it is an AWS-imposed limitation.
If you're not using prefix delegation, you can safely use max pods formulas (without the
NUM_IP_PER_PREFIXvariable) with any instance type.
Reserved network interface formula
(NUM_MAX_NET_INTERFACES - 1) * (NUM_IP_PER_INTERFACE - 1) + 2This formula reserves one entire network interface.
Subtracting a network interface is also required if the pod security groups feature is used, as 1 ENI is not available for pod IP allocation in this case. See relevant AWS documentation. This applies to formulas above if the feature is used in tandem.
Fixed value
512Simple scalar values are allowed. This example sets a fixed maximum of 512 pods per node, regardless of other factors.
These examples demonstrate the flexibility of the Maximum Pods formula. You can create custom formulas that best suit your cluster's specific needs and constraints.
How the Maximum Pods formula works
The MaxPods formula is an expression that evaluates a number. We use Common Expression Language (CEL) to evaluate it. Here is how it operates:
- Input: The formula takes the node's characteristics as input variables (e.g.,
NUM_MAX_NET_INTERFACES,NUM_CPU, scalers, etc.). - Calculation: It performs evaluation using the CEL library.
- Output: The calculation result is used as an integer. This number becomes the maximum number of pods allowed on the node.
- Application: The calculated value is used by the
kubeletto limit pod scheduling and by the CAST AI Autoscaler for capacity planning.
For example, let's break down a simple formula:
NUM_MAX_NET_INTERFACES * (NUM_IP_PER_INTERFACE - 1) + 2If a node has 4 network interfaces (NUM_MAX_NET_INTERFACES = 4) and 10 IPs per interface (NUM_IP_PER_INTERFACE = 10), the calculation would be:
4 * (10 - 1) + 2 = 4 * 9 + 2 = 36 + 2 = 38Thus, this node would be allowed to run a maximum of 38 pods.
The formula's flexibility allows for complex calculations that can account for various resource constraints and operational requirements. When you select or create a formula, you define the logic for this pod limit calculation.
Custom formulas
While the Cast AI Console UI provides several preset formulas for configuring an EKS node, you can define a custom formula using Terraform for more advanced configurations.
Threads per CPU
The Threads per CPU setting allows you to control whether Hyper-Threading (simultaneous multithreading) is enabled or disabled on your AWS EKS worker nodes.

Disabling Hyper-Threading can be beneficial for high-performance computing (HPC) workloads that require predictable performance and minimal resource contention.
How to configure
To disable Hyper-Threading:
- UI: Check the Disable Hyper-Threading checkbox in the Advanced Settings section of your Node Configuration
- API: Set the
threadsPerCpuparameter to1when updating a node configuration. To keep Hyper-Threading enabled, leave this parameter undefined - Terraform: Use the
threads_per_cpuparameter in theeksblock of yourcastai_node_configurationresource
How it works
- Enabled (default): Hyper-Threading is active, allowing each physical CPU core to handle multiple threads simultaneously
- Disabled: Hyper-Threading is turned off, restricting each physical core to handle only one thread at a time
When Hyper-Threading is disabled, the number of available vCPUs will equal the number of physical CPU cores on the instance.
ImportantChanging the Threads per CPU setting only affects newly provisioned nodes. To apply this configuration to existing nodes, you must either delete and replace them or perform a cluster rebalancing operation.
Using Amazon Linux 2023 with Cast AI
Amazon Linux 2023 (AL2023) is the next generation of Amazon Linux, a Linux distribution provided by Amazon Web Services (AWS). AL2023 is the required image family for Container Live Migration functionality.
Passing Custom Configuration via Init Script
It is possible to pass a shell script to run during node initialization or pass a nodeadm NodeConfig to apply to the new nodes. Note that the values passed as NodeConfig will apply and possibly overwrite values computed by the Cast AI provisioner.
Passing a shell script
Init script:
#!/bin/bash

echo "a script has run during node provisioning" > /var/log/node-configuration-init-script-out.txt
Passing a nodeadm Node Config
nodeadm Node ConfigInit script specified as MIME multipart with nodeadm NodeConfig. Refer to AWS Node Configuration API.
MIME-Version: 1.0
Content-Type: multipart/mixed; boundary="BOUNDARY"

--BOUNDARY
Content-Type: application/node.eks.aws

---
apiVersion: node.eks.aws/v1alpha1
kind: NodeConfig
spec:
  kubelet:
    config:
      evictionMaxPodGracePeriod: 30
--BOUNDARY--
Passing a shell script and nodeadm Node Configuration
nodeadm Node ConfigurationUsing MIME multipart, it is possible to pass nodeadm NodeConfig and shell scripts together:
MIME-Version: 1.0
Content-Type: multipart/mixed; boundary="BOUNDARY"

--BOUNDARY
Content-Type: application/node.eks.aws

---
apiVersion: node.eks.aws/v1alpha1
kind: NodeConfig
spec:
  kubelet:
    config:
      evictionMaxPodGracePeriod: 30
--BOUNDARY
Content-Type: text/x-shellscript; charset="us-ascii"

#!/bin/bash

echo "a script has run during node provisioning" > /var/log/node-configuration-init-script-out.txt

--BOUNDARY--
Using Bottlerocket with Cast AI
Bottlerocket is a Linux distribution designed and optimized for container orchestration. It contains only the essential components required for this purpose, minimizing the attack surface and enforcing container best practices.
Container Live Migration compatibilityContainer Live Migration is currently not supported with Bottlerocket AMIs. If you require Container Live Migration functionality, use Amazon Linux 2023 (
FAMILY_AL2023) instead.
Slow node startup with BottlerocketIf Bottlerocket nodes take 5+ minutes to reach
Readystate, the most common cause is a missing Dns-cluster-ip value in your Node Configuration. Without this value, Bottlerocket's bootstrap process attempts to discover it via IMDS, which can time out and delay the node join by ~5 minutes. Set the Dns-cluster-ip field to your cluster'skube-dnsClusterIP to resolve this. See Troubleshooting: Bottlerocket nodes take 5+ minutes to reach Ready state for details.
This section provides guidance on using Bottlerocket with Cast AI, including instructions on passing custom configurations and important considerations to remember. Useful resources are linked throughout to further understand Bottlerocket and its use cases. To start, here is a Bottlerocket overview:
Container Host - Bottlerocket - Amazon Web Services
Using Bottlerocket
You can use Bottlerocket on Cast AI by specifying the appropriate Amazon Machine Image (AMI) ID or name in Cast AI node configurations. This works out of the box for standard setups, but applying custom configurations requires a slightly different approach due to Bottlerocket's unique architecture.

Specifying the appropriate Amazon Machine Image (AMI) ID

Specifying the appropriate Amazon Machine Image (AMI) name
Limitations with Advanced Node Configuration
When using Bottlerocket AMIs, many of the fields in the advanced section of Cast AI's node configurations do not apply and cannot be used to pass custom configurations. This limitation is due to Bottlerocket's security-focused architecture, which does not provide a default shell in its container. Consequently, any changes to the AMI configuration must be passed through the settings exposed in the Bottlerocket API.
For a full list of settings available in Bottlerocket's API, refer to the Bottlerocket Settings API Reference.
Passing Custom Configurations via Init Script
Outside of Cast AI, custom configurations are typically passed to Bottlerocket AMIs in TOML format. Here's an example:
[settings.kubernetes]
api-server = "${endpoint}"
cluster-certificate = "${cluster_auth_base64}"
cluster-name = "${cluster_name}"
${additional_userdata}

[settings.kubernetes.node-labels]
"ingress" = "allowed"
"environment" = "prod"

[settings.kubernetes.system-reserved]
cpu = "100m"
memory = "256Mi"
ephemeral-storage = "2Gi"

[settings.kubernetes.kube-reserved]
cpu = "100m"
memory = "256Mi"
ephemeral-storage = "512Mi"

[settings.kubernetes.eviction-hard]
"memory.available" = "10%"

# Hardening based on <https://github.com/bottlerocket-os/bottlerocket/blob/develop/SECURITY_GUIDANCE.md>

[settings.kernel]
lockdown = "integrity"

[settings.host-containers.admin]
enabled = false
source = "328549459982.dkr.ecr.eu-central-1.amazonaws.com/bottlerocket-admin:v0.7.2"

[settings.host-containers.control]
enabled = false
Converting TOML Settings to Init Script Format
In Cast AI, you can pass custom Bottlerocket configurations through the init script in the advanced section of node configurations. However, the settings must be converted to a single-line format compatible with the init script to do this.
Below is an example that converts the TOML-style settings listed above into a format compatible with the init script:
settings.kubernetes.node-labels."ingress"="allowed"
settings.kubernetes.node-labels."environment"="prod"

settings.kubernetes.system-reserved.cpu="100m"
settings.kubernetes.system-reserved.memory="256Mi"
settings.kubernetes.system-reserved.ephemeral-storage="2Gi"

settings.kubernetes.kube-reserved.cpu="100m"
settings.kubernetes.kube-reserved.memory="256Mi"
settings.kubernetes.kube-reserved.ephemeral-storage="512Mi"

settings.kubernetes.eviction-hard."memory.available"="10%"

settings.kernel.lockdown="integrity"

settings.host-containers.admin.enabled=false
settings.host-containers.admin.source="328549459982.dkr.ecr.eu-central-1.amazonaws.com/bottlerocket-admin:v0.7.2"

settings.host-containers.control.enabled=false
Bottlerocket GPU nodesWhen using GPU nodes with Bottlerocket, you must keep the default parameter
settings.kernel.lockdown="none".
There is a known Bottlerocket issue with self-signing the NVIDIA drivers: https://github.com/bottlerocket-os/bottlerocket/issues/4218.GPU sharing configuration: When using GPU time-slicing with Bottlerocket, Cast AI automatically configures the required NVIDIA device plugin settings. For configuration details, see GPU sharing with time-slicing.
Docker Authentication Configuration
When using private container registries with Bottlerocket nodes, you need to configure Docker authentication credentials through the container registry settings for pulling images from Docker Hub or other private registries.
Configuration Format
To configure Docker authentication for Bottlerocket nodes, use the following format in your init script:
settings.container-registry.credentials = [{registry = "docker.io", auth = "base64_encoded_credentials"}]Or with username and password:
settings.container-registry.credentials = [{registry = "docker.io", username = "your_username", password = "your_password"}]Example Configuration
Here's a complete example for Docker Hub authentication:
settings.container-registry.credentials = [{registry = "docker.io", auth = "dXNlcm5hbWU6cGFzc3dvcmQ="}]Multiple Registry Support
You can configure multiple container registries by adding additional entries to the credentials array:
settings.container-registry.credentials = [
  {registry = "docker.io", auth = "base64_encoded_docker_credentials"},
  {registry = "your-private-registry.com", auth = "base64_encoded_private_credentials"}
]
For more information on Bottlerocket's container registry settings, refer to the Bottlerocket Container Registry API documentation.
Bottlerocket Settings Reference
The remaining fields in the advanced section of Cast AI's node configuration cannot be used to pass these configurations. Instead, you must use the settings exposed in the Bottlerocket API and set them within the init script.
Here is a visual of what sections of advanced node configuration settings can be used with Bottlerocket:
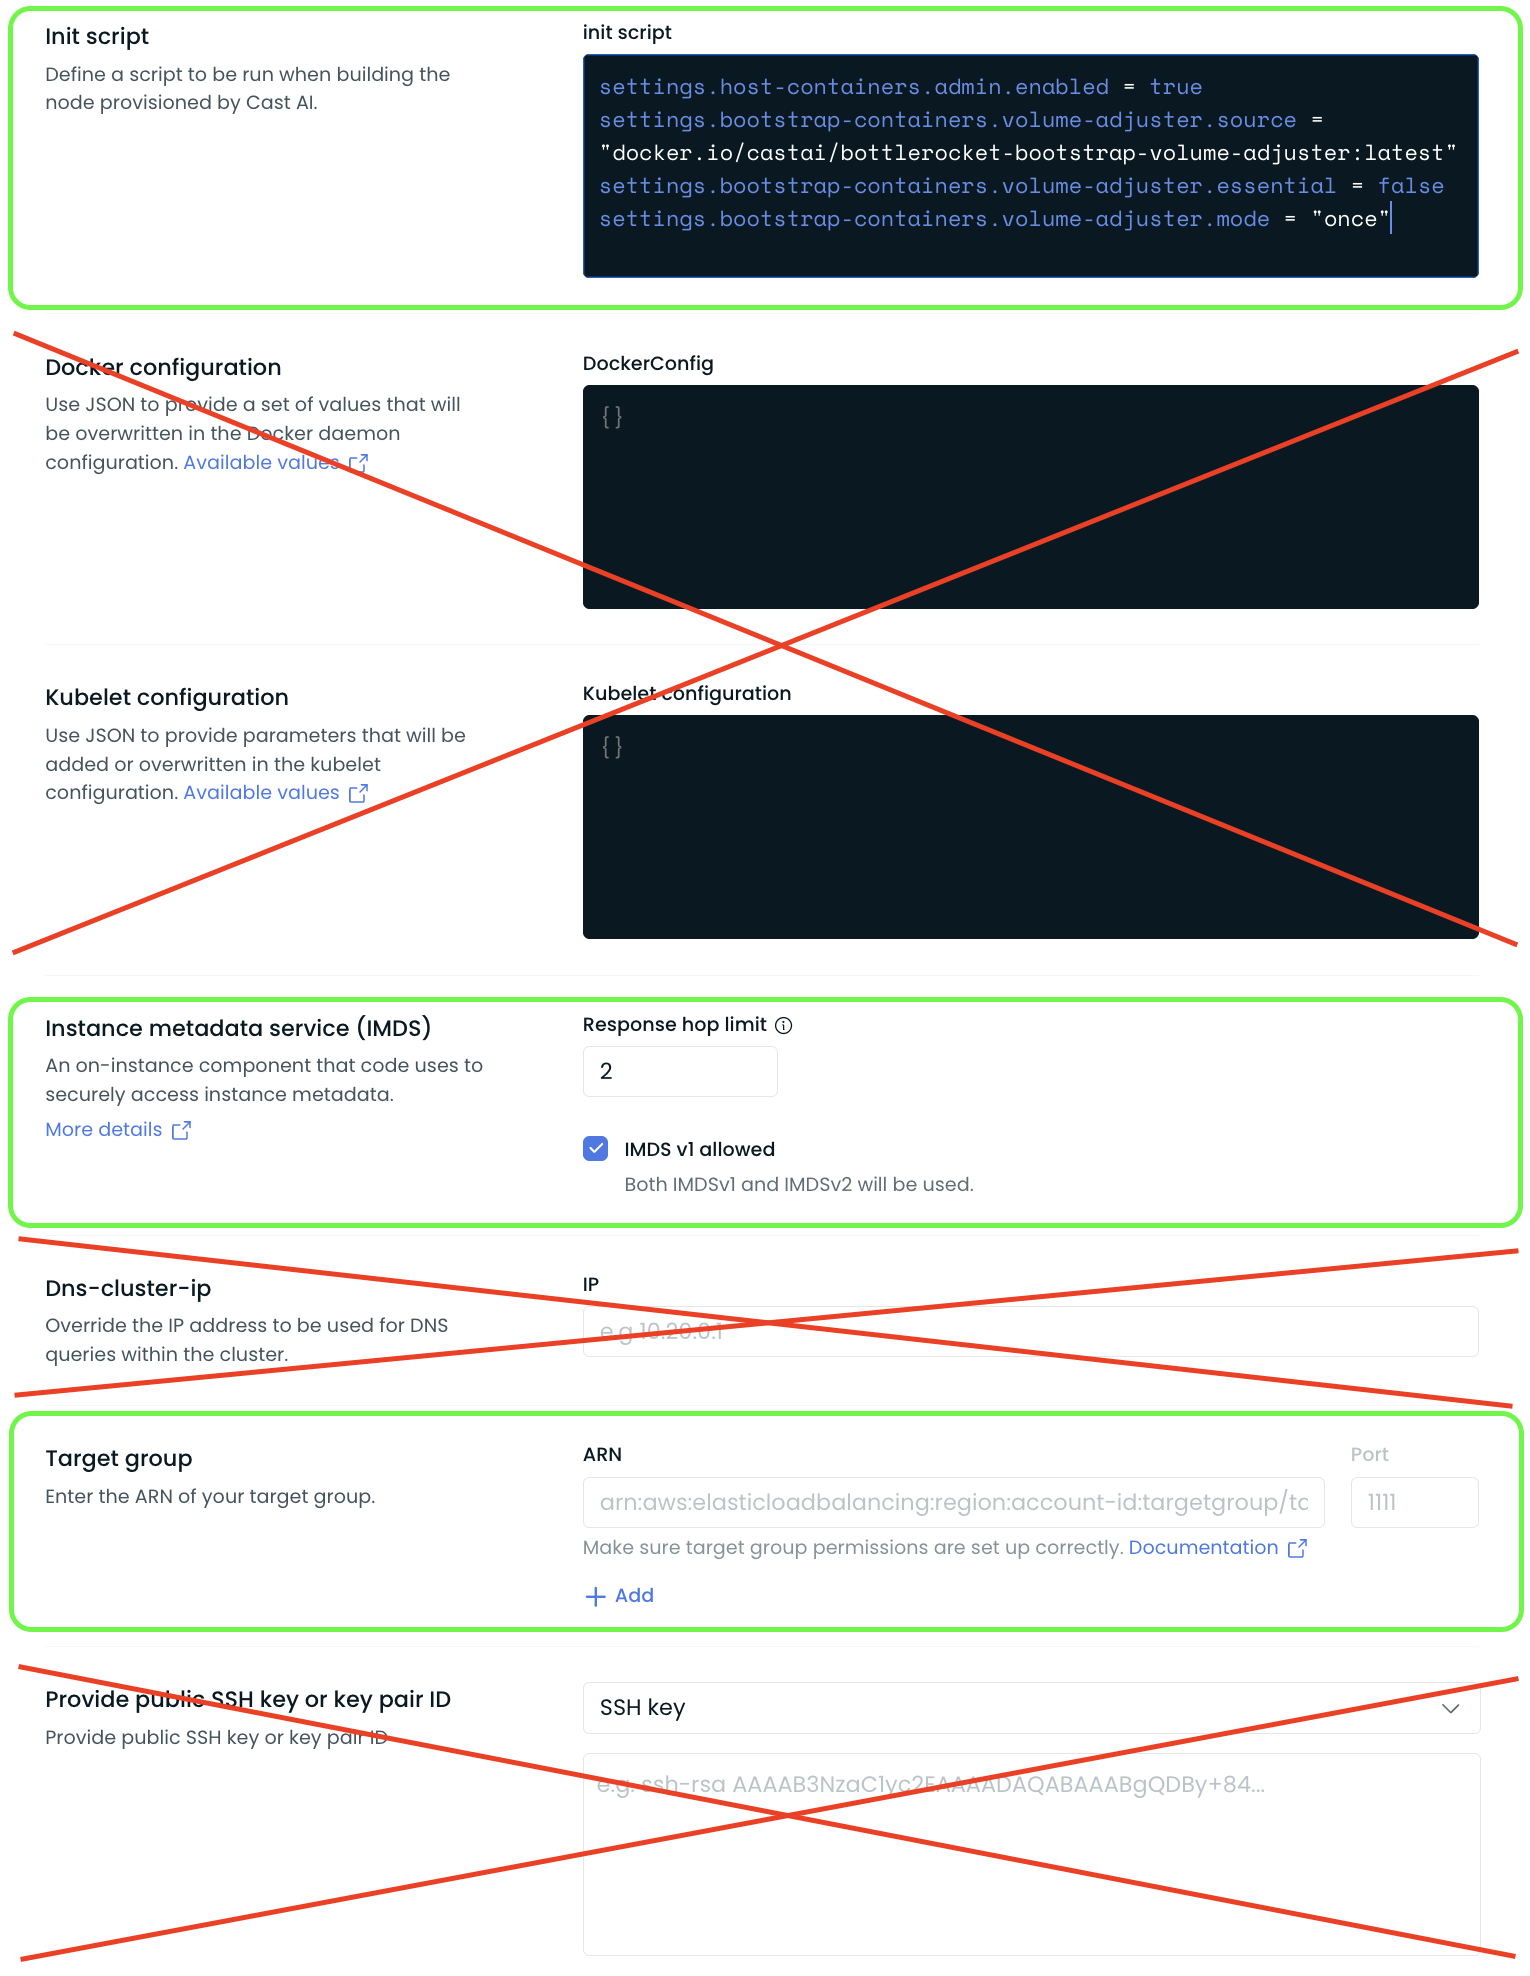
Customers migrating from other AMIs to Bottlerocket must convert their custom configurations into this Bottlerocket-compatible style and can only use the settings exposed in the API reference shared above.
Using Bootstrap Containers for Advanced Configurations
Any custom configurations outside of those settings, or the ability to change settings dynamically at boot, require the use of what Bottlerocket calls a bootstrap container.
Here is an example that dynamically adjusts the maximum number of pods per node based on the instance type:
settings.bootstrap-containers.max-pods-calculator.source = "docker.io/kisahm/bottlerocket-bootstrap-max-pods:v0.2"
settings.bootstrap-containers.max-pods-calculator.essential = false
settings.bootstrap-containers.max-pods-calculator.mode = "always"
settings.bootstrap-containers.max-pods-calculator.user-data = "ZXhwb3J0IEFERElUSU9OQUxfT1BUSU9OUz0iLS1jdXN0b20tY25pIGNpbGl1bSAtLWNpbGl1bS1maXJzdC1pbnRlcmZhY2UtaW5kZXggMSIK"
See the GitHub repository for detailed instructions: Bottlerocket Bootstrap Custom Max Pods
Connecting to Bottlerocket Nodes
Connecting to Bottlerocket nodes requires using an admin or control host container with special privileges. Guidance is provided in the Bottlerocket documentation:
Using Bottlerocket with Cast AI provides a secure foundation for container orchestration. While Bottlerocket's minimalistic design limits the use of traditional configuration methods, you can effectively pass custom configurations through the init script by converting them into the appropriate format. For advanced or dynamic configurations, bootstrap containers offer a solution to extend functionality.
GKE-specific configuration options
| Configuration | Description | Default value |
|---|---|---|
| Network tags | A string to be added to a tags field in a GCP VM resource | Empty |
| Max pods per node | Maximum number of pods to be hosted on a node | 110 |
| Boot disk | Boot disk storage type | balanced as per GCP documentation |
| Use Local SSD-backed ephemeral storage | Attach local ephemeral storage backed by Local SSD volumes. Check GCP documentation for more details. | False |
| Max pods per node formula | Advanced field. Formula to calculate the maximum number of pods that can run on a node. This affects how many IP addresses a node will need. Available variables: NUM_CPU (instance parameter), NUM_RAM_GB (instance parameter). This formula reserves Pod CIDR space the same way GKE does. GKE doubles the max-pods-per-node value, then rounds up to the next power of 2 to determine the CIDR size. This reduces IP address reuse as Pods are created and deleted. For example, if max pods per node is 11, you need 22 IPs. The next power of 2 is 32, so the Pod CIDR will be /27.In general, we recommend using Max pods per node with a static number instead of this advanced formula field. More info: Flexible Pod CIDR ranges for clusters | Empty (uses static Max pods per node value) |
GKE Max Pods Per Node Configuration
GKE offers two ways to configure the maximum number of pods per node:
- Max pods per node (recommended): Set a static number that applies to all nodes in the configuration
- Max pods per node formula (advanced): Use a dynamic formula that calculates the limit based on node characteristics
When to use the formula
The formula field is an advanced option that dynamically calculates pod limits based on node properties. Use it only when:
- You need different pod limits for different instance types within the same node configuration
- You have specific requirements that cannot be met with a static value
For most use cases, setting a static Max pods per node value provides better predictability and is easier to manage.
Formula variables
The following variables are available for use in the formula and will be bound to numeric values before evaluation:
| Variable | Description |
|---|---|
NUM_CPU | Number of CPUs available on the node |
NUM_RAM_GB | Amount of RAM in gigabytes available on the node |
Example formula
If you want the smallest value between 5 times the CPUs, 5 times the RAM, or a cap of 110, your formula would be:
math.least(110, 5*NUM_CPU, 5*NUM_RAM_GB)For a node with 8 CPUs and 16 GB RAM, this calculates to:
- 40 (5×8 CPUs)
- 80 (5×16 GB RAM)
- 110 (cap)
The formula picks the smallest value: 40 pods.
How GKE reserves IP addresses
GKE uses a specific method to reserve Pod CIDR space:
- Takes your max pods per node value (static or calculated from formula)
- Doubles this value
- Rounds up to the next power of 2 to determine the CIDR size
This approach reduces IP address reuse as Pods are created and deleted, improving stability.
Example: If max pods per node is 11:
- GKE reserves 22 IPs (11 × 2)
- Next power of 2 is 32
- Pod CIDR will be /27
For more information, see Google's documentation on Flexible Pod CIDR ranges for clusters.
AKS-specific configuration options
| Configuration | Description | Default value |
|---|---|---|
| Max pods per node | Maximum number of pods to be hosted on a node. | `30` |
| OS Disk | The type of managed [OS disk](https://learn.microsoft.com/en-us/azure/virtual-machines/disks-types#disk-type-comparison). | Standard SSD |
| Image Family | The OS family used for provisioning nodes. Possible values: - `FAMILY_UNSPECIFIED` - `FAMILY_UBUNTU` (Cast AI auto-picks the Ubuntu version: Ubuntu 22.04 for k8s <= 1.35, Ubuntu 24.04 for k8s >= 1.36) - `FAMILY_UBUNTU_2204` (Ubuntu 22.04, supported on k8s 1.25–1.36) - `FAMILY_UBUNTU_2404` (Ubuntu 24.04, supported on k8s 1.32+) - `FAMILY_AZURE_LINUX` (Azure Linux 3.0 is available from AKS v1.32 onward) - `FAMILY_WINDOWS_2019` - `FAMILY_WINDOWS_2022`Note: When verifying the OS version of an added node, don't rely on the Kubernetes label — log in to the node and check it directly. | `FAMILY_UBUNTU` |
| Pod subnet ID | The Azure subnet ID to be used for pod IP allocation. This allows you to specify a custom pod subnet per node configuration, enabling support for multiple pod subnets within a single AKS cluster. If not specified, the default pod subnet configured at the cluster level will be used. | `empty` (uses cluster default) |
| Load Balancers | A list of load balancers to attach nodes to. Setting this field disables Cast's default load balancer auto-discovery. `id` - The full ID of the Azure load balancer. `ipBasedBackendPools` - A list of IP-based backend pool names for attaching each node's IP. `nicBasedBackendPools` - A list of NIC-based backend pool names for attaching each node's NIC. | `empty` |
| Accelerated networking | Controls SR-IOV accelerated networking on the node NIC. Set to `Disabled` to force accelerated networking off regardless of whether the VM SKU supports it. When unset, Cast AI follows the default behavior and enables accelerated networking on supported SKUs. | Enabled on VM SKUs that support it |
Pod subnet configuration for AKS
To configure a custom pod subnet for a node configuration:
- Via Terraform: Use the
pod_subnet_idparameter in your Cast AI AKS Terraform configuration:
[...]
pod_subnet_id = azurerm_subnet.pod_subnet_1.id
[..]
module "castai-aks-cluster" {
source = "castai/aks/castai"
aks_cluster_name = var.aks_cluster_name
aks_cluster_region = var.aks_cluster_region
node_resource_group = azurerm_kubernetes_cluster.example.node_resource_group
resource_group = azurerm_kubernetes_cluster.example.resource_group_name
subscription_id = data.azurerm_subscription.current.subscription_id
tenant_id = data.azurerm_subscription.current.tenant_id
node_configurations = {
default = {
disk_cpu_ratio = 25
subnets = [azurerm_subnet.internal.id]
pod_subnet_id = azurerm_subnet.pod_subnet_1.id
tags = {
"node-config" = "default"
}
}
custom_pod_subnet = {
disk_cpu_ratio = 25
subnets = [azurerm_subnet.internal.id]
pod_subnet_id = azurerm_subnet.pod_subnet_2.id
tags = {
"node-config" = "custom-pod-subnet"
}
}
}
# other configuration...
}- Via API: Include the
pod_subnet_idfield in your node configuration API requests
Accelerated networking for AKS
By default, Cast AI provisions AKS nodes with accelerated networking enabled whenever the underlying VM SKU supports it. Accelerated networking offloads packet processing to the host hardware (SR-IOV), reducing latency and CPU overhead.
You can opt out per node configuration by setting Accelerated networking to Disabled. This forces accelerated networking off on every node provisioned from that configuration, even when the SKU supports it. Use this only when you have a specific reason to disable it — for example, compatibility constraints with custom networking stacks or third-party CNIs.
To disable accelerated networking:
- API: Set the
acceleratedNetworkingparameter toACCELERATED_NETWORKING_MODE_DISABLEDin theaksblock when creating a node configuration. To follow the default behavior, leave this parameter undefined.
{
  "aks": {
    "acceleratedNetworking": "ACCELERATED_NETWORKING_MODE_DISABLED"
  }
}- Terraform: Set
accelerated_networking = "disabled"inside theaksblock of yourcastai_node_configurationresource:
resource "castai_node_configuration" "default" {
  name       = "default"
  cluster_id = castai_aks_cluster.example.id
  subnets    = [azurerm_subnet.internal.id]

  aks {
    max_pods_per_node      = 30
    accelerated_networking = "disabled"
  }
}
When the field is omitted (or set to an empty value), Cast AI sends no preference to the API and the default behavior applies.
Virtual machine image choice
When Cast AI provisions a node, it must choose an appropriate VM image. This choice is crucial because the OS and image version determine the correct bootstrapping logic and instance type support, and are critical to ensuring the node joins the cluster successfully. For advanced use cases, Cast AI offers several options in the node configuration.
EKS
EKS supports a combination of the Image and Image Family fields to control OS choice.
- Image family: Determines the provisioning logic based on OS. If not provided, a default family is used for all operations (see table above for defaults). Some init scripts require selecting AMI Family explicitly. For example, if one wanted to provide a
nodeadmconfig via MIME multipart settings, one would need to set AMI Family to Amazon Linux 2023. For Container Live Migration,FAMILY_AL2023is required. - Image: Used to determine the actual image choice more precisely. The system supports three scenarios for this field:
- AMI ID (e.g.,
ami-1234567890abcdef0): A single item. Must point to a specific AMI. If the AMI architecture does not match the instance type, provisioning will fail. Use architecture restrictions in the Node template to avoid this scenario. The AMI must match the image family (default or provided value), or provisioning will fail. - Search string (e.g.,
amazon-eks-node-*): The search matches thenamefilter in aws describe-images and can include wildcards. The search can result in multiple images, and the system will choose the latest image in the list based on instance type, architecture, and Kubernetes version (if part of the image's name). If no images match the instance type architecture or the images are from a different family than the Image family field, provisioning will fail. - Empty: A default search will be performed based on the Image family. This search looks for public Amazon-owned images and will consider instance type architecture and Kubernetes versions to choose the proper image.
Sample scenarios and suggested configuration:
| Scenario | Suggested setup |
|---|---|
| Hands-off approach, let Cast AI choose. | Empty Image and Image family. |
| I want to use a specific OS family and let Cast AI choose the latest image based on the instance architecture and Kubernetes version. | Select Image family, empty Image field. |
| I want to use Container Live Migration. | Set Image family to FAMILY_AL2023, empty Image field, set Container runtime to containerd. |
| I want to use private or third-party AMI images and let Cast AI choose the image based on instance architecture. | Add a search string to the image that matches the required images. Select the proper image family (if different from the default). For multi-architecture instances, the list must include images for both arm64 and x86. |
| I want to use private or third-party AMI images that do not have architecture-agnostic builds, but let Cast AI choose the latest release. | Add a search string in Image. Select the proper image family (if different from the default). Add architecture constraints to node templates. |
| I want to use a specific golden AMI. | Enter the AMI in the Image field. Select the Image family (if different from the default) that matches the OS. Add architecture constraints to node templates. |
GKE
For GKE, the image field can be used to control the node bootstrapping logic (for Linux).
- The reference must point to a specific image.
- If the image does not match the instance type architecture (for example, an ARM64 image for an x86 node), node provisioning will fail.
- Changing the value might require a successful reconciliation to recreate Cast AI-owned node pools.
- If an image is not provided, the default behavior is to use the OS image captured when creating the
castpoolnode pool.
NoteCast AI does not officially support selecting an OS family (for example, Ubuntu vs Container-Optimized OS) on GKE. Unlike EKS and AKS, GKE does not expose a family-based image selector — images live in a private GCP project with no wildcard or family-based resolution. If you need a specific OS family, use one of the options below.
Choosing an OS for GKE nodes
| Scenario | Approach |
|---|---|
| Use Ubuntu for all Cast AI-provisioned nodes | Pin a specific Ubuntu image path in the Image field (for example, projects/ubuntu-os-gke-cloud/global/images/ubuntu-gke-2404-1-35-amd64-v20260416). After a control plane upgrade or new image publish, update the reference manually. |
| Use Ubuntu without manual image maintenance | Delete the existing castpool node pool in GKE, recreate it selecting Ubuntu as the node image, then trigger a Cast AI reconcile. Cast AI reads the OS image from the pool and uses it for all nodes it provisions going forward. |
| Keep the default (COS) | Leave the Image field empty. Cast AI uses the OS image from the castpool node pool. |
NoteIf you need Ubuntu to support btrfs (for example, for Cast AI disk resizing), use the castpool recreation approach. Container-Optimized OS does not support btrfs natively.
AKS
Custom VM images for AKS are not supported.
How to create a node configuration
A default node configuration is created during cluster onboarding in the Cast AI-managed mode.
You can choose to modify this configuration or create a new one. If you add a new node configuration that will be applied to all newly provisioned nodes, you must mark it as default.
Node configurations are versioned, and when the Cast AI provisioner adds a new node, the latest version of the node configuration is applied.
A new configuration can't be applied to an existing node. If you want to upgrade node configuration on a node or a set of nodes, you need to delete an existing node and wait until Autoscaler replaces it with a new one or rebalance the cluster (fully or partially).
Kubelet configuration examples
The Kubernetes documentation—Kubelet Configuration —contains all available Kubelet settings. Please refer to the version of your cluster.
For example, if you want to add some specific custom taints during node startup, you could do it with the following snippet:
{
    "registerWithTaints": [
        {
            "effect": "NoSchedule",
            "key": "nodes-service-critical",
            "value": "true"
        }
    ]
}
Use Node Template taints instead of init script taintsIf you set taints via
--register-with-taintskubelet flags in an init script, be aware that kubelet treats duplicate--register-with-taintsflags by keeping only the last value. Earlier taints are silently dropped. This means Cast AI's own provisioner taints (such asscheduling.cast.ai/spot) can be overridden by a later--register-with-taints=in your init script.Recommendation: Apply custom taints through Node Templates rather than init script flags. Node Template taints are applied reliably alongside Cast AI's own provisioner taints without risk of override.
The second example involves configuring thekubelet image pulling and setting kube API limits like the following:
{
    "eventBurst": 20,
    "eventRecordQPS": 10,
    "kubeAPIBurst": 20,
    "kubeAPIQPS": 10,
    "registryBurst": 20,
    "registryPullQPS": 10
}
Since kubeReserved cannot be edited as it may cause conflicts with the Autoscaler, systemReserved can be configured instead in the Kubelet configuration under Advanced Settings in NodeConfig, as shown in the following example:
{
    "systemReserved": {
        "cpu": "500m",
        "memory": "1Gi"
    }
}
Create node configuration with the Cast AI Terraform provider
Use the resource castai_node_configuration from Cast AI terraform provider.
Reference example:
resource "castai_node_configuration" "test" {
  name           = local.name
  cluster_id     = castai_eks_cluster.test.id
  disk_cpu_ratio = 5
  subnets        = aws_subnet.test[*].id
  tags           = {
    env = "development"
  }
  eks {
    instance_profile_arn = aws_iam_instance_profile.test.arn
    dns_cluster_ip       = "10.100.0.10"
    security_groups      = [aws_security_group.test.id]
  }
}
Container Live Migration requirements
When configuring nodes for Container Live Migration on EKS, specific infrastructure requirements must be met to ensure successful pod migration between nodes.
Image family requirements
Amazon Linux 2023 required: Nodes must use the Amazon Linux 2023 image family (FAMILY_AL2023) for Container Live Migration compatibility. Other image families are not supported.
{
  "imageFamily": "FAMILY_AL2023"
}
Container runtime requirements
Containerd v2+ required: Nodes must use containerd as the container runtime engine. Docker and other runtimes are not supported for live migration due to specific integration requirements for checkpoint and restore functionality.
{
  "containerRuntime": "containerd"
}
Updated 16 days ago