
Evictor vs. Rebalancer
While both Evictor and Rebalancer optimize your cluster, they serve different purposes and work in complementary ways. Understanding these differences is important to maximizing the use of these tools and achieving the optimal cluster state.
Evictor solves the "wasted space" problem by continuously reorganizing your existing workloads to use fewer nodes. Think of it like a smart packing algorithm that consolidates your pods into the minimum number of nodes needed, allowing unused nodes to be safely removed by the autoscaler's node deletion policy, saving costs.
Rebalancer solves the "wrong infrastructure" problem by replacing your current nodes with better, more cost-effective options. As cloud providers release new instance types and prices change, Rebalancer ensures your cluster uses the most optimal instances available.
Together, these tools address two major sources of Kubernetes waste: poor pod distribution and suboptimal node selection. While both optimize your cluster, they serve different purposes and work in complementary ways.
Key differences
| Aspect | Evictor | Rebalancer |
|---|---|---|
| Primary purpose | Pod consolidation within existing nodes | Node replacement with optimal instances |
| Node management | Cannot add or remove nodes¹ | Adds new nodes, then removes old ones |
| Pod handling | Actively moves pods between existing nodes for better consolidation and resource use (respects PDBs and affinity rules) | Drains old nodes; pods reschedule to new nodes |
| Operation frequency | Continuous (every 60 seconds by default) | On-demand or scheduled |
| Disruption level | Lower (uses existing nodes) | Higher (replaces entire nodes) |
¹ Evictor's pod consolidation often results in empty nodes that are then removed by the autoscaler's node deletion policy.
Workload compatibility
The following table shows how different workload types are handled during optimization by each tool.
Legend:
- ✓ = Will handle this workload type during optimization
- ✗ = Will not handle this workload type (considered problematic)
| Workload type | Evictor (standard) | Evictor (aggressive) | Rebalancer (standard) | Rebalancer (aggressive) |
|---|---|---|---|---|
| Single replica deployment | ✗² | ✓ | ✓ | ✓ |
| Multi-replica pods | ✓ | ✓ | ✓ | ✓ |
| Bare pod (no controller) | ✗² | ✗² | ✗² | ✓ |
| Jobs/CronJobs | ✗² | ✓ | ✗² | ✓ |
| StatefulSet | ✗² | ✗²³ | ✓ | ✓ |
² These workloads are considered "problematic" and are skipped to avoid disruption
³ Without Container Live Migration: Requires disposable flag or advanced configuration. With Container Live Migration enabled: Automatically eligible for migration if they meet Container Live Migration criteria; no disposable flag needed
When to use each tool
We recommend using both tools for optimal cluster efficiency.
Evictor should be enabled for all clusters as it provides continuous, automatic optimization with minimal disruption. Once enabled in your Autoscaler settings, Evictor runs continuously to maintain minimal pod distribution and optimal bin-packing.
Rebalancer ensures your cluster uses the most cost-effective and up-to-date instance types by replacing nodes with better alternatives as they become available. How often you rebalance depends on factors like workload sensitivity, cluster size, and how frequently your instance type preferences change. For guidance on rebalancing frequency for your specific environment, contact your Cast AI account team.
Best practice approach:
- Enable Evictor for continuous bin-packing and utilization optimization
- Use scheduled rebalancing to automate node optimization; the right cadence depends on your cluster's workload profile and cost optimization goals
- Use Rebalancer on-demand (manual rebalancing) for immediate optimization; for example, after significant workload changes
Getting started
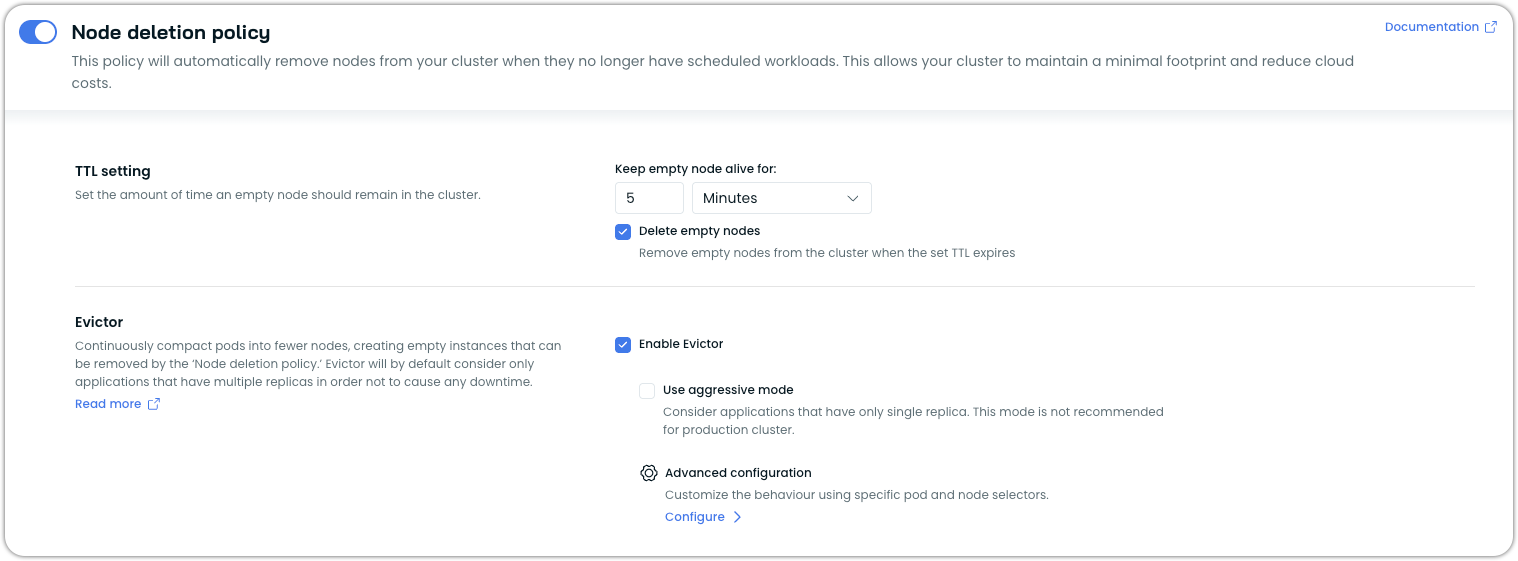
To enable Evictor:
-
Navigate to Autoscaler > Settings in the Cast AI console
-
Enable the Node deletion policy to automatically remove empty nodes that Evictor creates
-
Enable Evictor (Node deletion policy must be enabled for Evictor to become available)
-
Optionally enable Aggressive mode for fault-tolerant workloads in non-production environments
For advanced configuration and more detailed guidance, see the Evictor documentation
To use Rebalancer:
-
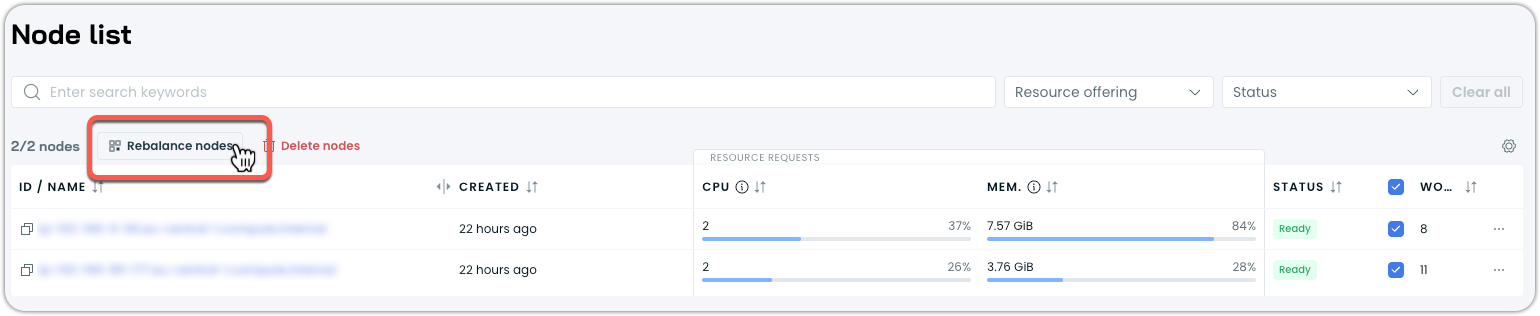
Go to Cluster > Rebalancing for full cluster optimization
-
Or select specific nodes via Cluster > Node list > Select nodes > Rebalance nodes
-
For scheduled operations, see Scheduled rebalancing
For preparation guidance and best practices, see Rebalancing preparation