
Using Container Live Migration with Evictor and Rebalancer
Container live migration integrates with Cast AI's Evictor and Rebalancer to enable zero-downtime workload optimization. This guide walks you through enabling live migration in your cluster and understanding how it works with both features to optimize your workloads.
Before you begin
Ensure your cluster meets the requirements for container live migration. Review the complete requirements and limitations before proceeding.
Key prerequisite:
- Cast AI-managed AWS EKS, Google GKE, or Azure AKS cluster running Kubernetes 1.30 or later
Enable container live migration
Container live migration can be enabled through two approaches:
- Cast AI Console (UI): Configure live migration through the Cast AI console using node templates and Autoscaler settings
- Terraform: Set up live migration infrastructure as code using Cast AI's Terraform provider
Using Terraform
If you prefer infrastructure as code, you can enable container live migration using Terraform. See our EKS Live Migration Terraform example for complete configuration templates and setup instructions.
Using Cast AI Console
Container live migration setup varies depending on whether you're setting up a new cluster or enabling the feature on an existing cluster.
For new clusters
When you connect a new cluster to Cast AI and enable automation, live migration components are automatically installed as part of the phase 2 onboarding script. You'll still need to configure node templates and node configuration as described below to ensure nodes support live migration.
For existing clusters
You'll need to manually install the live migration components first, then configure node templates. Follow these steps in order:
Step 1: Install live migration components (existing clusters only)
For existing clusters, manually install the live migration controller using Helm:
Which upgrade method to useThe Helm commands on this page use the umbrella chart (
castai-helm/castai) by default. If you need to use a different method:
- castctl: To upgrade all Cast AI components at once without managing Helm flags:
This preserves your existing configuration. See the castctl documentation for installation and authentication instructions.castctl castware upgrade- Individual charts: If you installed each component as a separate Helm release (e.g., for ArgoCD or custom GitOps), replace the release name and chart reference with the component-specific ones (e.g.,
castai-workload-autoscalerandcastai-helm/castai-workload-autoscaler) and remove theautoscaler.castai-workload-autoscaler.value prefix.Not sure which method you used? Run
helm list -n castai-agent. A single release namedcastaimeans umbrella chart; separate releases likecastai-workload-autoscalermean individual charts.
# Add Cast AI Helm repository
helm repo add castai-helm https://castai.github.io/helm-charts
helm repo update castai-helm

# Add live migration controller to existing installation
helm upgrade castai castai-helm/castai -n castai-agent \
  --reset-then-reuse-values \
  --set autoscaler.castai-live.castai.apiKey=<CONSOLE_API_KEY> \
  --set autoscaler.castai-live.castai.apiURL=<API_URL> \
  --set autoscaler.castai-live.castai.clusterID=<CLUSTER_ID> \
  --set autoscaler.castai-live.daemon.install.enabled=true \
  --set autoscaler.castai-live.castai-aws-vpc-cni.enabled=true
Replace the placeholders with your actual values:
<CONSOLE_API_KEY>: Your Cast AI API key<API_URL>: Cast AI API URL — see API access for regional endpoints<CLUSTER_ID>: Your Cast AI cluster ID
This installation:
- Installs the live migration controller in your cluster
- Sets up the specialized VPC CNI for TCP preservation
- Configures the necessary daemon components
All components are installed in the castai-agent namespace.
Step 2: Configure node templates
Navigate to your cluster's Autoscaler → Node templates section and either create a new template or edit an existing one.
In the node template configuration, locate the Container live migration section and enable it:

Enabling this option ensures that nodes provisioned using this template will support live migration.
Configure compatible instance families
After enabling Container Live Migration, you must configure compatible instance families to ensure successful migrations. Click on the Compatible instance helper section in the node template:
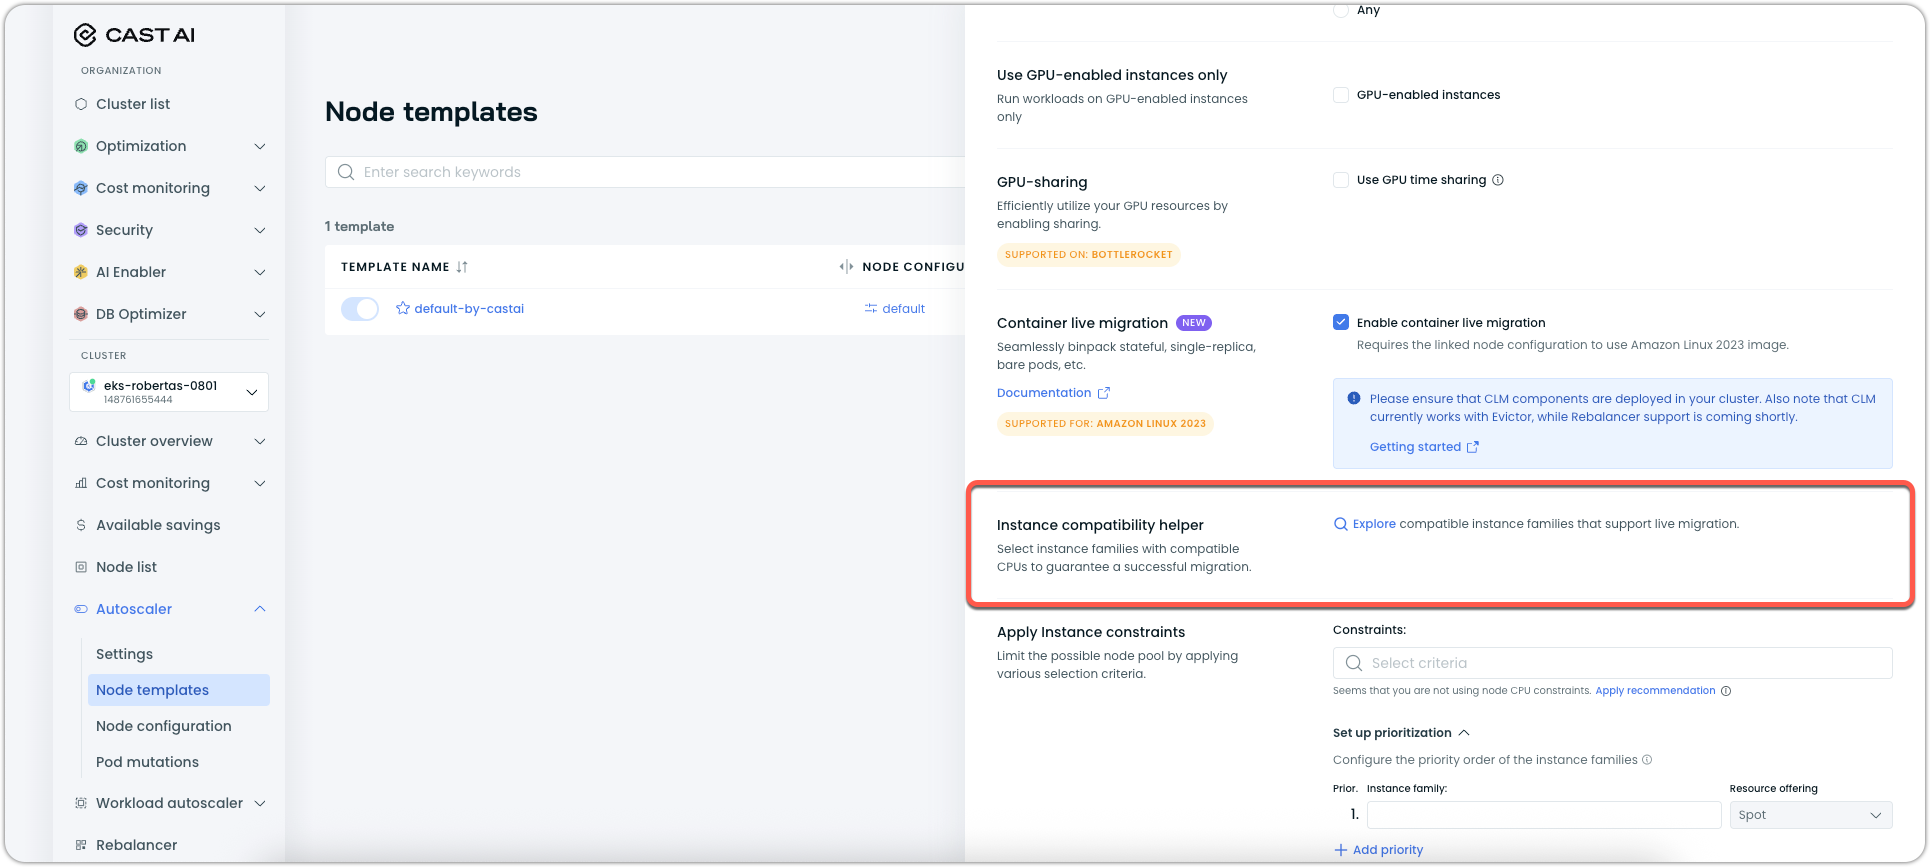
The instance selector helps you choose compatible instance families from the same CPU generation set. This ensures that workload migrations between nodes will succeed.
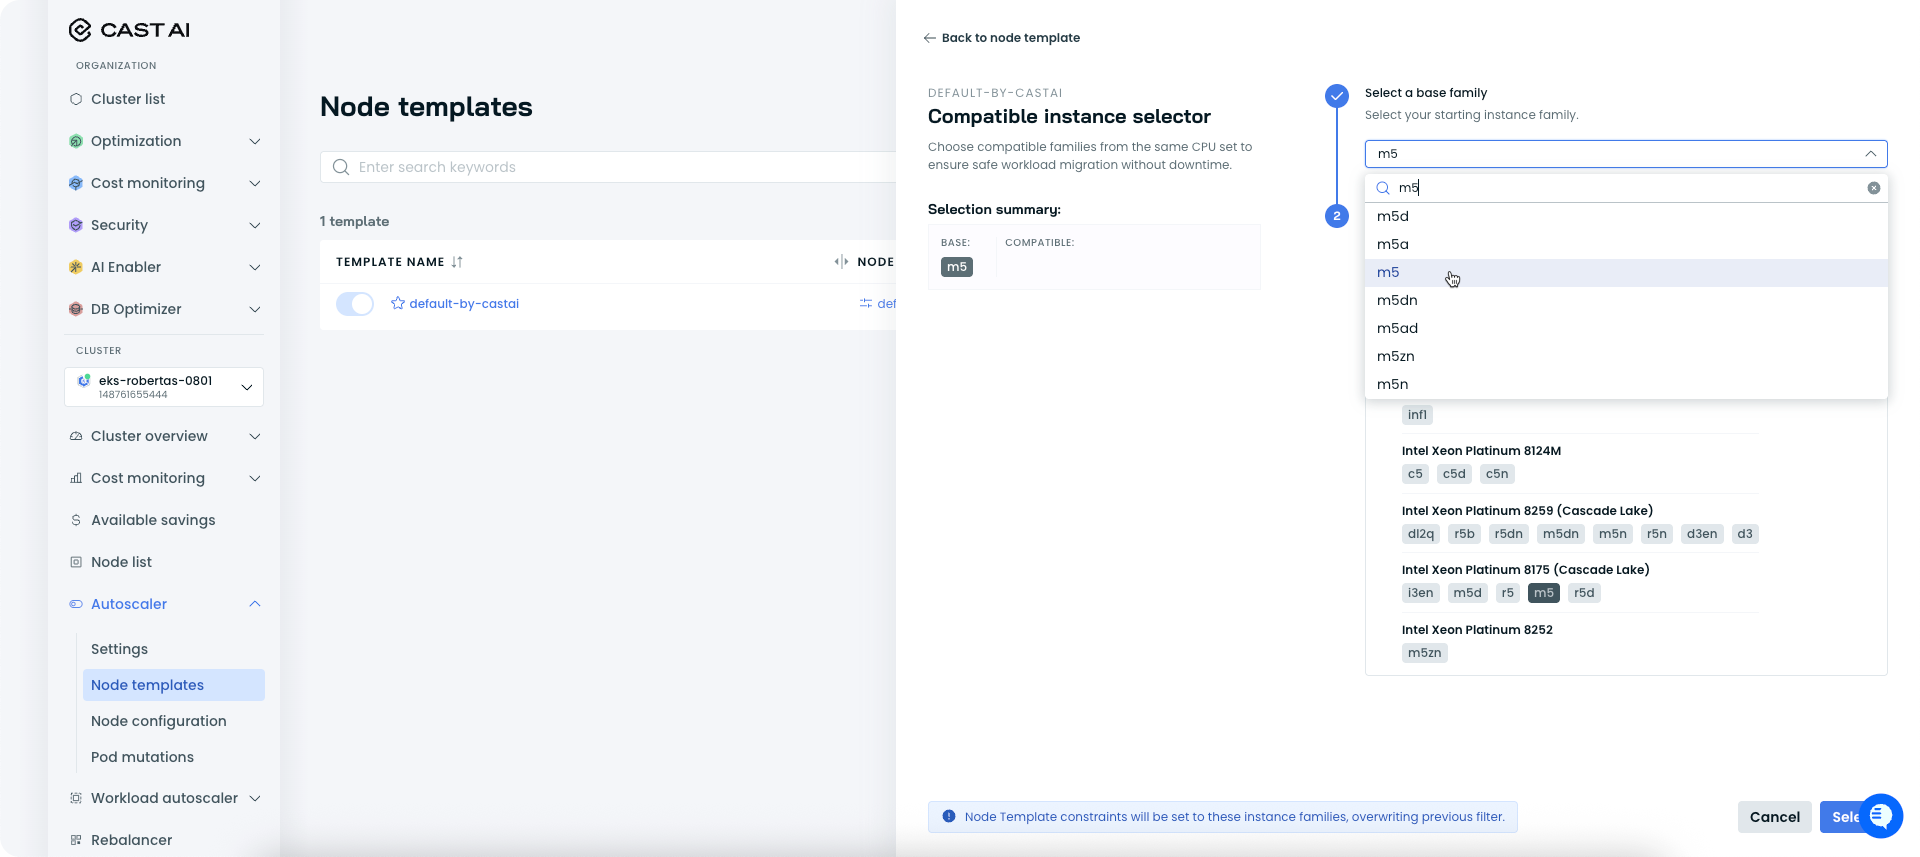
Select base instance family
Start by selecting your base instance family. This determines the CPU architecture and generation that will serve as the foundation for compatible selections.
Single architecture requirementBefore selecting your base instance family, ensure your node template's Processor architecture setting is configured for a single architecture (either AMD64 or ARM64, not "Any"). Live migration requires all nodes in the template to use the same processor architecture. Attempting to migrate between different architectures will fail.
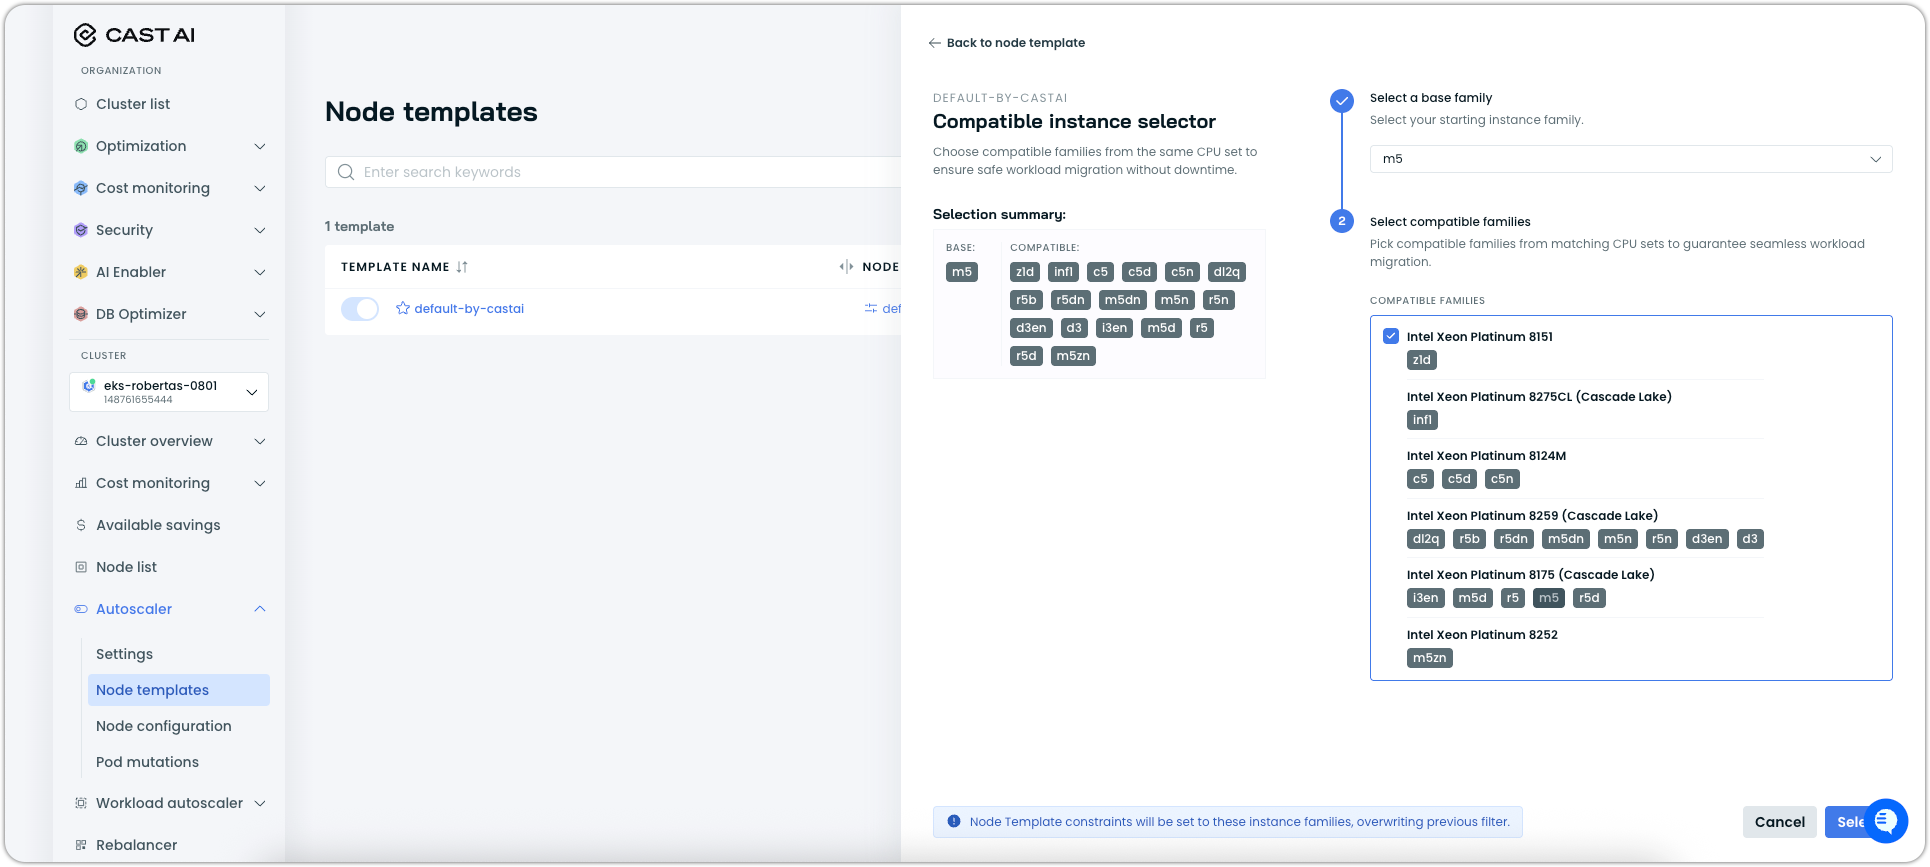
Choose compatible families
After selecting the base family, the interface will show you all compatible instance families. These are automatically filtered to include only families that share the same CPU generation characteristics:

For example, if you select m5 as your base family, compatible options include other fifth-generation families like c5, r5, and i5. However, fourth-generation families like r4, c4, or m4 would not be compatible. Therefore, they will be excluded.
Apply instance constraints
Once you've selected your compatible families, the node template's instance constraints will be automatically updated to include only these compatible options:
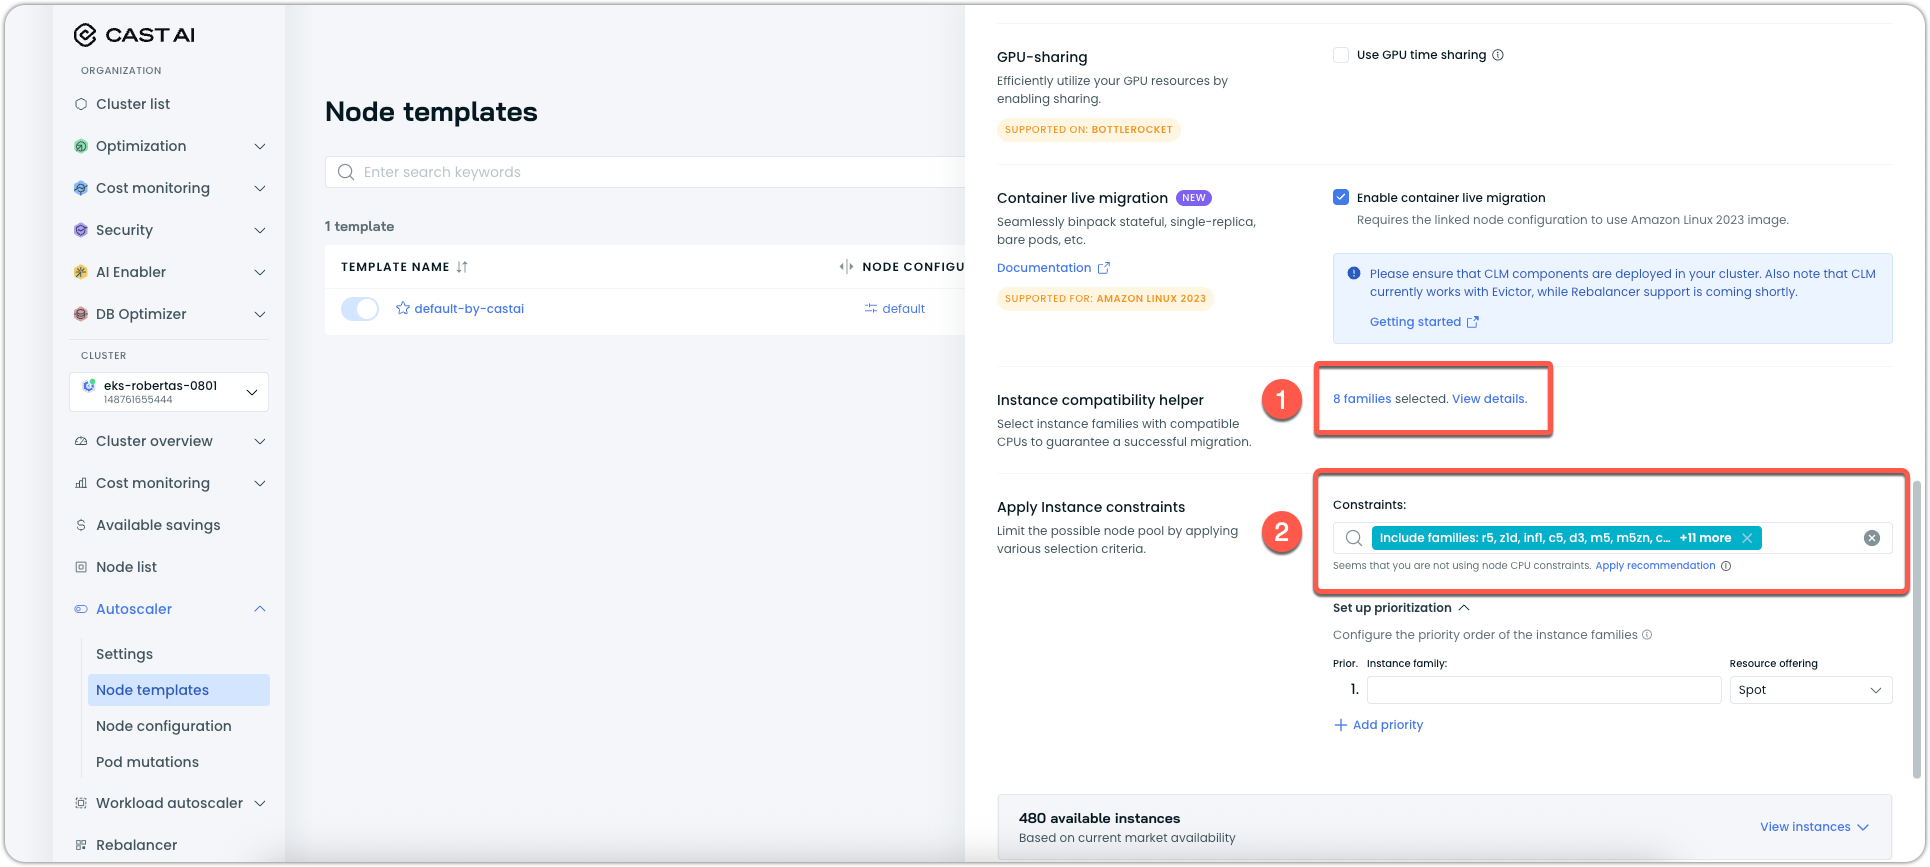
This configuration overrides any previous instance constraints in the template, ensuring that only live migration-compatible instance types can be provisioned.
Why compatible instances matterContainer Live Migration requires nodes with compatible CPU architectures to successfully transfer running workloads. Attempting to migrate between incompatible CPU generations (e.g., from c3 to c5 families) will result in migration failures. The compatible instance selector automates this compatibility checking, preventing configuration errors that could cause migration issues.
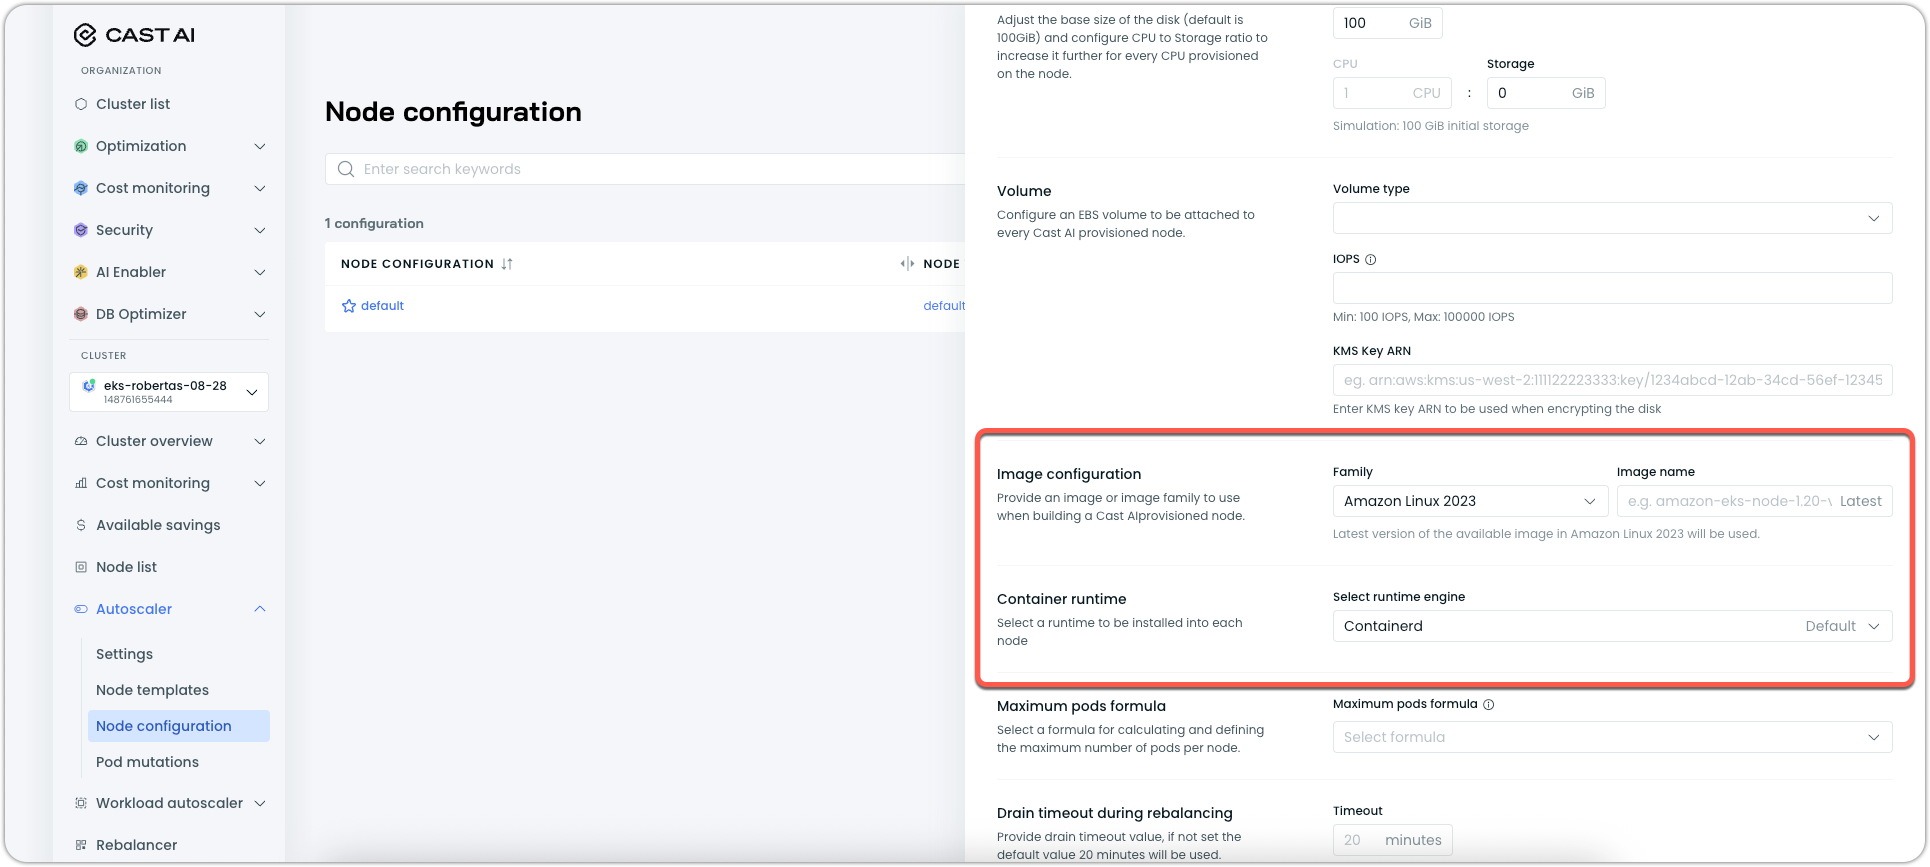
Step 3: Configure node infrastructure
Navigate to your cluster's Autoscaler → Node configuration section and either create a new configuration or edit an existing one. It has to be linked to the node template configured in the previous step.
Ensure your Node configuration is set up correctly for live migration:
- Image family: Set to
Amazon Linux 2023in the Image configuration section. - Container runtime: Set
Containerdas the container runtime
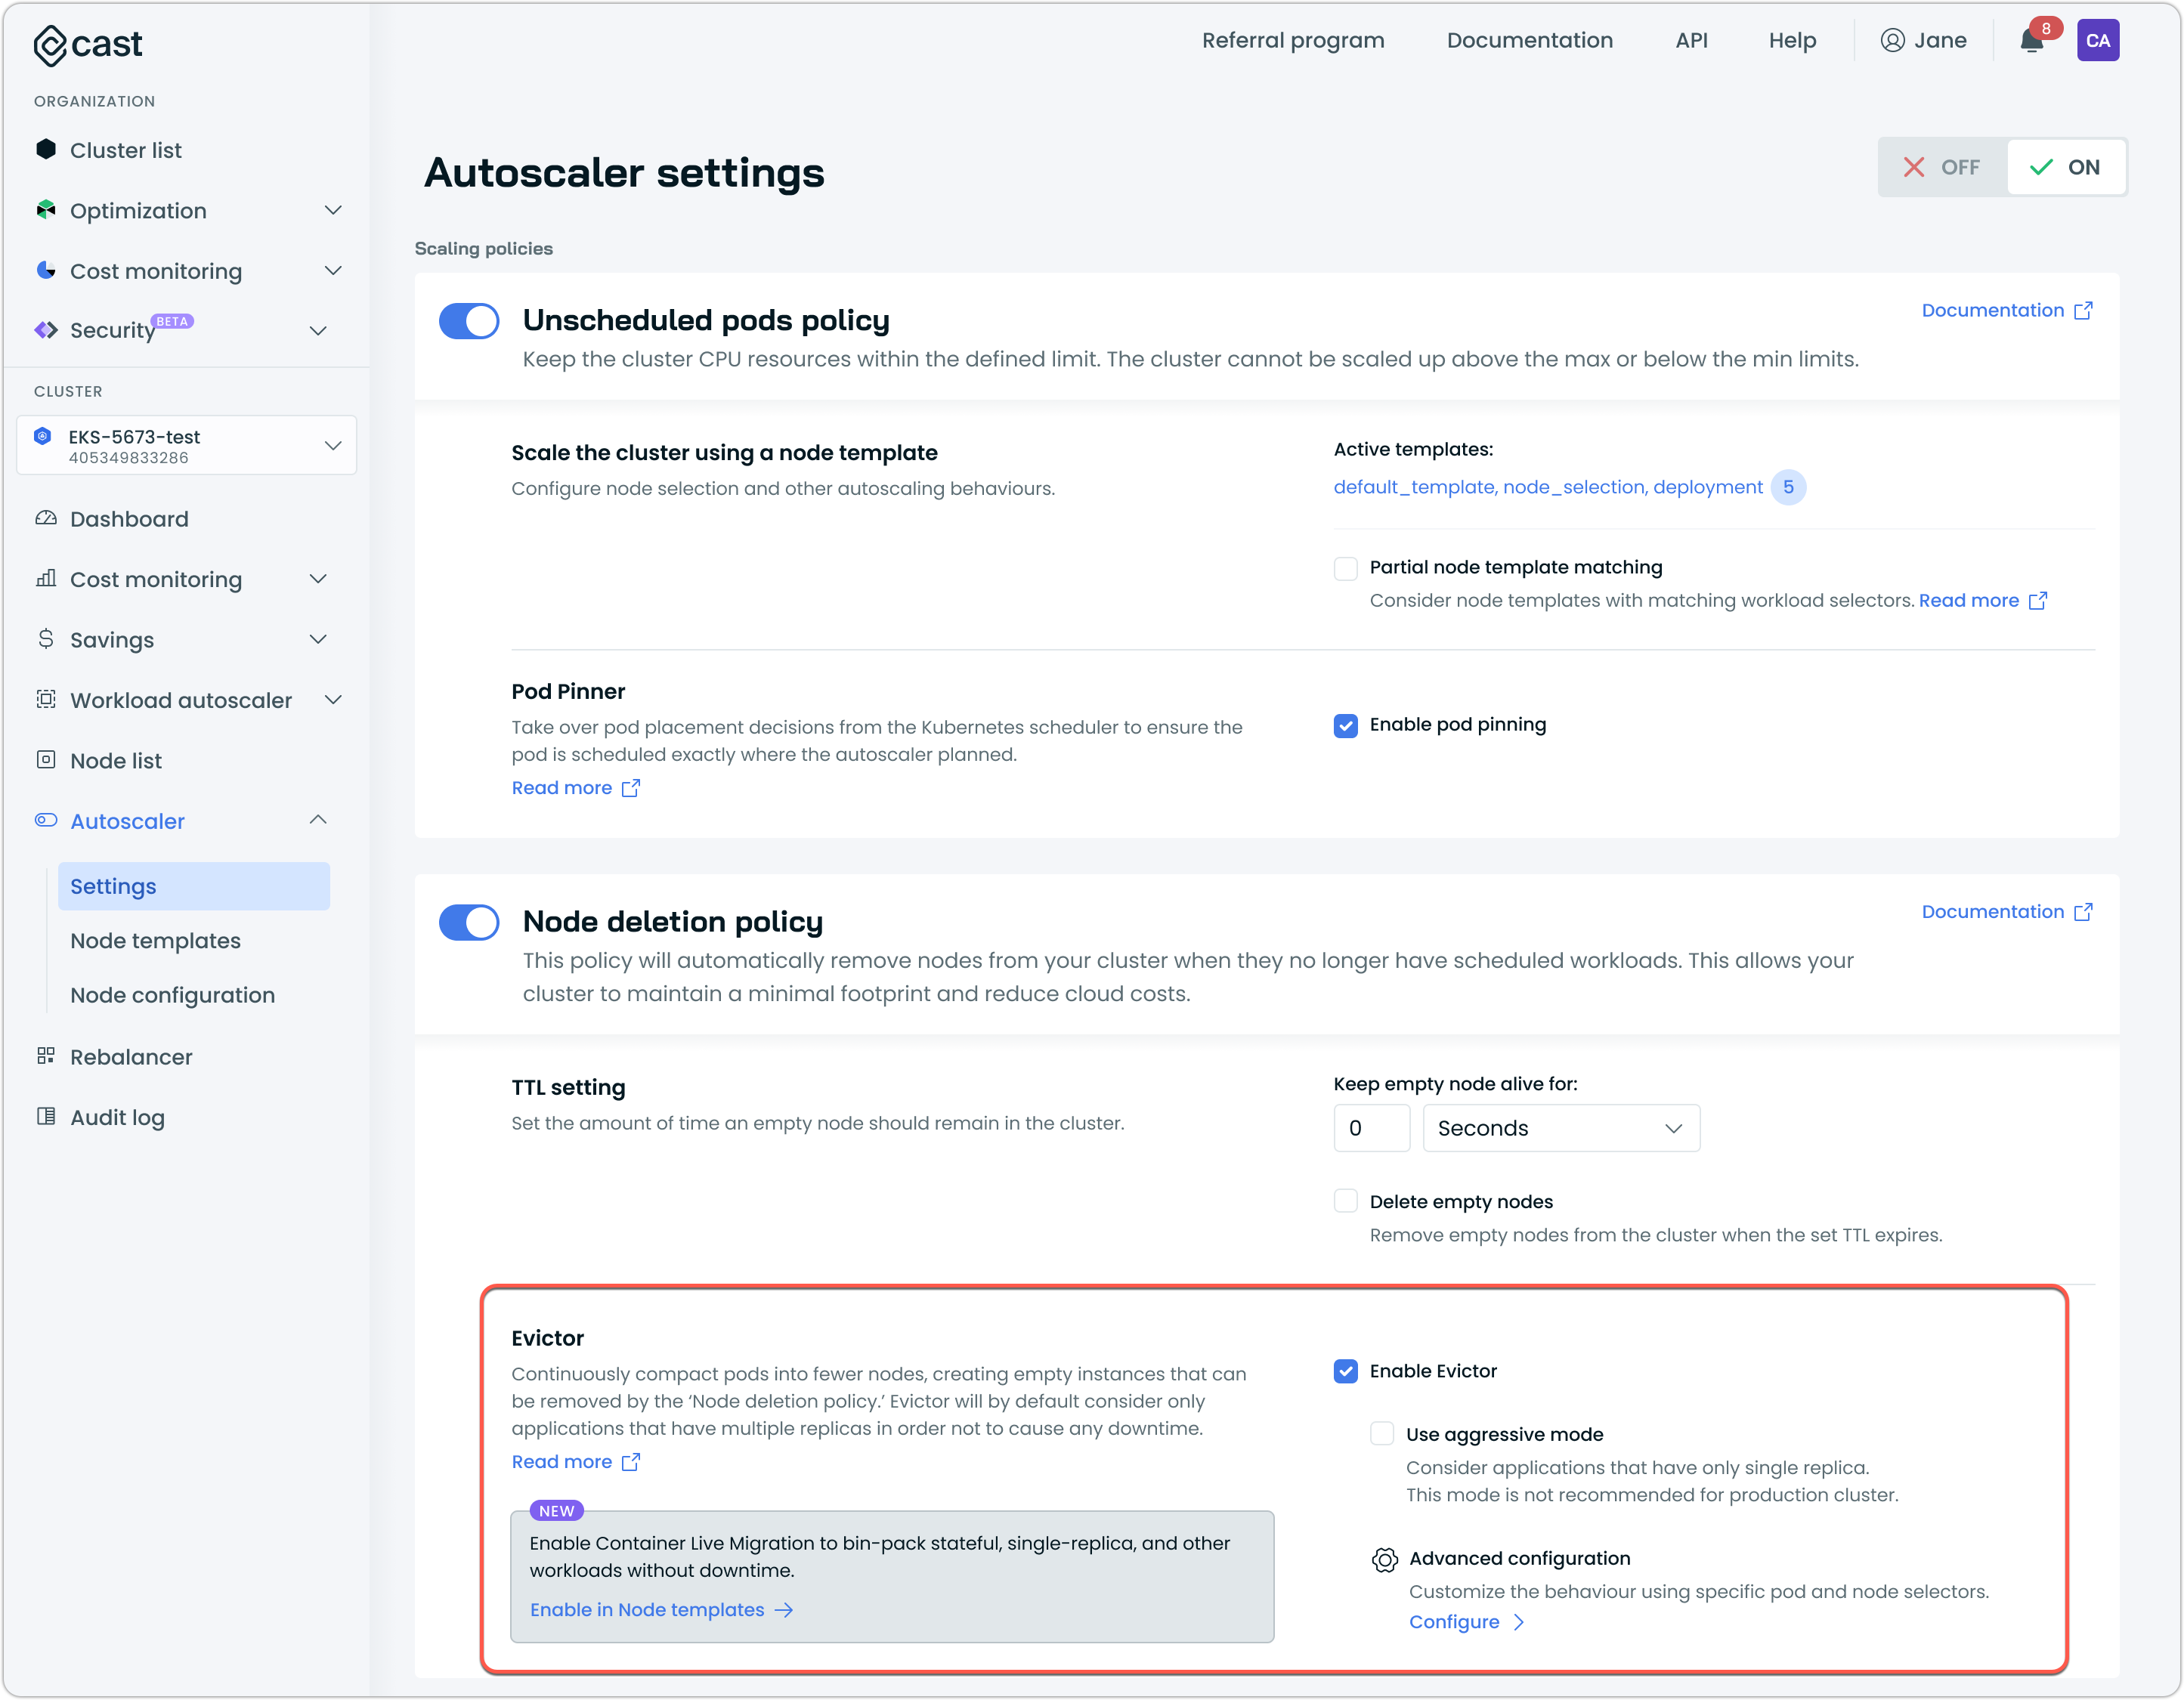
Step 4: Enable Evictor with live migration
Navigate to Autoscaler → Settings and locate the Evictor section within the Node deletion policy. Enable Evictor in order to leverage container live migration in the cluster.
For existing clusters with Evictor already installed: You'll need to update the Evictor configuration to enable live migration support:
Configuration-only changesThis command upgrades all components in the umbrella chart, not just Evictor. To change configuration without upgrading component versions, pin the chart to your current version by adding
--version <your-current-chart-version>to the command. Runhelm list -n castai-agentto check your current version.
helm upgrade castai castai-helm/castai -n castai-agent \
  --reset-then-reuse-values \
  --set autoscaler.castai-evictor.liveMigration.enabled=true
For newly connected clusters: Evictor will automatically include live migration support when installed as part of the cluster onboarding process.
Step 5: Replace existing nodes (recommended)
Perform a rebalancing to replace current nodes with live-migration-enabled nodes. This ensures Evictor has compatible nodes available for migration operations. Otherwise, you would have to wait for a natural node addition operation to occur in the cluster, stemming from additional capacity requirements from workloads.
Navigate to Rebalancer and create a rebalancing plan to replace all nodes. For instructions on cluster rebalancing, see Rebalancing.
This results in a cluster where all nodes support live migration, maximizing the optimization opportunities for Evictor immediately.
How Evictor uses live migration
Once enabled, Evictor automatically leverages live migration to optimize your cluster without manual intervention.
Automatic workload identification
Cast AI's live controller continuously scans your cluster and identifies workloads eligible for live migration by:
- Analyzing workload characteristics: Evaluating configurations, storage requirements, and other eligibility parameters
- Applying labels: Adding
live.cast.ai/migration-enabled=truelabels to compatible workloads
Migration decision logic
When Evictor identifies bin-packing opportunities, it follows this decision process:
- Check live migration eligibility: Evictor first checks if workloads have the live migration label (
live.cast.ai/migration-enabled=true) - Attempt live migration: For eligible workloads, Evictor initiates live migration to the destination node
- Handle migration failure: If live migration fails, the behavior depends on workload type and configuration:
- StatefulSets without disposable flag: Pod remains on source node; no fallback to eviction. Source node stays active.
- StatefulSets with disposable flag: Pod is evicted (disposable pods are always evicted)
- Other workloads: Falls back to traditional pod eviction
- Preserve critical workloads: Workloads with
autoscaling.cast.ai/removal-disabledlabels are recovered on the original node if migration fails
All of this behavior can be controlled via labels that Evictor respects.
Workload label matrix
Evictor respects multiple labels that control migration and eviction behavior:
| live.cast.ai/migration-enabled | autoscaling.cast.ai/removal-disabled | autoscaling.cast.ai/live-migration-disabled | Evictor action |
|---|---|---|---|
true | true | false (or missing) | Live migrate the workload, but do not fallback to traditional eviction if it fails; restore the pod on the source node instead |
true | true | true | Do nothing (workload protected) |
true | false (or missing) | true | Evict the pod using traditional eviction |
true | false (or missing) | false (or missing) | Live migrate the workload, if it fails, fallback to traditional eviction |
false | true | (ignored) | Do nothing (workload protected) |
false | false | (ignored) | Evict the pod using traditional eviction |
true (StatefulSet) | false (or missing) | false (or missing) | Live migrate the workload. If migration fails, do NOT fallback to eviction; pod stays on source node |
Label descriptions:
live.cast.ai/migration-enabled=true: Automatically applied by the live controller to eligible workloadsautoscaling.cast.ai/removal-disabled=true: Prevents eviction and ensures recovery on the original node if migration failsautoscaling.cast.ai/live-migration-disabled=true: Forces traditional eviction instead of attempting live migration
StatefulSet-specific behavior:
For StatefulSet pods with live.cast.ai/migration-enabled=true:
- Migration is attempted automatically without requiring the
disposableflag - If migration fails and no
autoscaling.cast.ai/disposable="true"flag is present, the pod remains on the source node (no eviction fallback) - Setting
autoscaling.cast.ai/disposable="true"means the pod will always be evicted (migration is attempted first with Container Live Migration, but eviction occurs if migration fails or if Container Live Migration is not enabled)
Configuration options
Evictor modes with live migration
Default mode: Evictor migrates multi-replica workloads and evicts single-replica applications using traditional methods.
Aggressive mode: When enabled, Evictor attempts to live-migrate all eligible workloads, including single-replica deployments and bare pods. This mode maximizes cost optimization but requires careful testing.
How Rebalancer uses live migration
The Rebalancer integrates with container live migration to achieve zero-downtime node replacements during cluster-wide optimization operations.
Migration during rebalancing
When you execute a rebalancing plan, Cast AI:
- Creates new optimal nodes with live migration support
- Identifies eligible workloads on nodes being replaced
- Attempts live migration for workloads with the
live.cast.ai/migration-enabled=truelabel - Falls back to traditional eviction if live migration fails
- Deletes old nodes once workloads are safely moved
This integration enables you to replace nodes across your cluster while maintaining application availability for eligible workloads.
Triggering a rebalancing with live migration
- Navigate to Rebalancer in the Cast AI console
- Click Prepare new plan
- Select the nodes you want to replace, or choose the entire cluster
- Click Generate plan and review it
- Click Rebalance to start the rebalancing
How do I monitor migrations during rebalancing?
Watch for migration custom resources during the rebalancing operation:
# Watch migrations in real-time
kubectl get migrations -A -w

# Get detailed status of a specific migration
kubectl describe migration <migration-name> -n <namespace>
Key events to look for:
| Event | Meaning |
|---|---|
PreDumpFinished | Memory pre-dump completed successfully |
PodCreateFinished | Pod recreated on destination node |
MigrationFinished | Live migration completed successfully |
MigrationFailed | Migration failed; check logs for details |
Monitoring live migrations
You can monitor progress through custom resources:
# List ongoing migrations
kubectl get migrations -A

# Get detailed migration status
kubectl describe migrations <migration-name> -n <namespace>
Inspect the events for each migration to build an understanding of the steps that were executed and where a migration might've failed.
Migration events
Migration progress is tracked through Kubernetes events in the migration resource:
| Event | Description |
|---|---|
PreDumpSkipped | Memory pre-dump iteration skipped |
PreDumpFinished | Memory pre-dump completed successfully |
PreDumpFailed | Memory pre-dump operation failed |
MigrationReconfigured | Migration configuration was updated |
PodCreateFinished | Pod successfully recreated on the new node |
PodCreateFailed | Failed to create pod on destination node |
MigrationFinished | Pod successfully migrated to the new node |
MigrationFailed | Migration failed, check logs for details |
Testing live migration
You can validate your live migration setup by deploying test workloads and triggering a rebalancing operation.
Test by workload typeNot all workloads survive checkpoint/restore, even when labeled eligible. The
live.cast.ai/migration-enabled=truelabel indicates basic eligibility criteria are met, but does not guarantee successful migration for every workload configuration.Test each distinct workload type individually, validate successful migration, then expand incrementally to production workloads.
Prerequisites
Before testing, verify that live migration is operational:
# Check live controller is running
kubectl get pods -n castai-agent -l app.kubernetes.io/name=castai-live

# Check if nodes are Container Live Migration-enabled
kubectl get nodes -l live.cast.ai/migration-enabled=true

# Verify Evictor has live migration enabled
helm get values castai -n castai-agent | grep liveMigration
If no nodes have the live.cast.ai/migration-enabled=true label, run a rebalancing first to replace existing nodes with Container Live Migration-enabled ones.
Deploy a test workload
Deploy a workload that meets Container Live Migration eligibility requirements. The following examples are designed to be automatically labeled as migration-eligible by the live controller.
This deployment works with Evictor's default mode:
kubectl apply -f - <<EOF
apiVersion: apps/v1
kind: Deployment
metadata:
  name: clm-test-deployment
  namespace: default
  labels:
    app: clm-test
spec:
  replicas: 2
  selector:
    matchLabels:
      app: clm-test
  template:
    metadata:
      labels:
        app: clm-test
    spec:
      containers:
        - name: nginx
          image: nginx:latest
          resources:
            requests:
              cpu: "500m"
              memory: "256Mi"
            limits:
              cpu: "1"
              memory: "512Mi"
          ports:
            - containerPort: 80
EOF
StatefulSets are fully supported for live migration with automatic eligibility detection:
Key behavior: When eligible StatefulSets are migrated, if migration fails, pods remain on the source node without fallback to eviction (unless explicitly marked as disposable).
kubectl apply -f - <<EOF
apiVersion: apps/v1
kind: StatefulSet
metadata:
  name: clm-test-statefulset
  namespace: default
  labels:
    app: clm-test
spec:
  serviceName: "clm-test-svc"
  replicas: 2
  selector:
    matchLabels:
      app: clm-test
  template:
    metadata:
      labels:
        app: clm-test
    spec:
      containers:
        - name: nginx
          image: nginx:latest
          resources:
            requests:
              cpu: "250m"
              memory: "128Mi"
            limits:
              cpu: "500m"
              memory: "256Mi"
          ports:
            - containerPort: 80
---
apiVersion: v1
kind: Service
metadata:
  name: clm-test-svc
  namespace: default
spec:
  clusterIP: None
  selector:
    app: clm-test
  ports:
    - port: 80
EOF
StatefulSet Migration BehaviorUnlike other workload types, StatefulSet pods that fail migration will NOT be evicted by default. This protects stateful workloads from disruptive restarts. The source node remains active if migration fails. If you set
autoscaling.cast.ai/disposable="true"on the StatefulSet or pods, they will always be evicted (regardless of whether Container Live Migration attempts migration or not).
Single-replica workloads require Evictor's aggressive mode. Enable it before deploying:
helm upgrade castai castai-helm/castai -n castai-agent \
  --reset-then-reuse-values \
  --set autoscaler.castai-evictor.aggressiveMode=true \
  --set autoscaler.castai-evictor.liveMigration.enabled=true
Then deploy the test workload:
kubectl apply -f - <<EOF
apiVersion: apps/v1
kind: Deployment
metadata:
  name: clm-test-single-replica
  namespace: default
  labels:
    app: clm-test
spec:
  replicas: 1
  selector:
    matchLabels:
      app: clm-test
  template:
    metadata:
      labels:
        app: clm-test
    spec:
      containers:
        - name: nginx
          image: nginx:latest
          resources:
            requests:
              cpu: "500m"
              memory: "256Mi"
            limits:
              cpu: "1"
              memory: "512Mi"
          ports:
            - containerPort: 80
EOF
Verify workload eligibility
After deploying, wait 1-2 minutes for the live controller to scan and label your workloads. Check if pods are labeled as Container Live Migration-eligible:
kubectl get pods -l app=clm-test,live.cast.ai/migration-enabled=trueIf your test pods appear in the output, they've been labeled as eligible for live migration. If no pods appear, the live controller hasn't labeled them yet.
If pods aren't receiving the label, check the live controller logs:
kubectl logs -n castai-agent -l app.kubernetes.io/name=castai-live --tail=50Trigger a test rebalancing
With eligible workloads deployed, trigger a rebalancing to initiate live migrations:
- Navigate to Rebalancer in the Cast AI console
- Click Prepare new plan
- Select the nodes running your test workloads
- Click Generate plan and review it
- Click Rebalance to start the rebalancing
How do I monitor the test migration?
Watch for migration custom resources during the rebalancing operation:
# Watch migrations in real-time
kubectl get migrations -A -w

# Get detailed status of a specific migration
kubectl describe migration <migration-name> -n <namespace>
Key events to look for:
| Event | Meaning |
|---|---|
PreDumpFinished | Memory pre-dump completed successfully |
PodCreateFinished | Pod recreated on destination node |
MigrationFinished | Live migration completed successfully |
MigrationFailed | Migration failed; check logs for details |
Verify migration success
After a migration completes, verify the workload is functioning correctly:
- Check migration status: Confirm the migration resource reports
MigrationFinished:
kubectl get migrations -A- Verify pod naming: The migrated pod has a new name with
-clone-Nsuffix (except StatefulSets, which retain their original names):
kubectl get pods -n <namespace> | grep <workload-name>- Confirm application health: Verify the application is responding correctly:
kubectl logs <pod-name> -n <namespace> --tail=100-
Check monitoring integration: Confirm your monitoring tools (Prometheus, Datadog, etc.) are scraping metrics from the migrated pod. Some monitoring agents may need time to rediscover the pod.
-
Validate service mesh connectivity: If using Istio or another service mesh, verify the pod is correctly enrolled, and traffic flows normally. Service mesh sidecars are migrated with the pod, but proxy configurations may need validation.
What if my application has short timeouts?
Applications with short TCP timeouts may experience connection failures during the checkpoint window. The duration of this window varies based on workload memory size, ephemeral storage volume, network throughput, CPU load, and whether PVCs need reattachment. If you observe connection errors after migration:
- Review application timeout configurations
- Consider increasing timeouts or adding retry logic for critical connections
- Test migration during low-traffic periods initially
Clean up test workloads
After testing, remove the test workloads:
kubectl delete deployment clm-test-deployment clm-test-single-replica --ignore-not-found
kubectl delete statefulset clm-test-statefulset --ignore-not-found
kubectl delete service clm-test-svc --ignore-not-found
Why isn't my workload eligible for live migration?
Workloads are automatically labeled as ineligible if they use any of the following configurations:
tty: truein the container spec- Host path volumes
- GPU resource requests
- PVCs that would require cross-AZ migration
For complete eligibility requirements, see Requirements and limitations.
Troubleshooting
Live migration components not installed
If you're enabling Container Live Migration on an existing cluster and components aren't working:
- Verify component installation: Check that the live controller is running:
kubectl get pods -n castai-agent -l app.kubernetes.io/name=castai-live - Install missing components: For existing clusters, manually install using the Helm command in Step 1
- Check installation logs: Review installation logs for any errors:
kubectl logs -n castai-agent -l app.kubernetes.io/name=castai-live
Workloads not being labeled
If workloads aren't receiving live migration labels:
- Verify requirements: Ensure workloads meet all technical requirements
- Check controller status: Confirm the live controller is running in the
castai-agentnamespace - Review logs: Examine live controller logs for issues
Migration failures
When migrations fail:
- Check events: Review migration events for specific error messages
- Verify node compatibility: Ensure source and destination nodes are in the same instance family generation
Evictor not using live migration
If Evictor continues using traditional eviction:
- Confirm feature enablement: Verify live migration is enabled in node templates
- Check node labels: Ensure nodes have
live.cast.ai/migration-enabled=truelabels:kubectl get nodes -l live.cast.ai/migration-enabled=true - Review workload labels: Confirm workloads have appropriate migration labels applied:
kubectl get pods -A -l live.cast.ai/migration-enabled=true - Verify Evictor configuration: Check that Evictor has live migration support enabled:
helm get values castai -n castai-agent | grep liveMigration
Migration failure recovery
When a migration fails, the system attempts to recover the original pod on the source node. In most failure scenarios, recovery succeeds, and the workload continues running on its original node.
However, if failure occurs during the restore phase on the destination node (after the checkpoint has been taken but before the container is fully restored), the original pod may not be recoverable.
Recommendation: Run multiple test migrations for each workload type before enabling live migration in production. This validates that your specific workload configurations survive the full checkpoint/restore cycle.
See also
- Requirements and Limitations
- Probe and Lifecycle Behavior During Migration
- Labels, Annotations, and Events Reference
Updated 16 days ago