
Cluster hibernation
Cluster hibernation allows you to optimize costs by temporarily scaling your cluster to zero nodes while preserving the control plane and cluster state. This feature is ideal for non-production environments, development clusters, or any cluster that doesn't need to run 24/7.
You can manage cluster hibernation through both the Cast AI console, API, and Terraform, with options for manual hibernation and scheduled automation.
How hibernation works
When you hibernate a cluster:
- The cluster enters a "Hibernating" state
- All nodes are systematically removed from the cluster
- The control plane remains active, but no workloads run
- Costs are minimized to just the control plane charges from your cloud provider
When you resume a hibernated cluster:
- Resume nodes are created to run essential system components
- Cast AI's autoscaler is reactivated
- Workloads are scheduled according to their requirements
- The cluster returns to its normal operational state
Resume relies on pod priority to ensure Cast AI components will be scheduled on the resume nodes. By default our components have the system-cluster-critical priority class.
The resume node needs to run critical Cast AI components for the cluster to transition into the connected state. To ensure these components are scheduled during the resume process, Cast AI may apply a CriticalAddonsOnly taint to the resume node. This taint is only added if the Cast AI components contain the corresponding toleration for it. If they don't, the resume node is created without any additional taint.
Prerequisites
ImportantCurrent hibernation is not designed for large clusters. If your cluster is above 1000 nodes, cluster hibernation might fail. If you want to hibernate a larger cluster, first reduce the number of nodes in it.
Before using cluster hibernation, ensure your environment meets these requirements:
Resume node size
Ensure the resume node size is enough to host Cast AI agent, cluster-controller. If you use pod mutations and Workload Autoscaler, ensure also the pod-mutator and workload-autoscaler can fit on the resume node.
Keep in mind that also some other cluster critical components might start on the resume node and take capacity.
If you see that resume is failing and the Cast AI components are not scheduled on the resume node, increase the node size.
Cloud-specific requirements
EKS clusters
EKS clusters require IAM permissions for hibernation operations.
Clusters onboarded after October 2025: The required IAM permissions are automatically included in the default permission set. No additional setup is required.
Clusters onboarded before October 2025: You need to update your IAM permissions using one of these methods:
- Re-onboard via script: Run the Phase 2 onboarding script again to update your Cast AI IAM role with hibernation permissions.
- Upgrade Terraform provider: If you manage your cluster with Terraform, upgrade to version 7.74.0 or later and re-apply your configuration.
EKS clusters using aws-auth ConfigMap authentication
EKS clusters where node IAM roles are granted cluster access via the aws-auth ConfigMap require additional configuration for cluster hibernation to work correctly.
Background: When EKS uses the aws-auth ConfigMap for node authentication, AWS automatically removes an IAM role from the ConfigMap when the last managed node group using that role is deleted. During cluster resume, Cast AI creates a temporary managed node group. When this node group is later deleted, AWS removes its IAM role from aws-auth, which can break authentication for other Cast AI-managed nodes still using that role.
Requirement: You must set nodeGroupArn in your default Node Configuration. Despite its name, this field specifies a dedicated IAM role ARN (not a node group ARN) that Cast AI will use exclusively for resume node groups. By using a dedicated role separate from your regular Cast AI node instance profile, the removal of this role from aws-auth after the resume node group is deleted won't affect other Cast AI-managed nodes.
When is this required?This configuration is required when your node instance profile's IAM role is granted cluster access via the
aws-authConfigMap. This applies to:
- Clusters using
CONFIG_MAPauthentication mode- Clusters using
API_AND_CONFIG_MAPauthentication mode where the node IAM role is configured inaws-authThis is not required when:
- Clusters use only
APIauthentication mode (EKS access entries)- Clusters use
API_AND_CONFIG_MAPmode but the node IAM role is configured via EKS access entries (notaws-auth)EKS does not remove entries from the access entries API when node groups are deleted, so clusters using access entries for node authentication are not affected.
Error message: If this configuration is missing, you'll see the following error when attempting to resume a cluster:
initiating cluster resume: rpc error: code = Unknown desc = validating resume capability: persistent error: cluster authentication mode is CONFIG_MAP, node configuration must specify nodeGroupArn for cluster resumeCheck your cluster's authentication mode:
aws eks describe-cluster --name <cluster-name> --query 'cluster.accessConfig.authenticationMode'Configure via Terraform:
resource "castai_node_configuration" "default" {
  name       = "default"
  cluster_id = castai_eks_cluster.my_cluster.id
  # ... other configuration ...

  eks {
    instance_profile_arn = aws_iam_instance_profile.cast_node_profile.arn
    node_group_arn       = "arn:aws:iam::123456789012:role/cast-dedicated-node-role"
    # ... other EKS settings ...
  }
}
Configure via API:
Set the nodeGroupArn field in the EKS section when creating or updating a node configuration.
NoteThe
nodeGroupArnfield is not available in the Cast AI console UI. You must configure it via Terraform or API.
Prerequisites verification checklist
Before testing hibernation, verify:
- Cast AI components have the
CriticalAddonsOnlytoleration — upgrade to current Helm chart versions if needed
Minimum chart versions with CriticalAddonsOnly toleration
| Component | Chart version | appVersion |
|---|---|---|
| castai-agent | 0.139.0 | v0.113.0 |
| castai-cluster-controller | 0.90.0 | v0.61.1 |
| castai-pod-mutator | 0.6.0 | v0.2.6 |
| castai-pod-pinner | 1.12.0 | v1.9.5 |
| castai-workload-autoscaler | 0.1.190 | v0.97.0 |
- Any other workload required during cluster recovery (e.g. CNI operators, custom admission webhooks) also has the
CriticalAddonsOnlytoleration:tolerations: - key: CriticalAddonsOnly operator: Exists - Cast AI cluster role has hibernation permissions
- Resume node size is big enough to schedule cluster critical and Cast AI components
- (EKS with aws-auth ConfigMap only)
nodeGroupArnis configured in the default Node Configuration
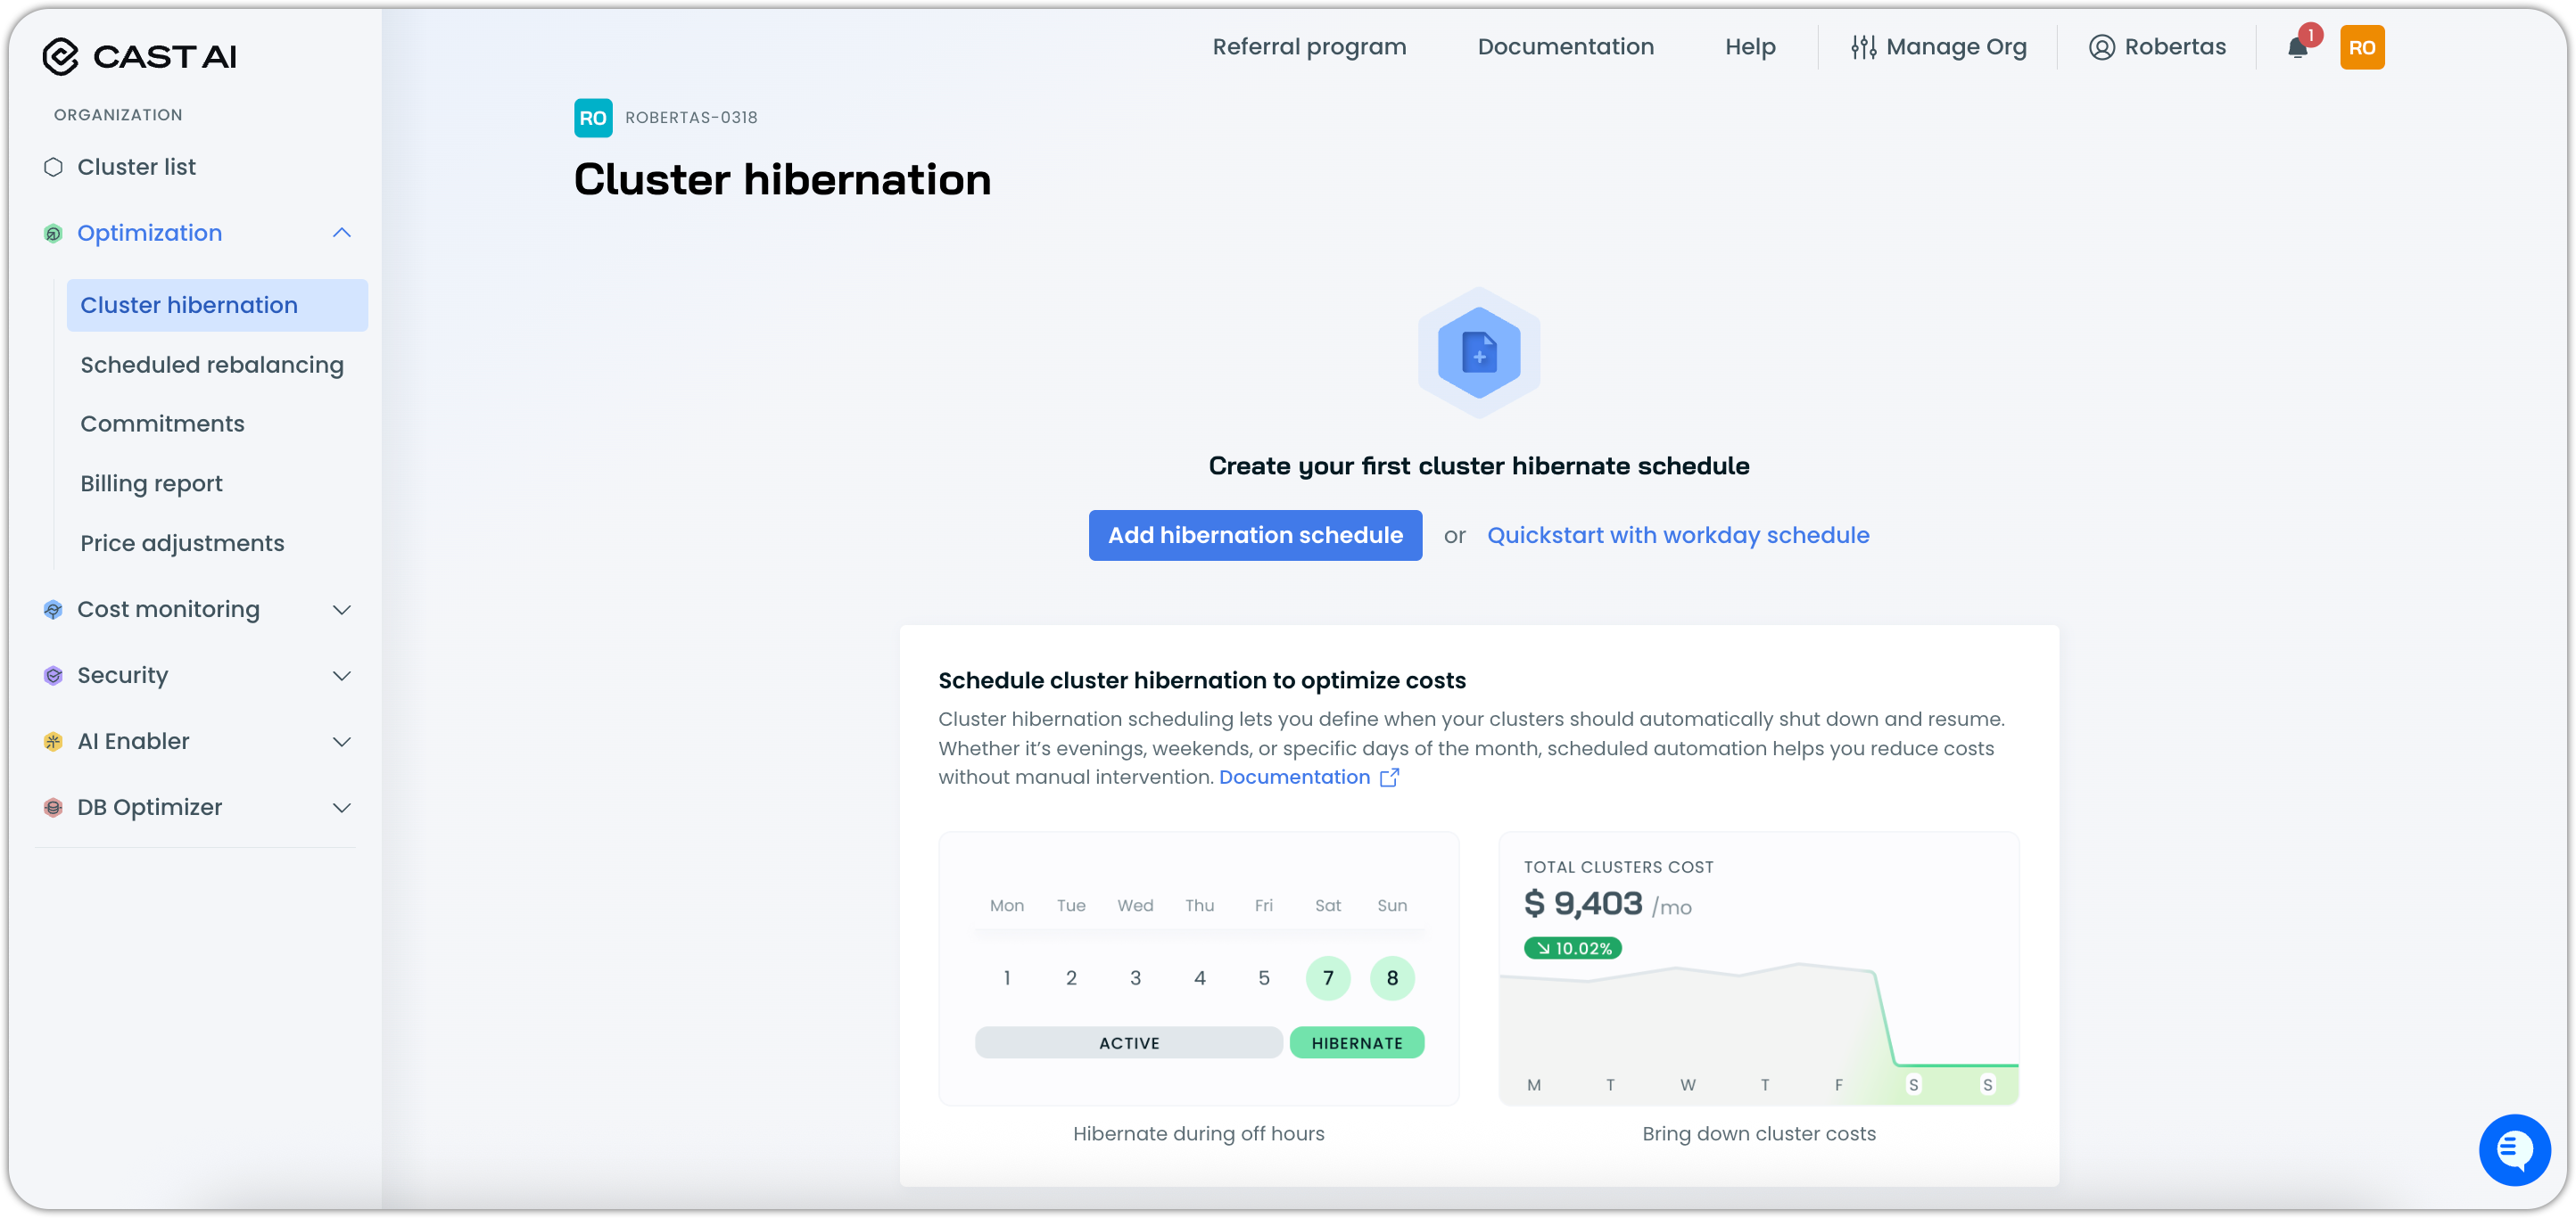
Managing hibernation schedules in the console
The Cast AI console provides a comprehensive interface for managing hibernation schedules across your organization. You can create, view, and manage hibernation schedules that automatically hibernate and resume clusters based on defined schedules.
Accessing hibernation schedules
You can access hibernation schedules in two ways:
Organization-level access:
- Navigate to the Optimization section in the Cast AI console
- Select Cluster hibernation from the menu
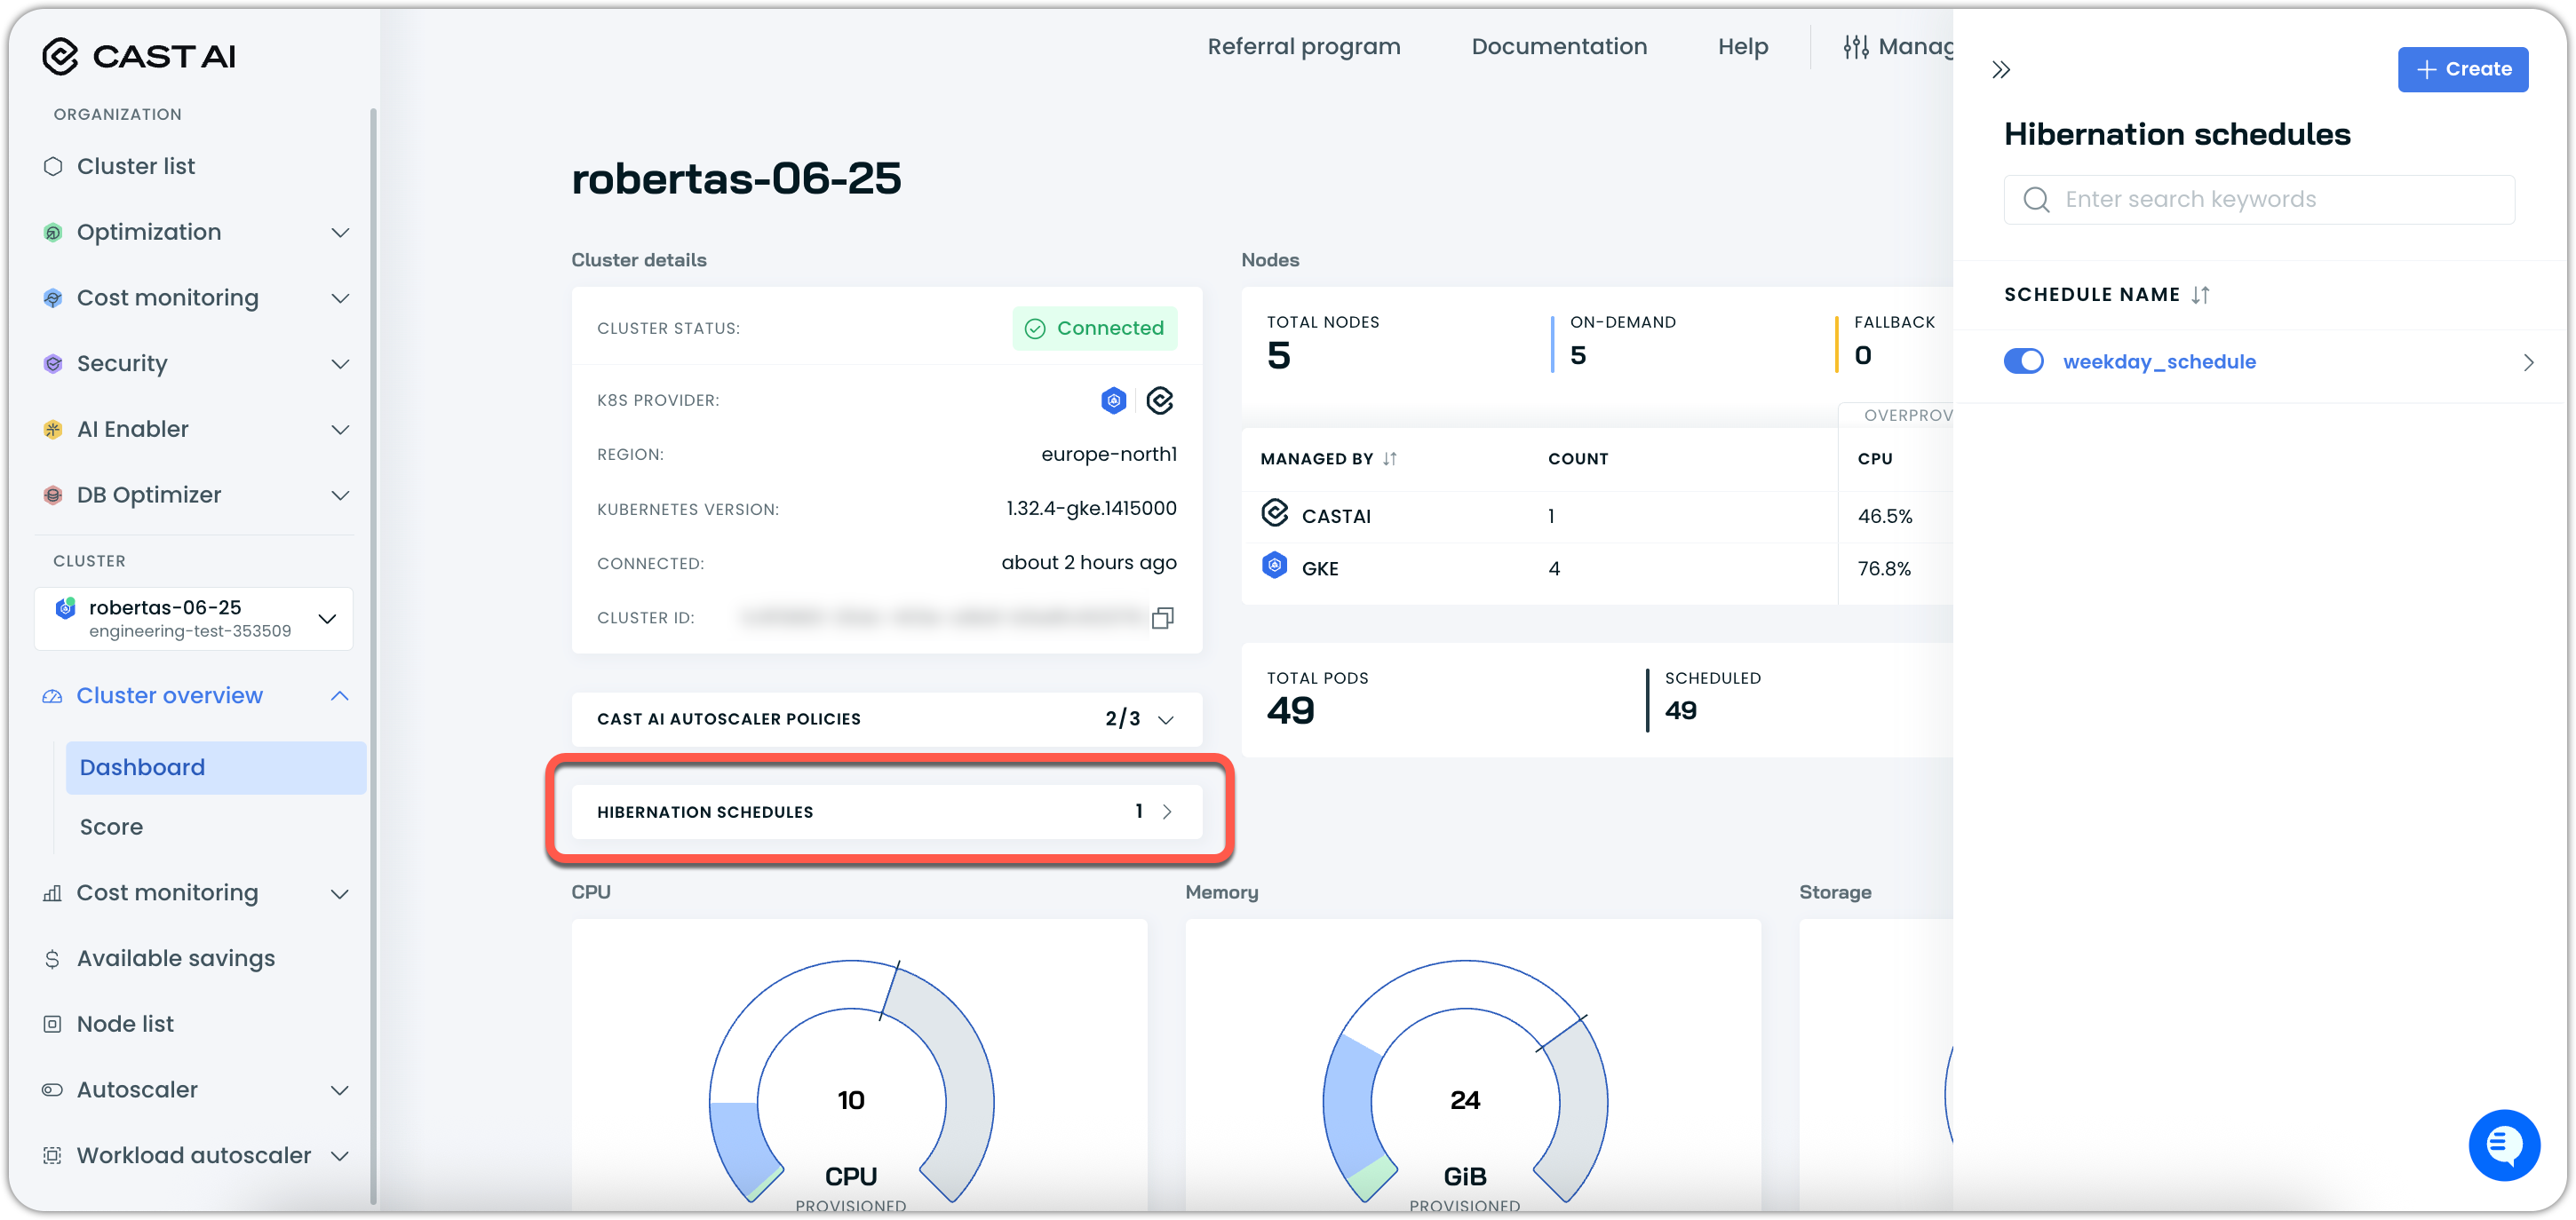
Cluster-level access:
- Navigate to any cluster dashboard
- Click on Hibernation schedules to open the hibernation schedules interface
Creating hibernation schedules
You can create hibernation schedules from either the organization-level hibernation page or directly from any cluster dashboard. Both entry points lead to the same schedule creation workflow.
The console provides a two-step process for creating hibernation schedules:
- Create schedule: Define the hibernation schedule parameters
- Assign clusters: Select which clusters the schedule applies to
When creating a schedule from a cluster dashboard, that cluster will be automatically pre-selected in the assignment step.
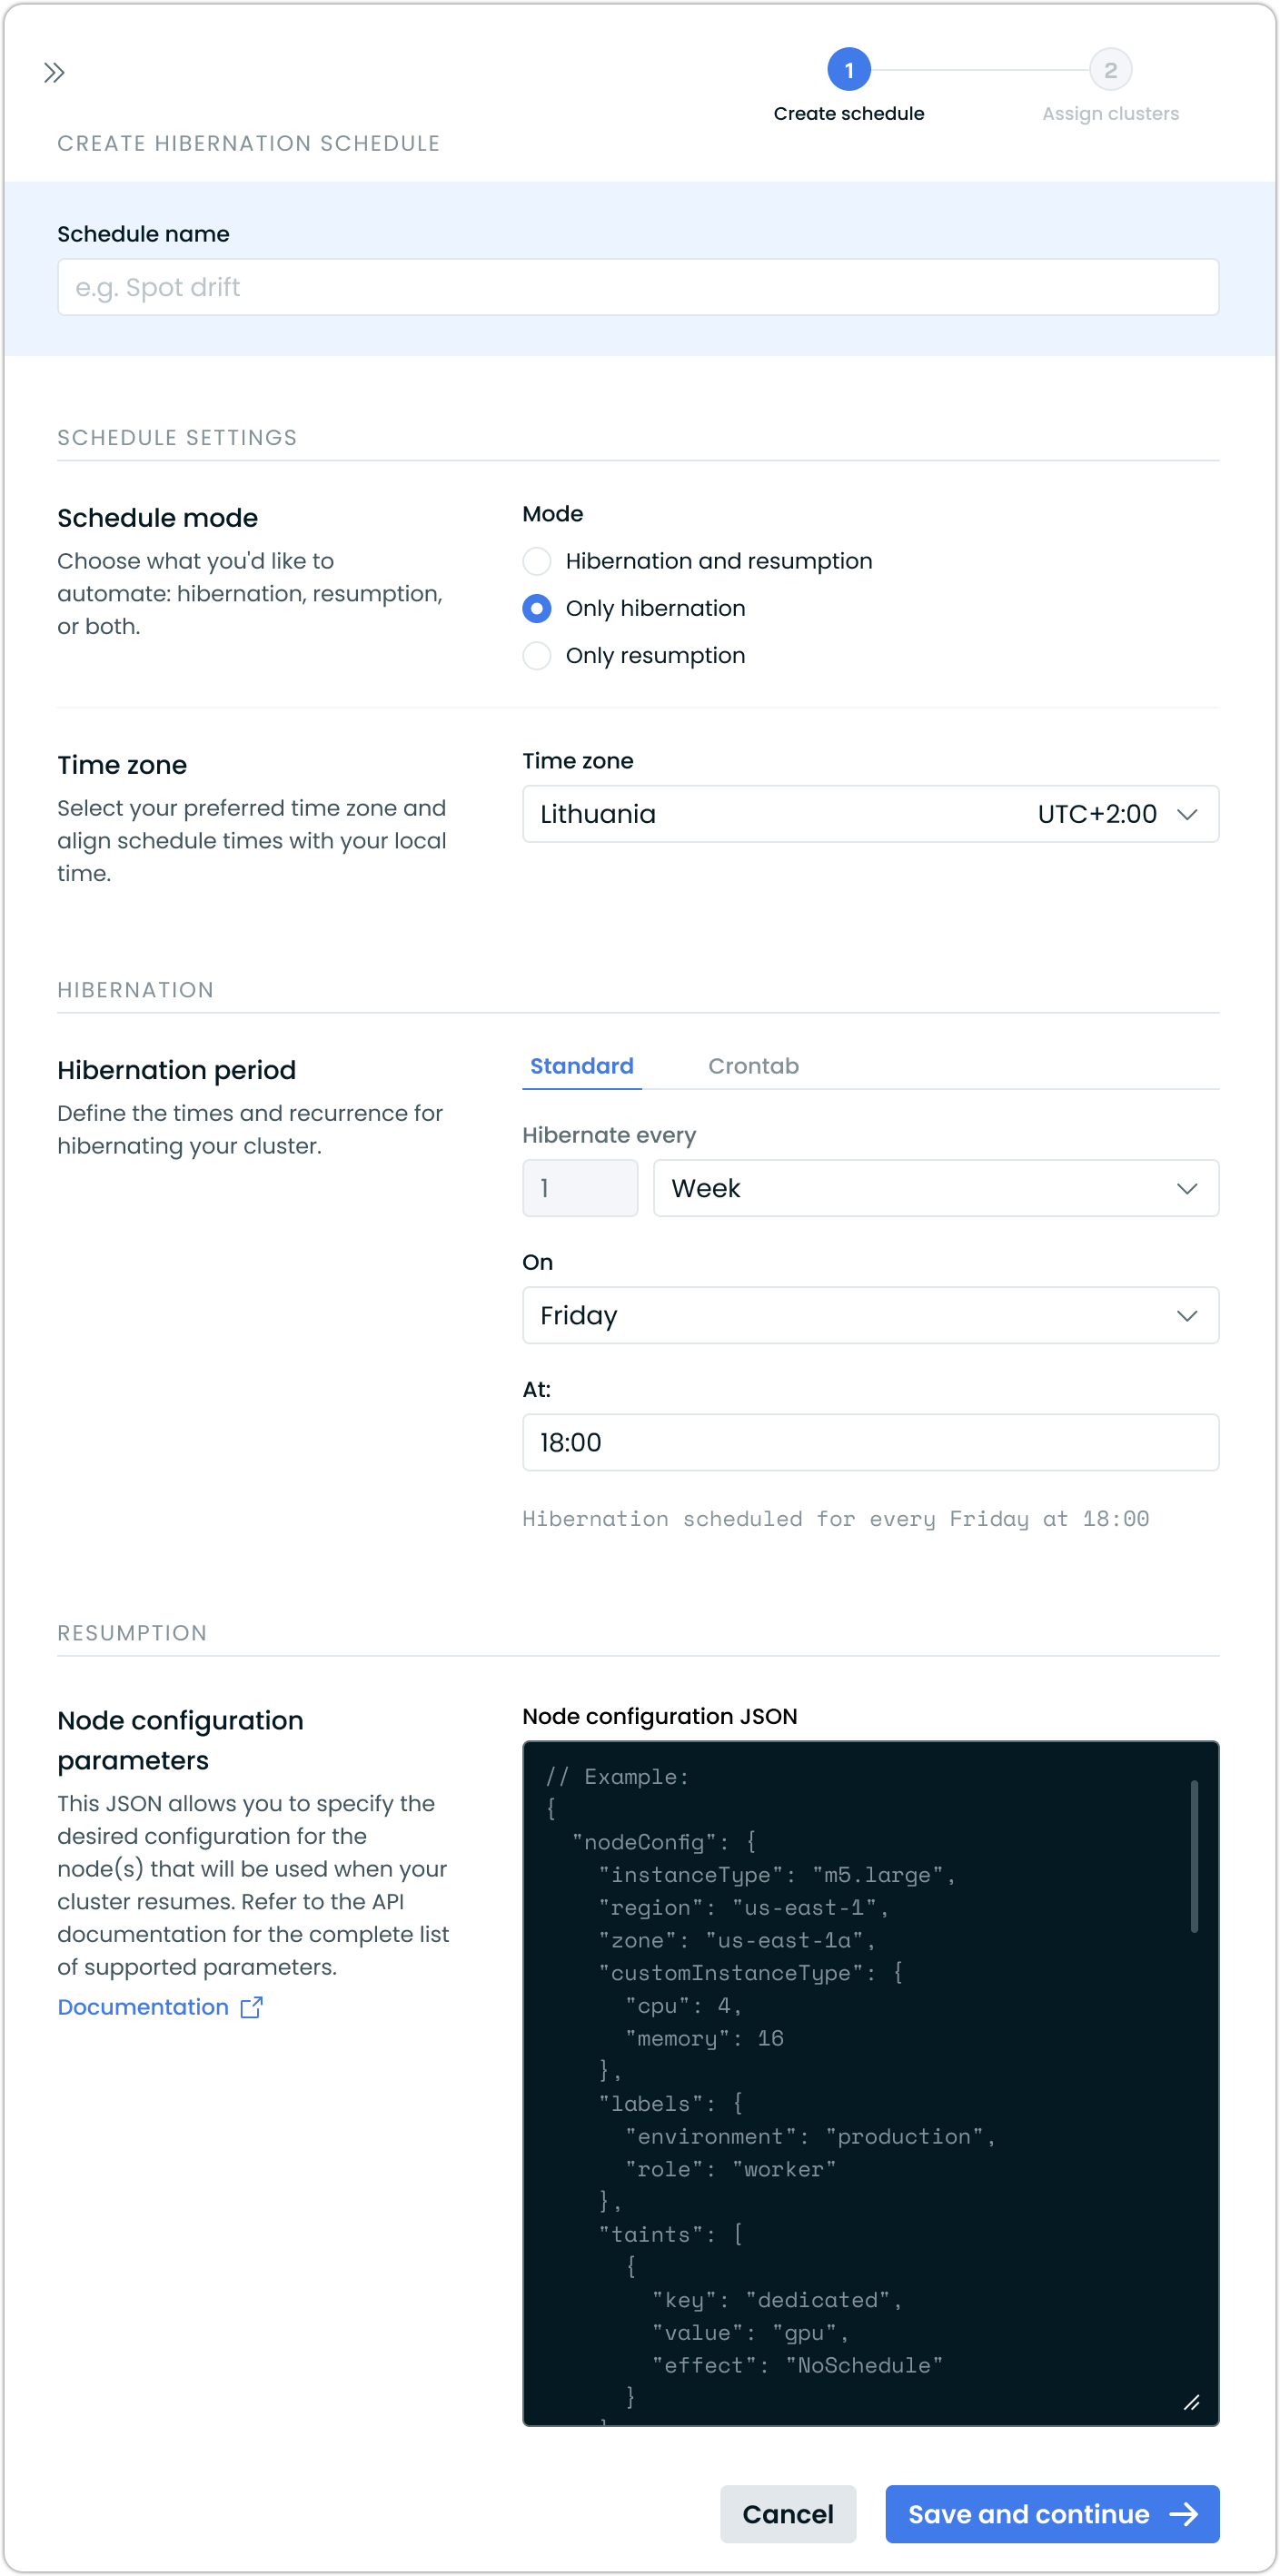
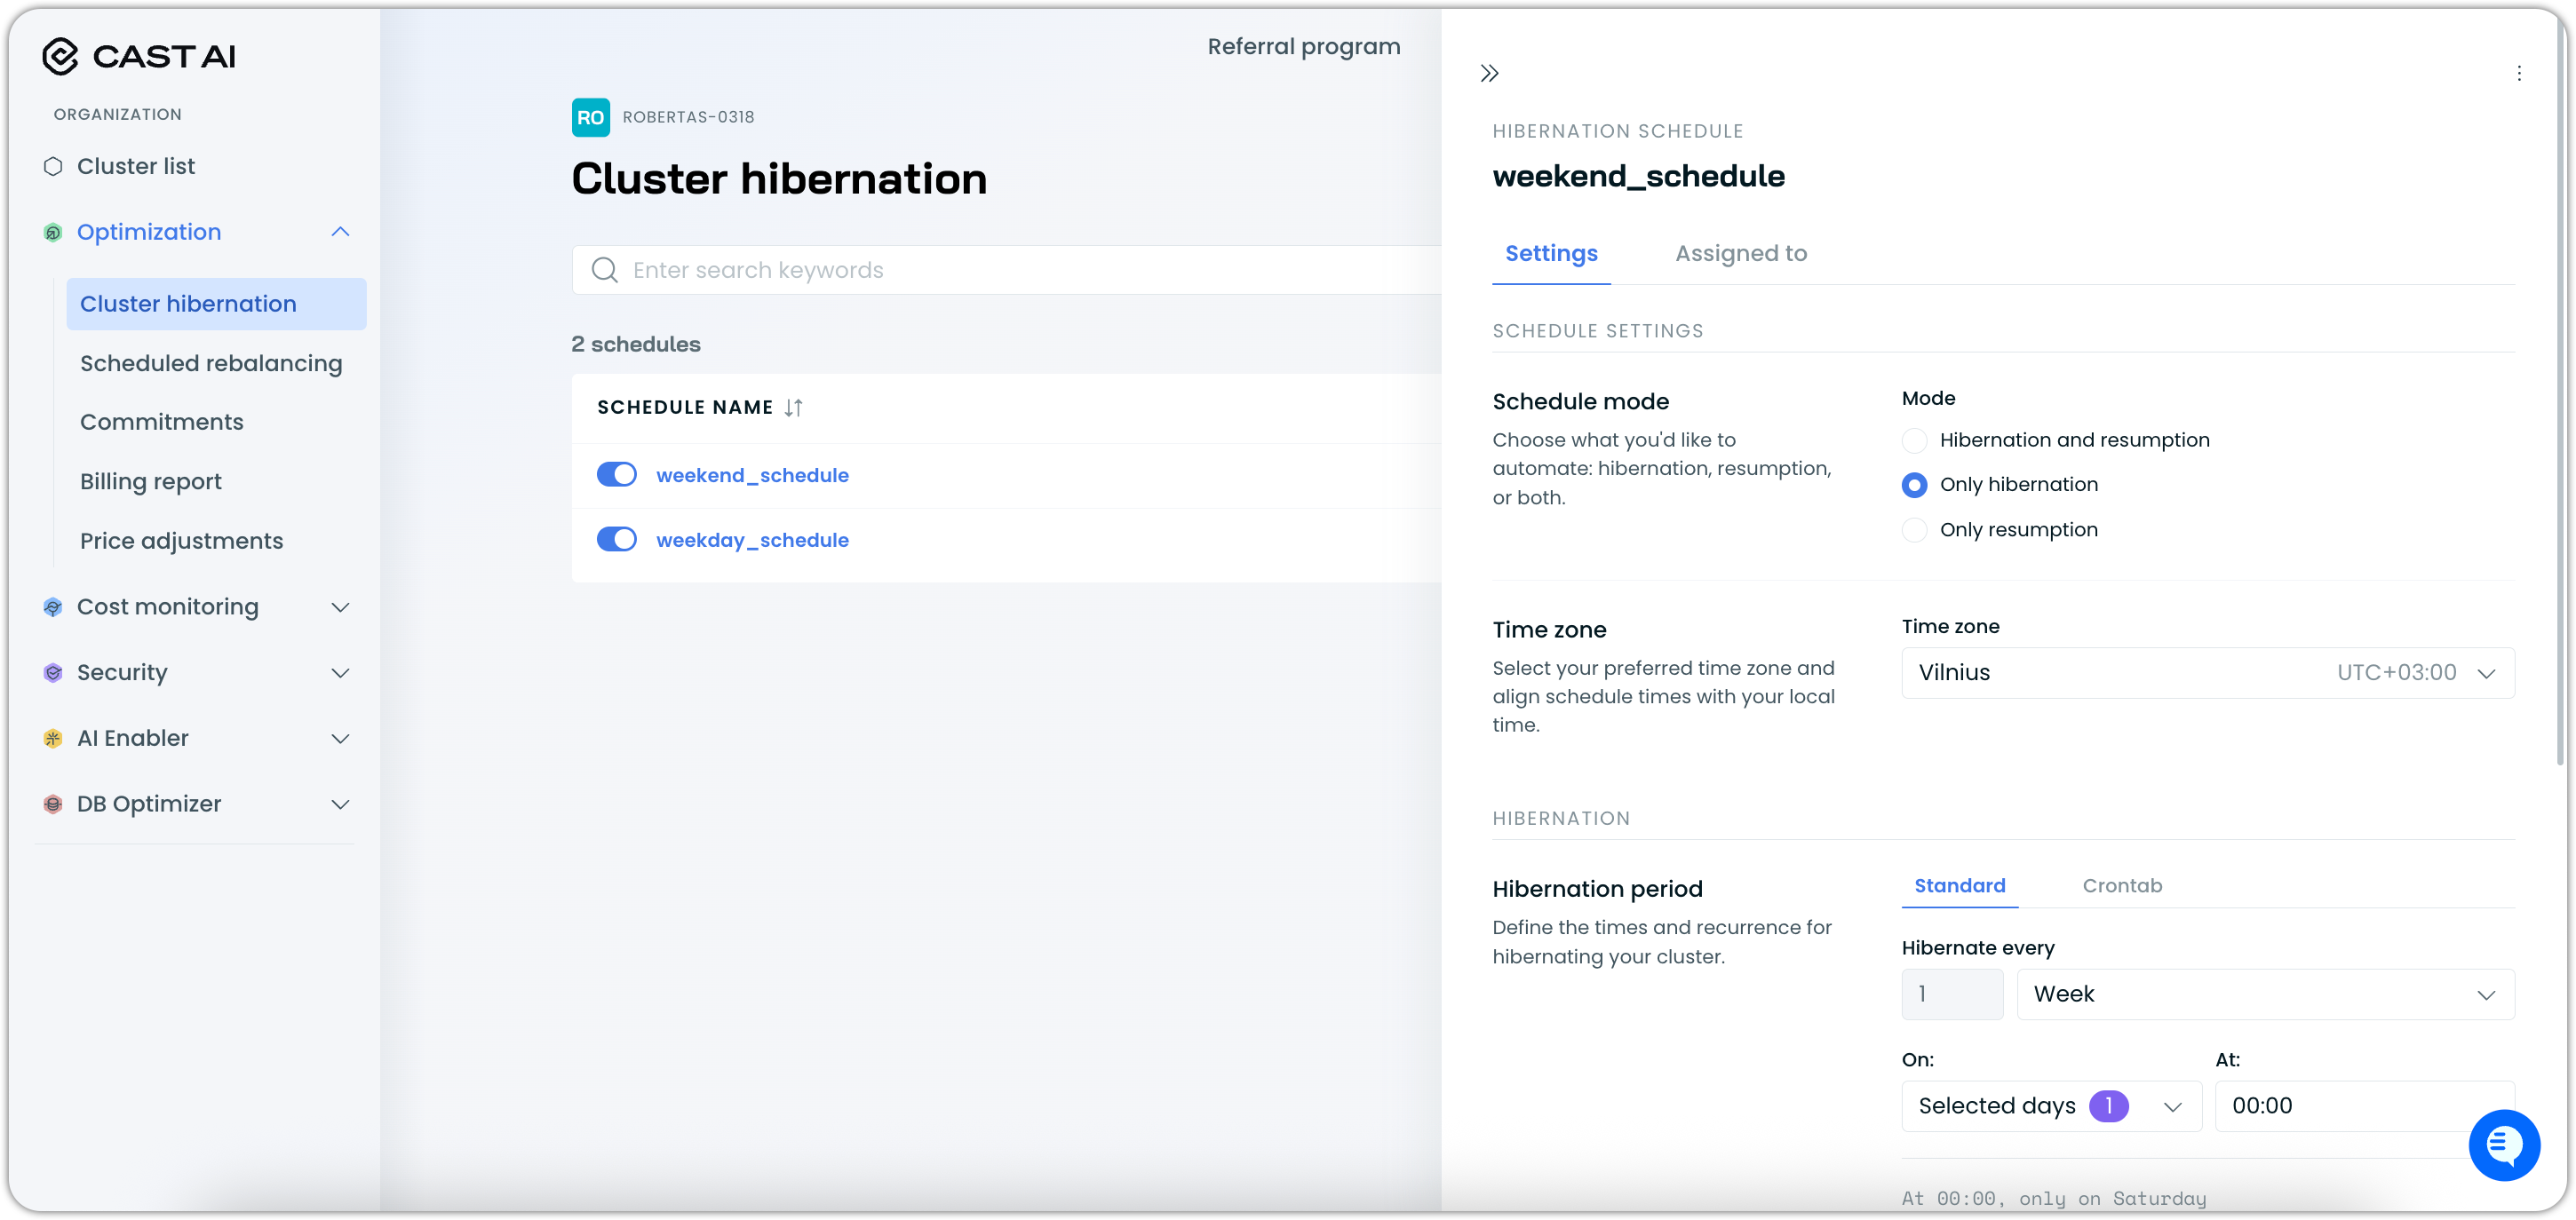
Step 1: Create a schedule
When creating a new hibernation schedule, you can configure:
Schedule name: A descriptive name for your hibernation schedule (e.g., "Spot drift", "Weekday work hours")
Schedule mode: Choose what you'd like to automate:
- Hibernation and resumption: Full automation of both hibernation and resumption
- Only hibernation: Automatically hibernate clusters (manual resumption required)
- Only resumption: Automatically resume hibernated clusters
Time zone: Select your preferred time zone to align schedule times with your local time. The interface automatically detects your location and suggests the appropriate time zone.
Hibernation period: Define when and how often to hibernate clusters:
- Standard: Define intervals via a user-friendly interface
- Crontab: Use cron expressions for custom scheduling
The console displays a preview of your schedule (e.g., "Hibernation scheduled for every Friday at 18:00").
Node configuration parameters: For resumption, specify the node configuration in JSON format. This allows you to define the desired configuration for nodes that will be used when your cluster resumes.
Step 2: Assign clusters
After creating the schedule, assign it to specific clusters:
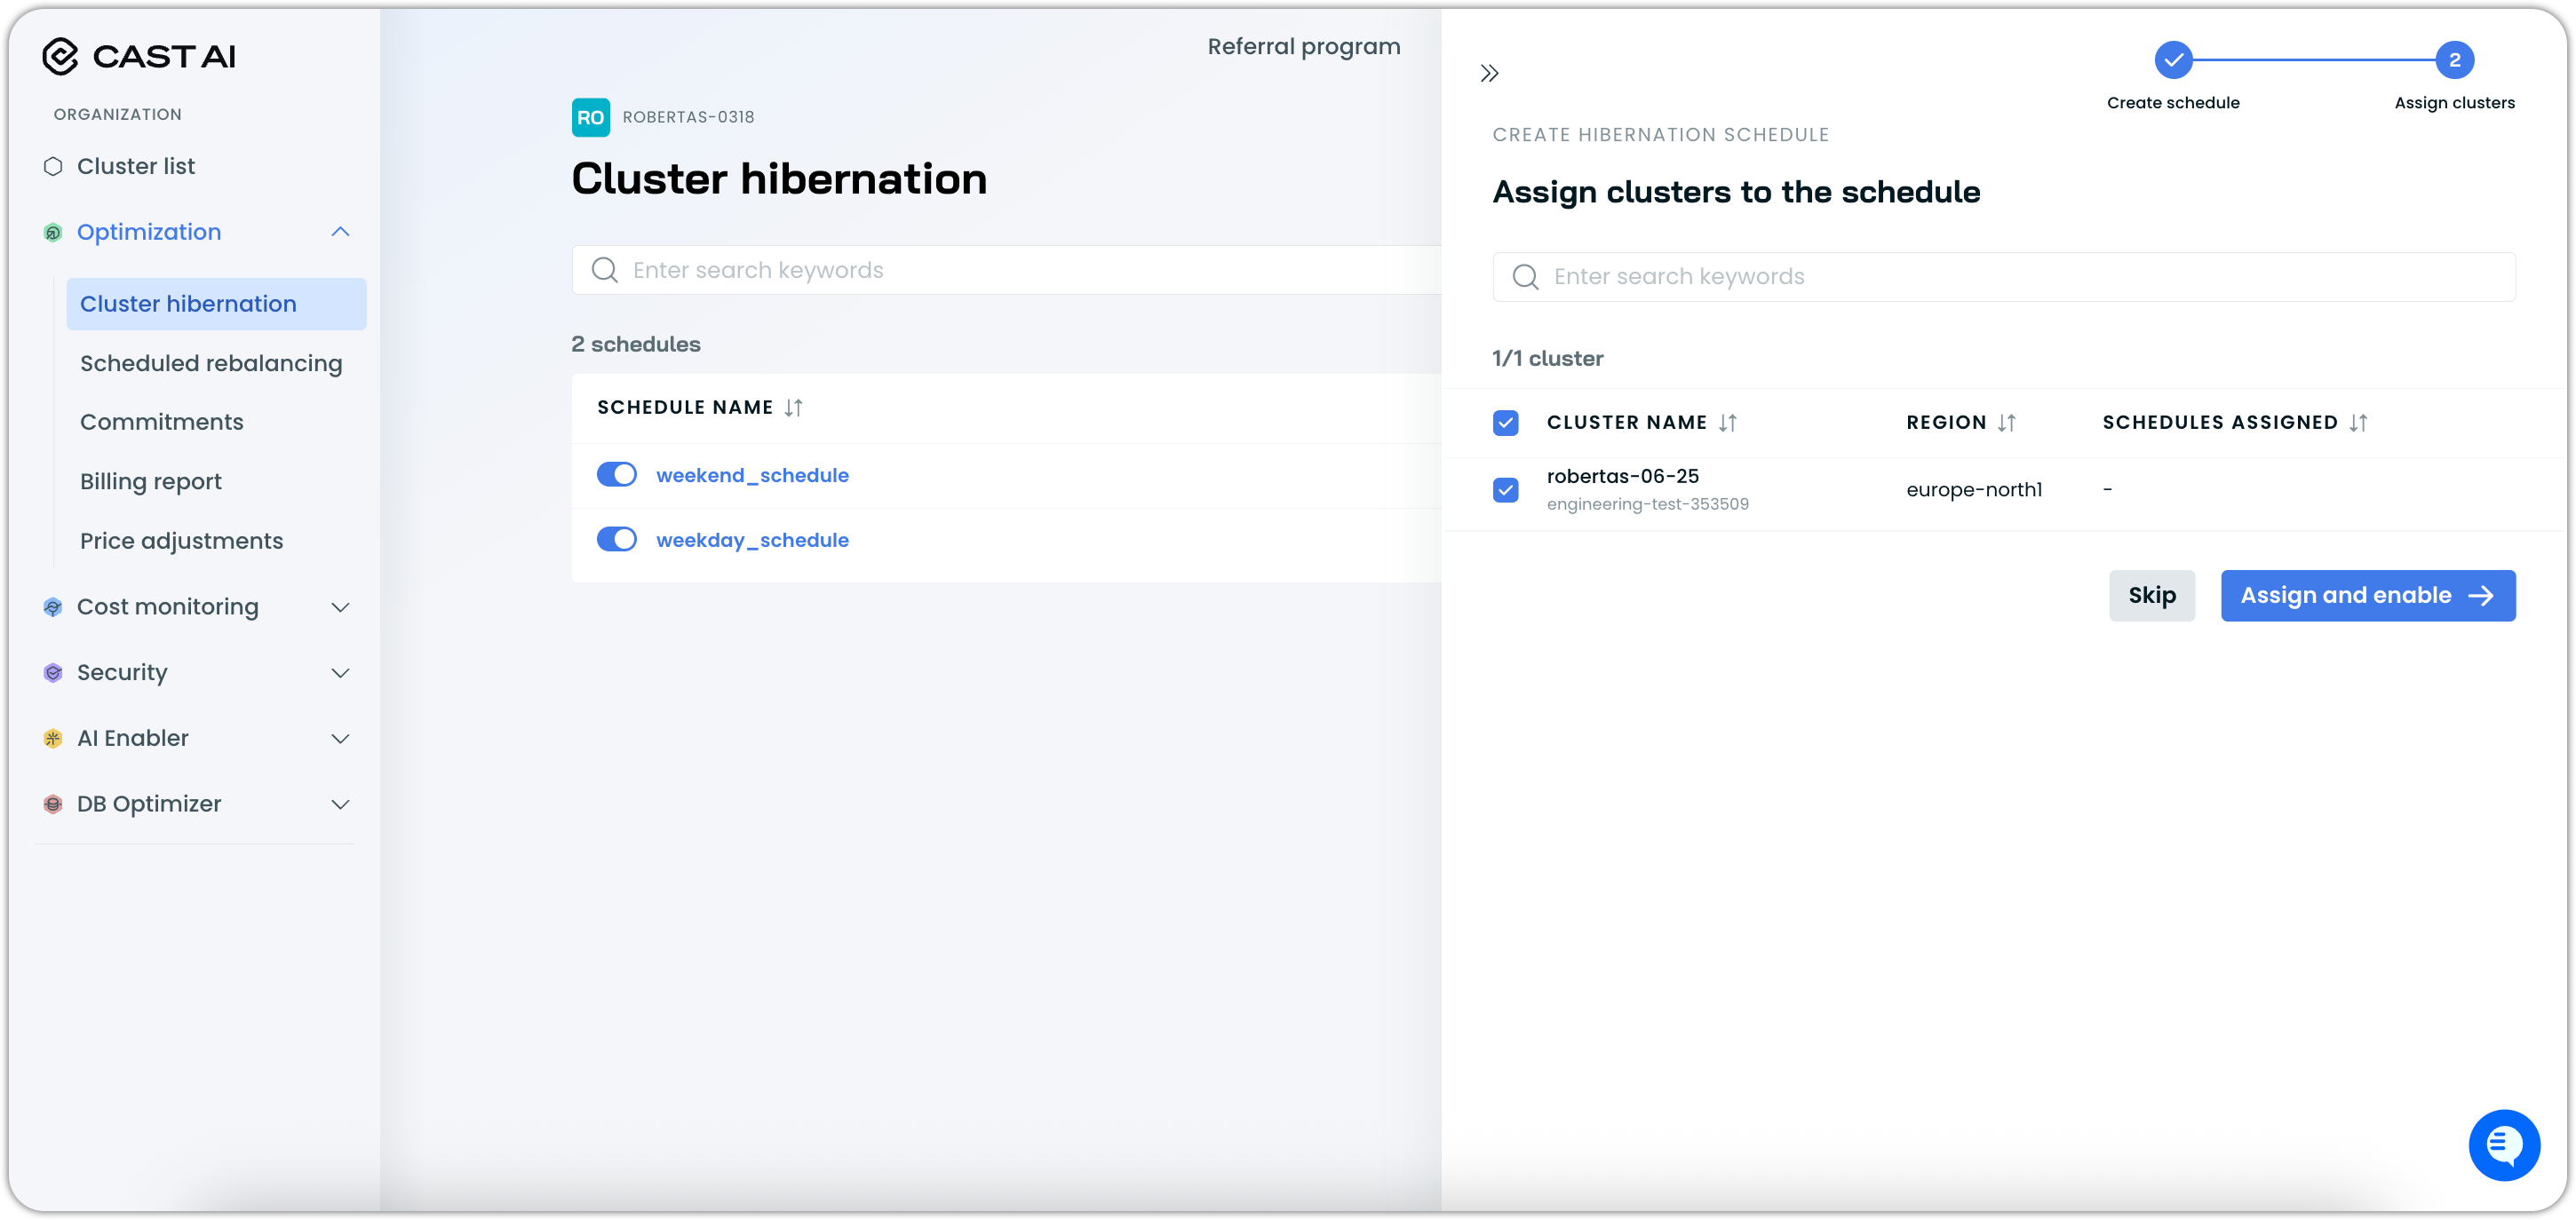
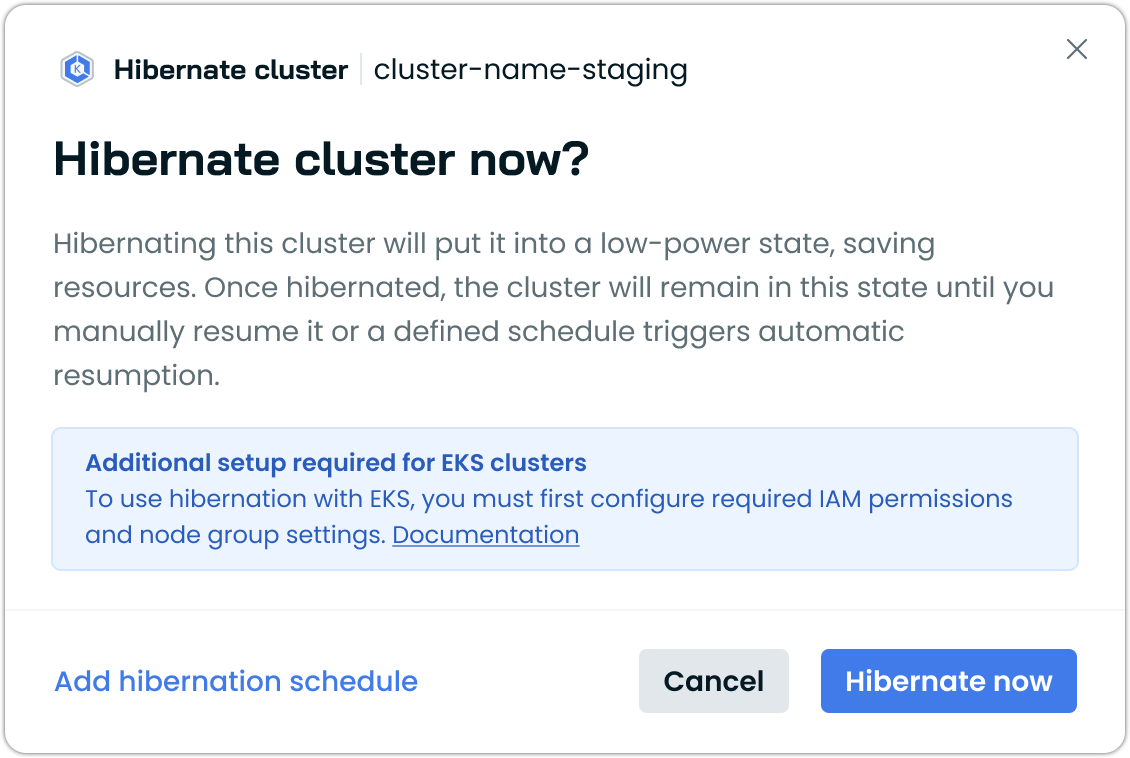
Additional setup for EKS clustersEKS clusters onboarded before October 2025 may need updated IAM permissions. If the console displays a permissions notification, re-run the onboarding script or upgrade your Terraform provider to v7.74.0+.
Managing existing schedules
You can view and manage hibernation schedules from both the organization-level hibernation page and individual cluster dashboards.
From Optimization > Cluster hibernation, the schedules list shows all your configured schedules. You can edit them and assign or unassign clusters at any time.
To make changes to an existing schedule, click on it in the list to open the settings drawer:
A schedule can be deleted through the three-dot (⋮) menu:
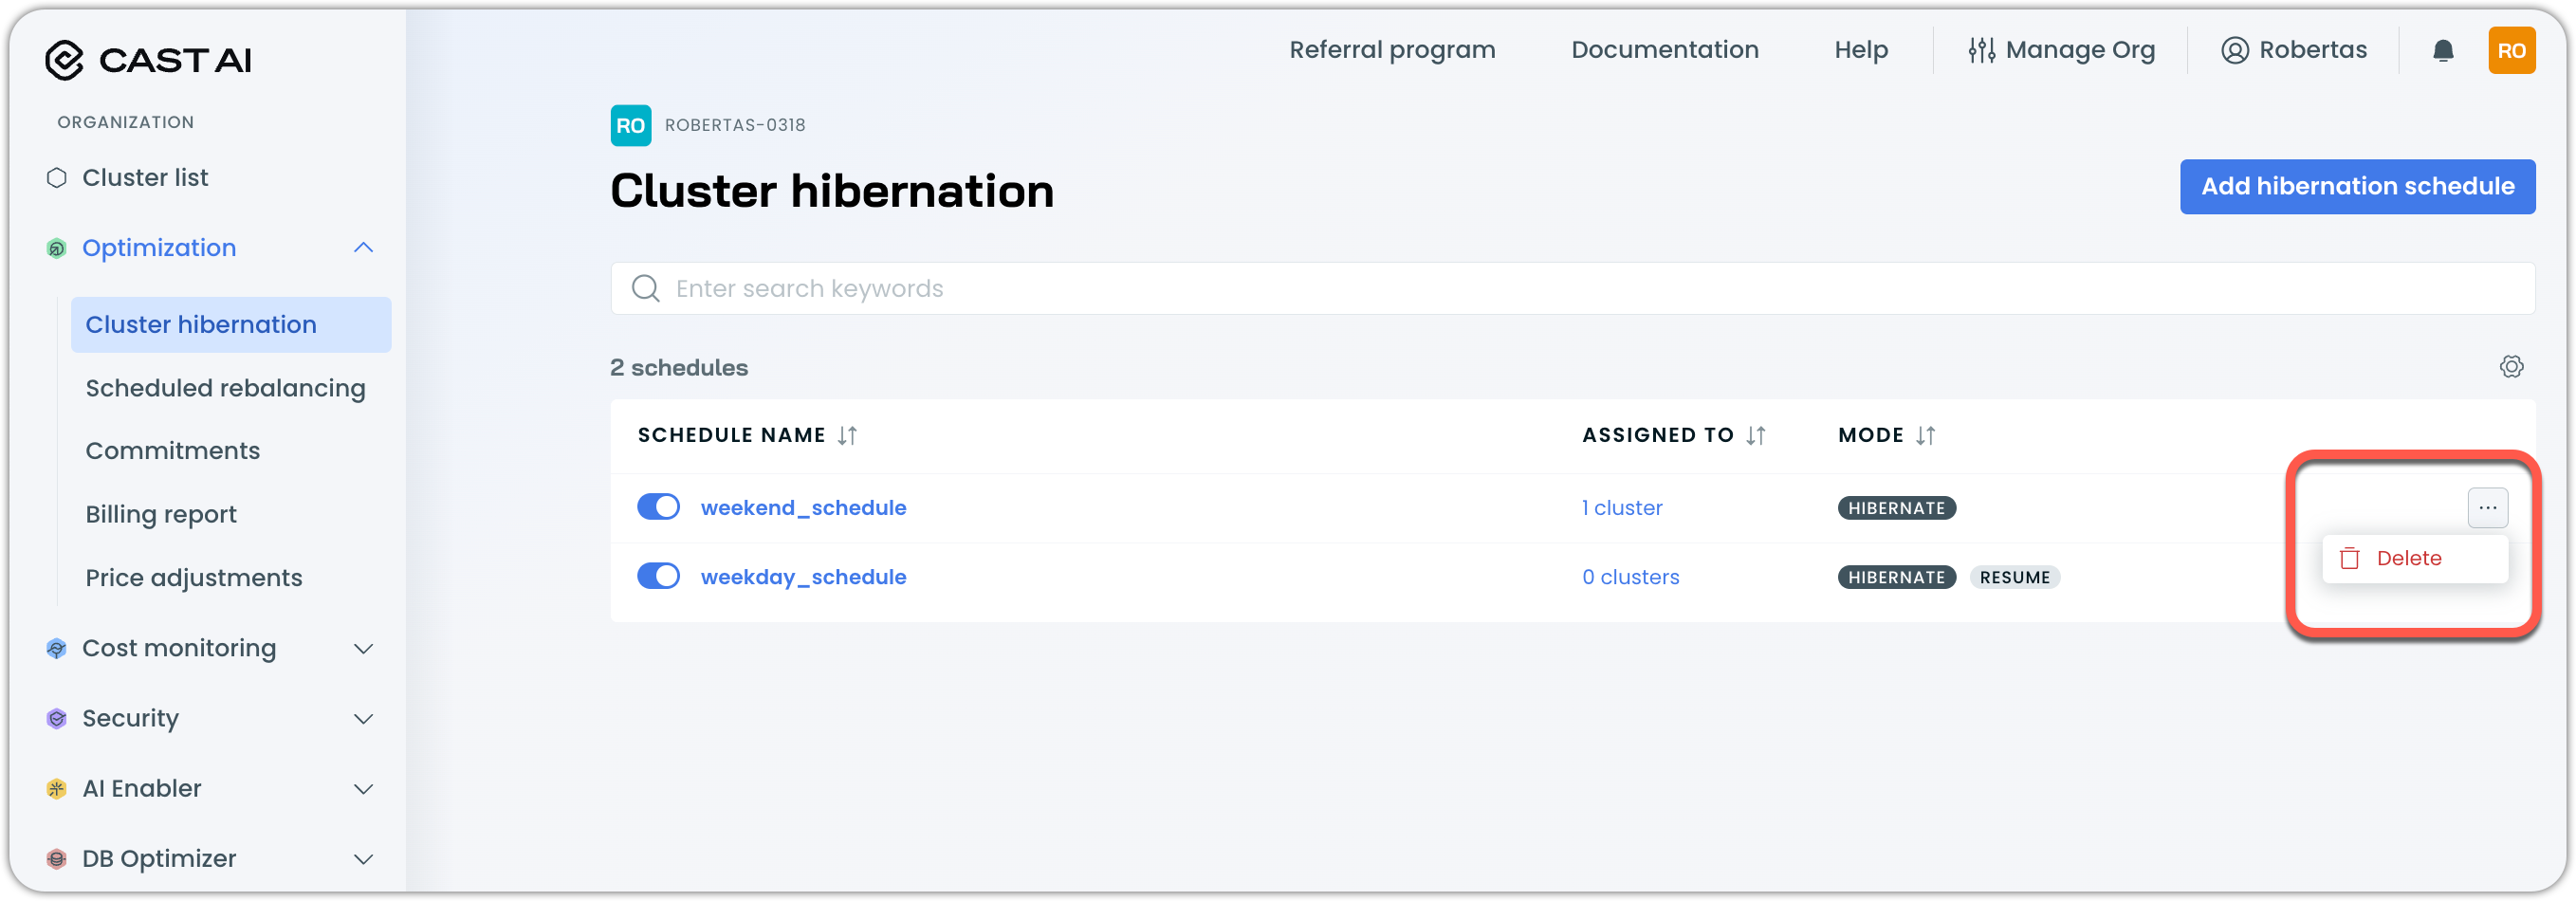
From cluster dashboards, you'll see a Hibernation schedules card showing the number of schedules assigned to that cluster (e.g., "2"). Clicking this opens a drawer where you can:
- View assigned schedules: See all schedules affecting the current cluster (e.g., "default_schedule", "Workday")
- Toggle schedule status: Enable or disable individual schedules for this cluster
- Create new schedules: Start the schedule creation process with the current cluster pre-selected

API-based hibernation schedule management
You can also create and manage hibernation schedules programmatically using the Cast AI API. This provides the same scheduling capabilities as the console interface but allows for automation and integration with your existing infrastructure as code workflows.
Creating hibernation schedules via API
You can create hibernation schedules using the Cast AI Hibernation Schedules API:
curl --request POST \
     --url $CASTAI_API_URL/cluster-autoscaler/v1beta/organizations/<organizationId>/hibernation-schedules \
     --header 'accept: application/json' \
     --header 'content-type: application/json' \
     --header 'X-API-Key: <your-api-key>' \
     --data '
{
  "enabled": true,
  "name": "Development Environment Schedule",
  "pauseConfig": {
    "enabled": true,
    "schedule": {
      "cronExpression": "0 18 * * MON-FRI"
    }
  },
  "resumeConfig": {
    "enabled": true,
    "schedule": {
      "cronExpression": "0 8 * * MON-FRI"
    },
    "jobConfig": {
      "nodeConfig": {
        "instanceType": "m5.large",
        "spotConfig": {
          "spot": true
        },
        "zone": "us-east-1a"
      }
    }
  },
  "clusterAssignments": {
    "items": [
      {
        "clusterId": "<your-cluster-id>"
      }
    ]
  }
}
'
Manual hibernation in the console
In addition to scheduled hibernation, you can manually hibernate and resume individual clusters. Manual hibernation can be initiated from either the cluster dashboard or the cluster list view.
Hibernating a cluster manually
You can manually hibernate a cluster from two locations:
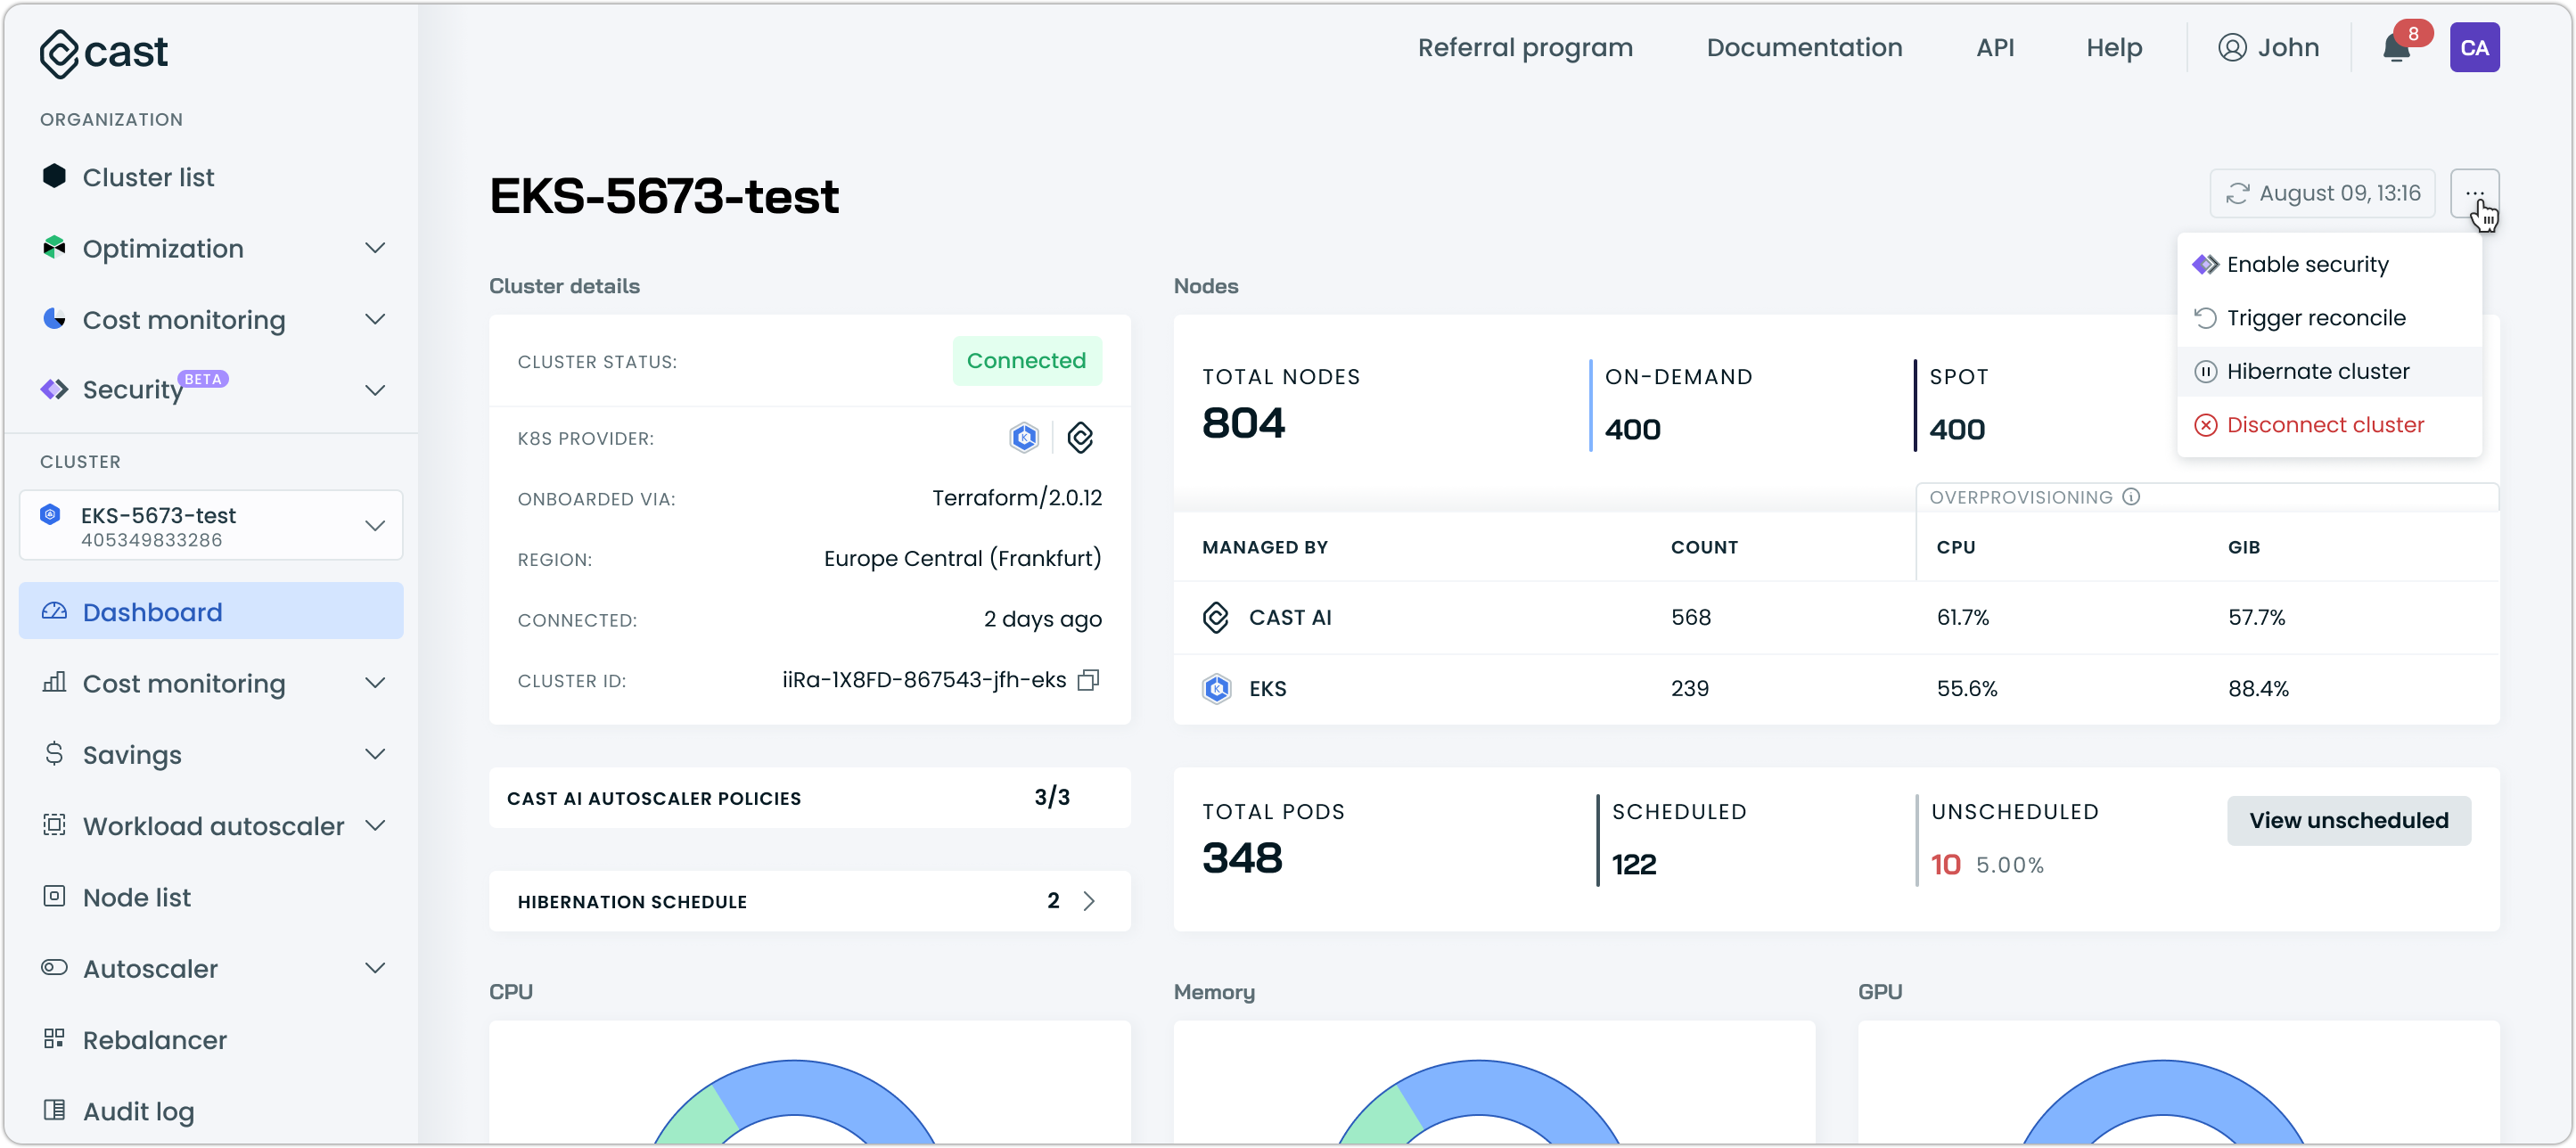
From cluster dashboard:
- Navigate to your cluster dashboard
- Locate the Hibernate cluster option in the cluster actions menu (top right)
- Click Hibernate cluster to initiate the hibernation process
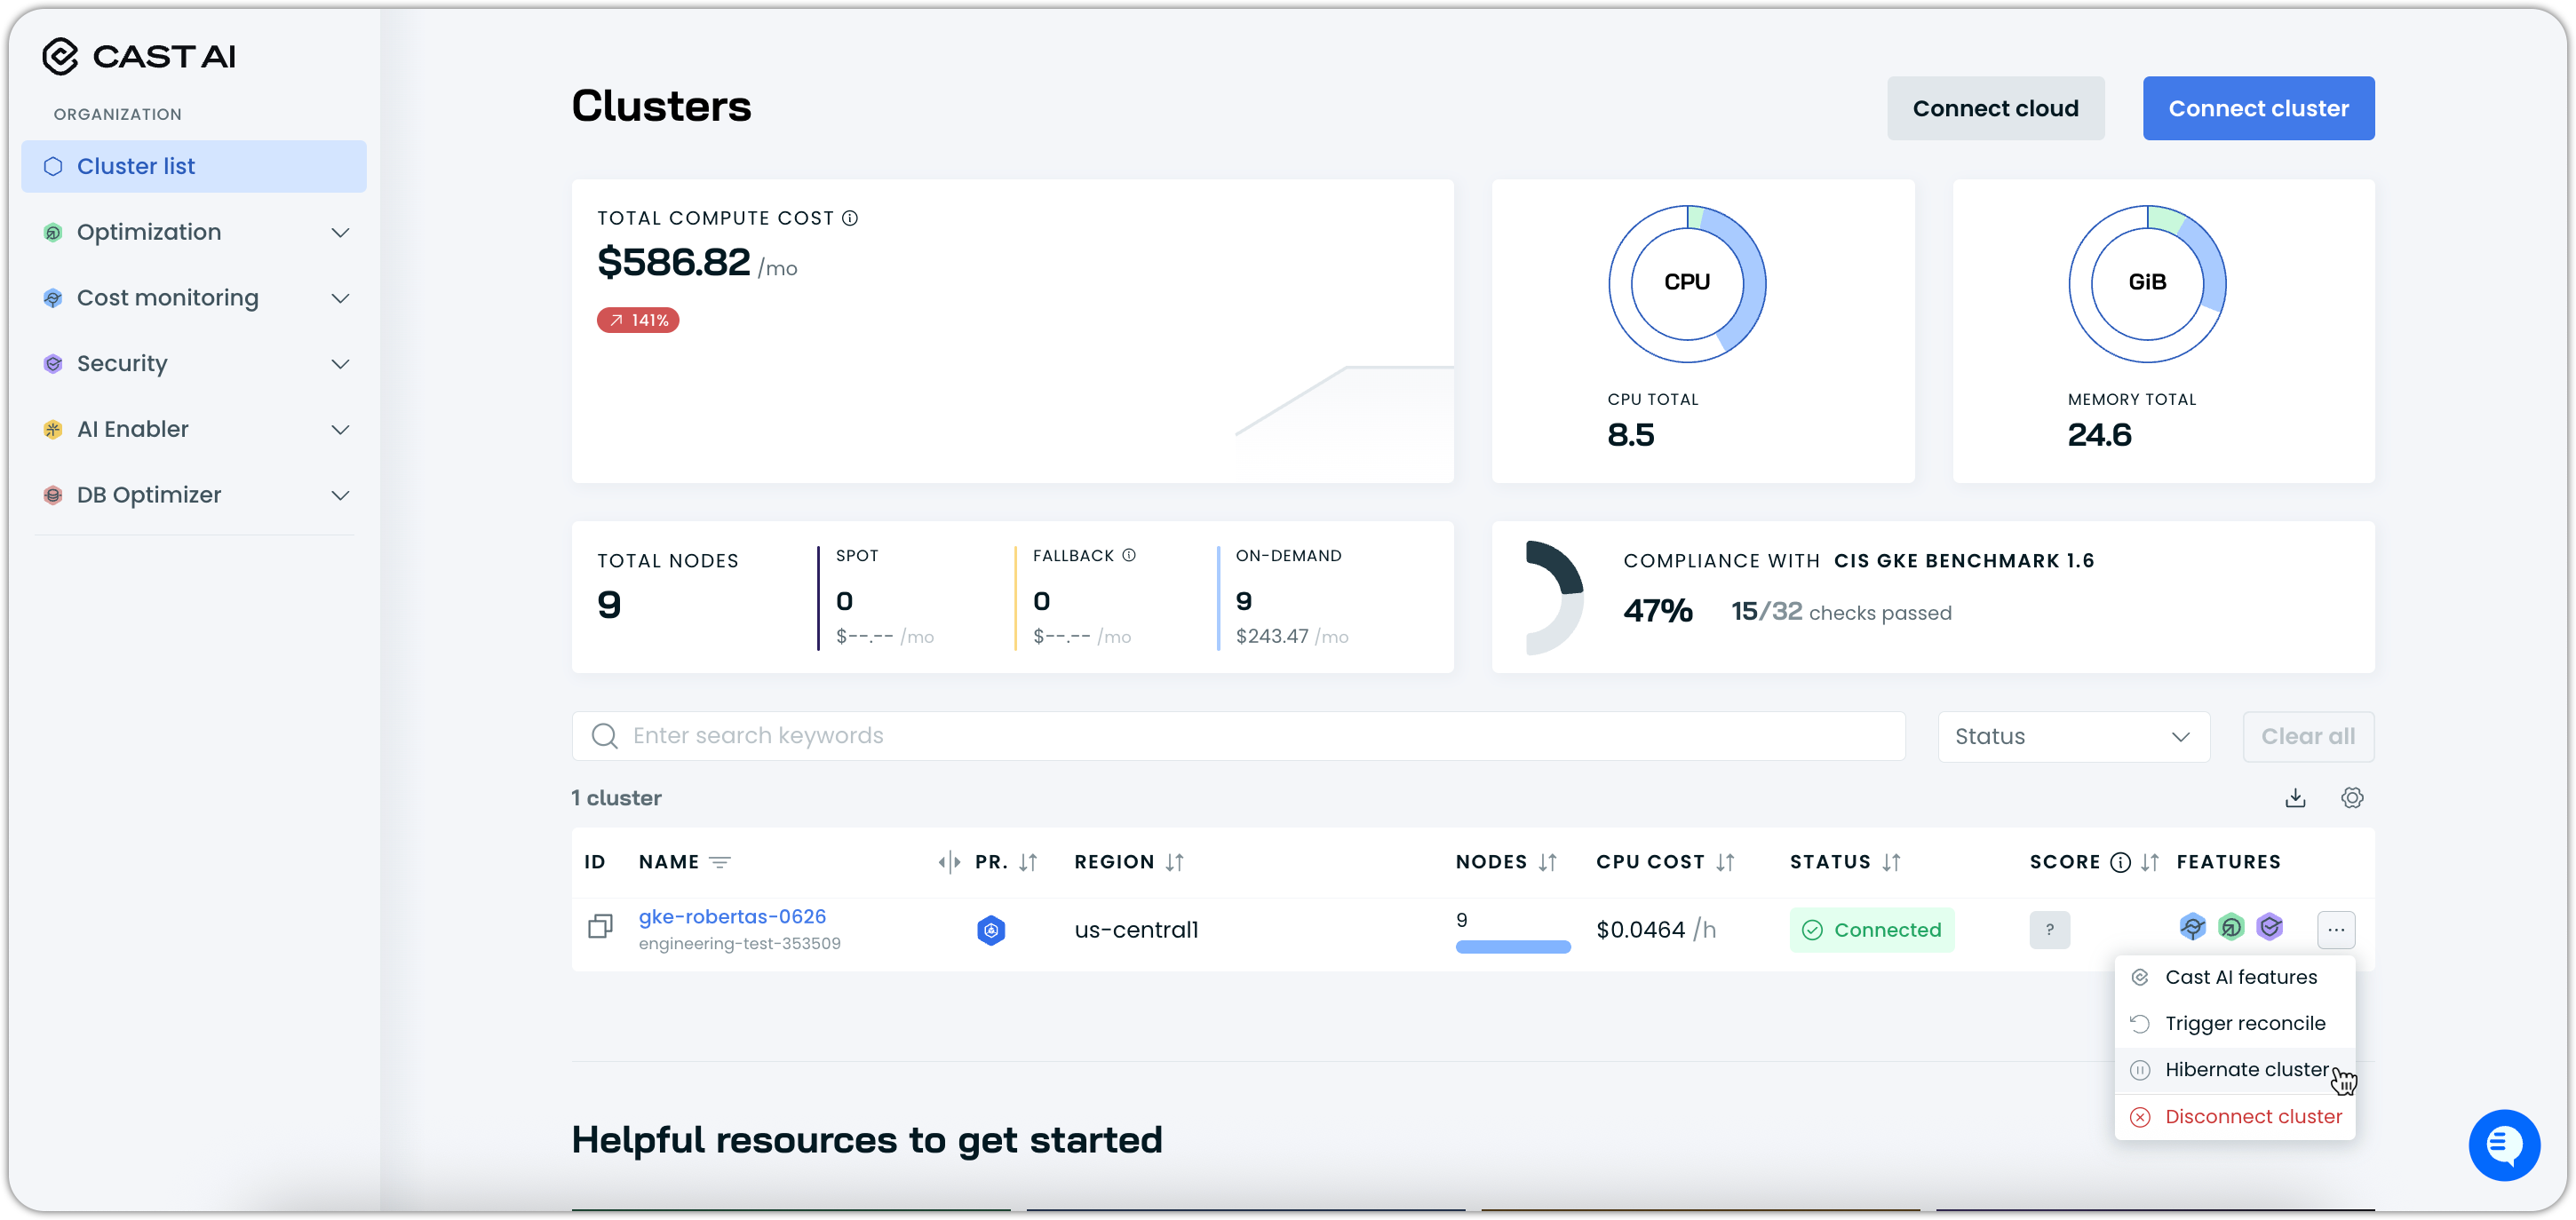
From cluster list:
- Navigate to the cluster list view
- Locate the cluster you want to hibernate
- Click Hibernate cluster for that cluster to initiate the hibernation process
Both methods will open a hibernation confirmation dialog where you can:
- Review hibernation details: Understand what will happen during hibernation
- Confirm hibernation: Click Hibernate now to proceed
- Cancel: Exit without hibernating if you change your mind
Cluster status during hibernation
When a cluster is hibernated, its status will change to reflect the hibernation state:
- Connected → Hibernating (during the hibernation process)
- Hibernating → Hibernated (when hibernation is complete)
The hibernation status is displayed throughout the console, including in the cluster list and cluster dashboard views.
Resuming a hibernated cluster manually
To resume a hibernated cluster:
- Navigate to the hibernated cluster (from either the cluster dashboard or the cluster list)
- Click Resume cluster in the available cluster actions
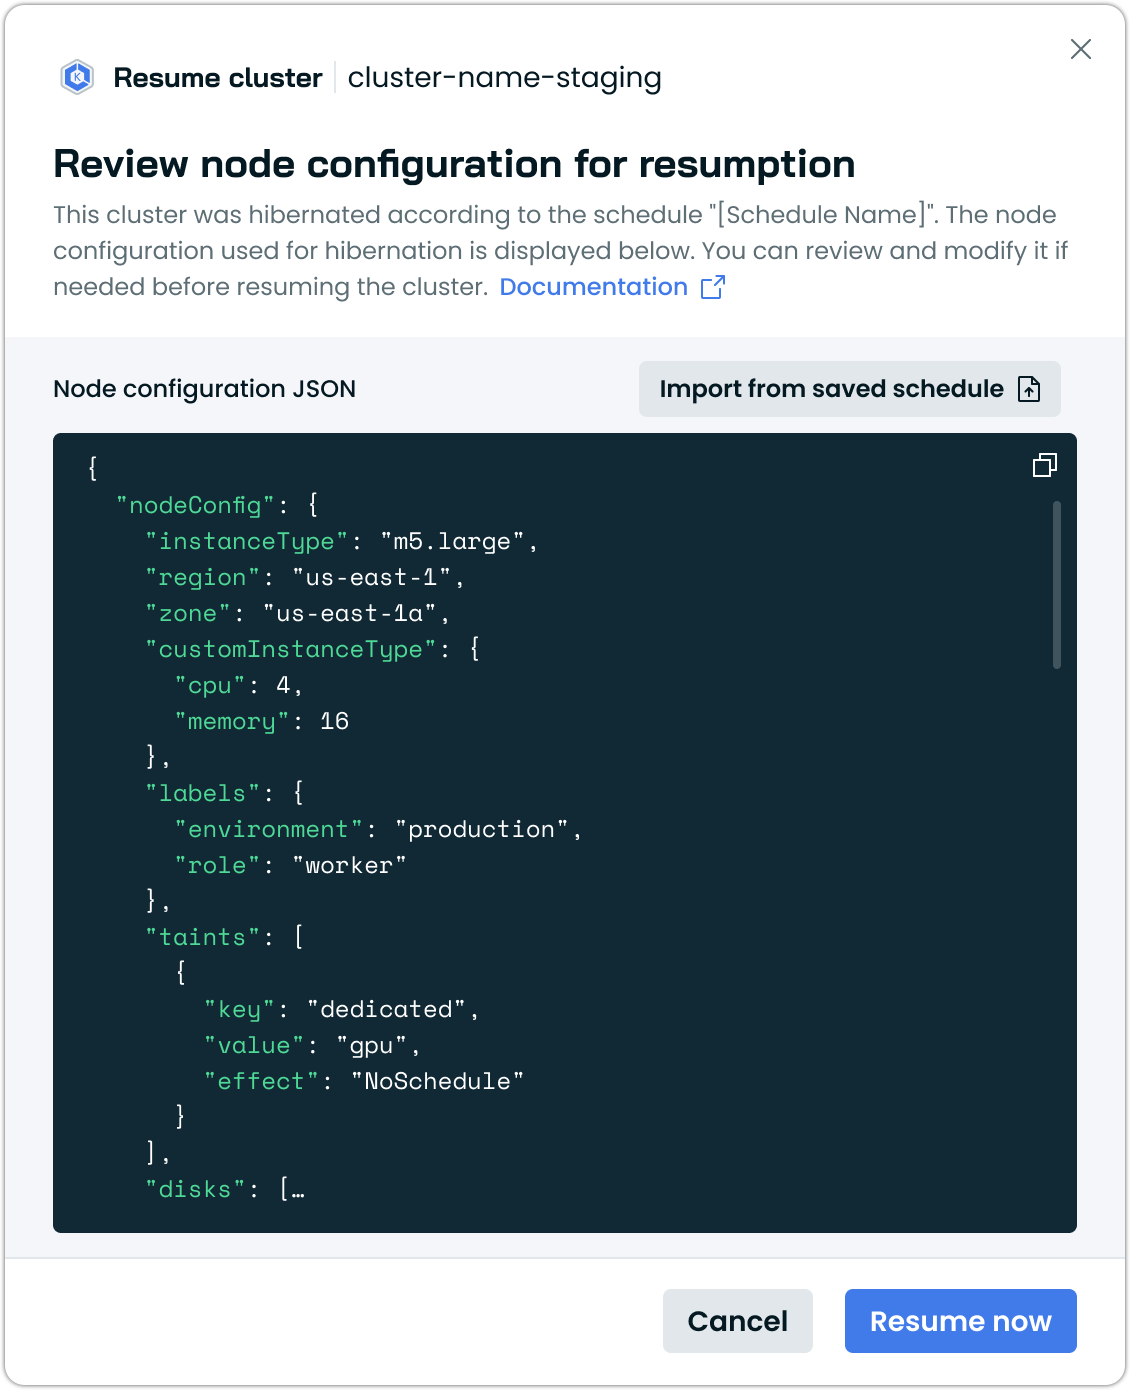
- Configure the resumption parameters in the dialog:
- Instance type: Specify the node instance type for resumption
- Node configuration: Additional node template configuration (optional)
The resumption process provides different configuration options depending on your setup:
When you have an existing node configuration:
- The system will display your current node configuration
- You can modify the configuration using the JSON editor
- Default values are pre-populated based on your cluster's previous configuration
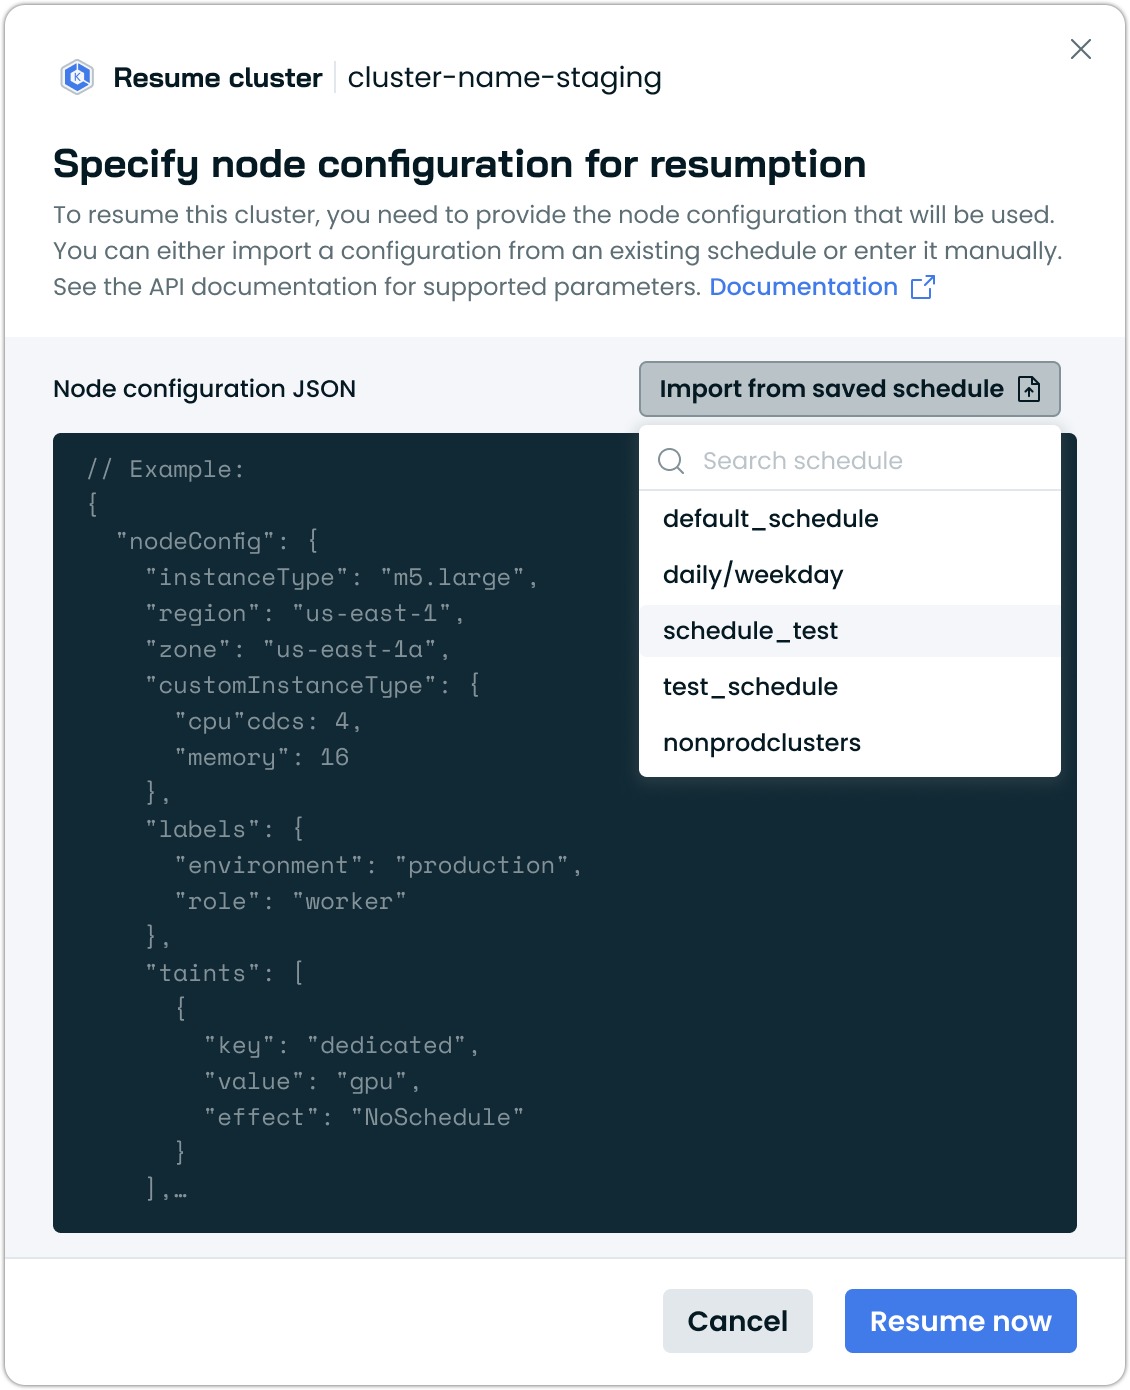
When you don't have node configuration:
- You'll be prompted to specify the node configuration for resumption
- The system provides a template you can customize, or choose to import a configuration from a hibernation schedule
- You can define instance type, region, availability zones, and other node parameters
Managing resumption nodes
After a cluster resumes, the temporary nodes created during resumption remain active in your cluster. Cast AI does not automatically remove or replace these nodes.
If you selected larger instance types during resumption to ensure successful startup, you have two options to optimize your cluster after resumption:
Option 1: Manual rebalancing
- Navigate to Rebalancer in the Cast AI console
- Generate a rebalancing plan to replace resumption nodes with more cost-efficient instances
- Execute the plan to complete the optimization
Option 2: Manual node removal
- Remove the resumption nodes manually from your cluster
- Cast AI's autoscaler will automatically provision optimized nodes based on your workload requirements
NoteIf you initially chose larger instance types to ensure reliable resumption, plan to rebalance your cluster afterward to optimize costs.
Resumption status changes
During the resumption process, the cluster status will progress through:
- Hibernated → Resuming (during the resumption process)
- Resuming → Connected (when resumption is complete and cluster is active)
The resumption process creates temporary nodes to run essential system components, then hands over control to Cast AI's autoscaler for normal operations.
Manual hibernation via API
You can also manage cluster hibernation programmatically using the Cast AI API.
Hibernating a cluster via API
You can hibernate a cluster using the Cast AI Hibernate API:
curl --request POST \
     --url $CASTAI_API_URL/cluster-autoscaler/v1/organizations/<your-organization-id>/clusters/<your-cluster-id>/hibernation-jobs \
     --header 'X-API-Key: <your-api-key>' \
     --header 'accept: application/json' \
     --header 'content-type: application/json' \
     --data '{"type":"PAUSE"}'
Replace the <placeholders> in the path with the actual IDs of your cluster and organization.
The cluster will transition to a "Hibernating" state, and the following actions will occur:
- The autoscaler will be disabled to prevent new nodes from being created
- All nodes will be systematically removed from the cluster in stages
- First, regular workload nodes are removed
- Temporary nodes keep essential services running until all other nodes are removed
- Finally, temporary nodes are removed as well
- The control plane will remain active, but no workloads will run
NoteDuring hibernation, you will still incur charges for the cloud provider's control plane and any persistent volumes that remain.
Resuming a hibernated cluster via API
To resume a hibernated cluster, use the Cast AI Resume API:
curl --request POST \
     --url $CASTAI_API_URL/cluster-autoscaler/v1/organizations/<your-organization-id>/clusters/<your-cluster-id>/hibernation-jobs:resumeCluster \
     --header 'X-API-Key: <your-api-key>' \
     --header 'accept: application/json'
It requires an existing hibernation schedule that is assigned to the cluster being resumed. The schedule's node configuration is used as the base for the resumption node.
The node specified in the schedule's node configuration has to be sufficient to run the cluster's essential components. The instance type requirements depend on your specific workloads and cloud service provider.
The resumption process works as follows:
- Temporary nodes are created using your specified instance type, and the rest of the node template configuration, if provided
- These nodes run essential system components, including Cast AI agents
- The autoscaler is reactivated and takes over normal cluster scaling operations
- The cluster returns to its "Ready" state
After resumption completes, the temporary nodes remain in your cluster. Cast AI does not automatically remove or replace these nodes. To optimize your cluster after resumption, you can either use the rebalancing feature to replace these nodes with more cost-efficient instances or manually remove them to allow the autoscaler to provision optimized nodes based on your workload requirements.
Troubleshooting Resume Operations
Insufficient Resources
If the resumption process fails, it's typically because:
- The specified
instanceTypecannot be provisioned in your cloud environment - The instance type doesn't have enough resources to run all cluster-critical components
In these scenarios, manual user intervention is required to resolve the issue and restore the cluster to a running state.
To restore the cluster to a running state, you have two options:
Option 1: Try resuming again with a different instance type in the node configuration:
curl --request POST \
     --url $CASTAI_API_URL/cluster-autoscaler/v1/organizations/<your-organization-id>/clusters/<your-cluster-id>/hibernation-jobs:resumeCluster \
     --header 'X-API-Key: <your-api-key>' \
     --header 'accept: application/json'
Option 2: Add nodes manually using your cloud provider
- Create nodes large enough to run the critical components
- Ensure the nodes are properly joined to the cluster
Once you successfully provision nodes with sufficient capacity to schedule all cluster-critical components (either through the resume API or manually), Cast AI will detect this and automatically complete the cluster resumption process.
ImportantChoosing an appropriate instance type is crucial for successful cluster resumption. Requirements vary by cluster type and size - while some clusters may operate with smaller instances (2 vCPU, 8GB RAM), other environments might require larger instances (16 vCPU, 64GB RAM). When in doubt, we recommend erring on the side of larger instances. After successful resumption, you can rebalance the cluster or manually remove these nodes to allow Cast AI to provision more cost-efficient alternatives based on your workload requirements.
Node Configuration parameters used in temporary nodesThe following parameters from the default node configuration are being used for temporary node creation during the resume process:
- Security groups
- Subnets
- IMDS hop limit
- IMDSv1/v2
- Volume size and type, IOPS, throughput, and KMS encryption
- SSH key pair
- Instance tags
Audit logging
Cast AI generates audit log events for all hibernation and resumption activities, providing visibility into cluster state changes and helping with compliance and troubleshooting. These events can be integrated with your monitoring and alerting systems.
Hibernation events
The following audit events are generated during hibernation operations:
- Cluster hibernated: When the cluster successfully enters the hibernated state
- Cluster hibernation failed: If the hibernation process encounters errors
Resumption events
Resumption operations generate these audit events:
- Cluster resumed: When the cluster successfully returns to the active state
- Cluster resumption failed: If the resumption process encounters errors
API reference
For detailed API specifications, see our reference documentation:
Comparison with legacy pause feature
NoteCast AI previously offered a different mechanism for pausing clusters. The new hibernation feature provides improved reliability and better cost optimization. For information on the legacy pause feature, see Pausing a cluster.
Key differences between hibernation and the legacy pause feature:
| Feature | Cluster hibernation | Legacy pause |
|---|---|---|
| Implementation | API-driven with automated resumption | Uses Kubernetes CronJobs |
| Setup complexity | Simple API calls with one-time configuration | Requires manual creation and scheduling of CronJobs |
| Cloud service provider (CSP) support | All major cloud providers | Limited provider support |
| Console interface | Full UI support for scheduling and management | No console interface |
| Audit logging | Complete audit trail for all operations | Limited logging capabilities |