
Getting started
Early Access FeatureThis feature is in early access. It may undergo changes based on user feedback and continued development. We recommend testing in non-production environments first and welcome your feedback to help us improve.
This guide walks you through setting up OMNI for your cluster, from initial onboarding through creating your first edge location, configuring node templates, and provisioning compute capacity in the edge.
Before you begin
Ensure you meet the following requirements before setting up OMNI.
Cluster requirements
- Phase 2 cluster — A cluster with Cast AI automation enabled. Phase 2 clusters have the Cluster Controller, Evictor, and other automation components installed, allowing Cast AI to provision and manage nodes. If your cluster is in Phase 1 (read-only), you'll need to enable automation first.
- Supported cluster type — EKS, GKE, or AKS
Required tools
The following tools must be installed on your local machine:
| Tool | Purpose | Version |
|---|---|---|
kubectl | Kubernetes CLI, configured for your cluster | v1.24+ |
| Helm | Package manager for Kubernetes | v3.10+ |
curl | HTTP client for downloading scripts | Any recent version |
jq | JSON processor for script operations | v1.6+ |
| Cloud CLI | Authenticated for your target edge location(s) | - |
Cloud permissions
You'll need sufficient permissions in your cloud account(s) to create networking resources (VPCs, subnets, security groups) and compute instances in the regions where you want to create edge locations. See Required cloud permissions for details.
Storage & networking requirements for OMNI
OMNI edge clusters need a storage class for PVC support and, on EKS, a LoadBalancer provider. The onboarding script configures both automatically. When using Terraform, set them as module inputs.
Storage provider
OMNI requires a storage class to provision persistent volumes for the agent on edge clusters. An SSD-backed class is recommended for performance.
How the script selects a storage class
The script applies this resolution order:
OVERRIDE_STORAGE_PROVIDERenvironment variable — takes precedence when set (optional).- OMNI-preferred storage class —
gp3for EKS,premium-rwofor GKE,managed-csi-premiumfor AKS. Used if the class exists in the cluster. - Cluster default storage class — used when no OMNI-preferred class is found.
- Failure — the script exits with an error: install the preferred class or set
OVERRIDE_STORAGE_PROVIDER.
WarningEKS clusters don't ship with volume provisioner nor storage class installed. To provision PVCs you need to install AWS EBS CSI driver and a gp3 based storage class. We recommend using
gp3storageclass for the OMNI agent due to performance benefits. If you have a different storage class or it has a different name, setOVERRIDE_STORAGE_PROVIDERto point to it.
Terraform
The storage_provider variable overrides the storage class used for edge clusters. Defaults to premium-rwo for GKE and gp3 for EKS when empty.
module "omni" {
  # ...
  storage_provider = "my-custom-sc"
}
LoadBalancer provider
This applies to EKS only. Provisioning load balancers requires either the AWS Load Balancer Controller (recommended) or the legacy in-tree cloud provider.
WarningThe legacy in-tree provider (
nlb) is not recommended for production clusters. Install the AWS Load Balancer Controller for better performance and features.
Onboarding script
The onboarding script auto-detects the controller by checking existence of elbv2.k8s.aws CRDs. If found, AWS Load Balancer Controller is used. If not, it falls back to the legacy provider.
Terraform
The loadbalancer_provider variable sets the provider for EKS edge clusters. Accepts nlb or external. Defaults to external when empty.
module "omni" {
  # ...
  loadbalancer_provider = "external"
}
The module assumes you have the AWS Load Balancer Controller installed in production clusters. Install it before applying the module, or set loadbalancer_provider = "nlb" to use the legacy provider.
Step 1: Onboard your cluster to OMNI
Onboarding deploys the OMNI components to your cluster. You can onboard in two ways.
Option A: During Phase 2 onboarding (recommended for new clusters)
If you're onboarding a cluster from Phase 1 (Read-only) to Phase 2 (Automation), you can enable OMNI at the same time.
-
In the Cast AI console, navigate to your cluster
-
Follow the standard Phase 2 onboarding flow
-
Select Extend cluster to other regions and cloud providers under Advanced settings
The script will be updated to include INSTALL_OMNI=true.
-
Copy and run the script in your terminal
-
Wait for the script to complete (typically 1-2 minutes)
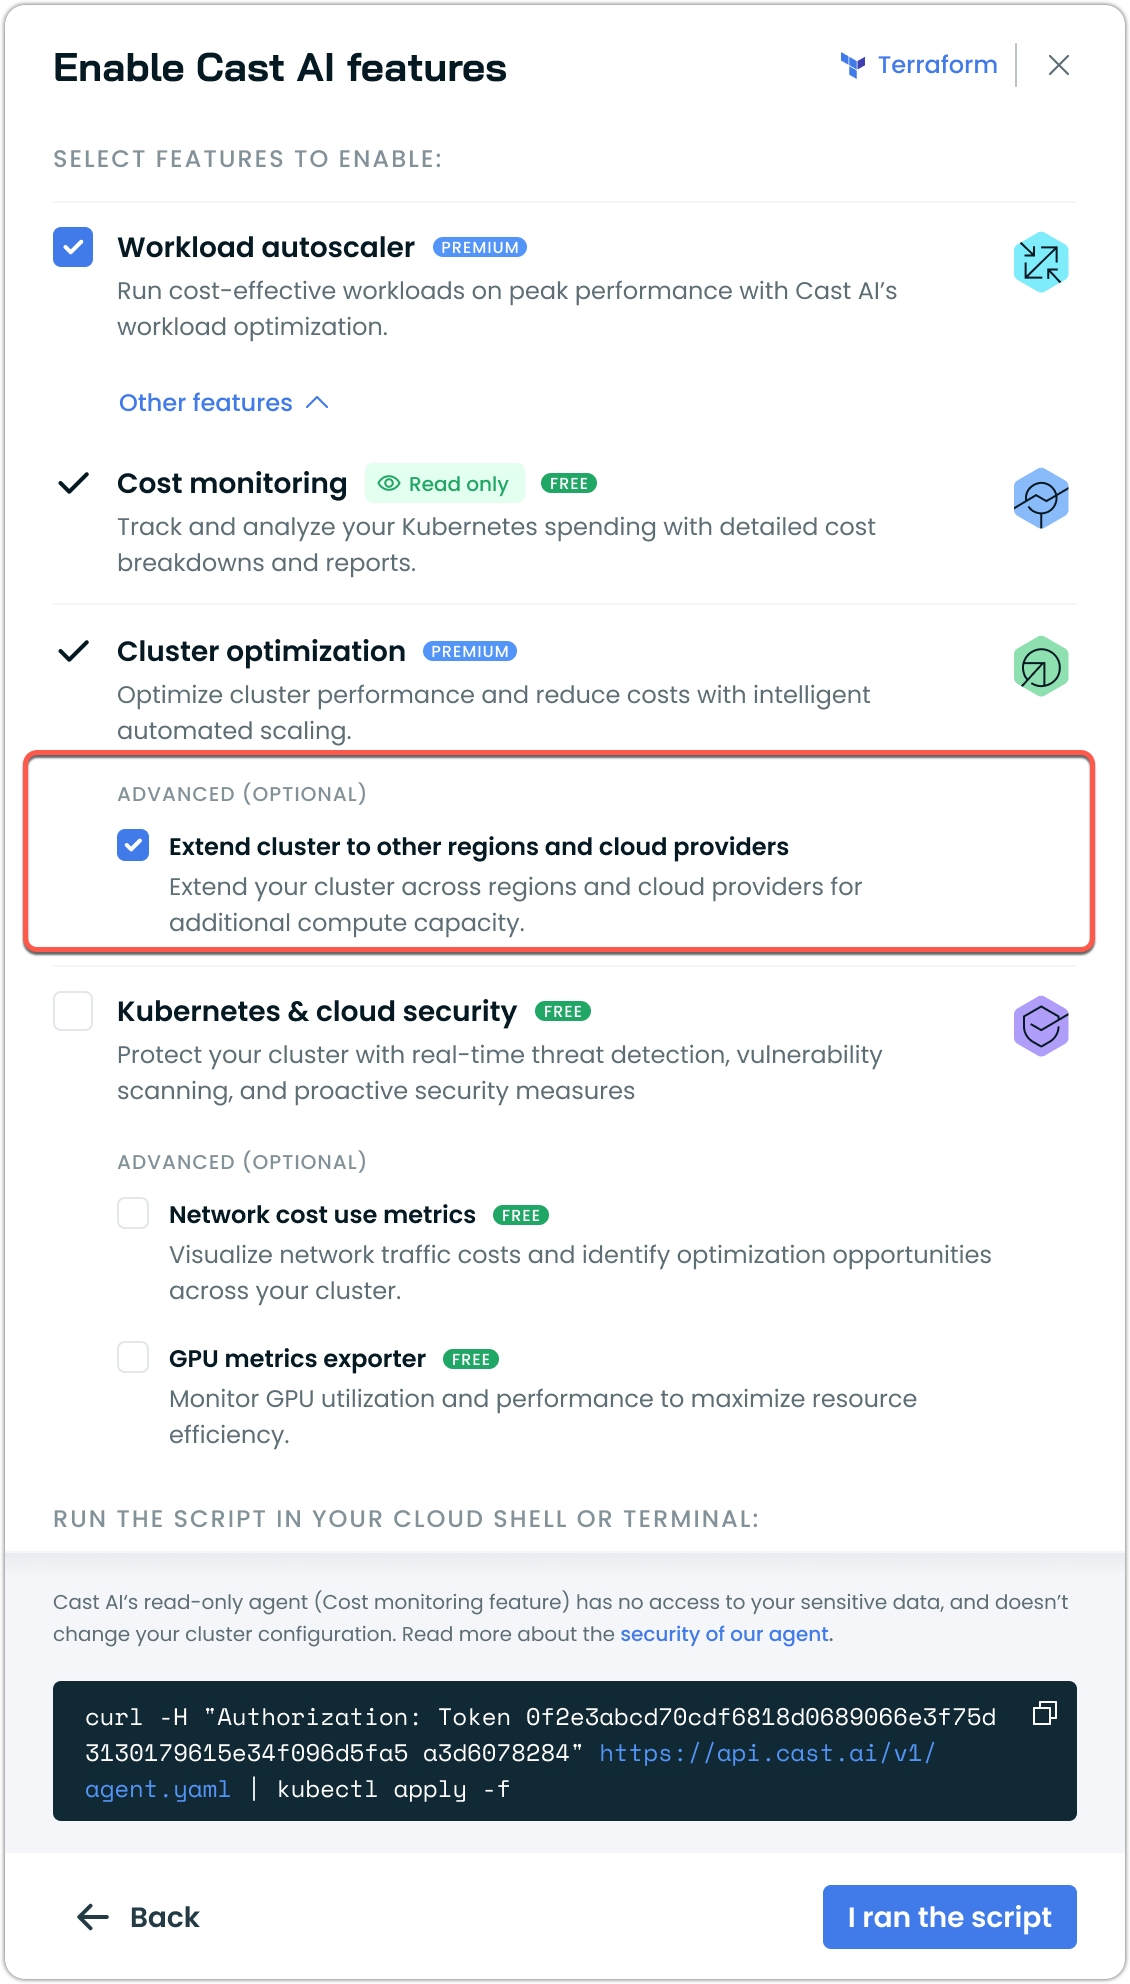
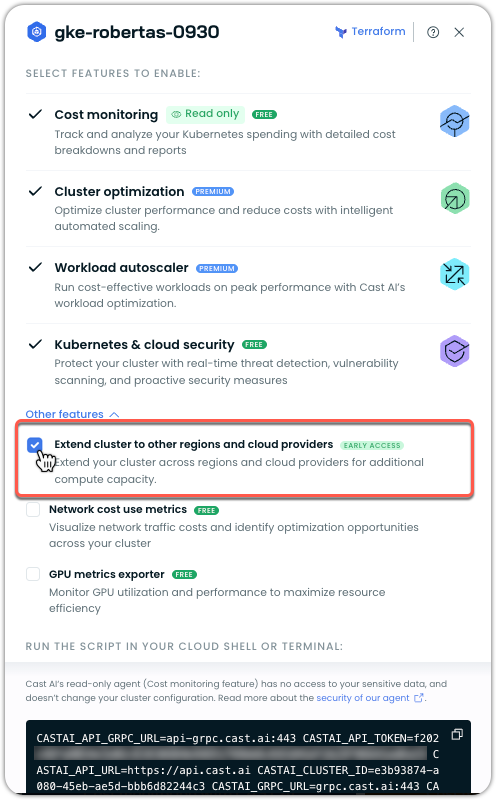
Option B: Enable OMNI on an existing Phase 2 cluster
If you already have a Phase 2 cluster with cluster optimization enabled:
- Navigate to your cluster in the Cluster list
- Click on the ellipsis and choose Cast AI features

-
Under Other features, check the box for Extend cluster to other regions and cloud providers
-
Copy the updated script and run it in your terminal
-
Wait for the script to complete (typically 1-2 minutes)
-
Verify onboarding (optional)
Verify onboarding (optional)
After the script completes, verify OMNI is enabled:
kubectl get pods -n castai-omniYou should see OMNI components running, including:
-
liqo-*pods (controller manager, CRD replicator, fabric, IPAM, proxy, webhook) -
castai-omni-agentpod -
k0smotron-controller-managerpodExample output:
NAME                                          READY   STATUS    RESTARTS   AGE
castai-omni-agent-595c4b97d9-xxxxx            1/1     Running   0          2m
k0smotron-controller-manager-5c75bbd5b8-xxxxx 1/1     Running   0          2m
liqo-controller-manager-7cf59bcc64-xxxxx      1/1     Running   0          2m
liqo-crd-replicator-687bdc6f66-xxxxx          1/1     Running   0          2m
liqo-fabric-xxxxx                             1/1     Running   0          2m
liqo-ipam-8667dbccbb-xxxxx                    1/1     Running   0          2m
liqo-proxy-77c66dfb88-xxxxx                   1/1     Running   0          2m
liqo-webhook-6f648484cc-xxxxx                 1/1     Running   0          2m
All pods should be in
Runningstatus.
Step 2: Create and onboard an edge location
Edge locations define the regions where edge nodes can be provisioned. Each edge location is cluster-specific and requires its own setup.
- In the Cast AI console, navigate to Autoscaler → Edge locations
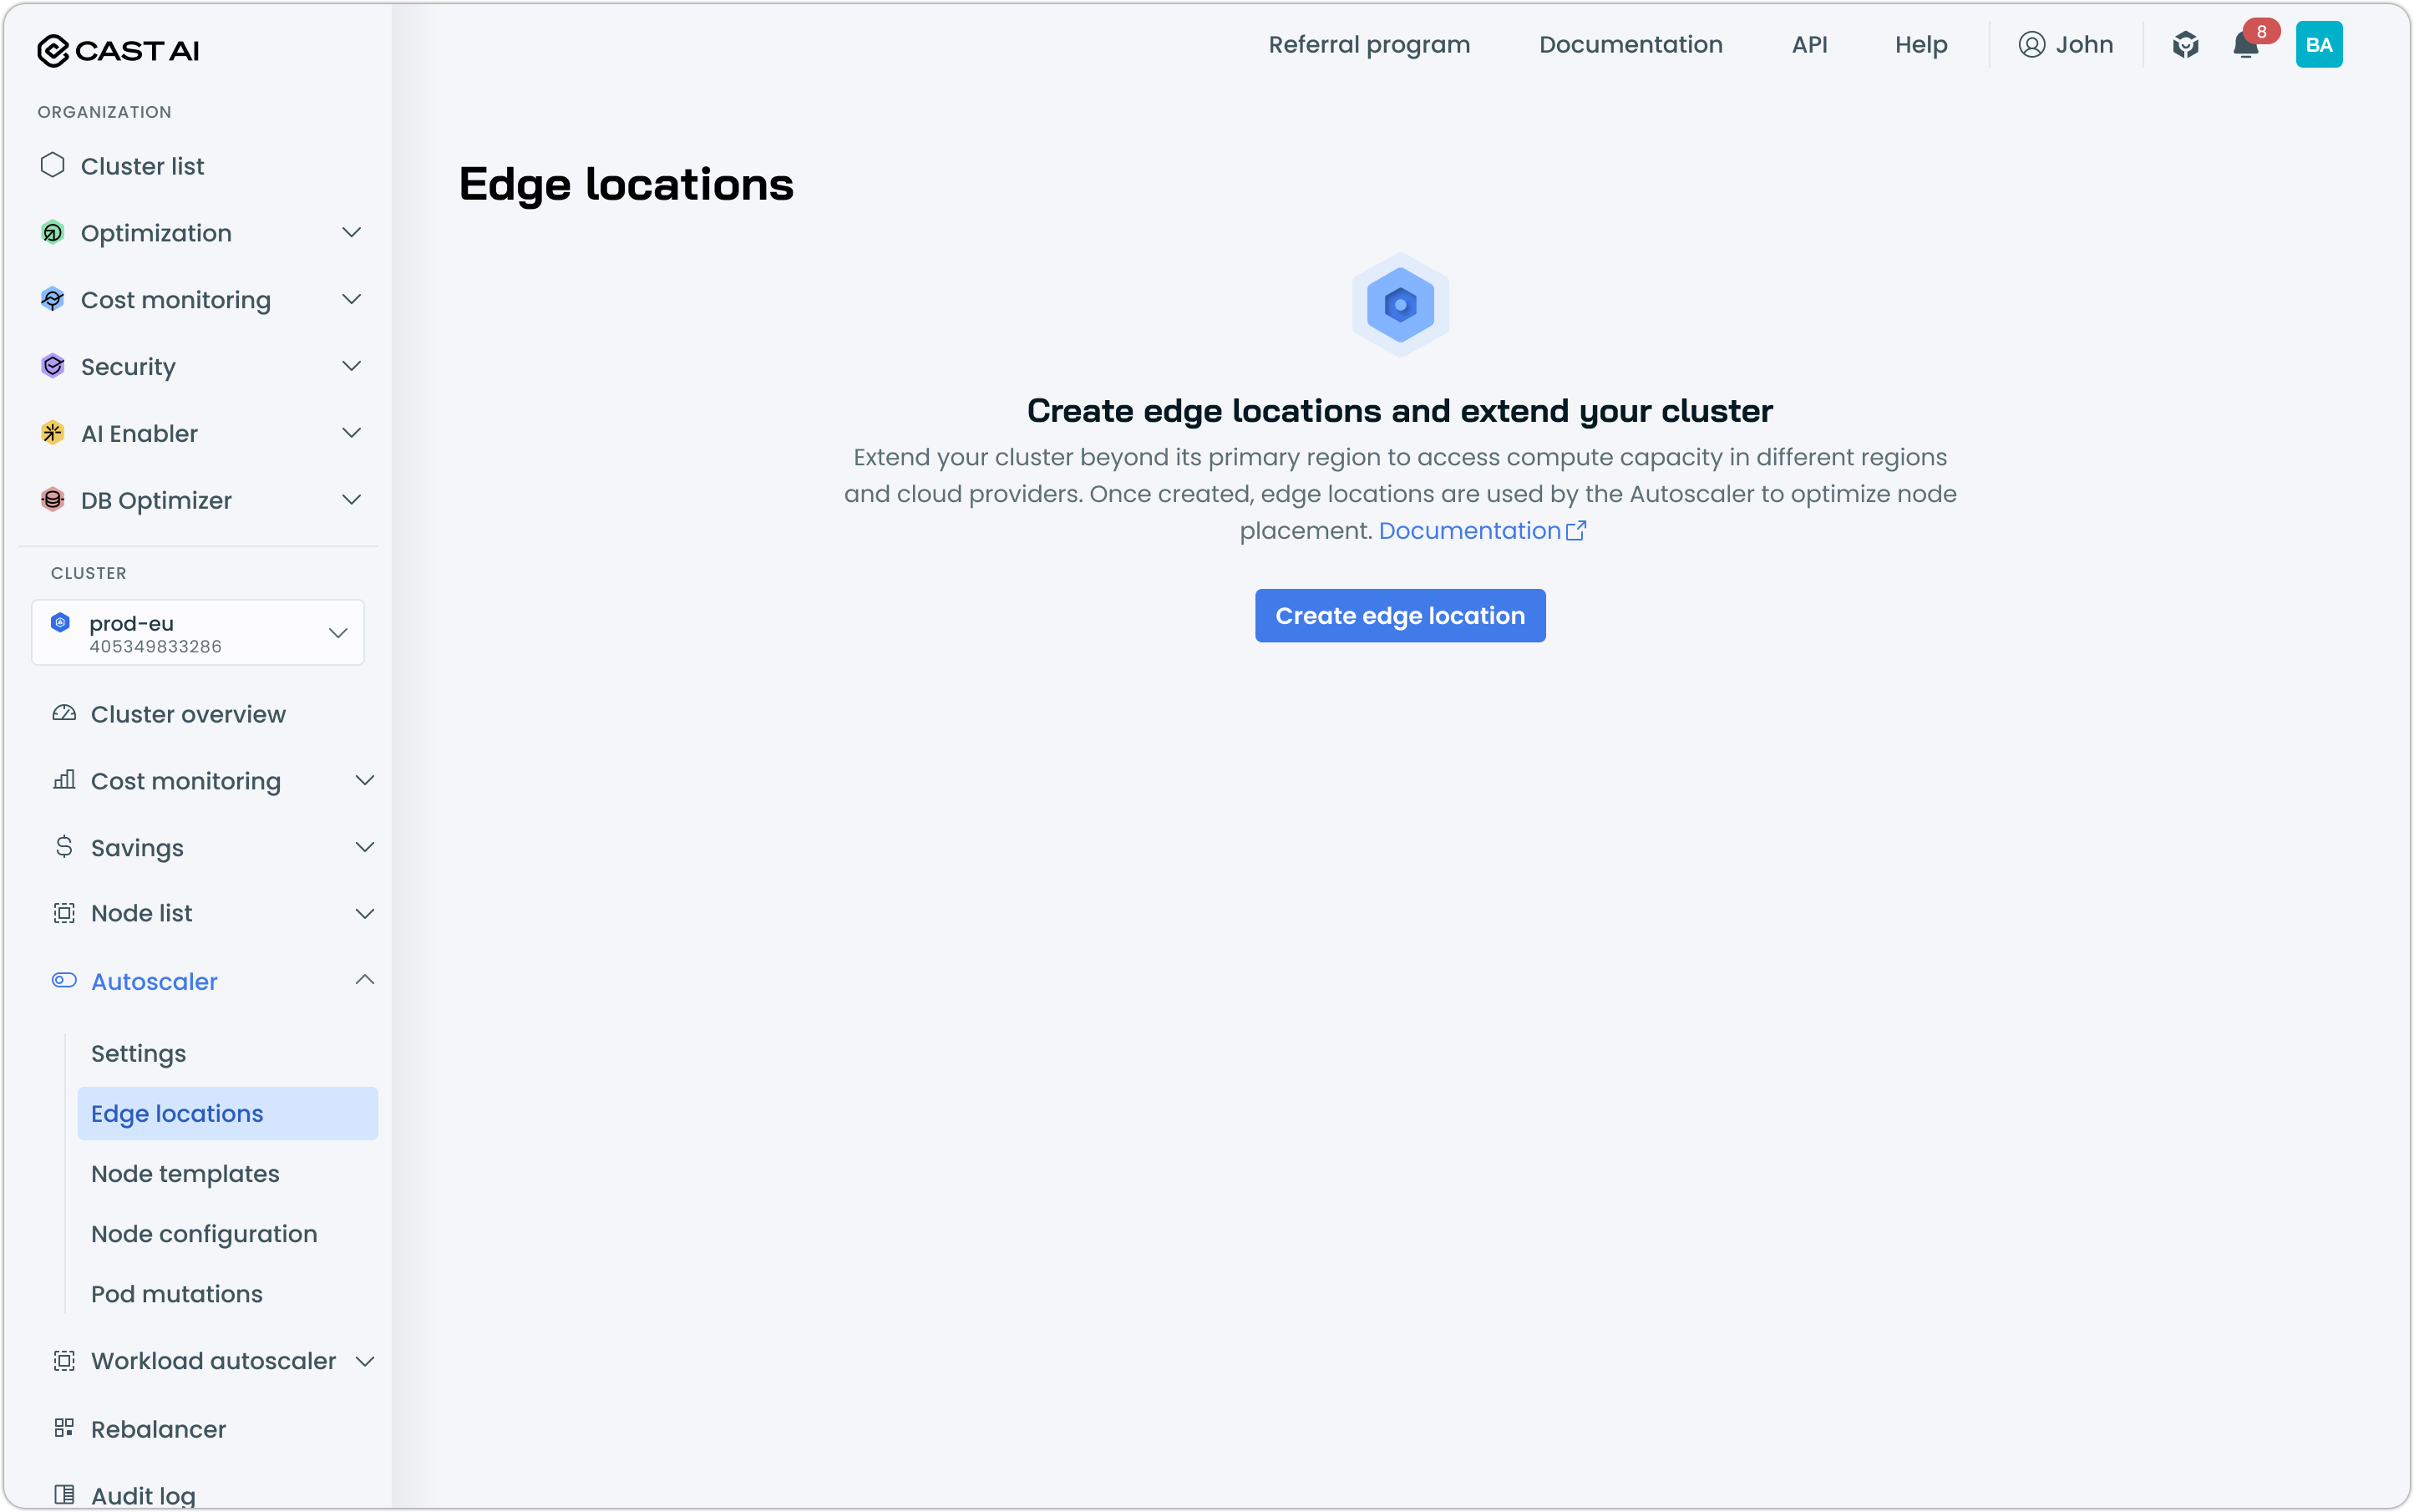
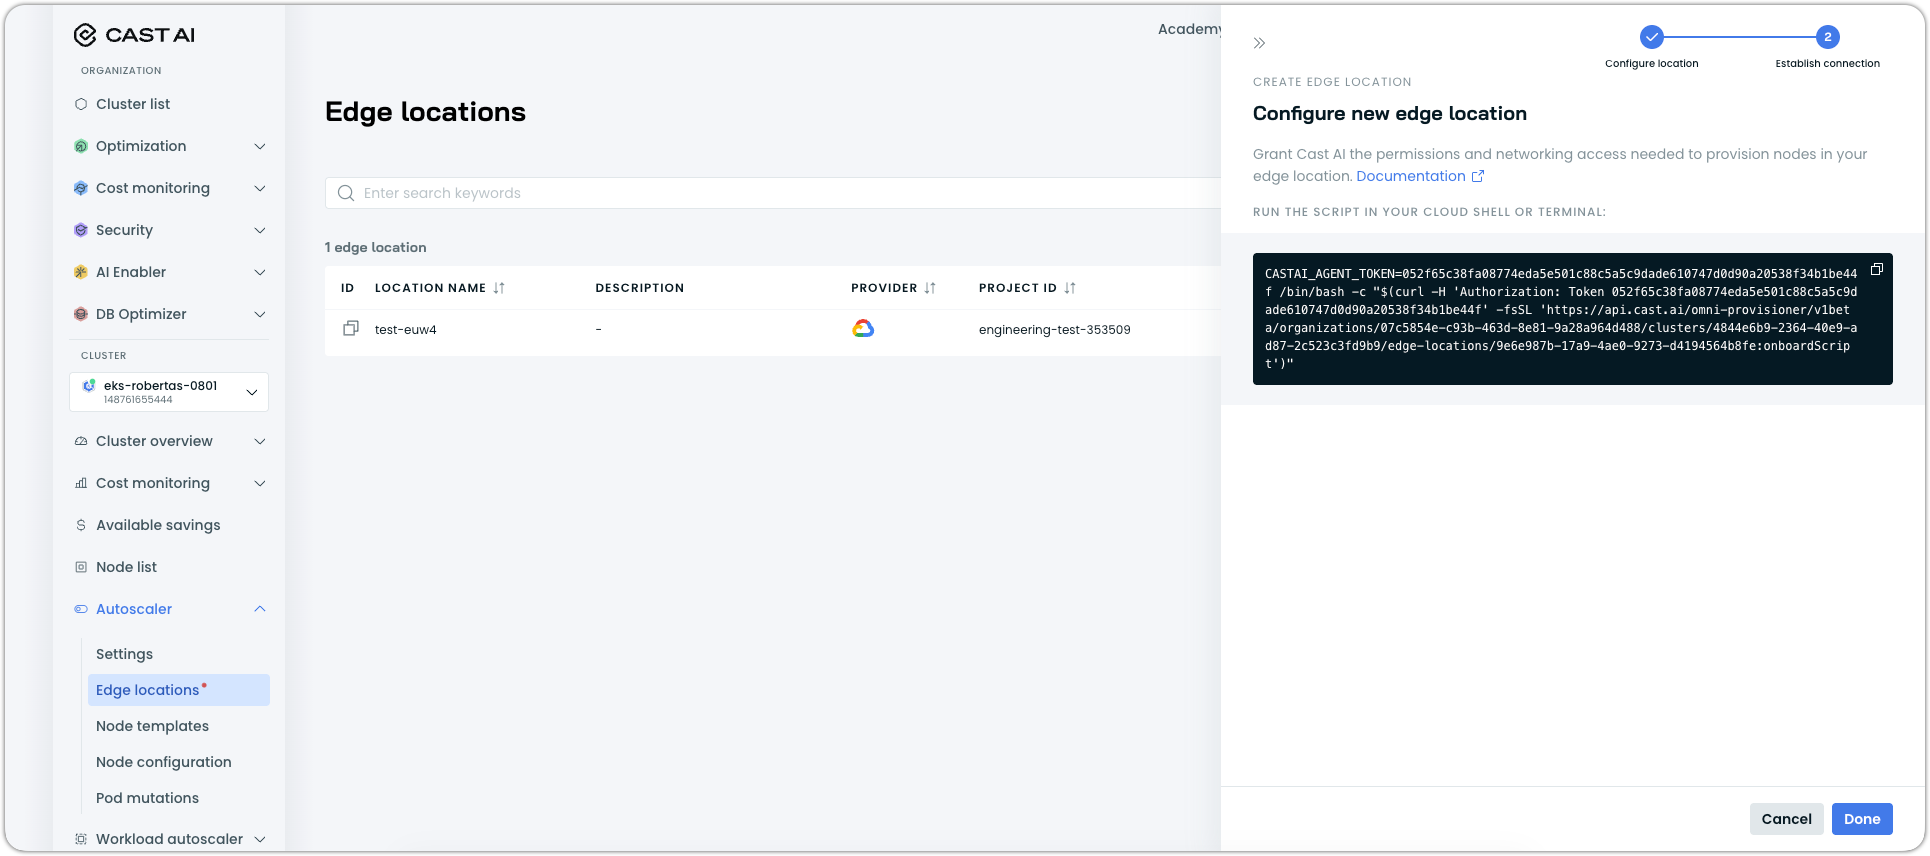
- Click Create edge location to open up the creation and configuration drawer
- Configure the edge location:
- Name: A descriptive name (e.g.,
aws-us-west-2orgcp-europe-west4) - Cloud provider: Select AWS or GCP, or OCI
- Region: Select the target region
GCPFor GCP, providing the Project ID is also required.
- Name: A descriptive name (e.g.,
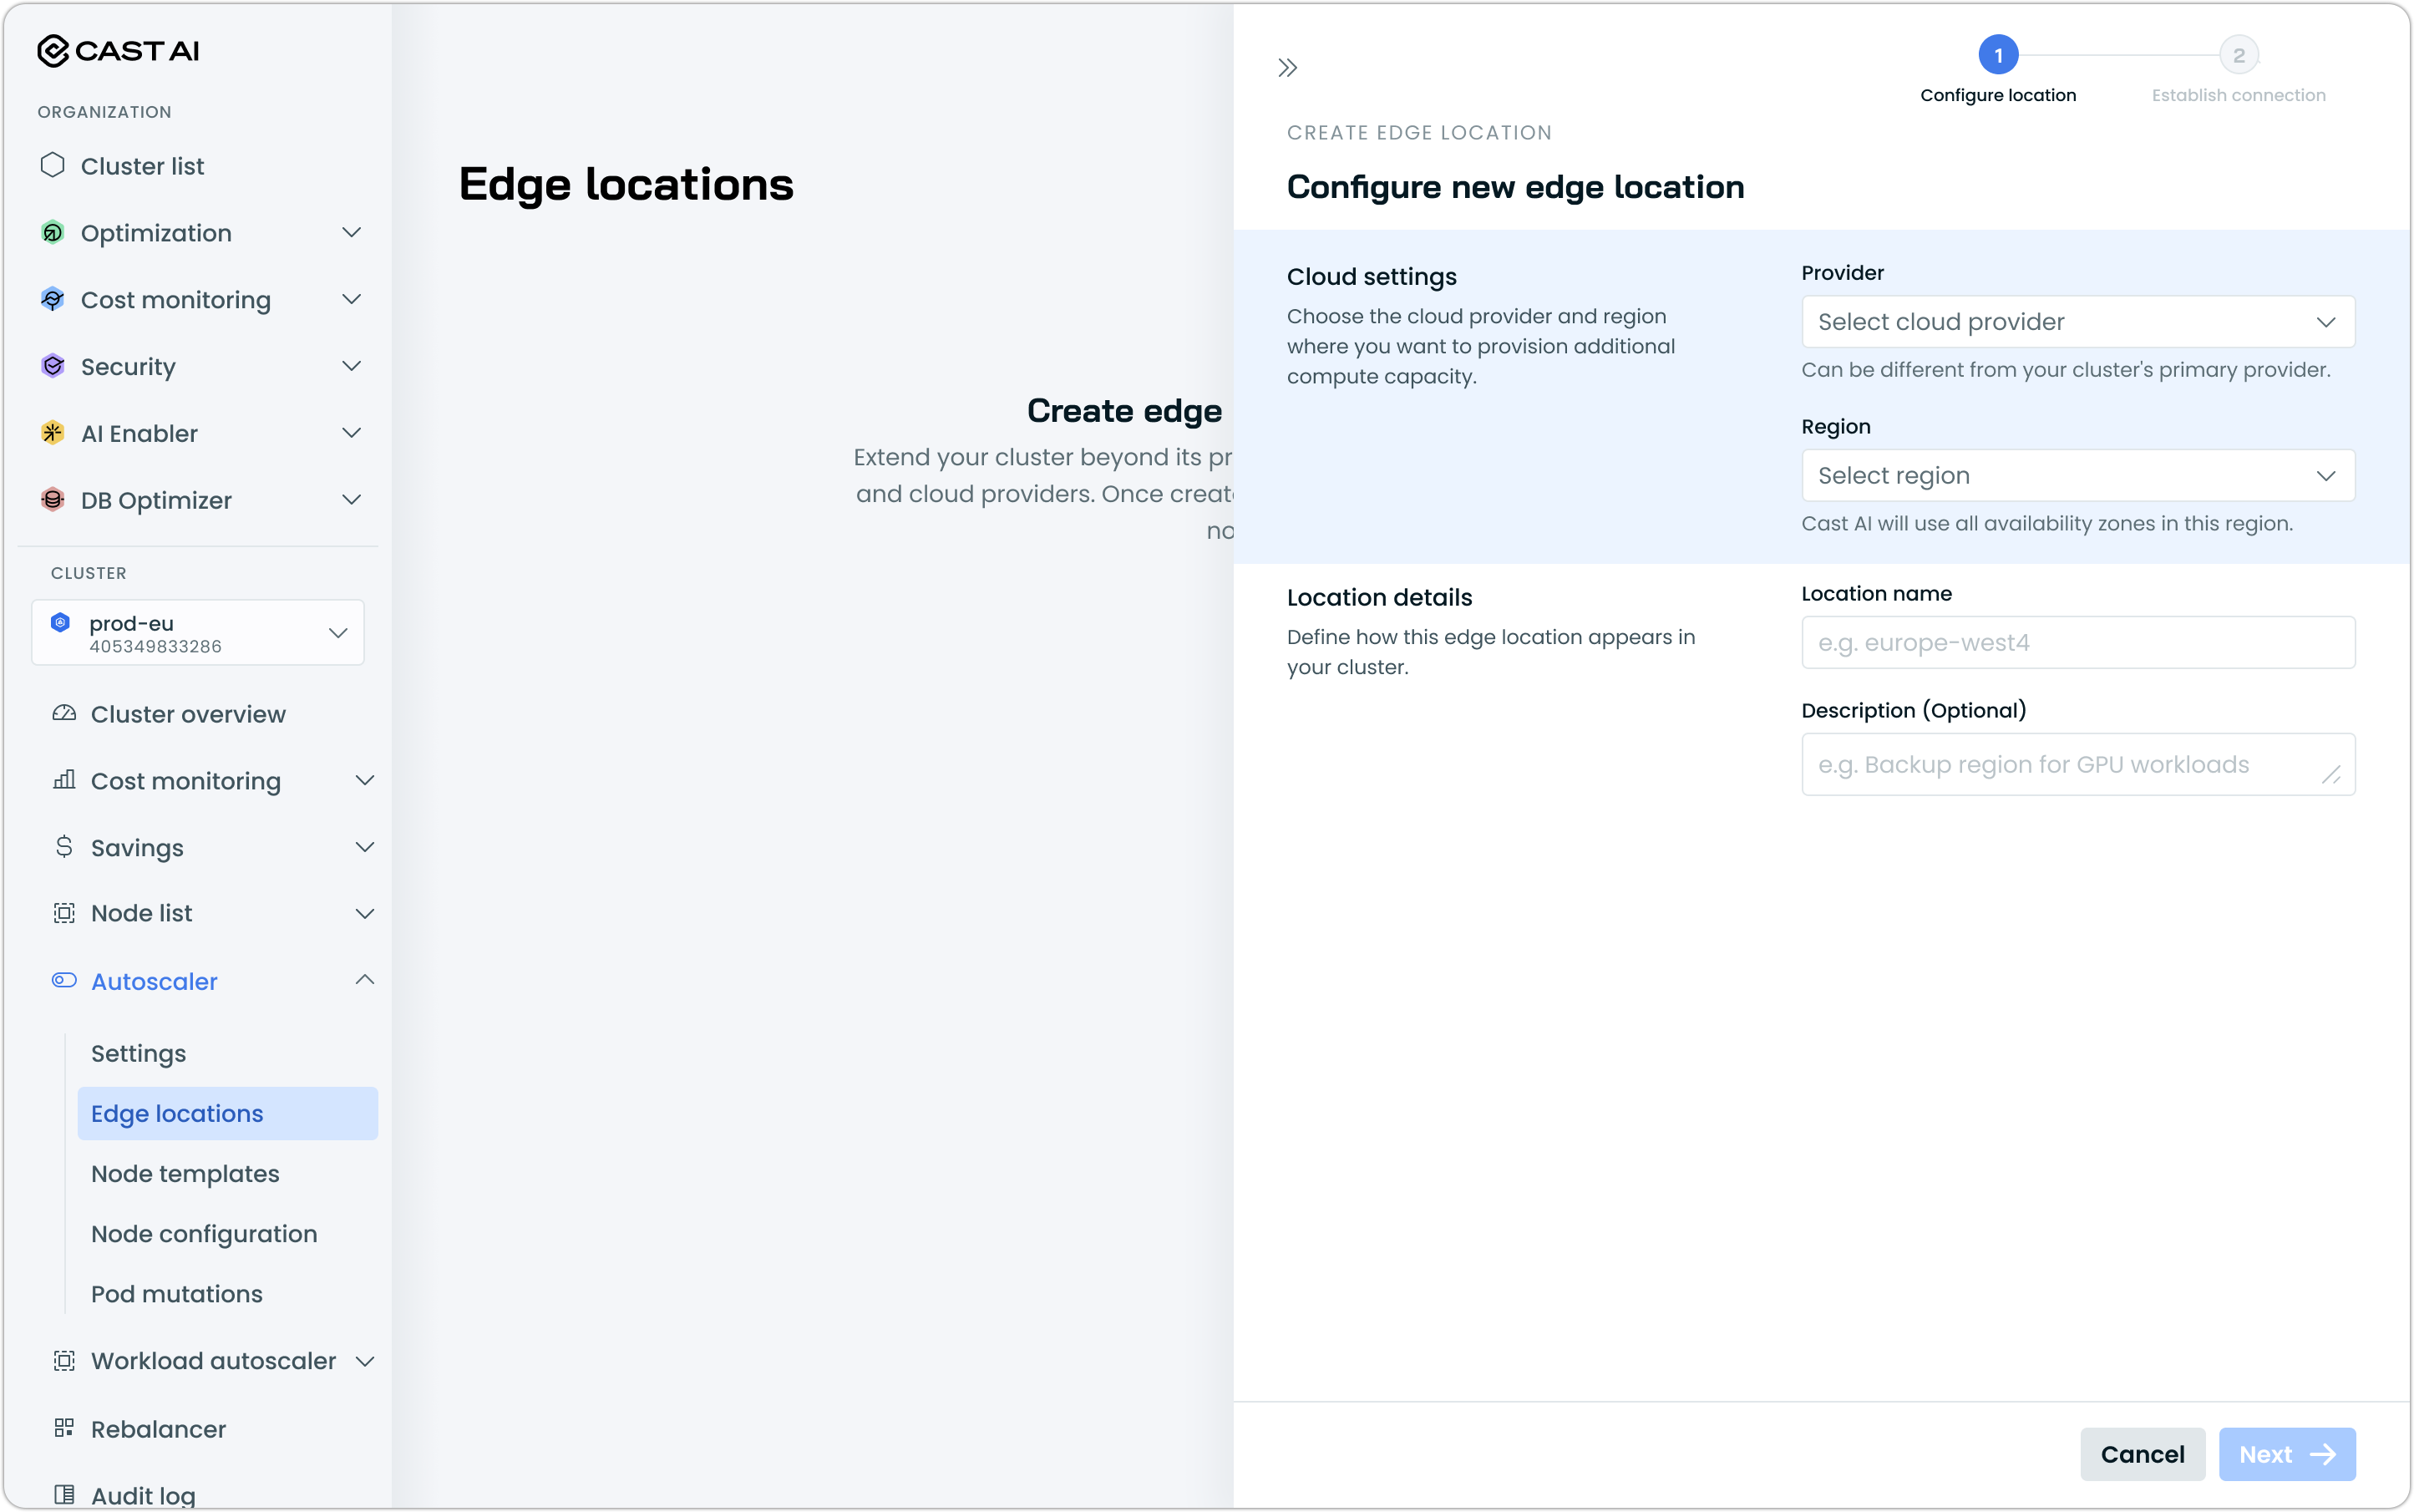
- Click Next
- Copy and run the provided script in your terminal to establish the connection with the edge location
NoteBefore running the script, ensure your cloud CLI is authenticated and configured for the correct account and region.
AWS
Set your AWS profile to ensure the script creates resources in the correct AWS account:
export AWS_PROFILE=<your-aws-profile>
# Then run the provided onboarding script
If you're already using your default AWS credentials, you can skip setting the profile.
GCP
Set your active GCP project to ensure the script creates resources in the correct project:
gcloud config set project <your-project-id>
# Then run the provided onboarding script
This should match the Project ID you provided when creating the edge location.
The script will:
- Create a VPC/network and subnet (if needed)
- Configure firewall rules and security groups
- Create service accounts or IAM users with appropriate permissions
- Register the edge location with Cast AI
Wait for the script to complete (typically 2-3 minutes).
After successful completion, the edge location appears in the Edge locations list with an Incomplete setup status and a notification confirms creation.

A newly created edgle location showing Incomplete setup status
What do the edge location statuses mean?
Edge locations can have one of the following statuses:
| Status | Meaning | Action Required |
|---|---|---|
| Pending | Edge location saved but onboarding script not yet run | Run the onboarding script |
| Incomplete setup | Script ran successfully but edge location not yet added to a node template | Add to at least one node template |
| In use | Edge location added to node template and active | None—ready for use |
| Failed | Cloud resource reconciliation detected missing or misconfigured resources | Re-run the edge location onboarding script |
Why does my edge location show 'Incomplete setup'?
An edge location shows Incomplete setup until it's added to at least one node template. This is expected behavior—proceed to Step 3 to add the edge location to a node template.
Why does my edge location show 'Failed'?
Cast AI periodically checks that the cloud resources for each edge location (VPCs, security groups, IAM roles, etc.) are properly configured. If any resources are missing or misconfigured, the edge location transitions to a Failed status and will not be considered by Autoscaler for node provisioning—even if it's selected in a node template.
To resolve this, re-run the edge location onboarding script to recreate the missing resources.
Can I skip the onboarding script for now?
Yes. If you skip running the script, the edge location is saved in a Pending state. You can return to complete this step later by accessing the edge location from the list.
Create additional edge locations (optional)
You can create multiple edge locations for the same cluster. Repeat the process above for each region where you want to provision edge nodes.
Step 3: Configure node templates for edge locations
Node templates control where the Autoscaler can provision nodes. To enable edge node provisioning, add edge locations to your node templates.
- Navigate to Autoscaler → Node templates
- Select an existing node template or create a new one
- In the node template editor, find the Edge locations section and check the box to Enable provisioning in edge locations
- Select one or more edge locations from the dropdown
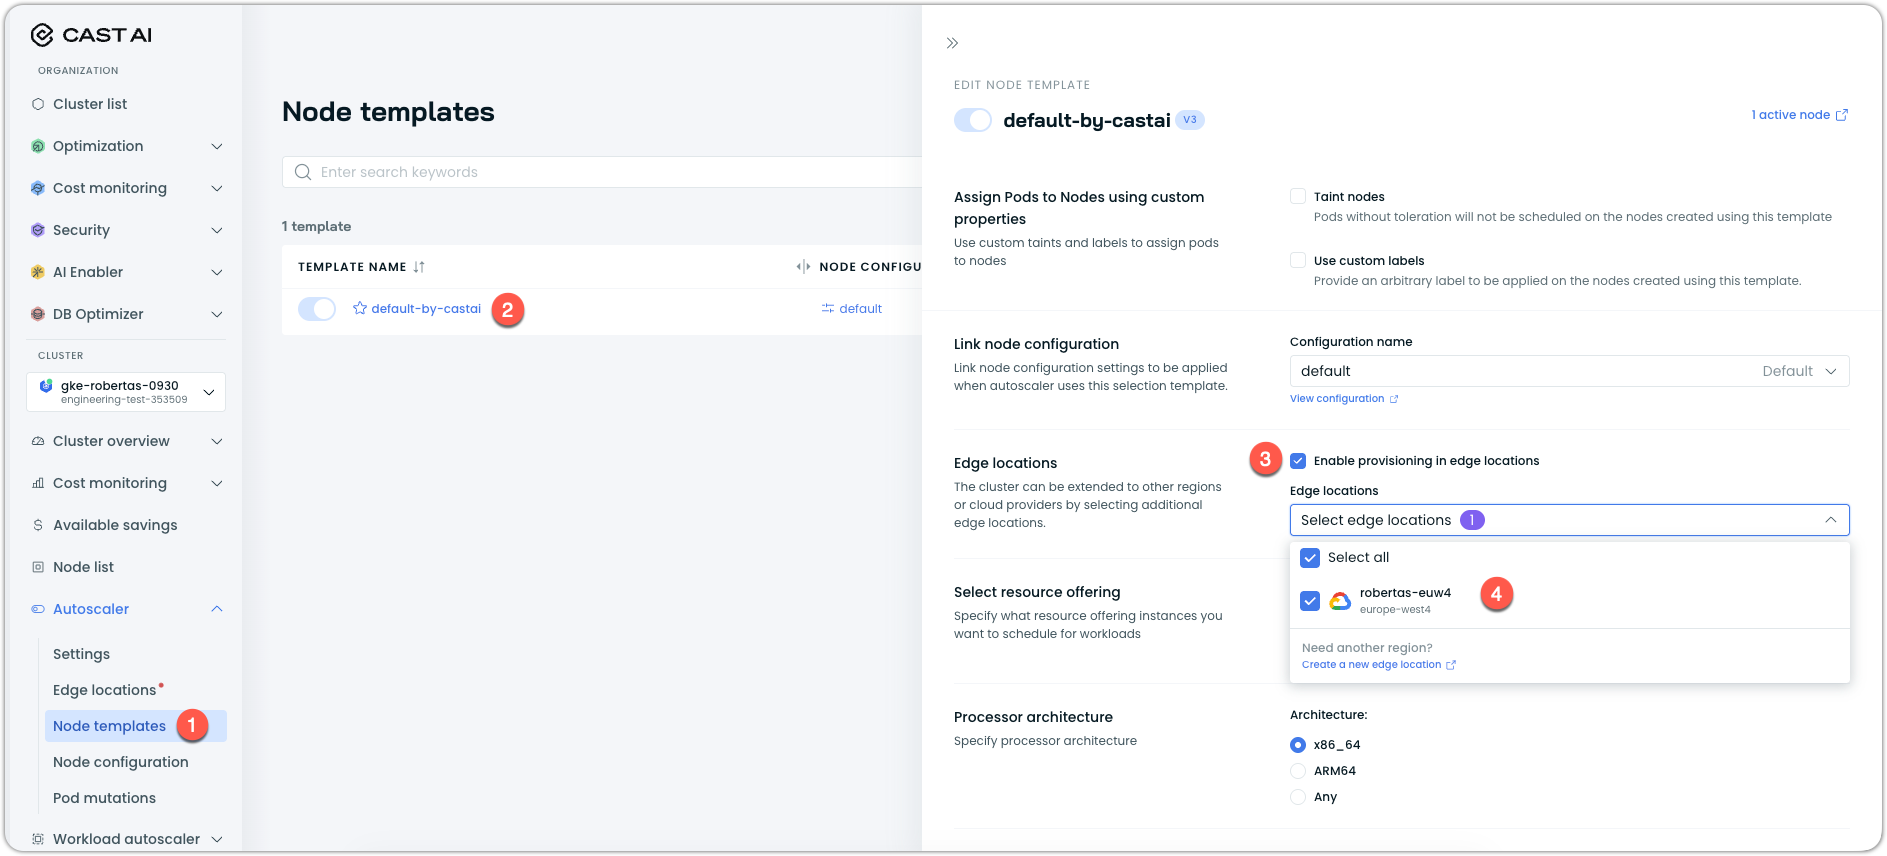
- Click Save
When edge locations are selected:
- The Instance constraints section is updated to account for inventory from all selected edge locations
- The Available instances list includes instances from the main cluster region and all selected edge locations
- Autoscaler can now provision nodes in any of these locations based on cost and availability
Instance availability comparison
Before:
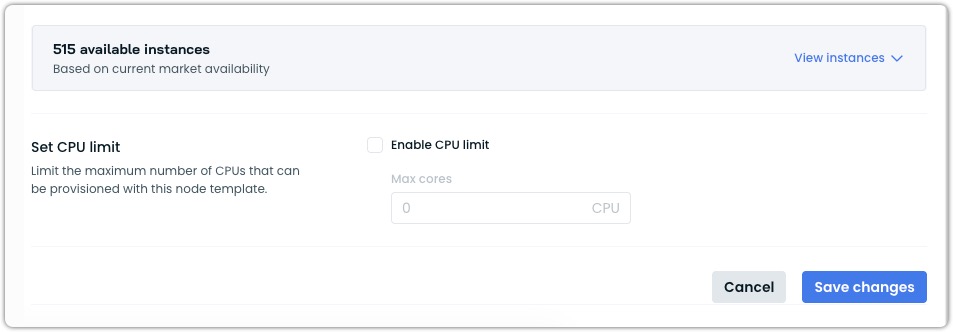
After:

After saving, the edge location status changes from Incomplete setup to In use.

Your cluster is now configured for edge node provisioning. The Autoscaler will automatically provision edge nodes as needed.
Edge node provisioning
Once configured, edge nodes are provisioned automatically by the Autoscaler based on:
- Cost optimization: Autoscaler compares Spot and On-Demand prices across the main cluster region and all edge locations configured in the node template
- Instance availability: Considers instances that are available in each region, including edge ones
- Node template constraints: Respects all CPU, memory, architecture, GPU requirements, and other constraints otherwise defined in the node template, as one would expect
How edge nodes appear in your cluster
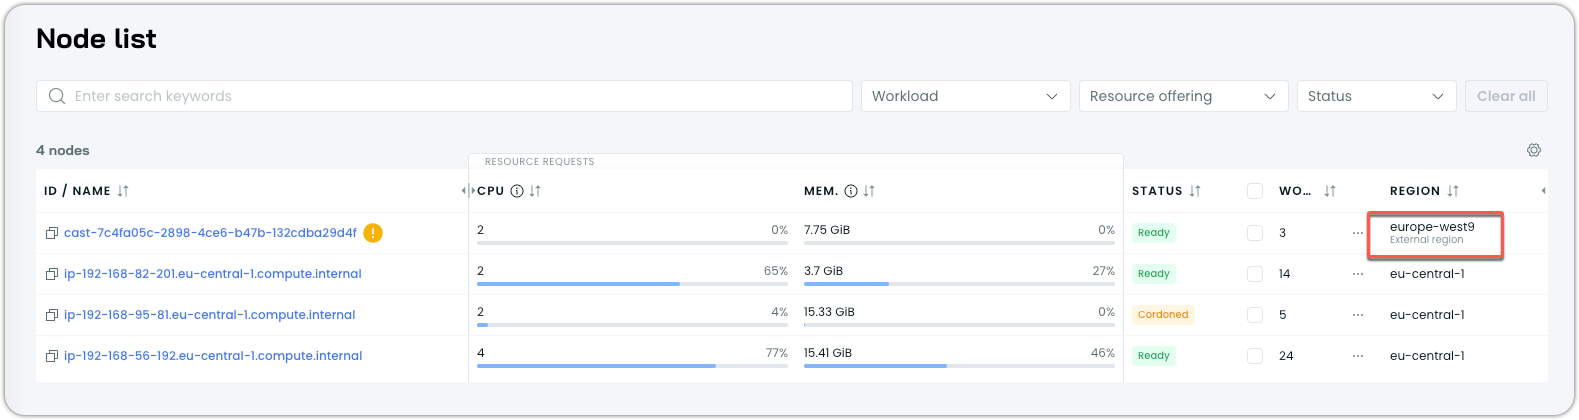
Cast AI Console
In the Cast AI Console, edge nodes are identified in the Nodes list via an additional External region label in the Node list:
Using kubectl
Edge nodes appear as virtual nodes in your cluster:
kubectl get nodesExample output:
NAME                                              STATUS   ROLE     AGE     VERSION
ip-192-168-56-192.eu-central-1.compute.internal   Ready    <none>   6h2m    v1.30.14-eks-113cf36
cast-7f6821f2-b9fd-47e0-ab38-1f80c9c32dc0         Ready    agent    6m20s   v1.30.14-eks-b707fbb
# The 2nd node is an edge node with ROLE=agent
Edge nodes can be identified by several characteristics:
Node labels:
liqo.io/type=virtual-node: Identifies the node as a Liqo virtual nodekubernetes.io/role=agent: Role designation for edge nodesomni.cast.ai/edge-location-name: Name of the edge locationomni.cast.ai/edge-id: Unique edge identifieromni.cast.ai/csp: Cloud provider of the edge (e.g.,gcp,aws)topology.kubernetes.io/region: Region where the edge node is located
Node taints:
virtual-node.omni.cast.ai/not-allowed=true:NoExecute: Applied to all edge nodes by default
ProviderID:
Edge nodes have a special provider ID format:
castai-omni://<identifier-string>You can inspect an edge node to see all these identifiers:
kubectl describe node <node-name>Scheduling workloads on edge nodes
To enable workloads to run on edge nodes, label the namespace to allow offloading:
kubectl label ns <namespace-name> omni.cast.ai/enable-scheduling=trueTo verify the label was applied:
kubectl get ns <namespace-name> --show-labelsWhen you deploy workloads to a labeled namespace, a mutating webhook automatically adds the required toleration to your pods, allowing them to be scheduled on edge nodes.
This label enables Liqo's offloading mechanism for the namespace.
Which namespaces should I NOT offload?
Do not offload the following namespaces:
default— Exists in both the main cluster and edge clusters; offloading it can cause unexpected behaviorkube-system— System namespace; should not be offloadedkube-public— System namespace; should not be offloadedcastai-omni— Contains OMNI components; should not be offloaded
What about custom taints on my node template?
If your node template has additional custom taints beyond the default edge taint, you must manually add the corresponding tolerations to your pod specs. Only the default virtual-node.omni.cast.ai/not-allowed toleration is added automatically by the mutating webhook.
Explicit edge placement with nodeSelector
If you want to explicitly place specific workloads on edge nodes (rather than letting Autoscaler decide), you can use a nodeSelector in your pod specification. This approach gives you direct control over which workloads run on edge nodes.
apiVersion: v1
kind: Pod
metadata:
  name: my-edge-workload
  namespace: <your-offloaded-namespace>
spec:
  nodeSelector:
    liqo.io/type: virtual-node
  tolerations:
    - key: virtual-node.omni.cast.ai/not-allowed
      operator: Equal
      value: "true"
      effect: NoExecute
  containers:
    - name: my-container
      image: my-image:latest
You can also target a specific edge location:
nodeSelector:
  omni.cast.ai/edge-location-name: aws-us-west-2
Or a specific cloud provider:
nodeSelector:
  omni.cast.ai/csp: gcp
Explicit workload placement
If namespace is labeled with omni.cast.ai/enable-scheduling=true then all workloads in this namespace can be scheduled to run on edge nodes. This works great for new namespaces which are fully dedicated to be offloaded.
But in some cases you may want to offload a single workload from existing namespace. For example, lets say we have various Deployments and DaemonSets running in monitoring namespace. Our goal is to allow only node-exporter DaemonSet to run on all nodes, include omni edge nodes.
If we label monitoring namespace with omni.cast.ai/enable-scheduling=true it will allow all workloads to run on edge nodes.
To prevent that we can label namespace with local offloading strategy
kubectl label ns <namespace-name> omni.cast.ai/enable-scheduling-local-only=trueThen we need to explicitly configure our node-exporter DaemonSet to run on all nodes by adding virtual-node.omni.cast.ai/not-allowed toleration.
NoteOnly add the edge node toleration to workloads that are compatible with running in different regions or clouds. Consider all requirements when deciding which workloads to allow on edge nodes.
apiVersion: apps/v1
kind: DaemonSet
metadata:
  name: node-exporter
  namespace: monitoring
spec:
  selector:
    matchLabels:
      app: node-exporter
  template:
    metadata:
      labels:
        app: node-exporter
    spec:
      tolerations:
        - key: virtual-node.omni.cast.ai/not-allowed
          operator: Exists
          effect: NoExecute
      containers:
        - name: node-exporter
          image: quay.io/prometheus/node-exporter:v1.11.1
Workload compatibility
Not all workloads are suitable for running on edge nodes. Consider the following when deciding which workloads to offload:
Requirements (hard constraints):
- Must not be in
default,kube-system,kube-public, orcastai-omninamespaces - Persistent storage is supported only via the
liqostorage class, which uses the node's local host path — data is lost if the edge node is deleted (see Using persistent storage on edge nodes)
Recommendations:
- Workloads that can tolerate some additional network latency (cross-region or cross-cloud communication adds latency)
- Workloads with minimal to no dependencies on other in-cluster services
- Workloads that don't require Kvisor security/netflow monitoring
Given the above, workloads such as batch processing, GPU-intensive workloads that benefit from GPU availability more than low latency, and workloads where cost savings from cheaper GPU or compute instances justify the operational trade-offs, are prime candidates to be tested and offloaded to edge nodes.
Running DaemonSets on edge nodes
DaemonSets require an additional toleration to schedule pods on edge virtual nodes. Add this to your DaemonSet spec:
tolerations:
  - key: virtual-node.omni.cast.ai/not-allowed
    operator: Exists
    effect: NoExecute
Example DaemonSet:
apiVersion: apps/v1
kind: DaemonSet
metadata:
  name: my-daemonset
  namespace: <your-offloaded-namespace>
spec:
  selector:
    matchLabels:
      app: my-daemonset
  template:
    metadata:
      labels:
        app: my-daemonset
    spec:
      tolerations:
        - key: virtual-node.omni.cast.ai/not-allowed
          operator: Exists
          effect: NoExecute
      containers:
        - name: my-container
          image: my-image:latest
Using persistent storage on edge nodes
Edge nodes support persistent storage through the liqo storage class, which provisions volumes backed by the node's local host path.
WarningThe
liqostorage class uses the edge node's local host path as its underlying storage. If the edge node is deleted or replaced, all data stored in these volumes is permanently lost. This storage is intended for ephemeral use cases such as caches, temporary build artifacts, or data that can be regenerated — not for durable application state.
To provision a PVC on edge nodes:
- Label the namespace with
omni.cast.ai/enable-scheduling: "true"to allow workloads to be scheduled on edge nodes. - Annotate the PVC with
omni.cast.ai/provision-on-all-edge-nodes: "true"so the volume is provisioned on edge nodes. - Set
storageClassName: liqoin the PVC spec.
Full example:
apiVersion: v1
kind: Namespace
metadata:
  labels:
    omni.cast.ai/enable-scheduling: "true"
  name: omni-pvc-demo
---
apiVersion: apps/v1
kind: Deployment
metadata:
  name: app
  namespace: omni-pvc-demo
spec:
  replicas: 1
  selector:
    matchLabels:
      app: omni-pvc-demo
  template:
    metadata:
      labels:
        app: omni-pvc-demo
    spec:
      terminationGracePeriodSeconds: 0
      containers:
        - name: app1
          image: busybox
          command: [ "/bin/sh" ]
          args: [ "-c", "while true; do echo $(date -u) >> /data/out.txt; sleep 5; done" ]
          volumeMounts:
            - mountPath: /data
              name: persistent-storage
      volumes:
        - name: persistent-storage
          persistentVolumeClaim:
            claimName: data
---
apiVersion: v1
kind: PersistentVolumeClaim
metadata:
  name: data
  namespace: omni-pvc-demo
  annotations:
    omni.cast.ai/provision-on-all-edge-nodes: "true"
spec:
  accessModes:
    - ReadWriteOnce
  storageClassName: liqo
  resources:
    requests:
      storage: 1Gi
Evictor behavior with edge nodes
The Evictor works with edge nodes but respects the edge node toleration requirement:
What Evictor can do:
- Evict workloads from edge nodes back to nodes in the main cluster when capacity is available
- Pack workloads across multiple edge nodes to optimize resource utilization
- Consider edge nodes in its bin-packing decisions
What Evictor cannot do:
- Place workloads on edge nodes unless they explicitly tolerate
virtual-node.omni.cast.ai/not-allowed=true:NoExecute
This means:
- Workloads without the edge toleration will never be moved to edge nodes by Evictor
- Workloads with the edge toleration can be evicted from the main cluster to edges (and vice versa)
- You maintain control over which workloads can run on edge nodes through tolerations
NoteOnly add the edge node toleration to workloads that are compatible with running in different regions or clouds. Consider all requirements when deciding which workloads to allow on edge nodes.
Edge node provisioning time
Edge nodes typically take the same amount of time to become ready as nodes in your main cluster region would.
For GPU instances, provisioning may take slightly longer due to driver installation.
Troubleshooting
Common issues and solutions
| Issue | Possible Cause | Solution |
|---|---|---|
| Script fails during onboarding | Missing cloud permissions | Verify all required permissions are in place (see Prerequisites) |
| Script fails during onboarding | Cloud CLI not authenticated | Run aws configure, gcloud auth login, or configure OCI CLI |
| Script fails during onboarding | Missing curl or jq | Install curl and jq on your local machine |
| Script fails during onboarding | Missing helm | Install helm on your local machine |
| Script fails during onboarding | No suitable storage class on EKS | Install the EBS CSI driver and a gp3 storage class, or set OVERRIDE_STORAGE_PROVIDER to an existing class |
| Edge location shows Pending | Script not run | Run the provided onboarding script |
| Edge location shows Incomplete setup | Not added to node template | Add the edge location to at least one node template |
| Edge location shows Failed | Cloud resources missing or misconfigured | Re-run the edge location onboarding script to recreate resources |
| Workload not scheduling on edge | Namespace not labeled | Label namespace with omni.cast.ai/enable-scheduling=true |
| Workload not scheduling on edge | Missing toleration | Add required toleration or use labeled namespace (automatic) |
| Workload fails on edge node | Persistent volume using unsupported storage class | Use storageClassName: liqo with the omni.cast.ai/provision-on-all-edge-nodes: "true" annotation; note that liqo volumes use host local path and data is lost if the node is deleted |
| No edge nodes provisioning | Edge locations not in node template | Add edge locations to the node template |
| No edge nodes provisioning | Edge location in Failed state | Re-run edge location onboarding script |
Verification checklist
If you're experiencing issues, work through this checklist:
-
OMNI components deployed?
kubectl get ns castai-omni
kubectl get pods -n castai-omni
All pods should be in
Runningstatus. -
Edge location status healthy?
Check the Cast AI console → Autoscaler → Edge locations. Status should be In use, not Pending, Incomplete setup, or Failed. -
Edge location added to node template?
Verify your node template has edge locations enabled and at least one edge location selected. -
Architecture set to x86_64?
If edge locations are selected, the node template architecture must bex86_64. -
Namespace labeled?
kubectl get ns <namespace> --show-labels | grep omni.cast.ai/enable-scheduling -
Edge nodes visible?
kubectl get nodes | grep agent