
Getting started
This guide walks you through connecting your Karpenter-managed cluster to Cast AI, deploying optimization features, and running your first rebalancing operation. By the end, you'll have Cast AI working alongside Karpenter with active optimization in place.
What you'll accomplish:
- Connect your EKS cluster running Karpenter to Cast AI
- Deploy the full Karpenter Enterprise suite
- Run your first cluster rebalancing
- Enable workload autoscaling for continuous optimization
Prerequisites
Required tools
Ensure the following tools are installed and accessible:
-
kubectl (v1.19+) configured to access your cluster
Install kubectl -
Helm (v3.0+) for deploying Cast AI components
Install Helm
Helm and kubectl are the only tools required for installation.
Cluster requirements
Your cluster must meet these requirements:
- Amazon EKS cluster with Karpenter version 0.32.0 or later installed and operational
- kubectl access with cluster-admin or equivalent permissions to create namespaces and deploy workloads
- Outbound internet access to the Cast AI API and gRPC endpoints (see communication requirements)
AWS permissions
The IAM principal used for the Helm installation needs permissions to:
- Create IAM roles and policies
- Create instance profiles
- Manage EC2 security groups
For the minimal required permissions policy, see Cloud permissions.
Cast AI account
If you don't have a Cast AI account, sign up here. The savings report and basic features are available on the free tier.
Step 1: Install Cast AI
Get your API key
Log in to the Cast AI console and navigate to API > API access keys to create a key. Copy it — you'll use it in the Helm command below.
Install the umbrella chart
Karpenter Enterprise suite is deployed as a single Helm release using the castai umbrella chart with the kent profile:
helm upgrade -i castai castai \
  --repo https://castai.github.io/helm-charts \
  -n castai-agent --create-namespace \
  --set kent.enabled=true \
  --set global.castai.provider=eks \
  --set global.castai.apiKey=<YOUR_API_KEY> \
  --set global.castai.apiURL=<API_URL> \
  --set global.castai.grpcURL=<GRPC_URL>
Replace <YOUR_API_KEY> with your Cast AI API key, and set <API_URL> and <GRPC_URL> to the endpoints for your region — see Communication requirements.
What components get installed
The chart installs Cast AI components in the castai-agent namespace:
| Component | Purpose |
|---|---|
castai-agent | Collects cluster metrics and workload data |
castai-aws-node | AWS VPC CNI integration for container networking |
castai-cluster-controller | Coordinates optimization actions |
castai-kentroller | Integrates Cast AI with Karpenter |
castai-live-controller | Orchestrates container live migration |
castai-live-daemon | Per-node agent for live migration operations |
castai-live-patch-daemonset | Patches nodes for live migration support |
castai-workload-autoscaler | Continuous workload rightsizing |
castai-pod-mutator | Automates Pod spec adjustments |
For more details, see Hosted components.
After 2-3 minutes, verify all pods are running:
All pods should show Running status.
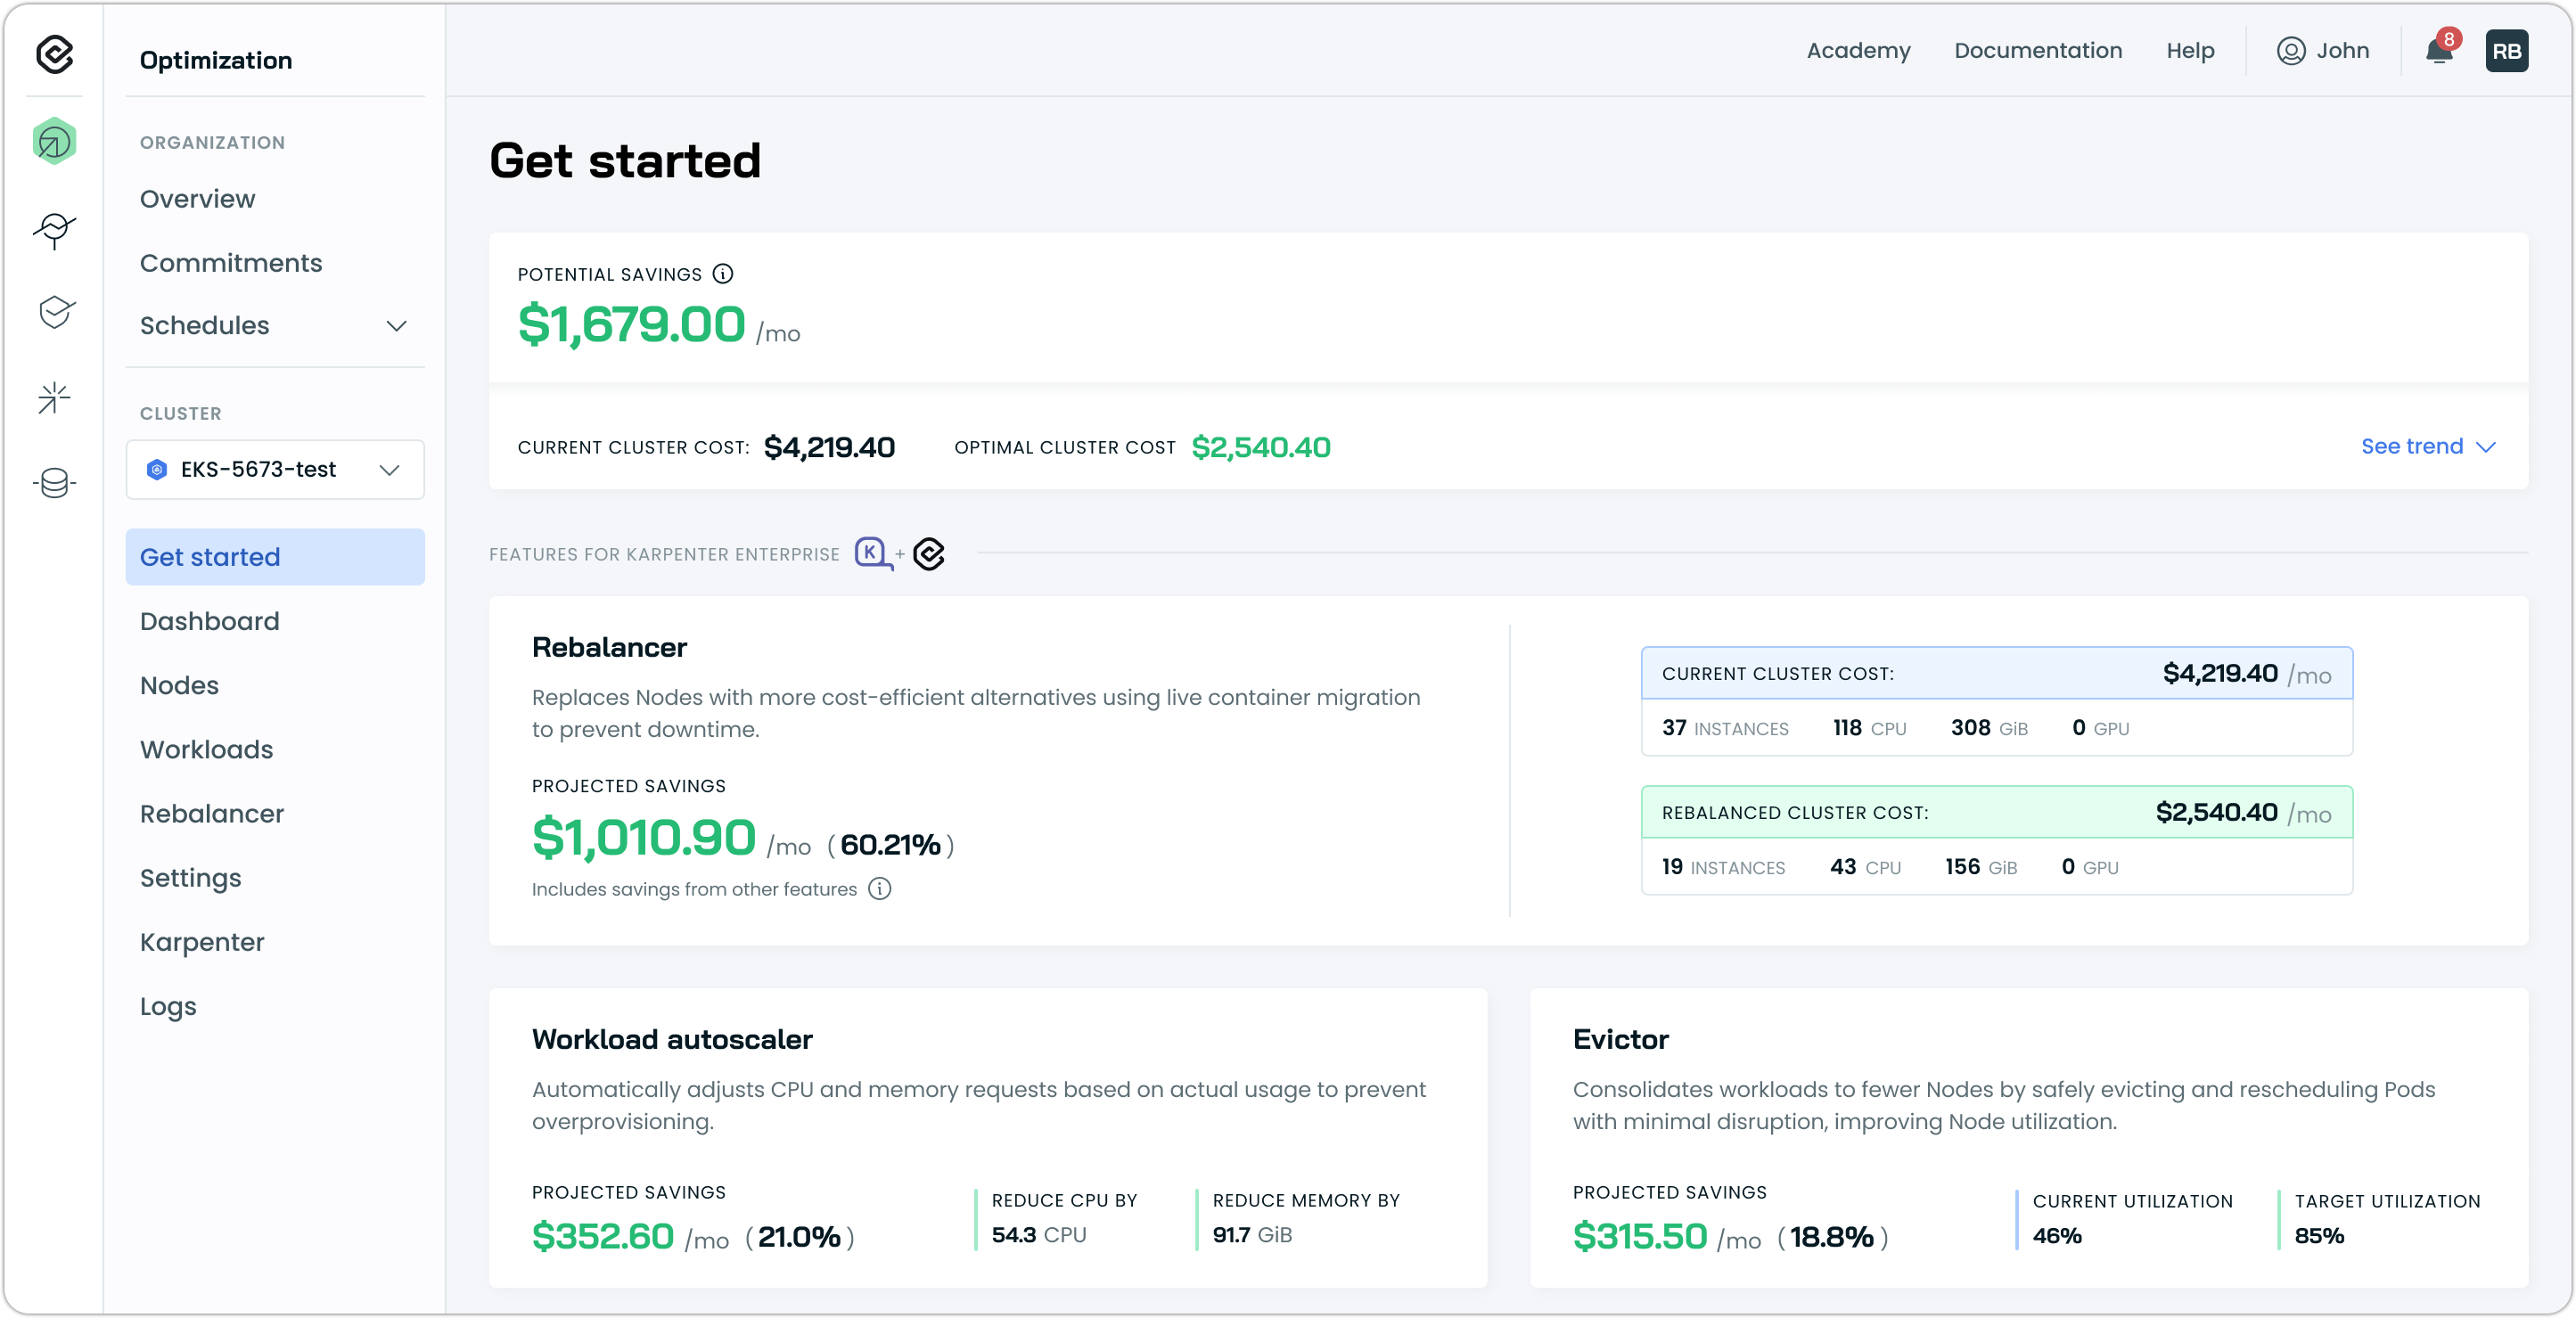
Step 2: Review optimization potential
Once the agent connects, navigate to the Cast AI console and open your cluster. You'll land on the Get started page.
The Get started page is your optimization dashboard. At the top, you'll see:
- Potential savings – Total monthly savings available
- Current cluster cost vs. Optimal cluster cost – Where you are now vs. where you could be
Below that are feature cards that show each optimization opportunity, along with projected savings and its current status. The Rebalancer card shows your biggest immediate opportunity. This is what you'll run first.
What if features show 'Install' instead of data?
If you deselected features during connection, those cards will show an Install button instead of data. You can install them anytime:
- Click Install on the feature card
- Follow the installation prompts
- The feature will appear as active once installation completes
The Get started page always reflects what's currently deployed in your cluster.
Where did this data come from?
Cast AI analyzed your cluster after onboarding:
- Inventoried all Nodes, Pods, and workloads
- Measured actual CPU and memory usage
- Identified over-provisioned resources
- Compared your current instance types against more optimal alternatives
- Calculated potential consolidation opportunities
This analysis runs continuously, so the numbers stay current as your cluster changes.
You're now ready to either run Rebalancer immediately or configure features first. Most users start with Rebalancer to see immediate results.
Step 3: Configure features (optional)
Before running your first rebalancing, you may want to enable Continuous Rebalancing and review your Karpenter configuration in Cast AI.
Enable Continuous Rebalancing
Continuous rebalancing is disabled by default. To enable it, configure Kentroller with your desired mode. A common starting point is full mode, which replaces underutilized nodes with cheaper alternatives:
castai-kentroller:
  castai:
    continuousRebalancing:
      enabled: true
      mode: full
Apply using Helm:
helm upgrade castai castai/castai-umbrella \
  --reset-then-reuse-values \
  -f values.yaml
Container Live Migration is automatically used for eligible workloads, allowing Pods to move with potentially no downtime. For full configuration options, see Continuous rebalancing.
Should I enable Continuous Rebalancing now or later?
Enable now if: You want fully automated, ongoing optimization. Continuous rebalancing runs safely in the background and only acts when projected savings meet your configured thresholds.
Enable later if: You prefer to run Rebalancer manually first to see how Cast AI optimizes your cluster, then enable continuous optimization once you're comfortable.
Either approach works — Rebalancer provides immediate, one-time optimization, while Continuous Rebalancing provides ongoing efficiency.
Review your Karpenter configuration
Cast AI automatically imported your Karpenter NodePools and NodeClasses. Navigate to Karpenter in the left sidebar to see them.
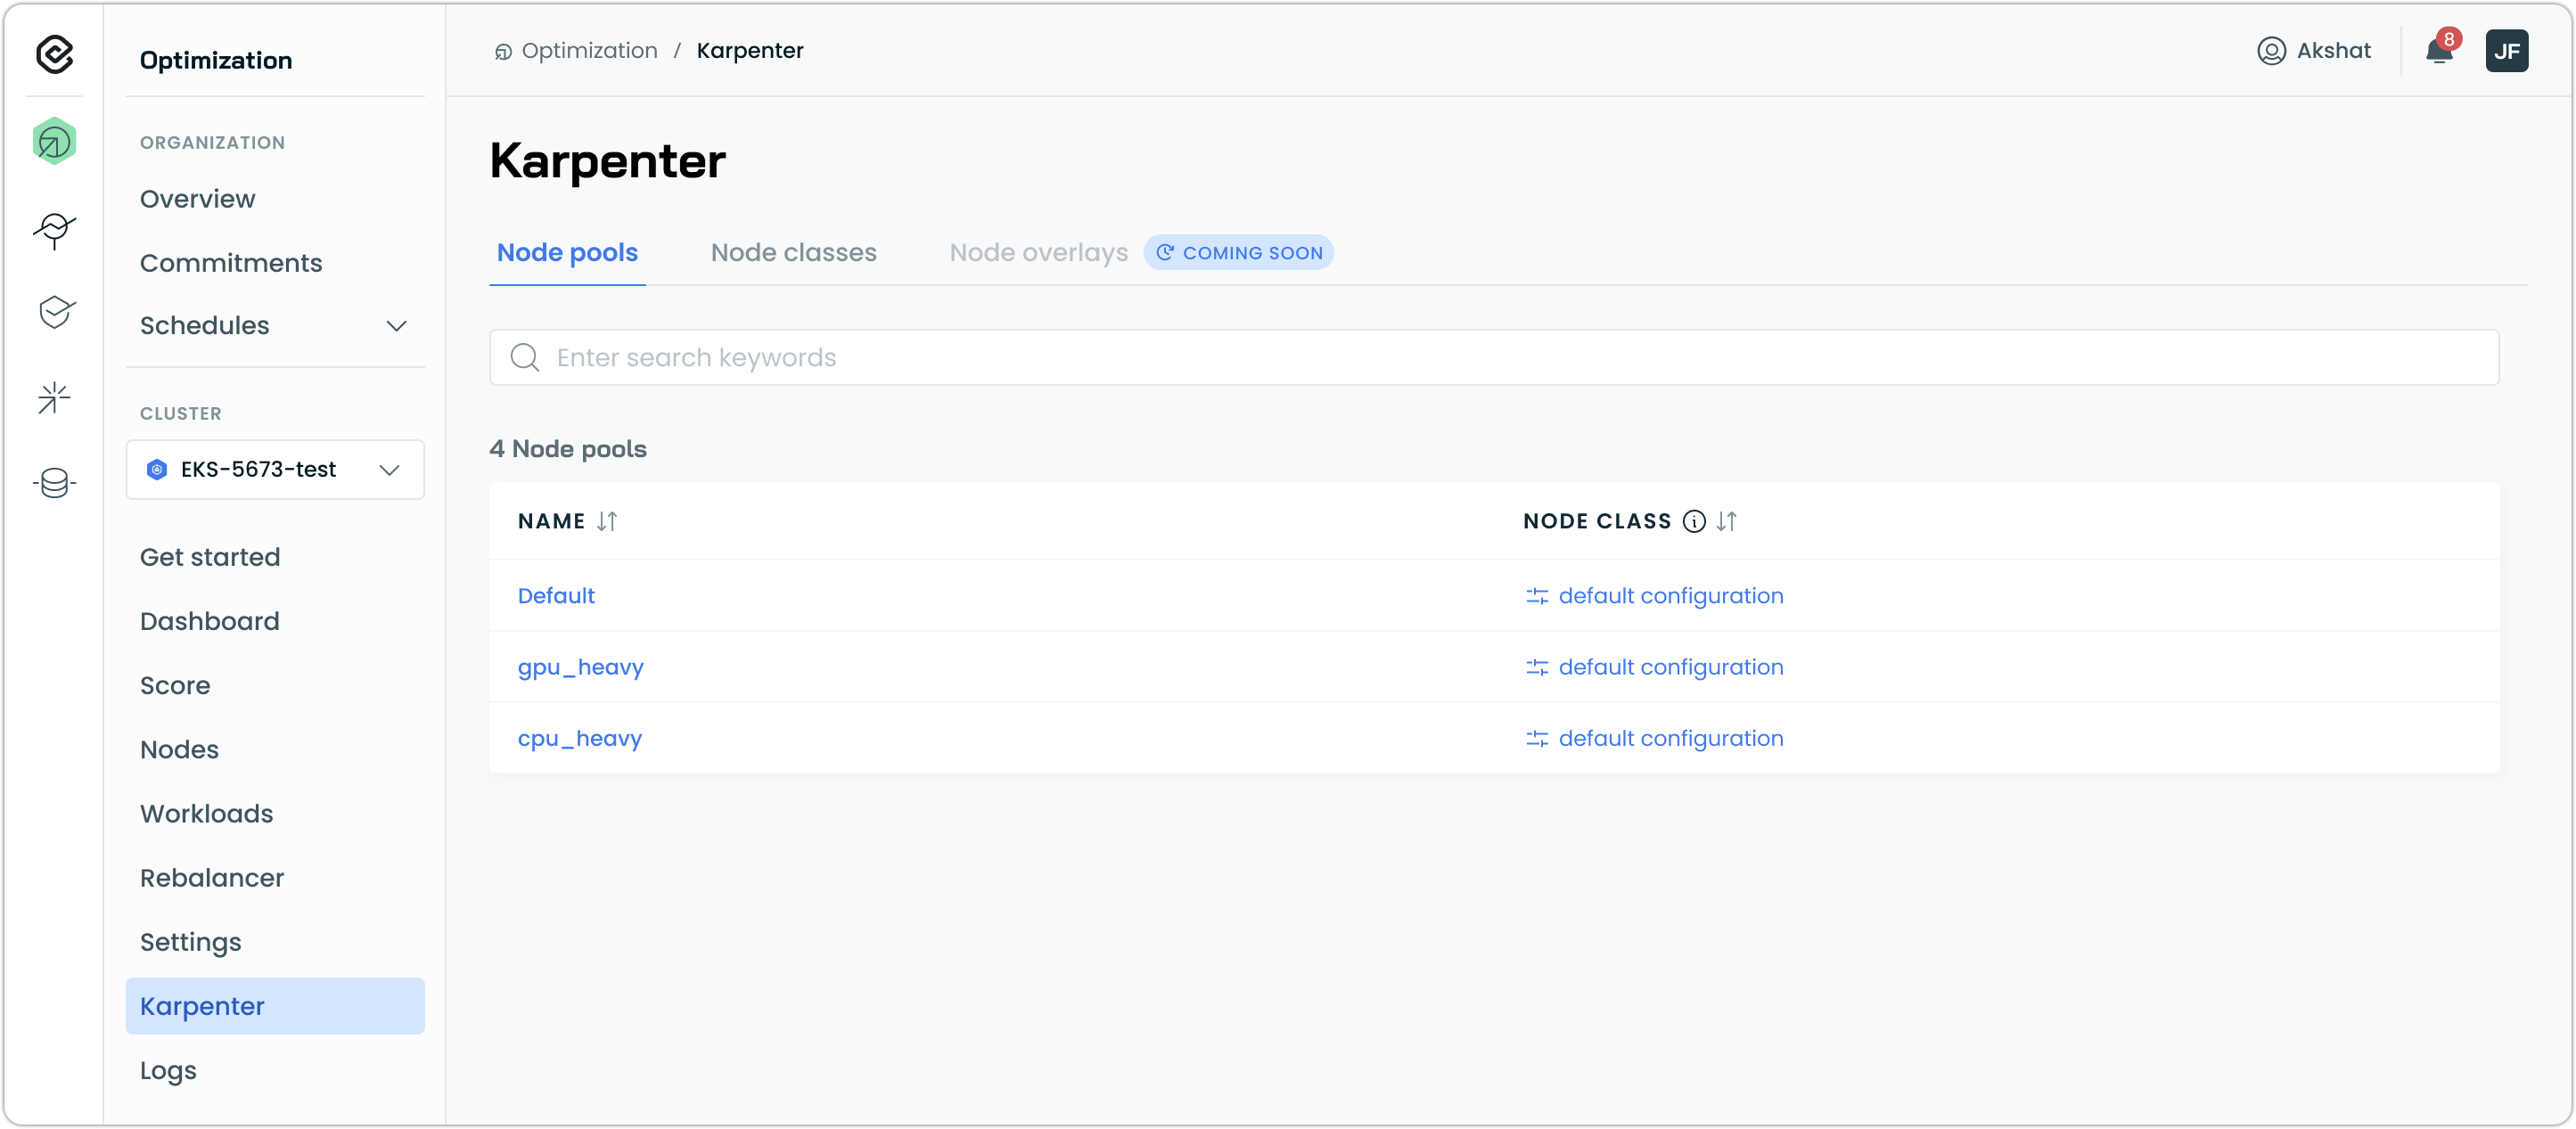
This page shows how Cast AI recognizes and preserves your existing Karpenter setup.
NodePools and NodeClasses are read-only in the Cast AI console. To modify your Karpenter configuration, use your existing GitOps workflows or kubectl commands. Cast AI respects your Karpenter CRDs as the source of truth.
What are Node overlays?
You'll see a Node overlays tab marked "Coming soon." Node overlays (a Karpenter 1.6+ feature) let clusters override scheduler decisions for special hardware, OS configs, or capacity types. Cast AI support for Node overlays is planned for a future release.
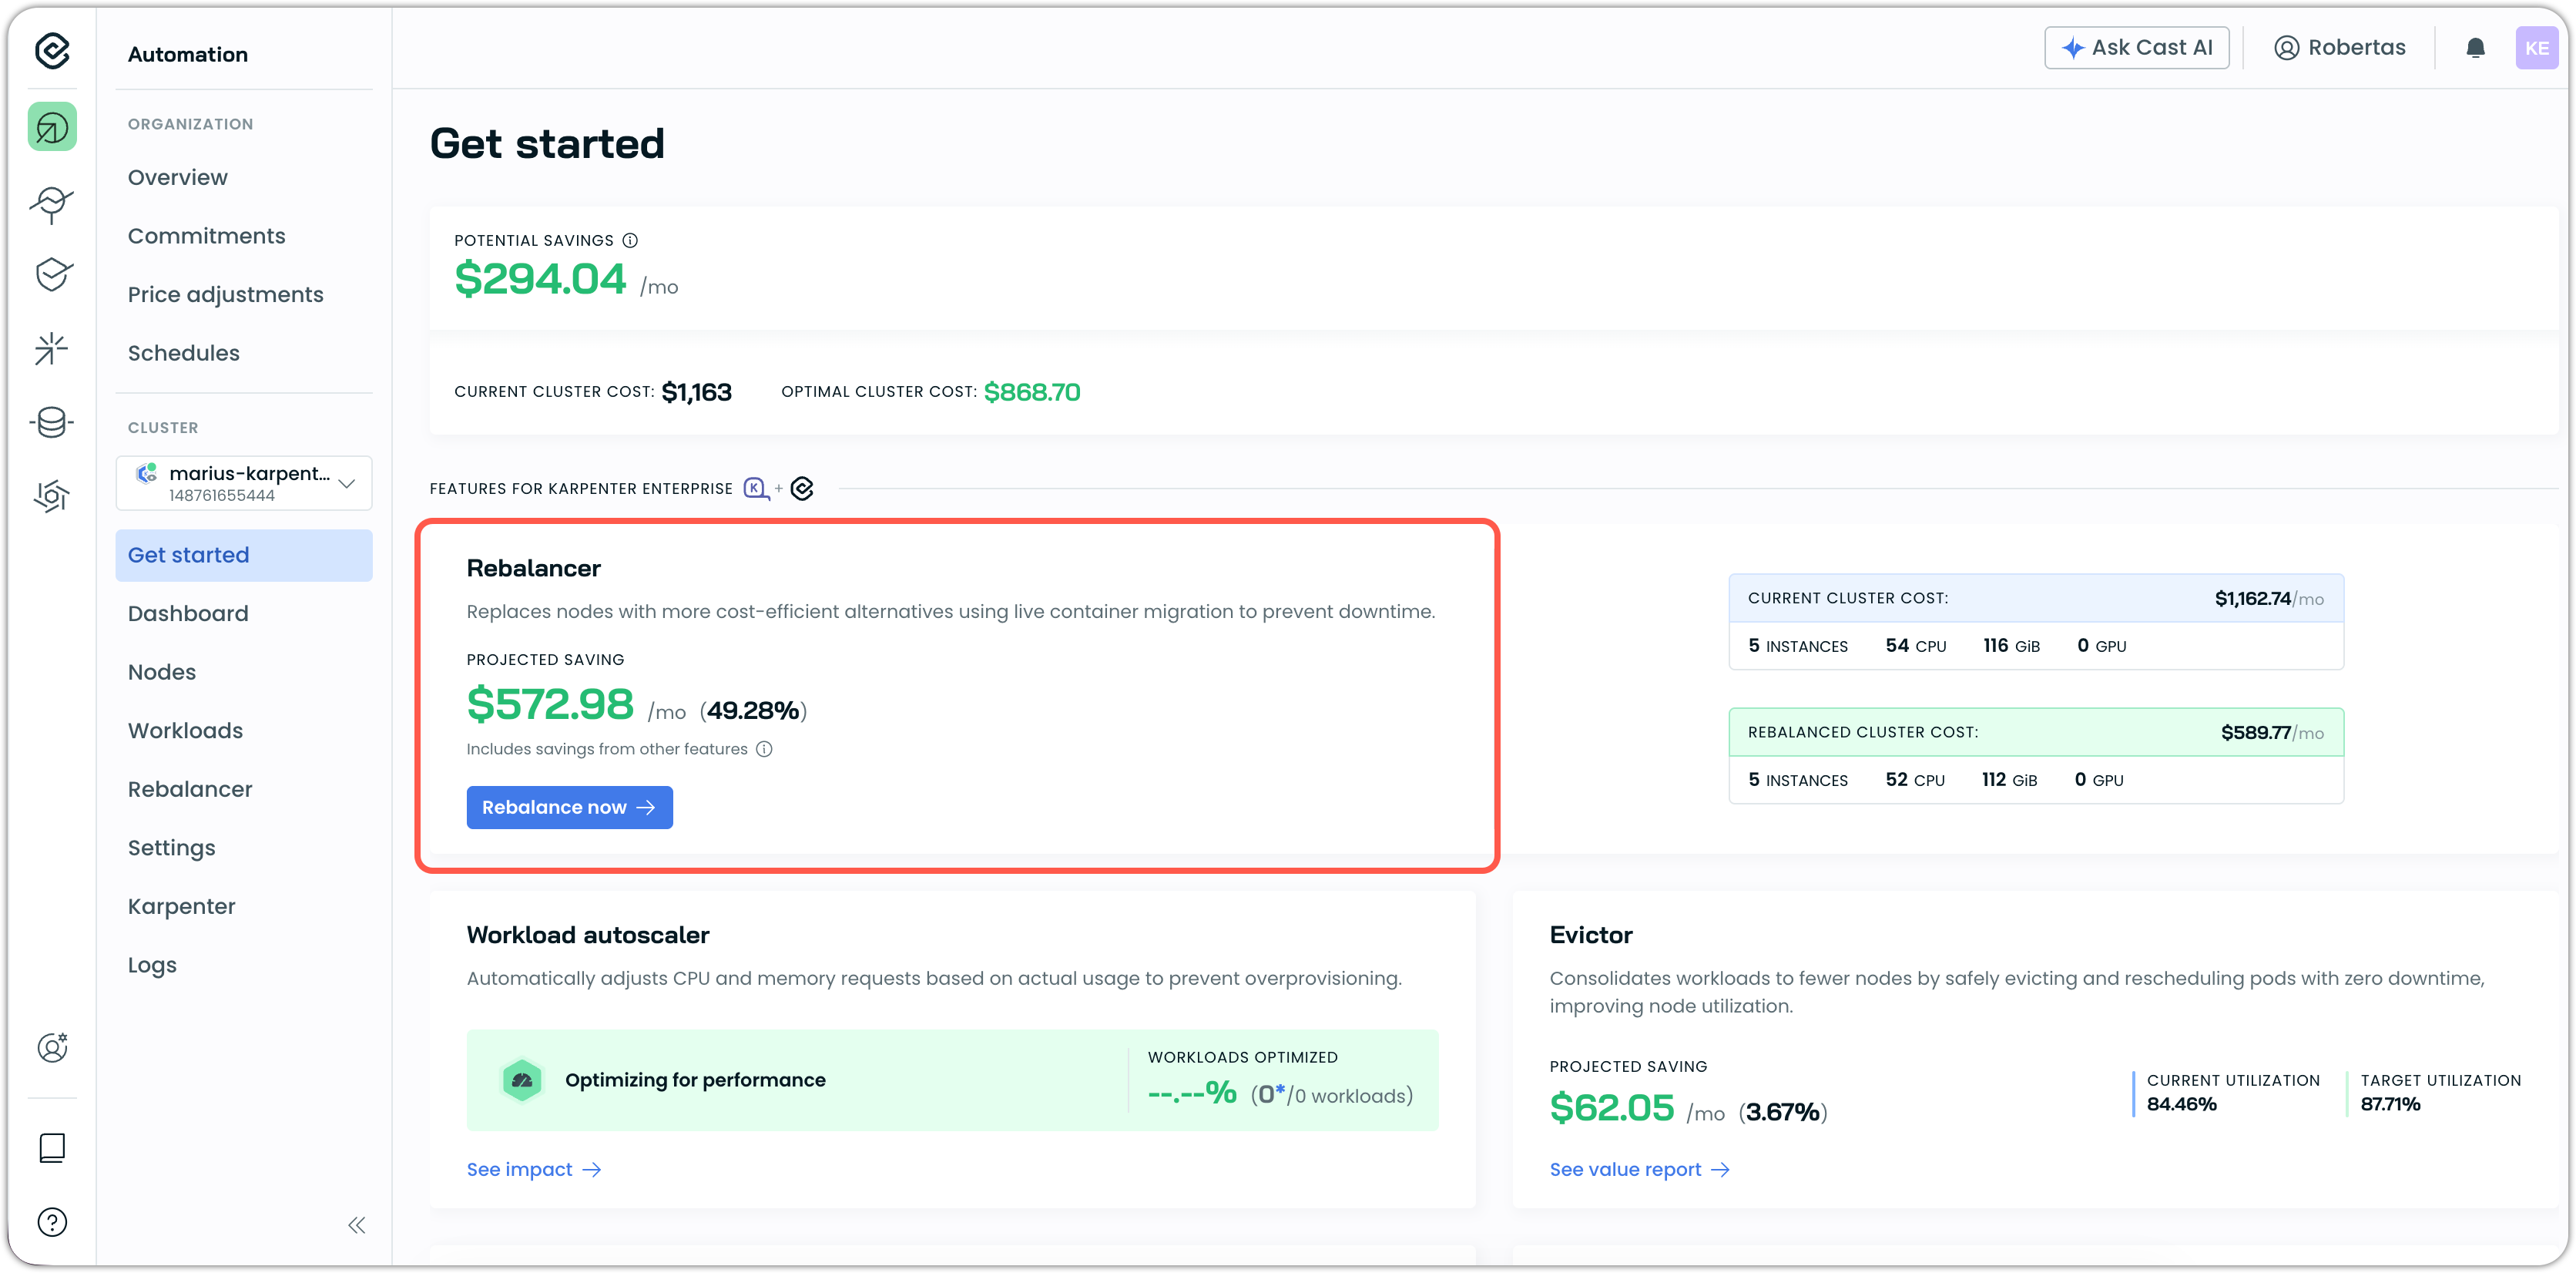
Step 4: Run your first rebalancing
Rebalancing replaces nodes with more cost-efficient alternatives. This is your first active optimization.
-
Locate the Rebalancer card on the Get started page or the navigation sidebar.
-
Review the projected savings and configuration comparison:
- Current cluster cost and instance count
- Rebalanced cluster cost and optimized instance count
-
Click Rebalance now on the Rebalancer card.
-
Review the rebalancing plan that appears:
- Nodes to be replaced
- Replacement instance types
- Expected cost reduction
-
Click Generate plan for Cast AI to generate a rebalancing plan for the selected Nodes.
What happens during rebalancing?
When you start rebalancing:
- Cast AI creates new NodeClaims through Karpenter for the optimized instance types
- Karpenter provisions the new nodes
- Workloads are drained using standard Kubernetes eviction
- Old nodes are deleted once empty
The entire process respects Pod Disruption Budgets and coordinates with Karpenter's native lifecycle management.
Monitor rebalancing progress
- Navigate to Rebalancer in the left sidebar.
- View the active rebalancing operation showing:
- Nodes being replaced
- Progress percentage
- Time remaining
Tracking progress via CRDs
Currently, for Karpenter clusters, the Cast AI console may not show detailed progress during rebalancing. For full visibility, inspect the Rebalancing CRD directly:
kubectl get rebalancing -n castai-agent
kubectl describe rebalancing <name> -n castai-agent
The Rebalancing CRD contains:
- Current phase and stage
- Status messages
- Related events for each step
- Failure reasons if something goes wrong
This is the source of truth for rebalancing status.
Once rebalancing is complete, return to the Get Started page to view your updated savings figures.
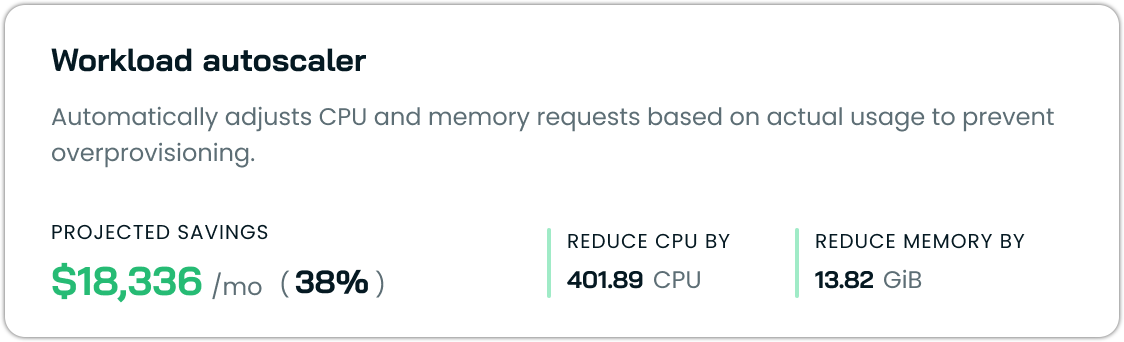
Step 5: Enable workload autoscaling
Workload Autoscaler continuously rightsizes your workloads based on actual resource usage. This optimization runs continuously in the background.
-
Locate the Workload Autoscaler card on the Get started page.
-
Review the projected savings:
- CPU and memory over-provisioning to be reduced
- Monthly cost savings from rightsizing
-
Go to Workloads in the side navigation menu, then Scaling policies in the top right.
-
Once there, toggle the default scaling policies to ON:
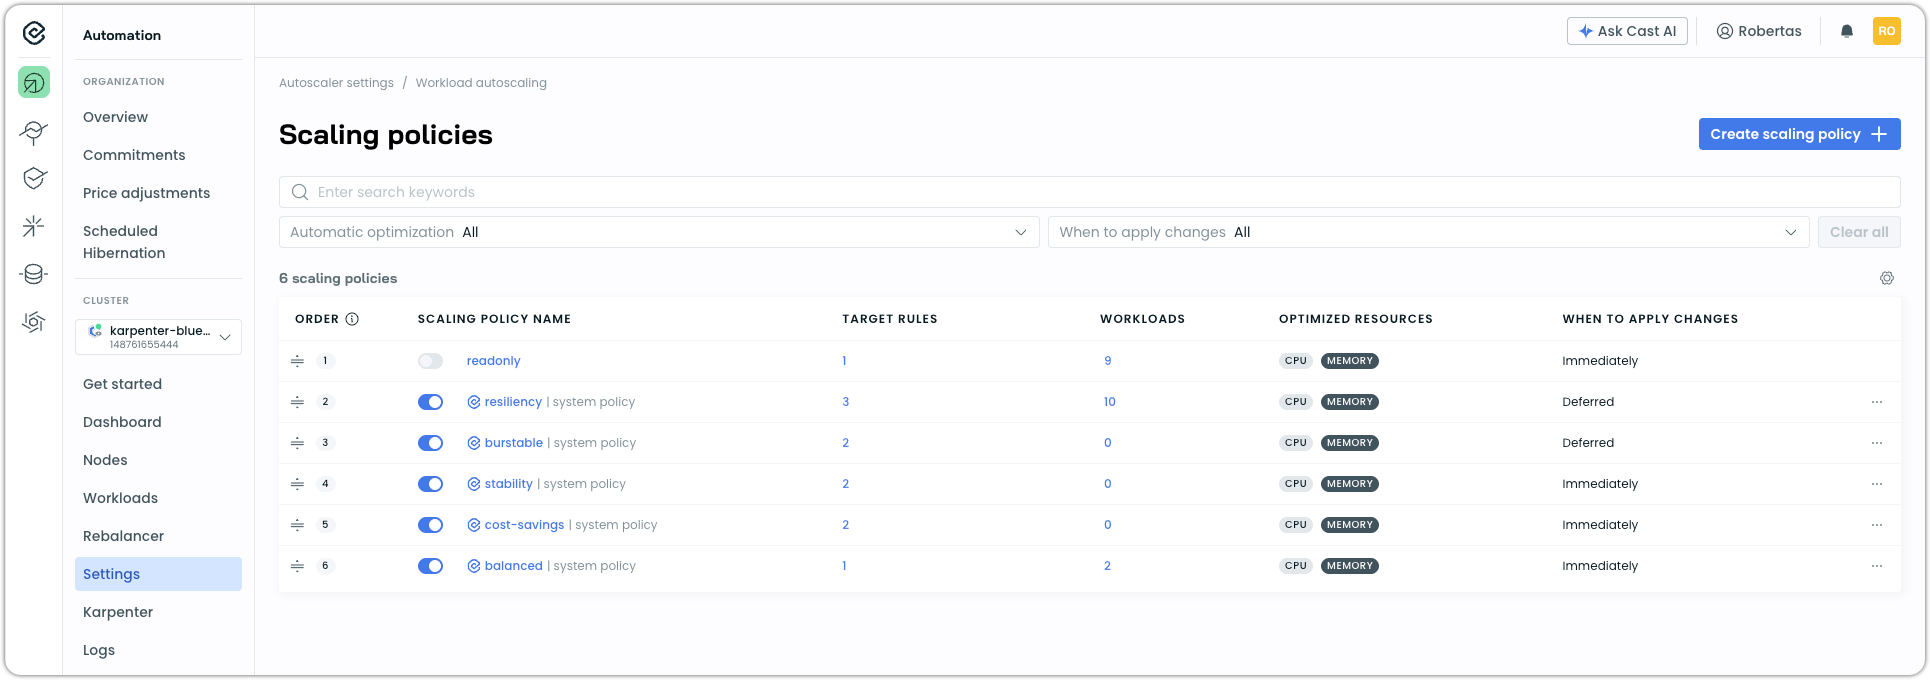
This will enable automated workload rightsizing for your workloads with settings that are data-driven and proven across thousands of Cast AI clusters.
Workload Autoscaler will begin gradually generating resource recommendations and conservatively applying them to your workloads. As it gains more confidence from observing your workloads over the next 48 hours, it will likely reduce resource requests more significantly.
What happens after enabling
Workload Autoscaler:
- Begins monitoring resource usage across all workloads
- Generates rightsizing recommendations almost immediately
- Applies recommendations automatically (if configured) or when your Pods restart
- Updates continuously as usage patterns change
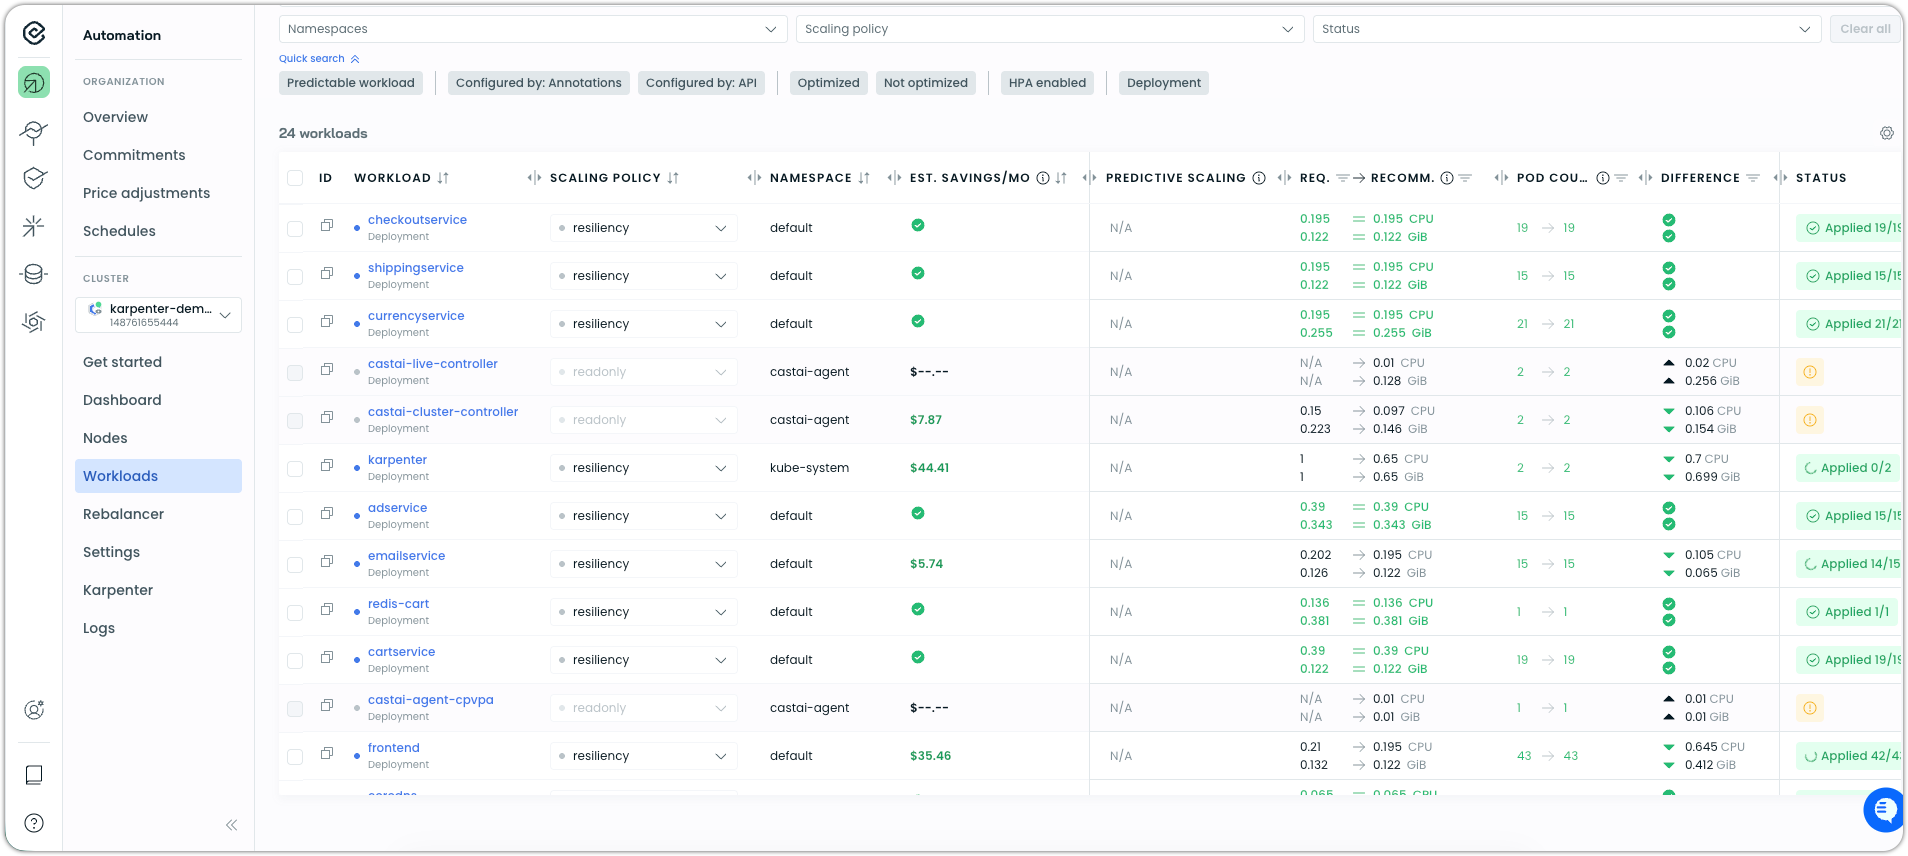
You can view recommendations and adjustments on the Workloads page.
Next steps
You've successfully connected your Karpenter cluster and enabled active optimization. From here, you can:
Customize feature settings
Visit the Settings page to adjust advanced configurations for each feature.
Understand Karpenter integration
Learn more about how Cast AI works alongside Karpenter in Karpenter Enterprise suite overview and Karpenter Enterprise suite features.
Set up alerts and reporting
Configure Slack or email notifications for optimization events and schedule regular savings reports. See Notifications.
Troubleshooting
Components not starting
If pods in the castai-agent namespace are not reaching Running status:
-
Check pod events:
kubectl describe pod -n castai-agent <pod-name> -
Check component logs:
kubectl logs -n castai-agent -l app.kubernetes.io/name=castai-agent -
Verify IAM permissions are correctly configured.
Cluster not appearing in console
If your cluster doesn't appear after running the script:
-
Verify the agent is running:
kubectl get pods -n castai-agent -l app.kubernetes.io/name=castai-agent -
Check agent logs for connection errors:
kubectl logs -n castai-agent -l app.kubernetes.io/name=castai-agent -c agent -
Ensure your cluster has outbound internet access to the Cast AI API and gRPC endpoints (see communication requirements).
Karpenter not detected
If Cast AI doesn't detect Karpenter in your cluster:
-
Verify Karpenter is installed:
kubectl get pods -n karpenter -
Check that Karpenter CRDs exist:
kubectl get crd | grep karpenter
If Karpenter is installed but not detected, contact Cast AI support with your cluster details.
Rebalancing not starting
If rebalancing won't start or shows errors:
-
Verify the Kentroller component is running:
kubectl get pods -n castai-agent -l instance=castai-kentroller -
Check Kentroller logs:
kubectl logs -n castai-agent -l instance=castai-kentroller -
Ensure Karpenter is operational and able to provision nodes:
kubectl get nodeclaims
Rebalancing requires both Cast AI and Karpenter to be fully operational.
NodeClaims stuck in Waiting or Provisioning
If NodeClaims remain in Waiting or Provisioning state for more than 10-15 minutes:
-
Check NodePool CPU limits—this commonly blocks scaling:
kubectl get nodepool -o yaml | grep -A5 "limits:" -
Review instance family and generation constraints. Overly strict filters cause most capacity failures:
kubectl get nodepool -o yaml | grep -A10 "requirements:" -
For Spot capacity, check if the requested instance types have availability in your region.
-
Inspect the NodeClaim for specific errors:
kubectl describe nodeclaim <nodeclaim-name>
If NodeClaims remain stuck after checking these, contact Cast AI support.
Continuous rebalancing not creating plans
If Continuous Rebalancing is enabled but no plans are created:
-
Verify Continuous Rebalancing is enabled:
helm get values castai | grep -A5 continuousRebalancing -
Check Kentroller logs for cycle output:
kubectl logs -n castai-agent -l app=castai-kentroller | grep "continuous-rebalancing" -
Verify savings thresholds are reachable. If the cluster is already well-optimized, plans may be discarded because projected savings fall below the configured minimum.
For further troubleshooting steps, see Continuous rebalancing.
Spot interruption predictions not appearing
If the Spot interruption prediction model is enabled but no predictions appear during active Spot usage:
-
Verify the interruption queue is configured in your Karpenter deployment:
kubectl get deployment -n karpenter karpenter -o yaml | grep -i queue -
Check that IAM permissions for SQS access are correctly configured.
-
Confirm the prediction model is enabled in Cast AI Settings.
-
Verify Kentroller is running and connected:
kubectl logs -n castai-agent -l instance=castai-kentroller --tail=50
If predictions still don't appear during active Spot usage, contact Cast AI support.
Rebalancing failed or stuck
If rebalancing operations fail or appear stuck:
-
Check the Rebalancing CRD for status and failure reasons:
kubectl get rebalancing -n castai-agent kubectl describe rebalancing <name> -n castai-agent -
Review Kentroller logs for detailed error information:
kubectl logs -n castai-agent -l instance=castai-kentroller --tail=200
The Rebalancing CRD contains:
- Current phase and stage (including failures)
- Human-readable failure reasons
- Related events for each step
This CRD is the source of truth for diagnosing rebalancing issues. The UI may not show detailed progress, but the CRD provides full visibility.
Escalate to Cast AI support if:
- Rebalance plans fail repeatedly with the same error
- NodeClaims created during rebalancing are stuck for more than 15 minutes
- Kentroller logs show persistent connection or API errors
Unexpected node replacements
If nodes are being replaced unexpectedly:
-
Check if Karpenter's drift detection triggered the replacement:
kubectl get nodeclaim -o yaml | grep -A5 "disruption" -
Review if node expiration (
expireAfter) is configured in your NodePool:kubectl get nodepool -o yaml | grep -i expireafter -
Check Karpenter controller logs for consolidation or drift events:
kubectl logs -n karpenter -l app.kubernetes.io/name=karpenter --tail=100 | grep -i "disruption\|drift\|consolidat"
Common causes of unexpected replacements:
- NodePool
expireAftersetting triggering periodic node repaving - Drift detection from AMI updates, security group changes, or label modifications
Workload Autoscaler not generating recommendations
If Workload Autoscaler is enabled but not showing recommendations:
-
Verify the Workload Autoscaler pod is running:
kubectl get pods -n castai-agent -l app=castai-workload-autoscaler -
Check that metrics-server is installed and working:
kubectl top nodes kubectl top pods -A -
Review Workload Autoscaler logs for errors:
kubectl logs -n castai-agent -l app=castai-workload-autoscaler
Workload Autoscaler requires metrics-server for resource usage data.
Related resources
- Karpenter Enterprise suite overview – How Cast AI extends Karpenter
- Karpenter Enterprise suite features – Detailed feature documentation
- Rebalancer – Understanding cluster rebalancing
- Workload Autoscaler – Workload rightsizing details
Updated 8 days ago