
Enable Workload Autoscaler with pod mutations
Overview
In this tutorial, you'll learn how to use pod mutations to automatically enable Cast AI Workload Autoscaler on workloads without modifying deployment manifests. This approach is useful when you want to roll out vertical autoscaling across namespaces or workload types without requiring application teams to update their configurations.
This tutorial assumes you have basic knowledge of:
- Kubernetes workloads (Deployments, pods, labels)
- Cast AI pod mutations concepts
- Cast AI Workload Autoscaler functionality
By the end of this tutorial, you'll be able to:
- Create a pod mutation that enables Workload Autoscaler using the custom workloads feature
- Target specific workloads using namespace and label filters
- Verify that the mutation is correctly enabling autoscaling on new pods
Background
Cast AI Workload Autoscaler optimizes container resource requests based on actual usage patterns. To enable it on standard workloads, you typically add the workloads.cast.ai/configuration annotation to your Deployment's metadata. However, pod mutations operate at the pod level, not the controller level, so they cannot modify Deployment resources directly.
To work around this, we use the custom workloads feature. Custom workloads are identified by a label on the pod itself, and their configuration annotation is also read from the pod. This makes them ideal for pod mutations.
The mutation adds two items to each matching pod:
workloads.cast.ai/custom-workloadlabel — Registers the pod as a custom workload with Workload Autoscalerworkloads.cast.ai/configurationannotation — Contains the autoscaling configuration
This approach lets you enable Workload Autoscaler across your cluster declaratively, without touching application manifests or requiring coordination with development teams.
Custom workloads vs. standard workloads
Standard workloads read their Workload Autoscaler configuration from the parent controller (Deployment, StatefulSet, etc.). This is the typical approach when you control the application manifests.
Custom workloads read their configuration from pod-level labels and annotations. This is useful for:
- Workloads managed by custom controllers
- Bare pods without parent controllers
- Scenarios where you want to inject configuration via pod mutations
Both approaches provide the same optimization capabilities. The main difference is where the configuration lives and how workloads are identified in the Workload Autoscaler UI.
For more details, see Custom workload support.
Before you start
Before starting this tutorial, ensure you have:
- A Kubernetes cluster connected to Cast AI
- The pod mutator installed and running (see Pod mutations quickstart)
- Workload Autoscaler enabled on your cluster (see Workload Autoscaler overview)
- kubectl configured to access your cluster
- A scaling policy created (or use the
defaultpolicy)
How to verify the pod mutator is running
Run the following command to check that the pod mutator pods are running:
kubectl get pods -n castai-agent -l app.kubernetes.io/name=castai-pod-mutatorYou should see output similar to:
NAME                                  READY   STATUS    RESTARTS   AGE
castai-pod-mutator-767d48f477-lshm2   1/1     Running   0          10m
castai-pod-mutator-767d48f477-wvprs   1/1     Running   0          10m
If no pods are listed or the status isn't Running, see the installation accordion below.
How to install the pod mutator
-
Add the Cast AI Helm repository:
helm repo add castai-helm https://castai.github.io/helm-charts helm repo update -
Install the pod mutator:
helm upgrade -i --create-namespace -n castai-agent pod-mutator \
  castai-helm/castai-pod-mutator \
  --set castai.apiKey="${CASTAI_API_KEY}" \
  --set castai.clusterID="${CLUSTER_ID}"
Replace
${CASTAI_API_KEY}and${CLUSTER_ID}with your actual values. You can find these in the Cast AI console under User → API keys and in your cluster's settings. -
Verify the installation:
kubectl get pods -n castai-agent -l app.kubernetes.io/name=castai-pod-mutator
For detailed installation options, see the Pod mutations quickstart.
How to verify Workload Autoscaler is enabled
Run the following command to check that the Workload Autoscaler component is running:
kubectl get pods -n castai-agent -l app.kubernetes.io/name=castai-workload-autoscalerYou should see output similar to:
NAME                                         READY   STATUS    RESTARTS   AGE
castai-workload-autoscaler-5f8b7c9d4-xxxxx   1/1     Running   0          10m
You can also verify in the Cast AI console by navigating to Workload Autoscaler in the sidebar. If the component is not running, see the installation accordion below.
How to install Workload Autoscaler
-
Add the Cast AI Helm repository (if not already added):
helm repo add castai-helm https://castai.github.io/helm-charts helm repo update -
Install the Workload Autoscaler:
helm upgrade -i --create-namespace -n castai-agent workload-autoscaler \
  castai-helm/castai-workload-autoscaler \
  --set castai.apiKey="${CASTAI_API_KEY}" \
  --set castai.clusterID="${CLUSTER_ID}"
Replace
${CASTAI_API_KEY}and${CLUSTER_ID}with your actual values. -
Verify the installation:
kubectl get pods -n castai-agent -l app.kubernetes.io/name=castai-workload-autoscaler
For detailed configuration options and scaling policies, see Workload Autoscaler overview.
Deploy a test workload
First, create a test namespace and deployment that we'll use for this tutorial to apply and verify the mutation.
-
Create a namespace for testing:
kubectl create namespace woop-mutation-demo -
Deploy a sample workload without any Workload Autoscaler annotations:
kubectl apply -f - <<EOF
apiVersion: apps/v1
kind: Deployment
metadata:
  name: demo-app
  namespace: woop-mutation-demo
spec:
  replicas: 2
  selector:
    matchLabels:
      app: demo-app
  template:
    metadata:
      labels:
        app: demo-app
        enable-autoscaling: "true"
    spec:
      containers:
        - name: nginx
          image: nginx:1.25
          resources:
            requests:
              cpu: 100m
              memory: 128Mi
            limits:
              cpu: 200m
              memory: 256Mi
EOF
About the test workload configuration
This deployment includes:
- Two replicas: Allows you to verify the mutation applies consistently across pods
enable-autoscaling: "true"label: Provides a targeting mechanism for the mutation filter, demonstrating label-based filtering- Resource requests and limits: Gives Workload Autoscaler baseline values to optimize
The label
enable-autoscalingis arbitrary—you can use any label that fits your organization's conventions. In production, you might target workloads by team, environment, or application tier. -
Verify the deployment is running:
kubectl get pods -n woop-mutation-demo
Expected output:
NAME                       READY   STATUS    RESTARTS   AGE
demo-app-869684576-6tzm9   1/1     Running   0          11s
demo-app-869684576-cwhjn   1/1     Running   0          11s
Create the pod mutation
Now create a pod mutation that registers matching pods as custom workloads and enables Workload Autoscaler. The mutation uses a JSON patch to add both the required label and configuration annotation.
-
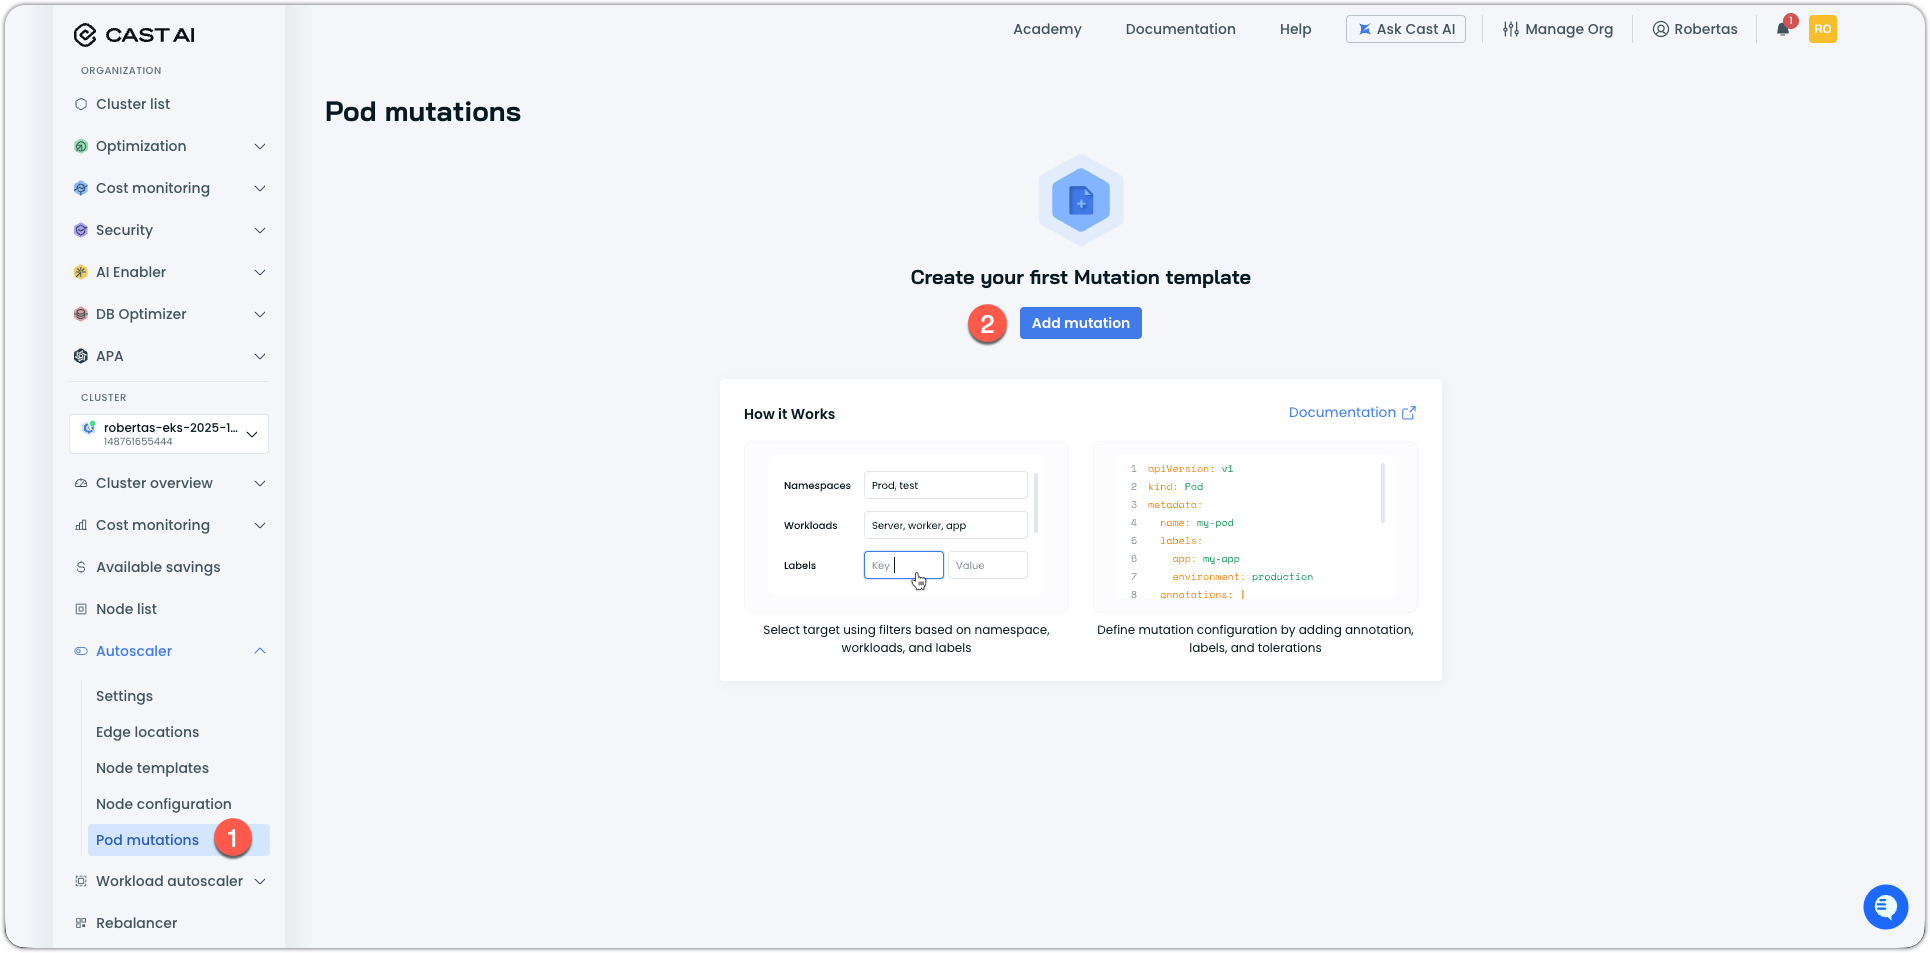
In the Cast AI console, navigate to Autoscaler → Pod mutations.
-
Click Add mutation.
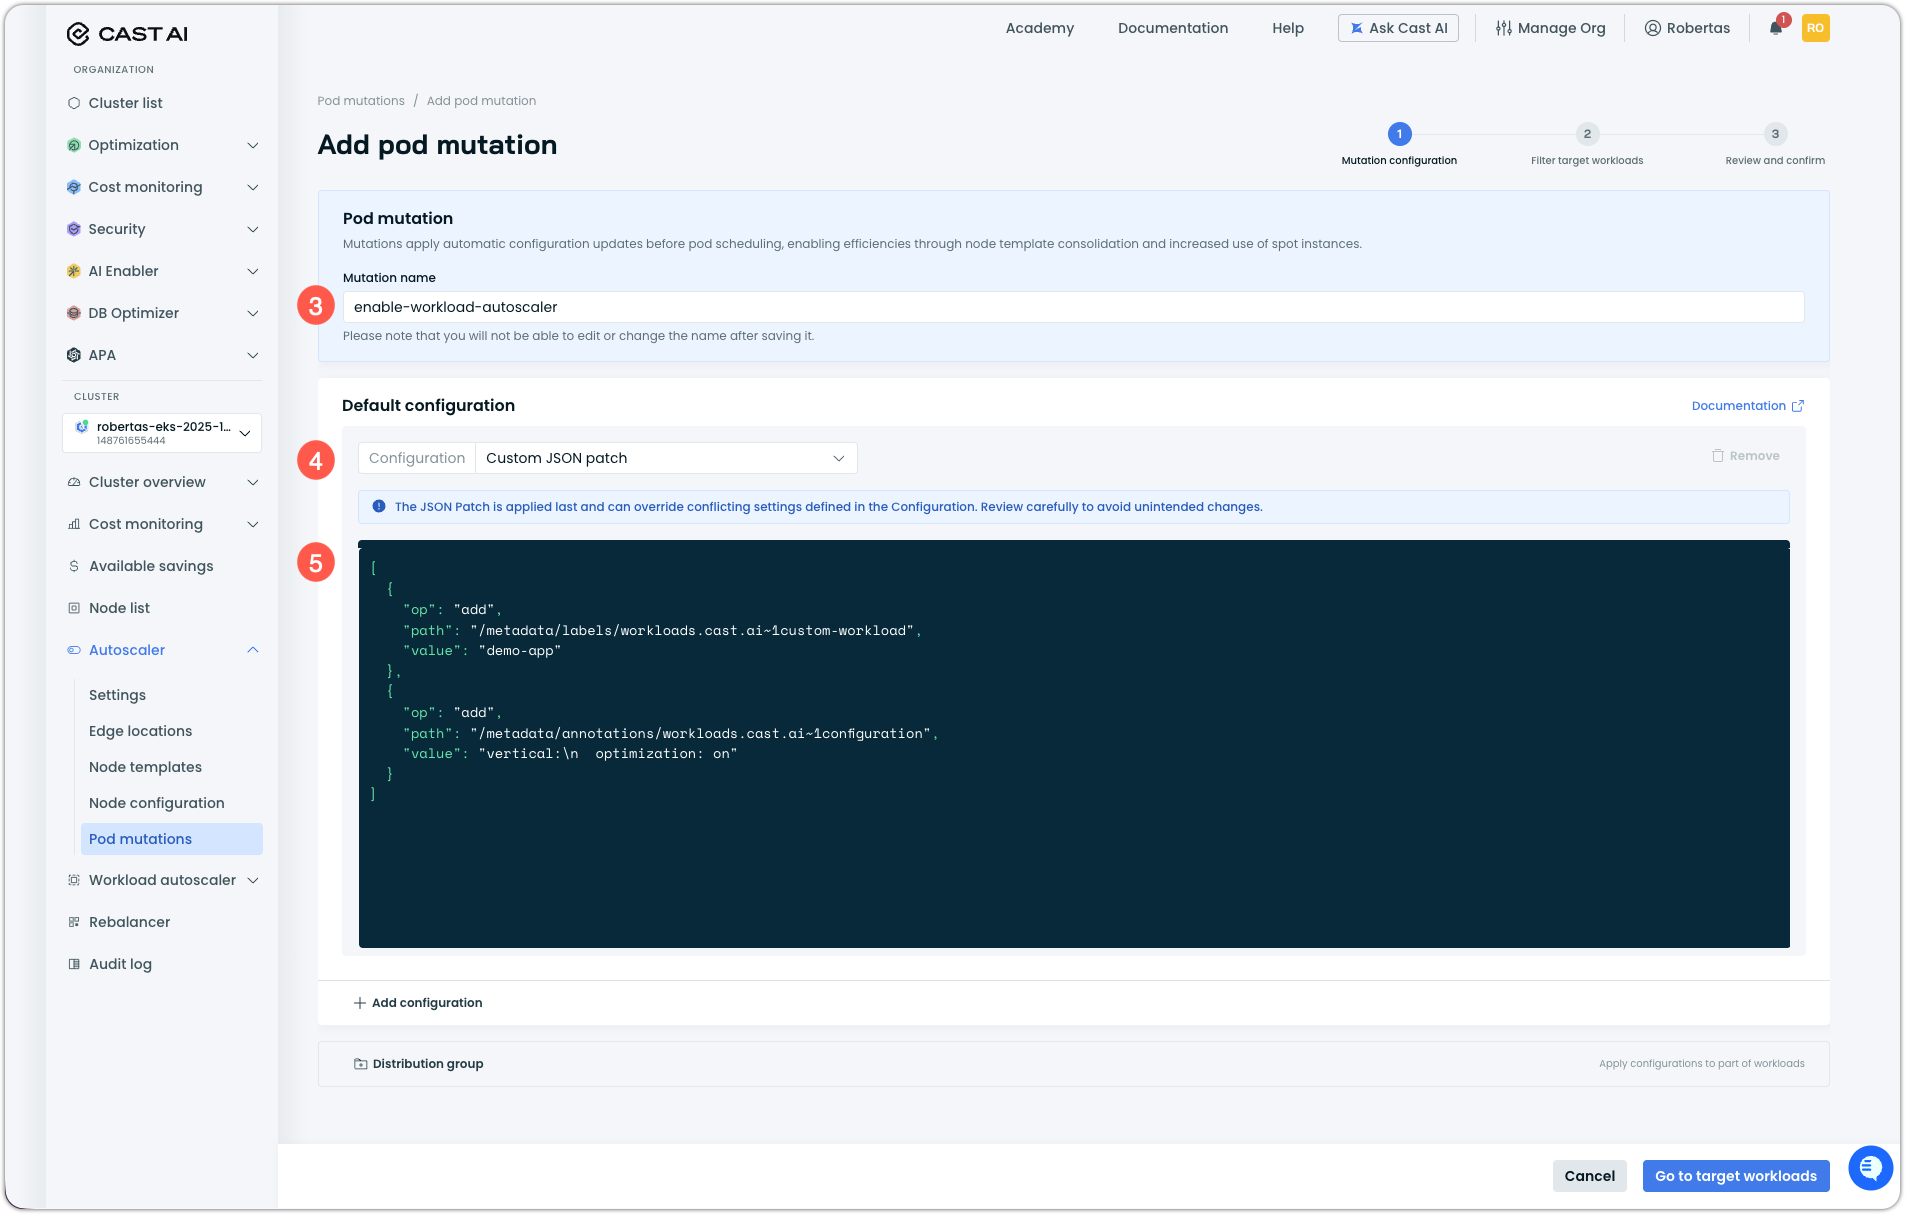
-
Enter a name for your mutation:
enable-workload-autoscaler -
Under Default configuration, click the Configuration dropdown and select Custom JSON patch.
-
Enter the following JSON patch operation:
[
  {
    "op": "add",
    "path": "/metadata/labels/workloads.cast.ai~1custom-workload",
    "value": "demo-app"
  },
  {
    "op": "add",
    "path": "/metadata/annotations/workloads.cast.ai~1configuration",
    "value": "vertical:\n  optimization: on"
  }
]
Understanding the JSON patch
This JSON patch performs two operations:
1. Add the custom workload label:
{"op":"add","path":"/metadata/labels/workloads.cast.ai~1custom-workload","value":"demo-app"}This registers the pod as a custom workload. The label value (
demo-app) serves as an identifier—pods with the same value are treated as a single workload for optimization purposes.2. Add the configuration annotation:
{"op":"add","path":"/metadata/annotations/workloads.cast.ai~1configuration","value":"vertical:\n optimization: on"}This enables vertical autoscaling with default settings. The
\nrepresents an actual newline character in the YAML configuration.Note that
/in annotation and label keys must be escaped as~1per RFC 6901 (JSON Pointer).Customizing the workload identifier
The
workloads.cast.ai/custom-workloadlabel value serves as the workload identifier. In this tutorial, we use a static value (demo-app), but in production you might want to:- Use namespace-specific values to separate workloads across namespaces
- Create different mutations for different application groups
- Match the value to your existing workload naming conventions
Pods with the same label value in the same namespace are grouped together as a single workload in the Workload Autoscaler UI.
-
Click Go to target workloads to proceed to filter configuration.
Configure target filters
Configure filters to target the workloads that should receive the Workload Autoscaler configuration.
-
Under Filter target workloads, click the Filter type dropdown and select Include namespaces.
-
Select
woop-mutation-demofrom the namespace list. -
(Optional) Add a label filter to target only pods with the
enable-autoscaling: "true"label:a. Click Add filter type and select Include pod labels.
b. Add the label condition:
- Key:
enable-autoscaling - Value:
true
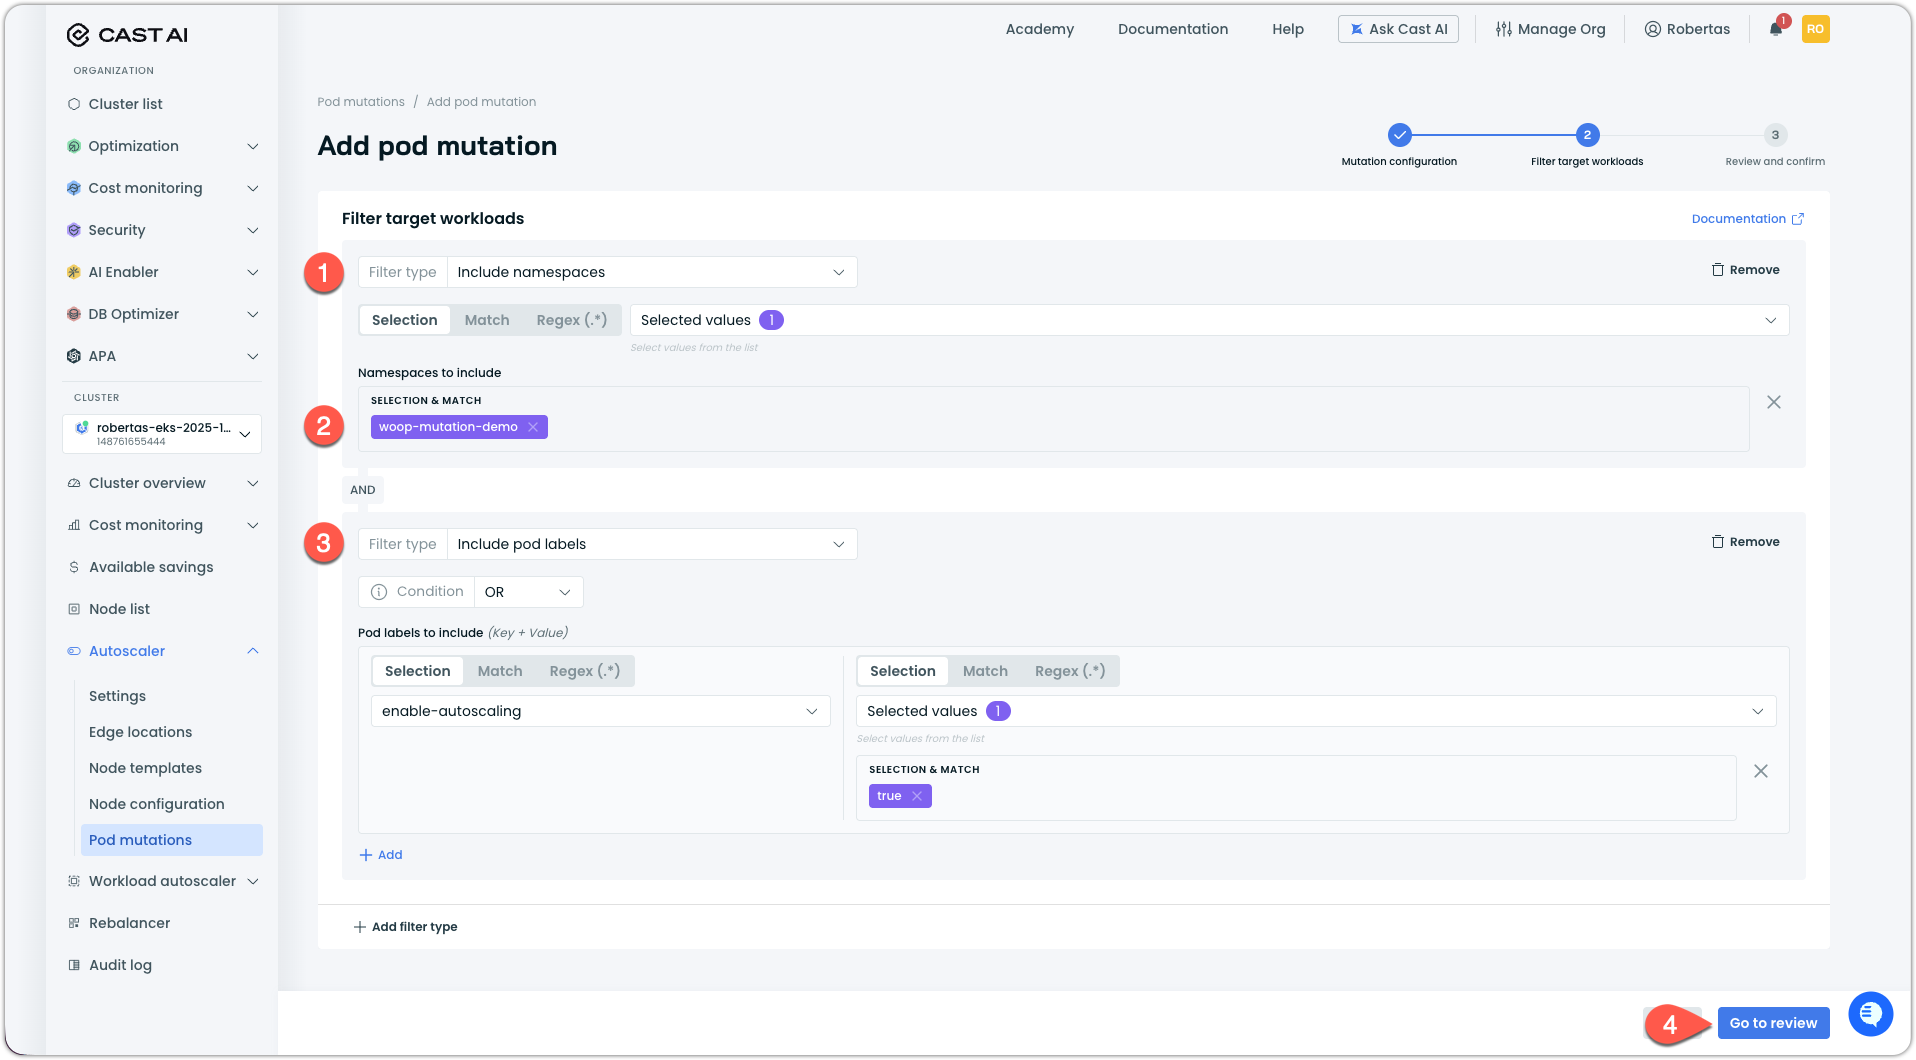
- Key:
-
Click Go to review to see the configuration summary.
-
Review the Affected workloads panel to confirm your
demo-appdeployment appears in the affected list.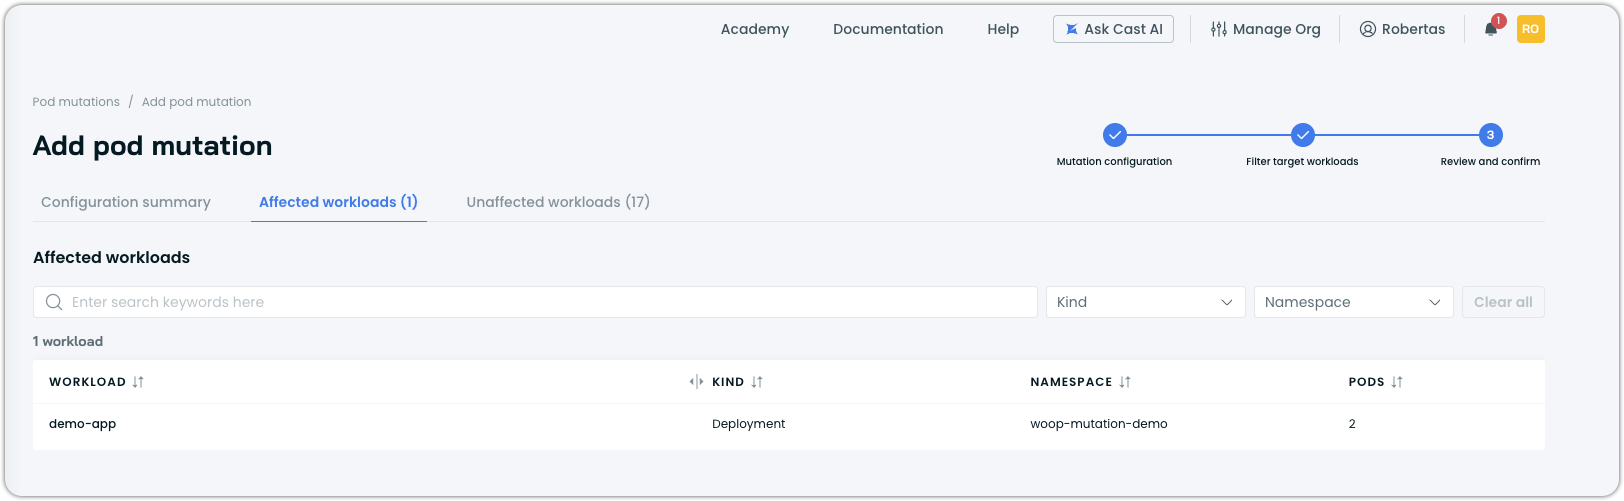
-
Click Create and confirm enablement.
At this point, the mutation will be enabled and active, but it will show that 0 pods are mutated. This is because we need to restart the pods, since mutations apply at creation time, while our deployment is already running.

Verify the mutation
Test that the mutation is correctly adding the custom workload label and Workload Autoscaler annotation to new pods.
-
Delete the existing pods to trigger recreation with the mutation applied:
kubectl delete pods -n woop-mutation-demo -l app=demo-app -
Wait for the new pods to be created:
kubectl get pods -n woop-mutation-demo -w -
Check that the new pods have the custom workload label:
kubectl get pods -n woop-mutation-demo -l app=demo-app -o jsonpath='{.items[0].metadata.labels.workloads\.cast\.ai/custom-workload}'Expected output:
demo-app -
Check that the pods have the Workload Autoscaler configuration annotation:
kubectl get pod -n woop-mutation-demo -l app=demo-app -o json | jq '.items[0].metadata.annotations["workloads.cast.ai/configuration"]'Expected output:
"vertical:\n optimization: on" -
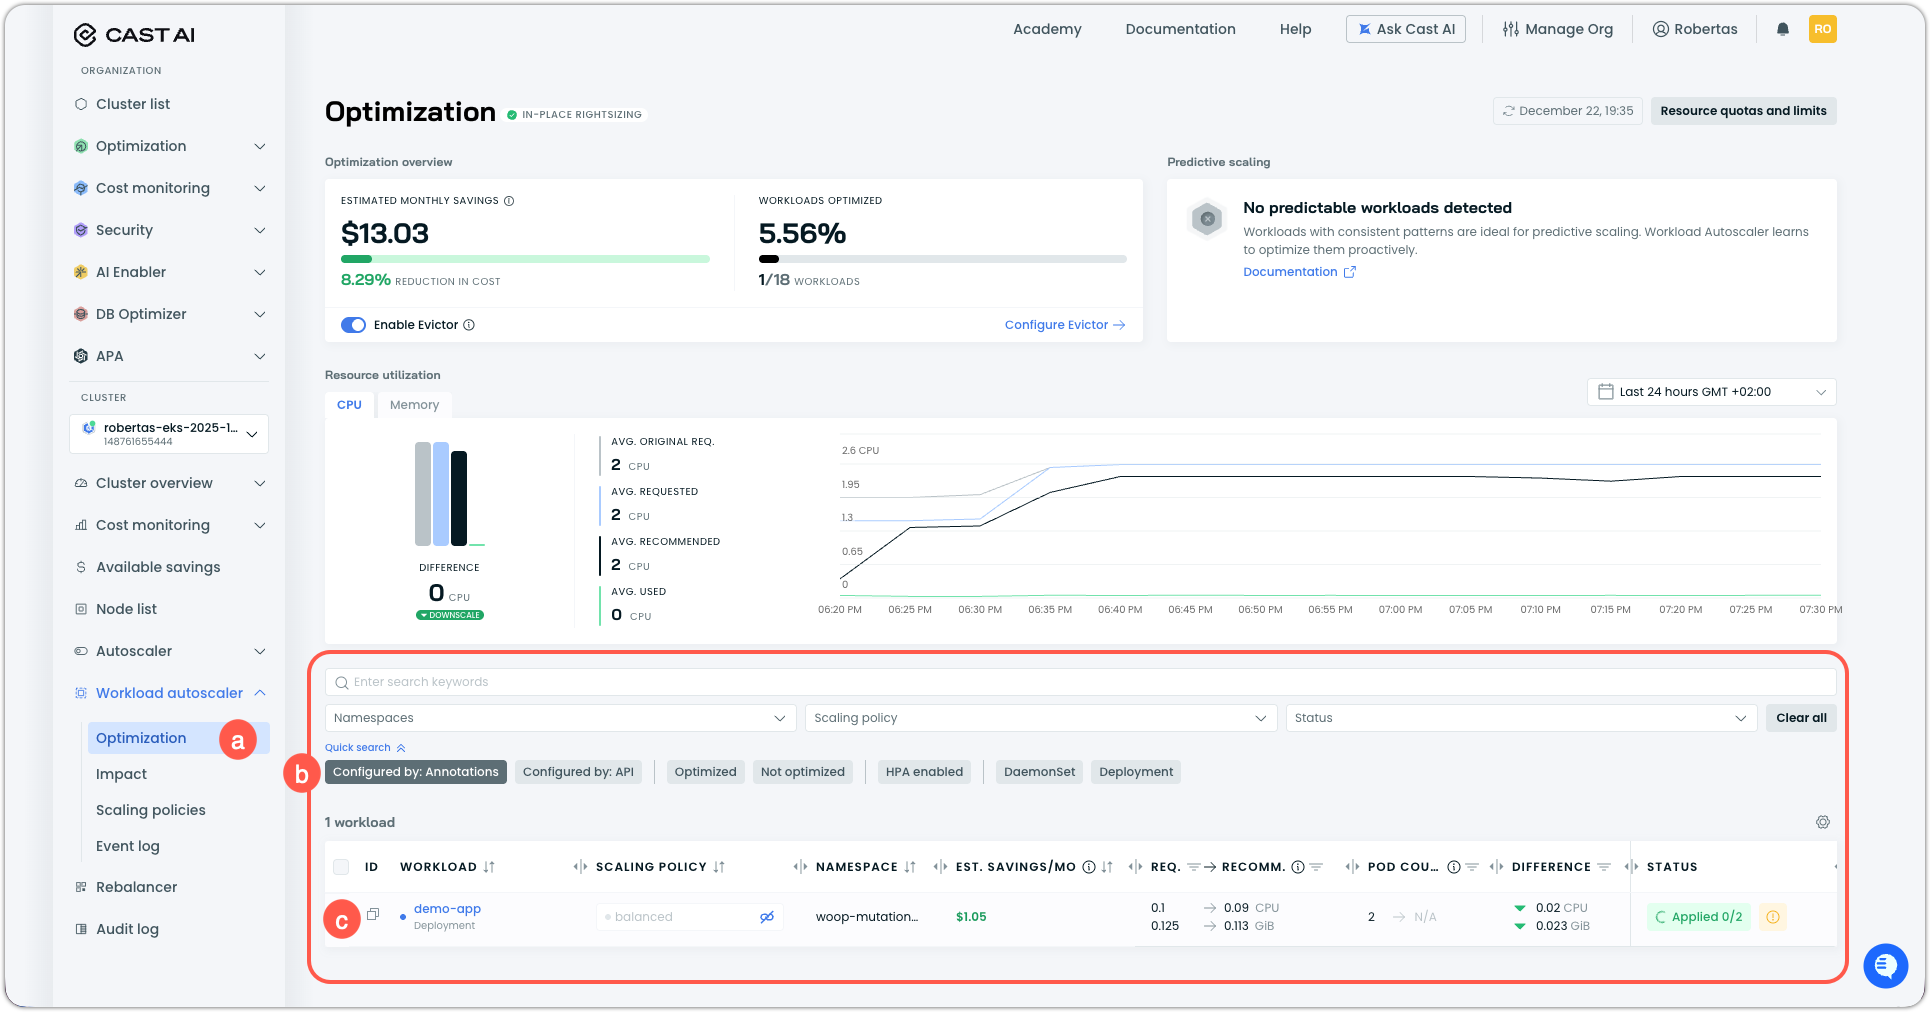
Verify in the Cast AI console that the workload appears in Workload Autoscaler as a custom workload:
a. Navigate to Workload Autoscaler → Optimization in the sidebar.
b. Find
demo-appin the workloads list. It will appear as a custom workload.c. Confirm the workload shows up as being optimized.
Clean up
Remove the test resources when you're done:
-
Delete the test namespace:
kubectl delete namespace woop-mutation-demo -
(Optional) Delete the mutation in the Cast AI console:
a. Navigate to Autoscaler → Pod mutations.
b. Click on
enable-workload-autoscaler.c. Click Delete mutation and confirm.
Summary
In this tutorial, you learned how to:
- Create a pod mutation using JSON patch to register pods as custom workloads and enable Workload Autoscaler
- Use namespace and label filters to target specific workloads
- Verify that new pods receive the configuration and appear in Workload Autoscaler
This approach enables you to roll out Workload Autoscaler across your cluster without modifying application manifests, using the custom workloads feature to work around the controller-level configuration requirement.
Mutation reference
After creating the mutation, it exists as a PodMutation custom resource in your cluster. Below is the YAML representation for reference.
PodMutation YAML
apiVersion: pod-mutations.cast.ai/v1
kind: PodMutation
metadata:
  annotations:
    pod-mutations.cast.ai/pod-mutation-id: 5c9e70fb-a9bc-4237-b2e1-6ca6467dd61d
    pod-mutations.cast.ai/pod-mutation-name: enable-workload-autoscaler
    pod-mutations.cast.ai/pod-mutation-source: api
  creationTimestamp: "2025-12-22T16:44:34Z"
  generation: 2
  name: api-mutation-5c9e70fb-a9bc-4237-b2e1-6ca6467dd61d
  resourceVersion: "19682"
  uid: 4d605ae7-400f-4c61-9361-101858dfb89a
spec:
  filter:
    pod: {}
    workload: {}
  filterV2:
    pod:
      excludeLabels: {}
      labels:
        matchers:
        - keyMatcher:
            type: exact
            value: enable-autoscaling
          valueMatcher:
            type: exact
            value: "true"
        operator: or
    workload:
      namespaces:
      - type: exact
        value: woop-mutation-demo
  patchesV2:
  - operations:
    - op: add
      path: /metadata/labels/workloads.cast.ai~1custom-workload
      value: demo-app
    - op: add
      path: /metadata/annotations/workloads.cast.ai~1configuration
      value: |-
        vertical:
          optimization: on
  restartPolicy: deferred
  spotConfig: {}
Next steps
- Custom workload support — Learn more about custom workloads and their configuration options
- Workload Autoscaler annotations reference — Complete reference for all annotation configuration options
- Pod mutations reference — Complete CRD specification and configuration options