

Azure AD: Set up IdP user group sync
This guide walks you through setting up automated group synchronization between Microsoft Entra ID (Azure AD) and Cast AI. The process involves configuration steps in both Cast AI and the Microsoft Entra console.
Before you begin
Ensure that:
- You have an existing SSO connection between Azure AD and Cast AI configured and working. If you haven't set this up yet, see Setting up SSO with Azure AD
- You have administrative access to your Microsoft Entra ID (Azure AD) tenant, including the ability to create and configure Enterprise Applications
- You have the Owner role in your Cast AI organization
- You've identified which Azure AD groups should be synchronized to Cast AI
Azure AD licensing requirementA paid Azure AD (Entra ID) plan — such as Microsoft Entra ID P1 or P2 — is required to sync only specific groups rather than all users and groups in your directory. Without a paid plan, you can still configure provisioning, but you will not be able to selectively assign groups to the application.
NoteThis setup requires coordination between Cast AI console configuration and Microsoft Entra console changes. Plan to complete both parts in the same session.
Part 1: Enable group sync in Cast AI
Step 1: Navigate to SSO settings
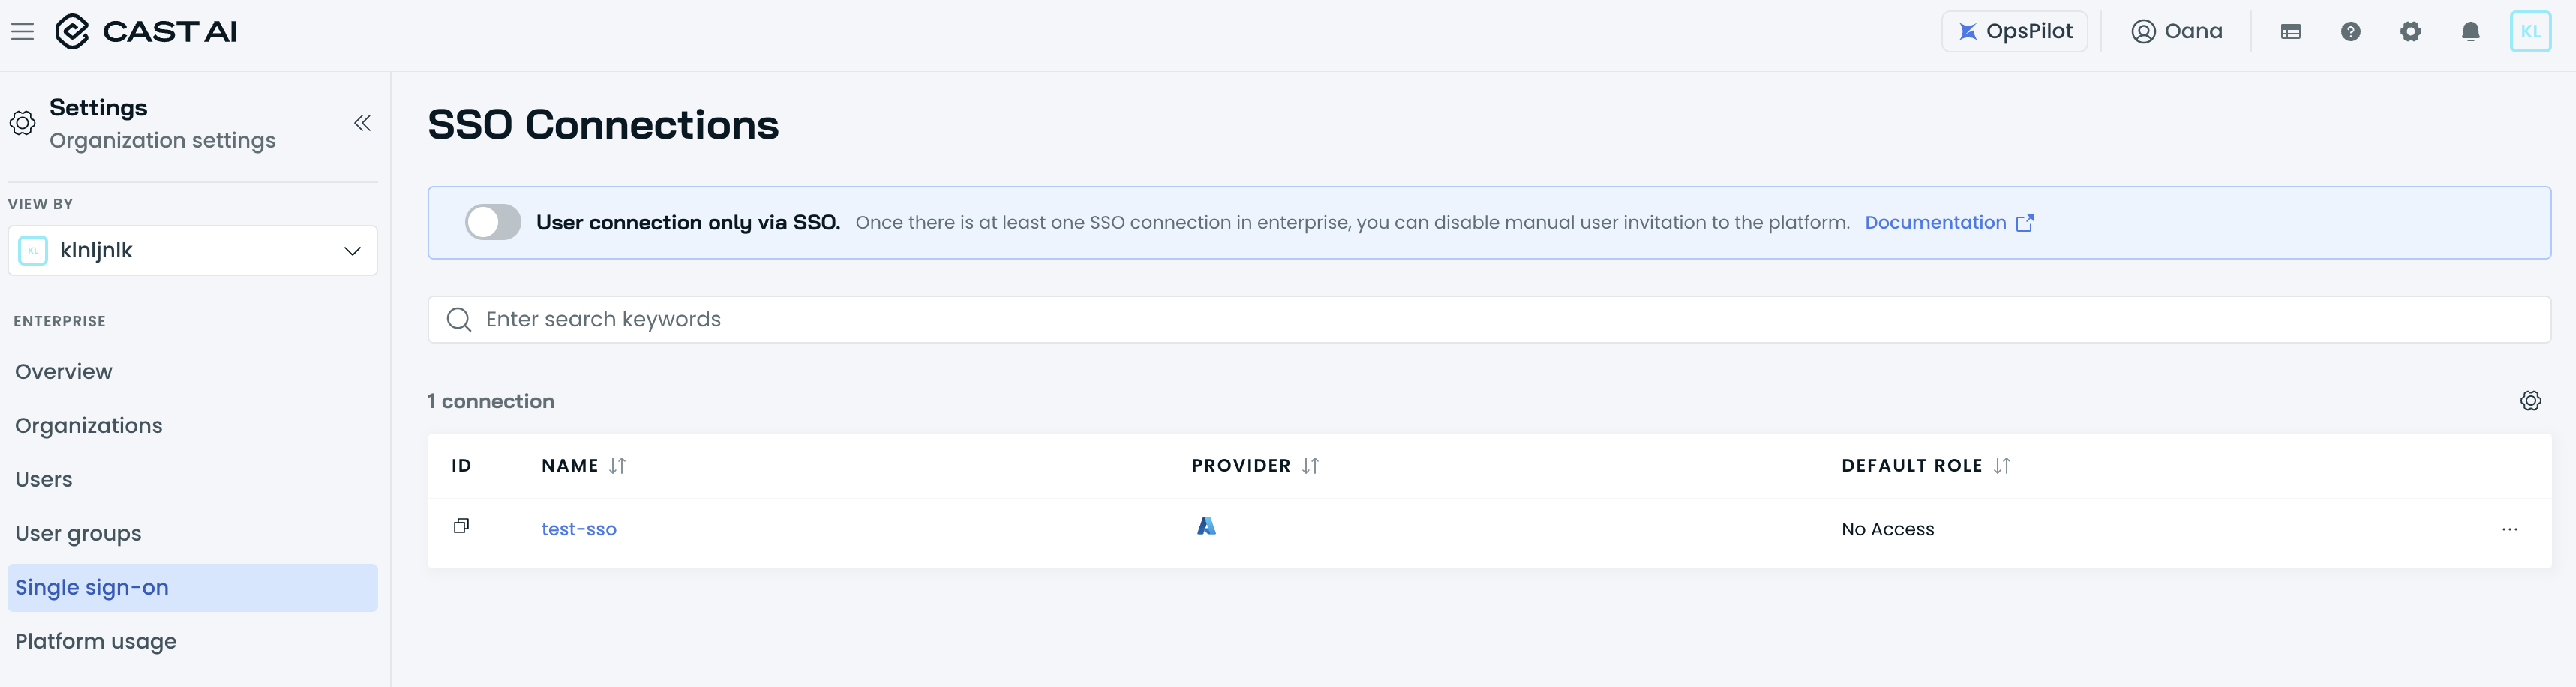
- In the Cast AI console, go to Organization settings
- Navigate to Access control > Single sign-on in the left sidebar
- Locate your existing Azure connection in the table
Step 2: Enable synchronization
- Click your Azure AD connection, then check the Synchronize user groups from the IAM system to Cast AI box in the drawer that opens to enable sync
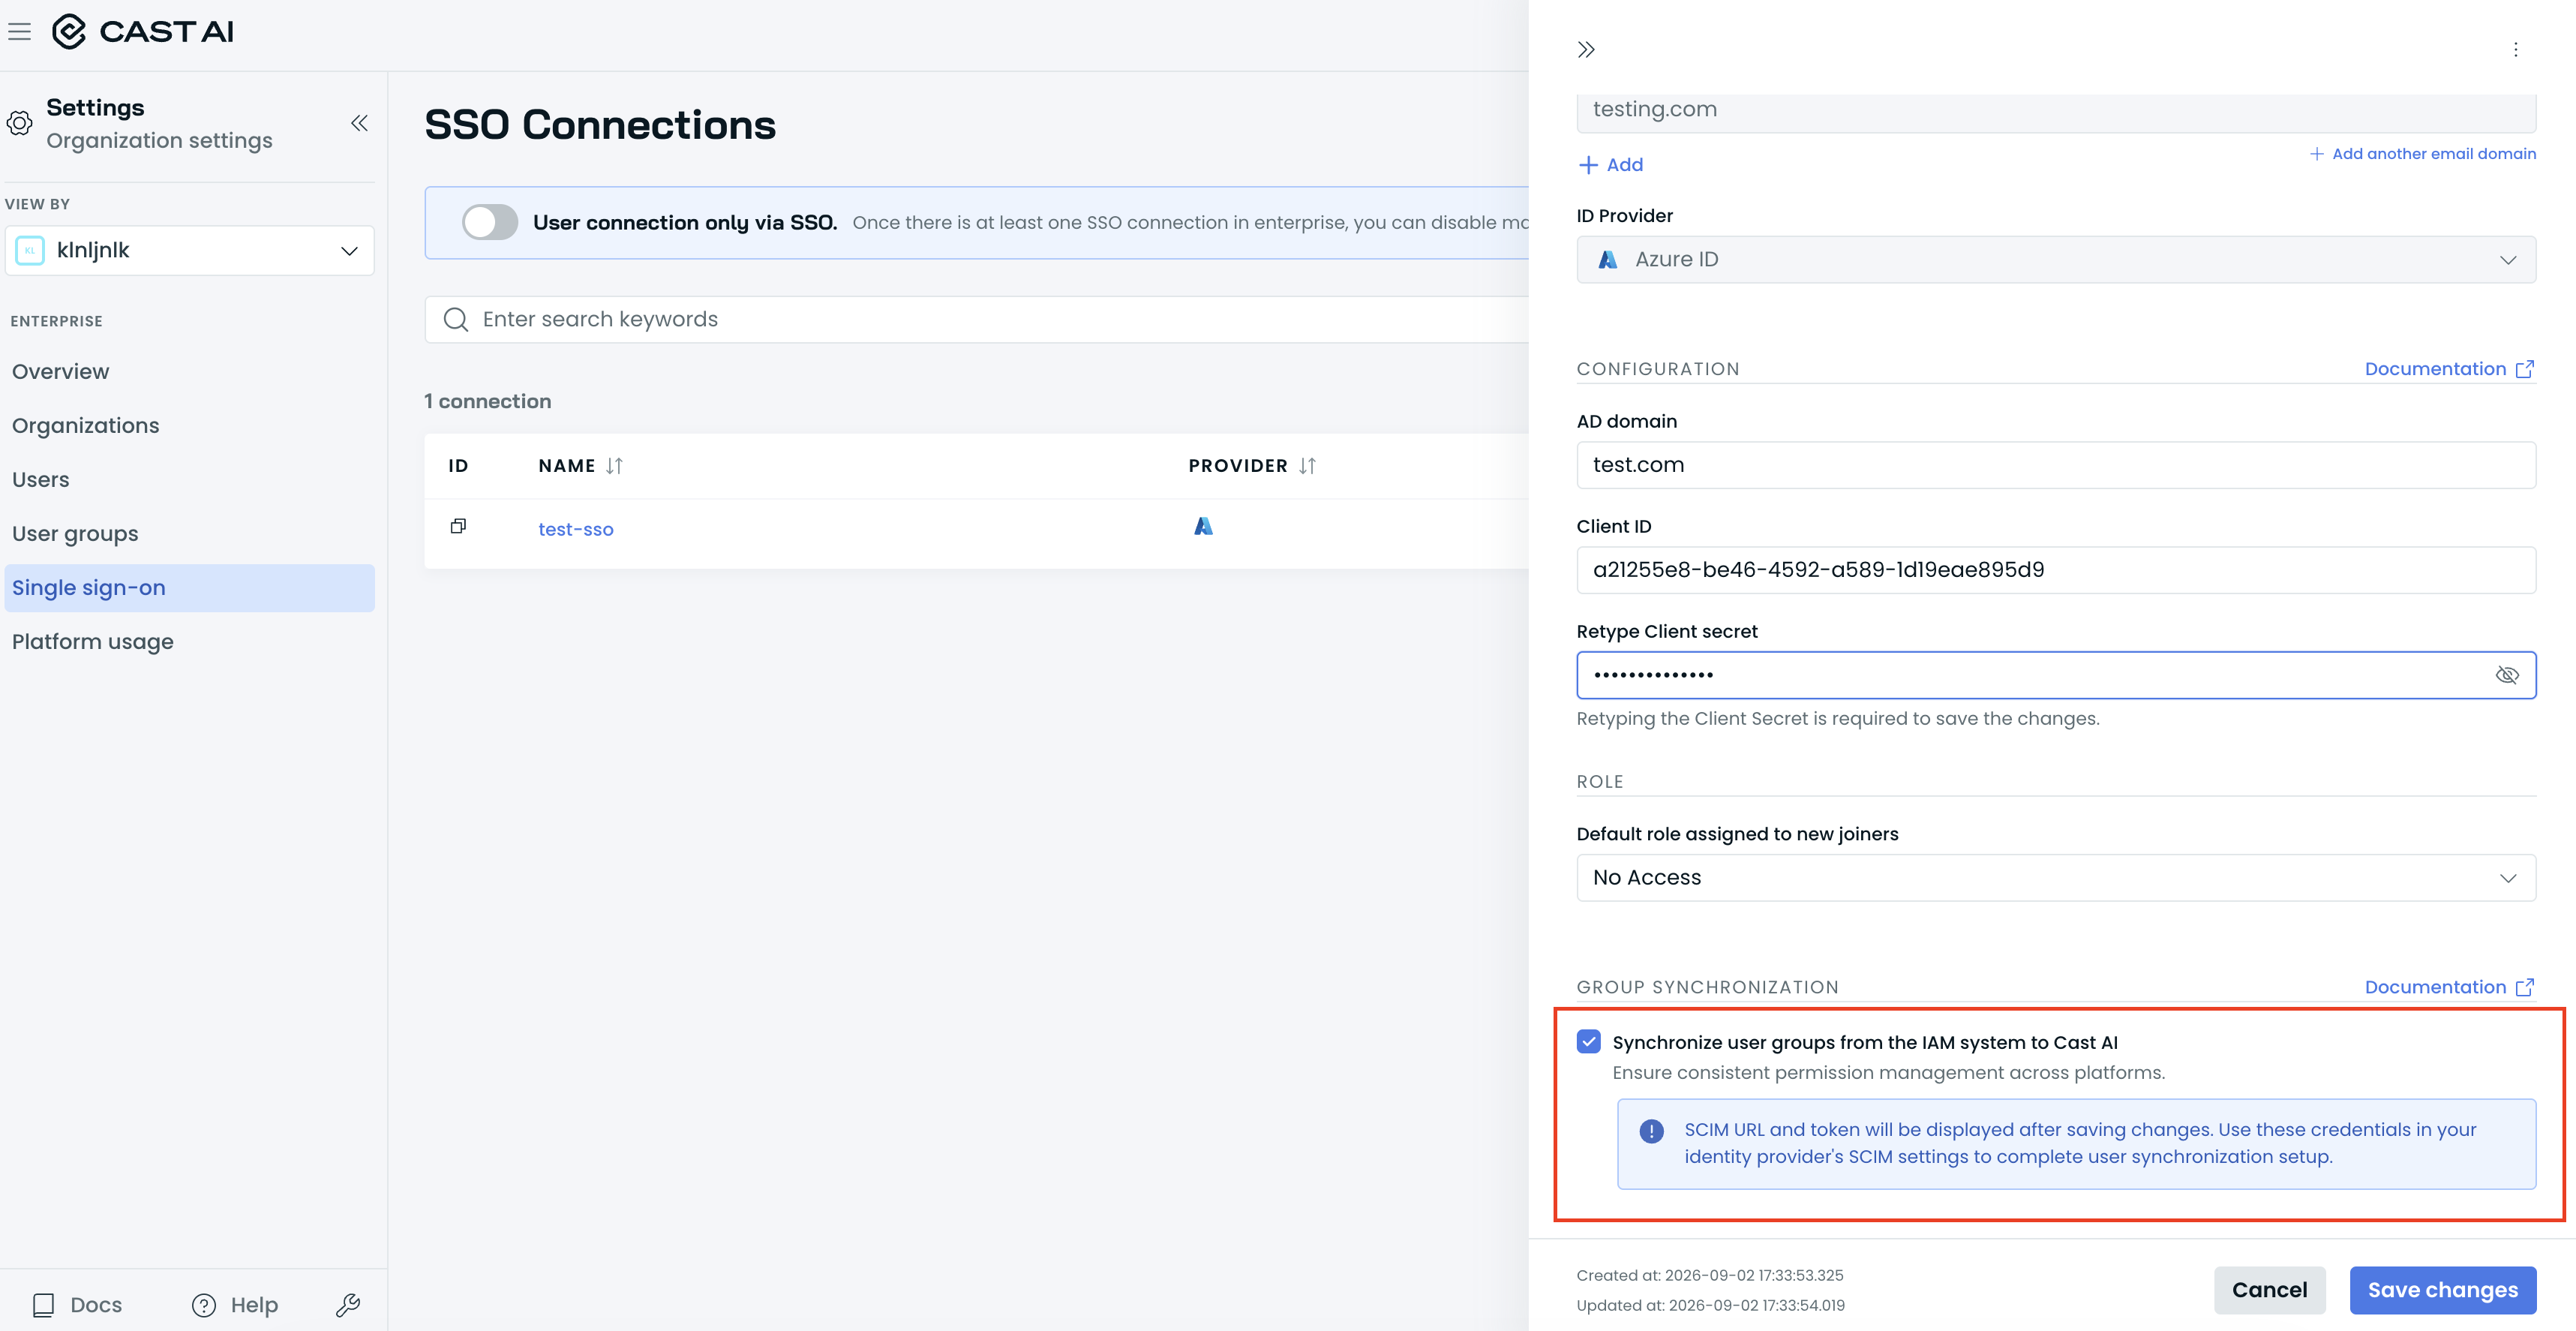
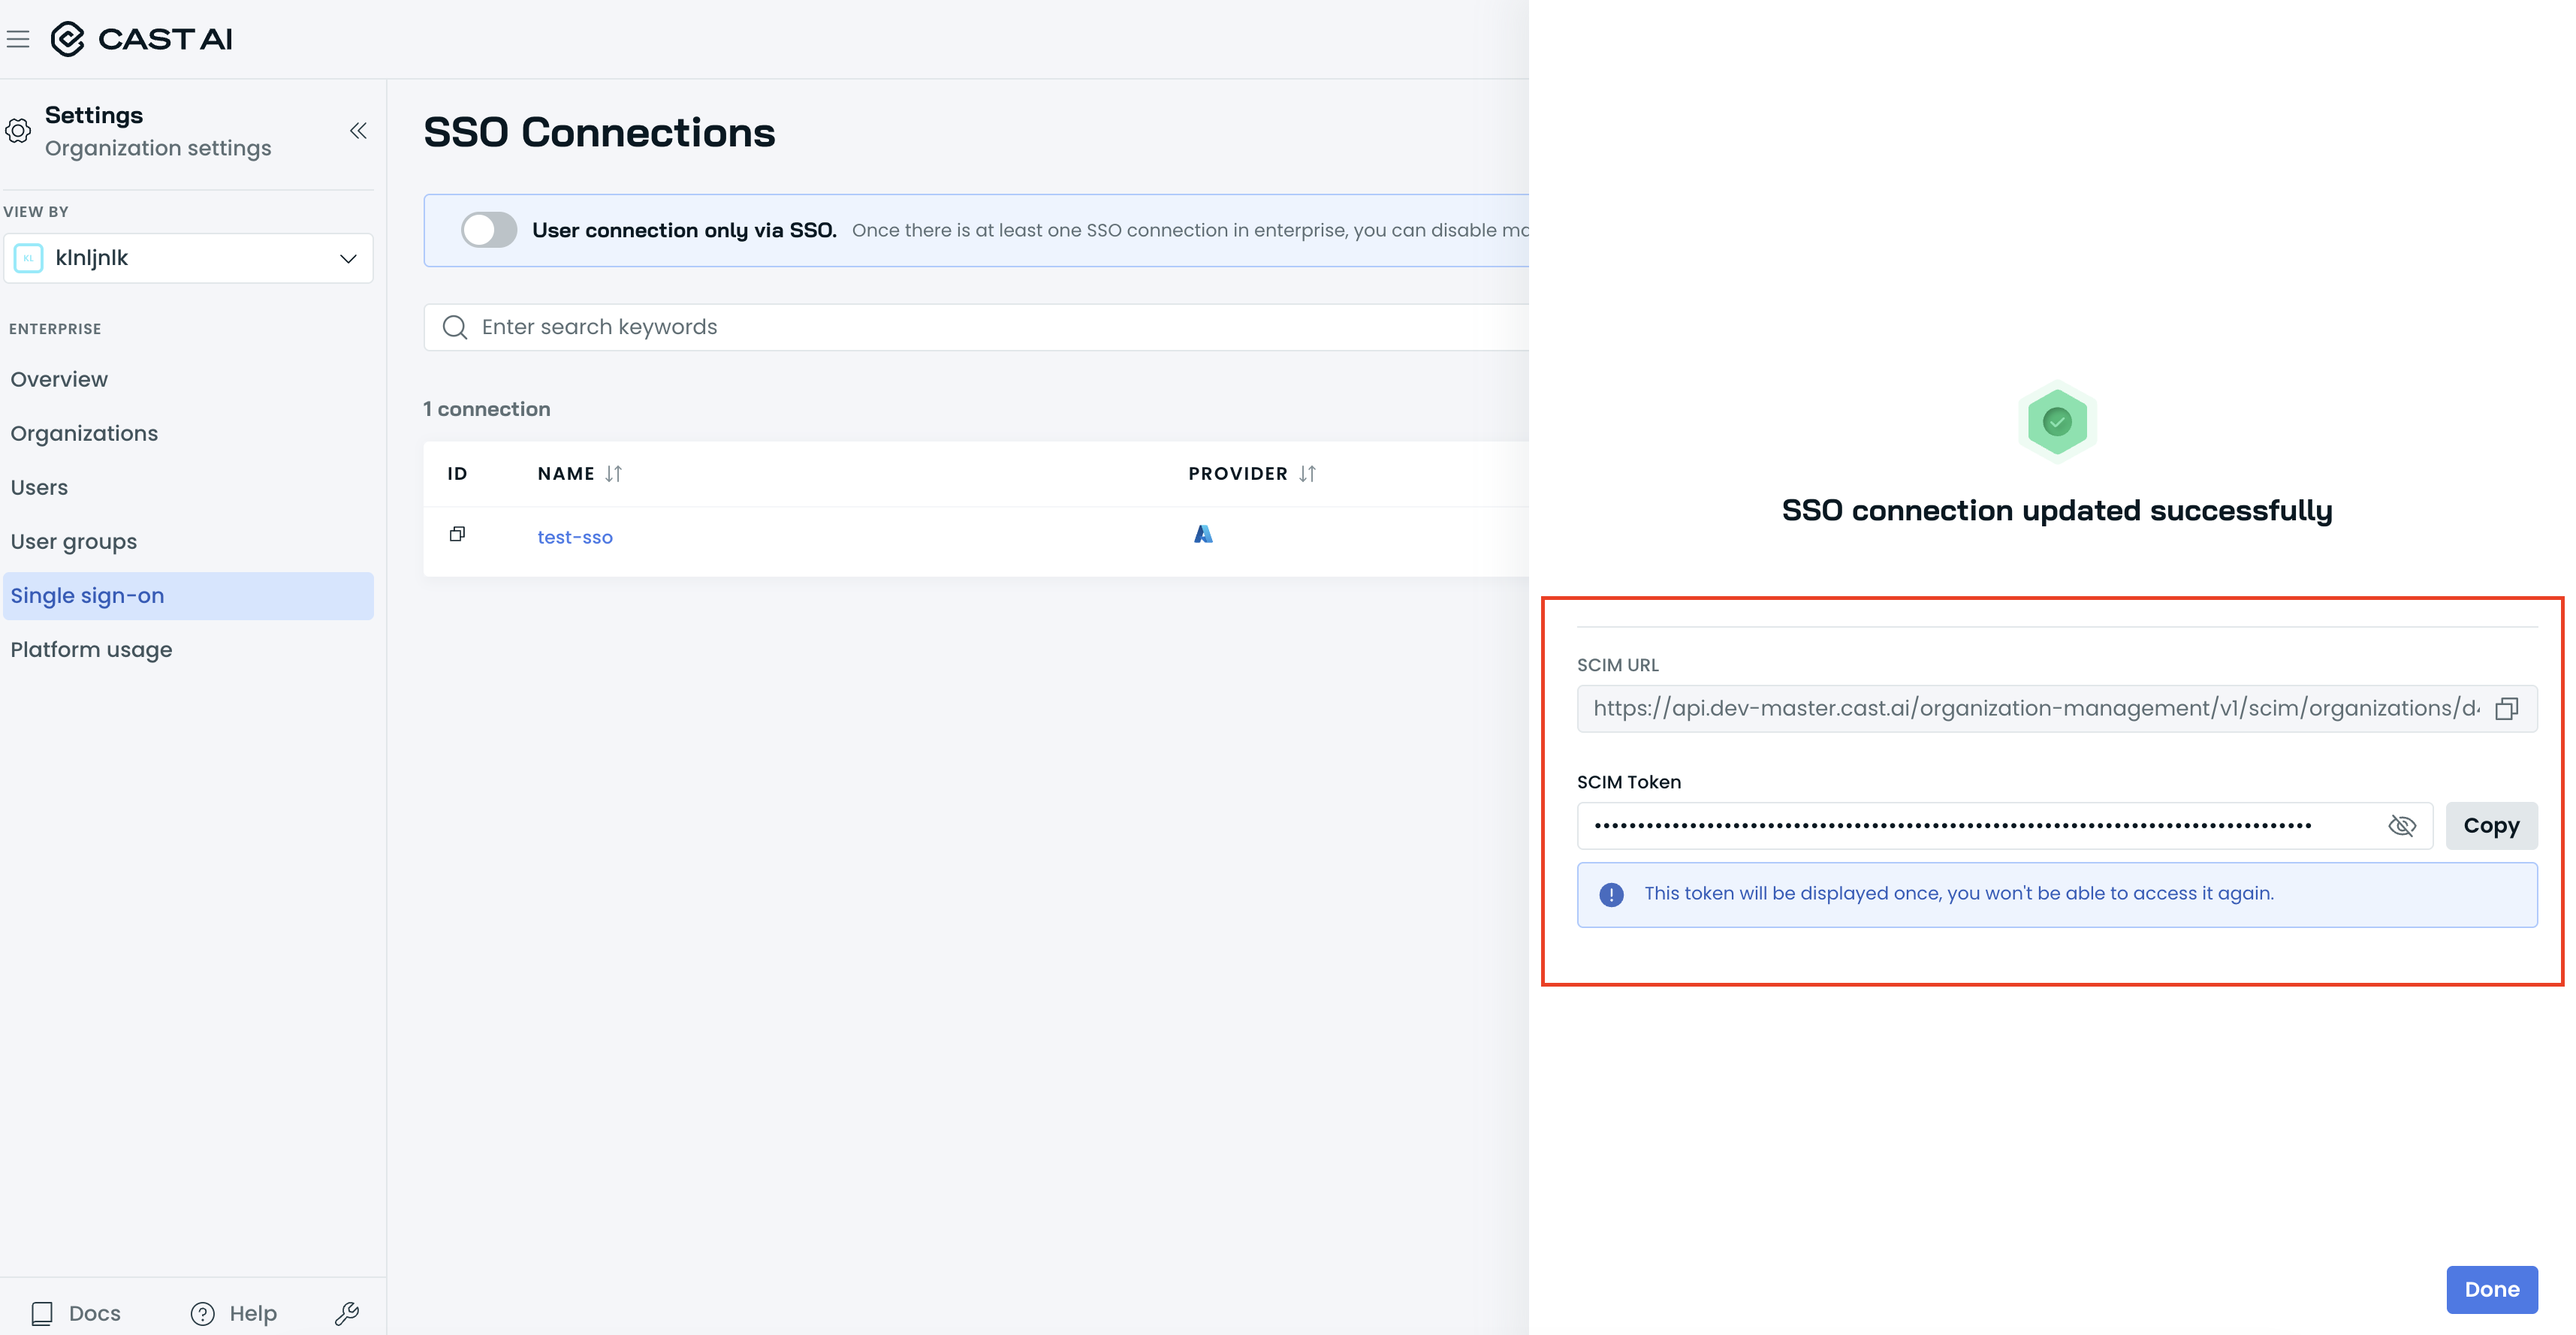
- Cast AI will generate an SCIM endpoint URL and bearer token for your organization once you press the Save changes button
- Copy and save both the URL and token – you'll need these for Azure AD configuration
Part 2: Configure SCIM provisioning in Microsoft Entra ID
Step 1: Create an Enterprise Application
- Sign in to the Microsoft Entra admin center as an administrator
- Navigate to Applications > Enterprise applications
- Click New application
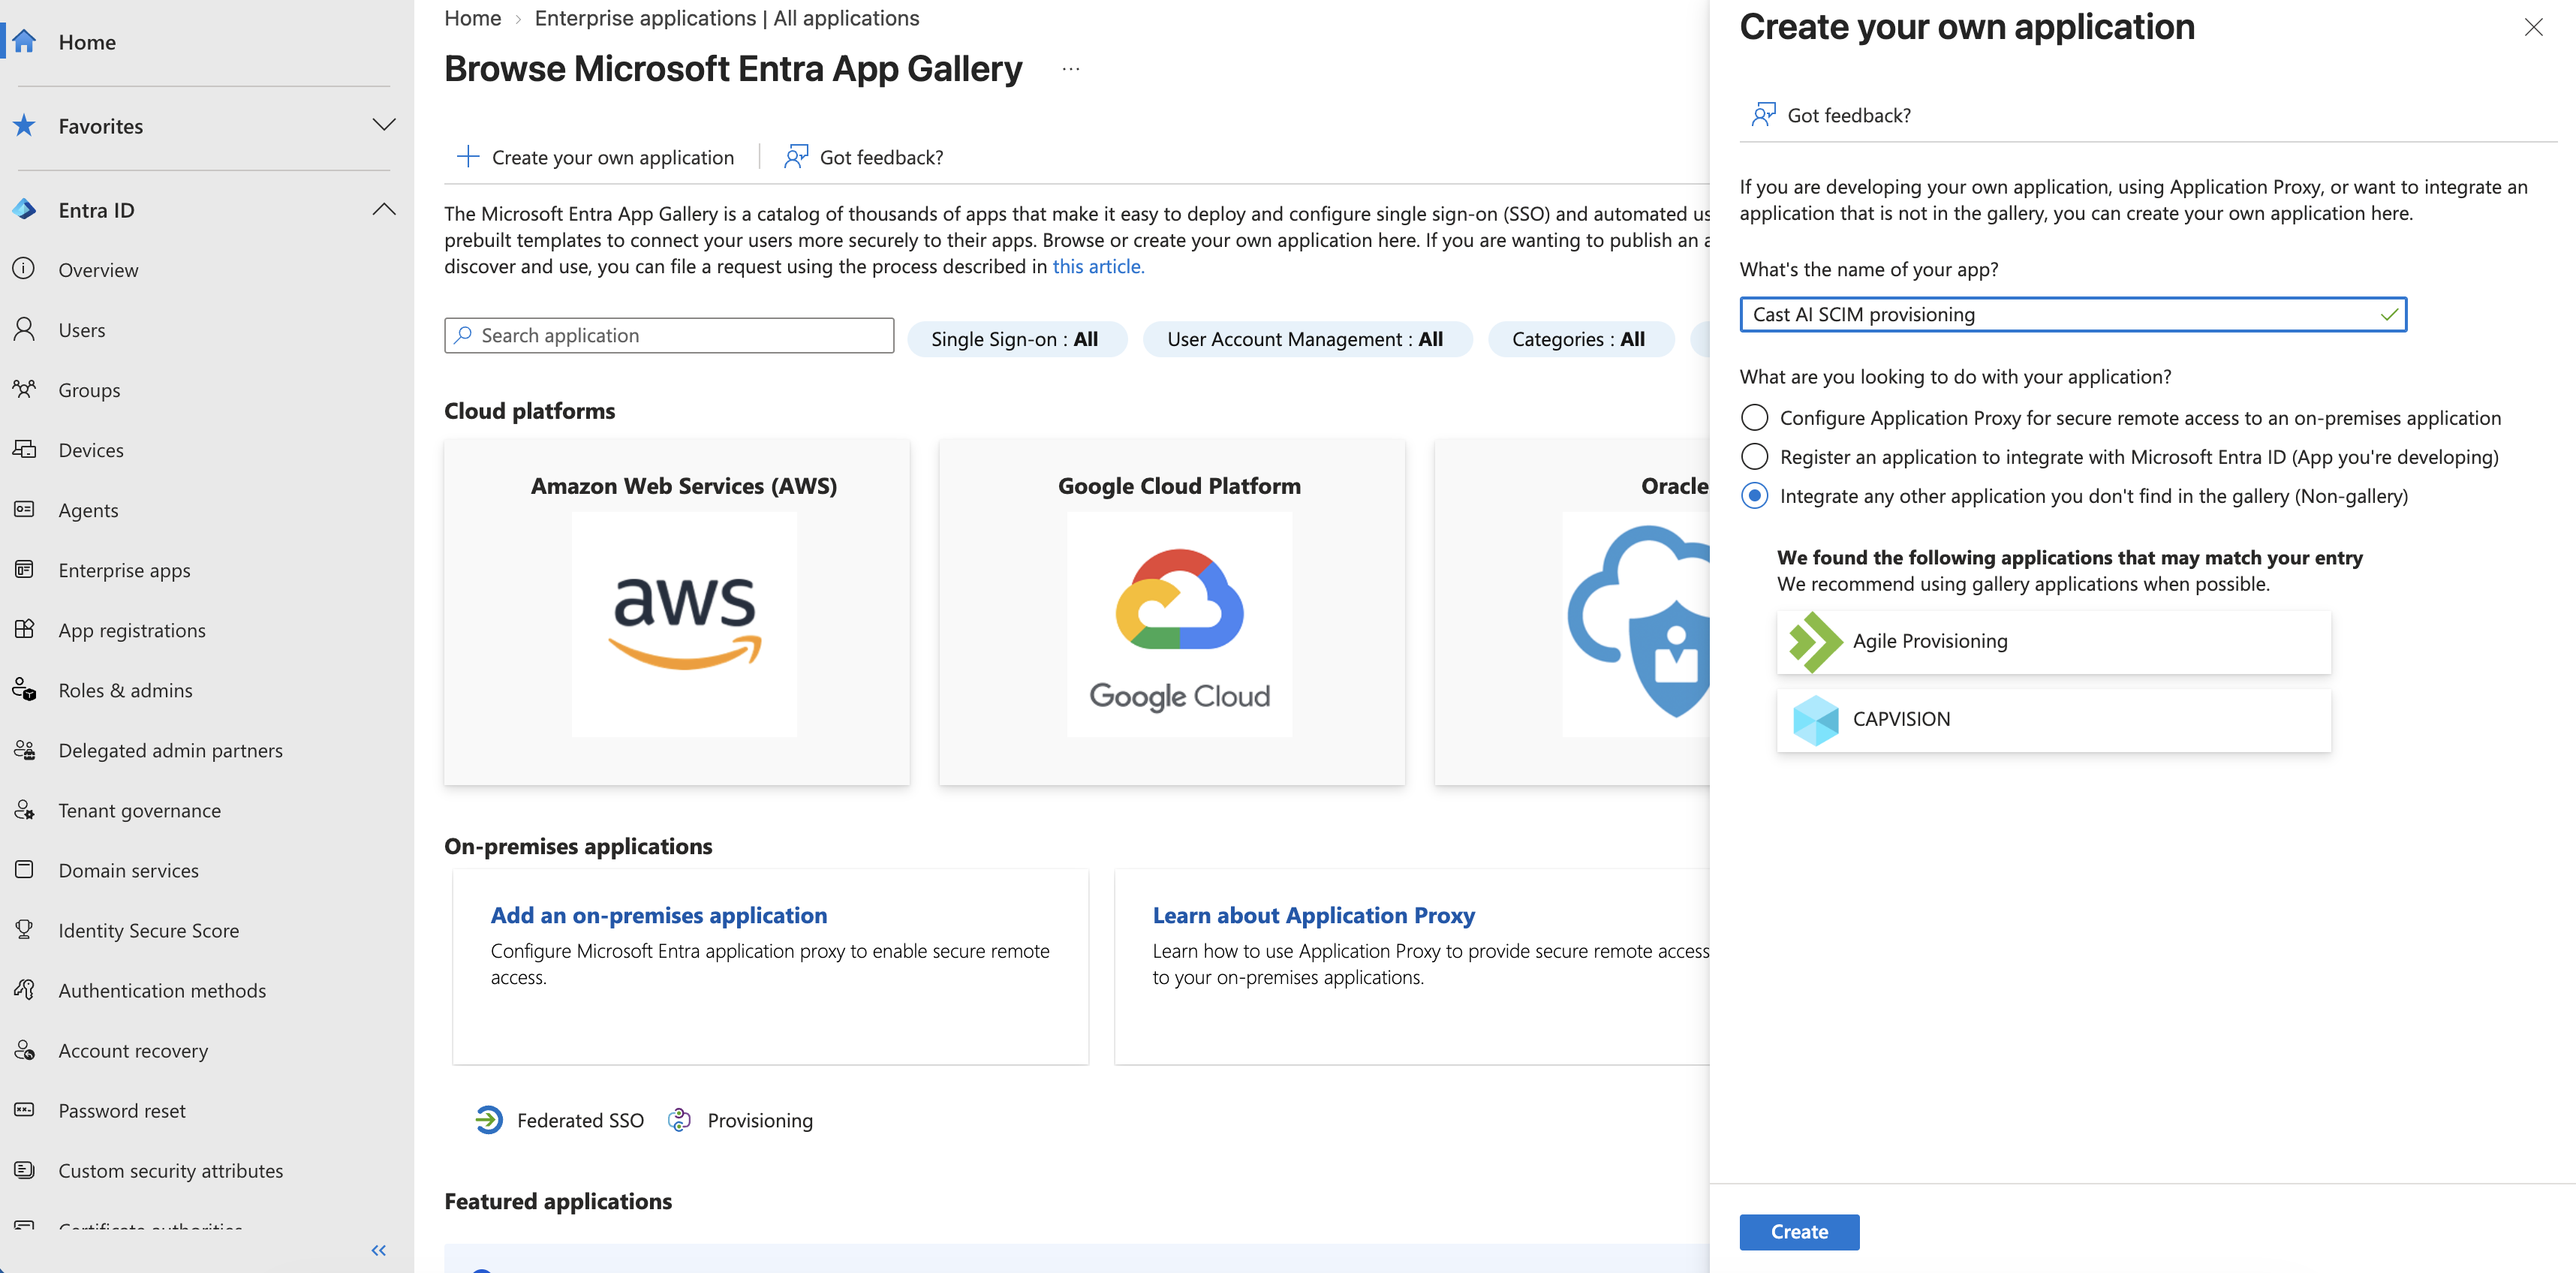
- Click Create your own application
- Give the application a descriptive name (e.g., "Cast AI SCIM Sync" or "Cast AI Group Provisioning") to help other administrators identify its purpose
- Under What are you looking to do with your application?, select Integrate any other application you don't find in the gallery (Non-gallery)
- Click Create
NoteUse a descriptive name rather than the default. This prevents accidental deletion by other administrators who may not recognize a generic application name.
Step 2: Configure provisioning credentials
- In your newly created Enterprise Application, click Provisioning in the left sidebar
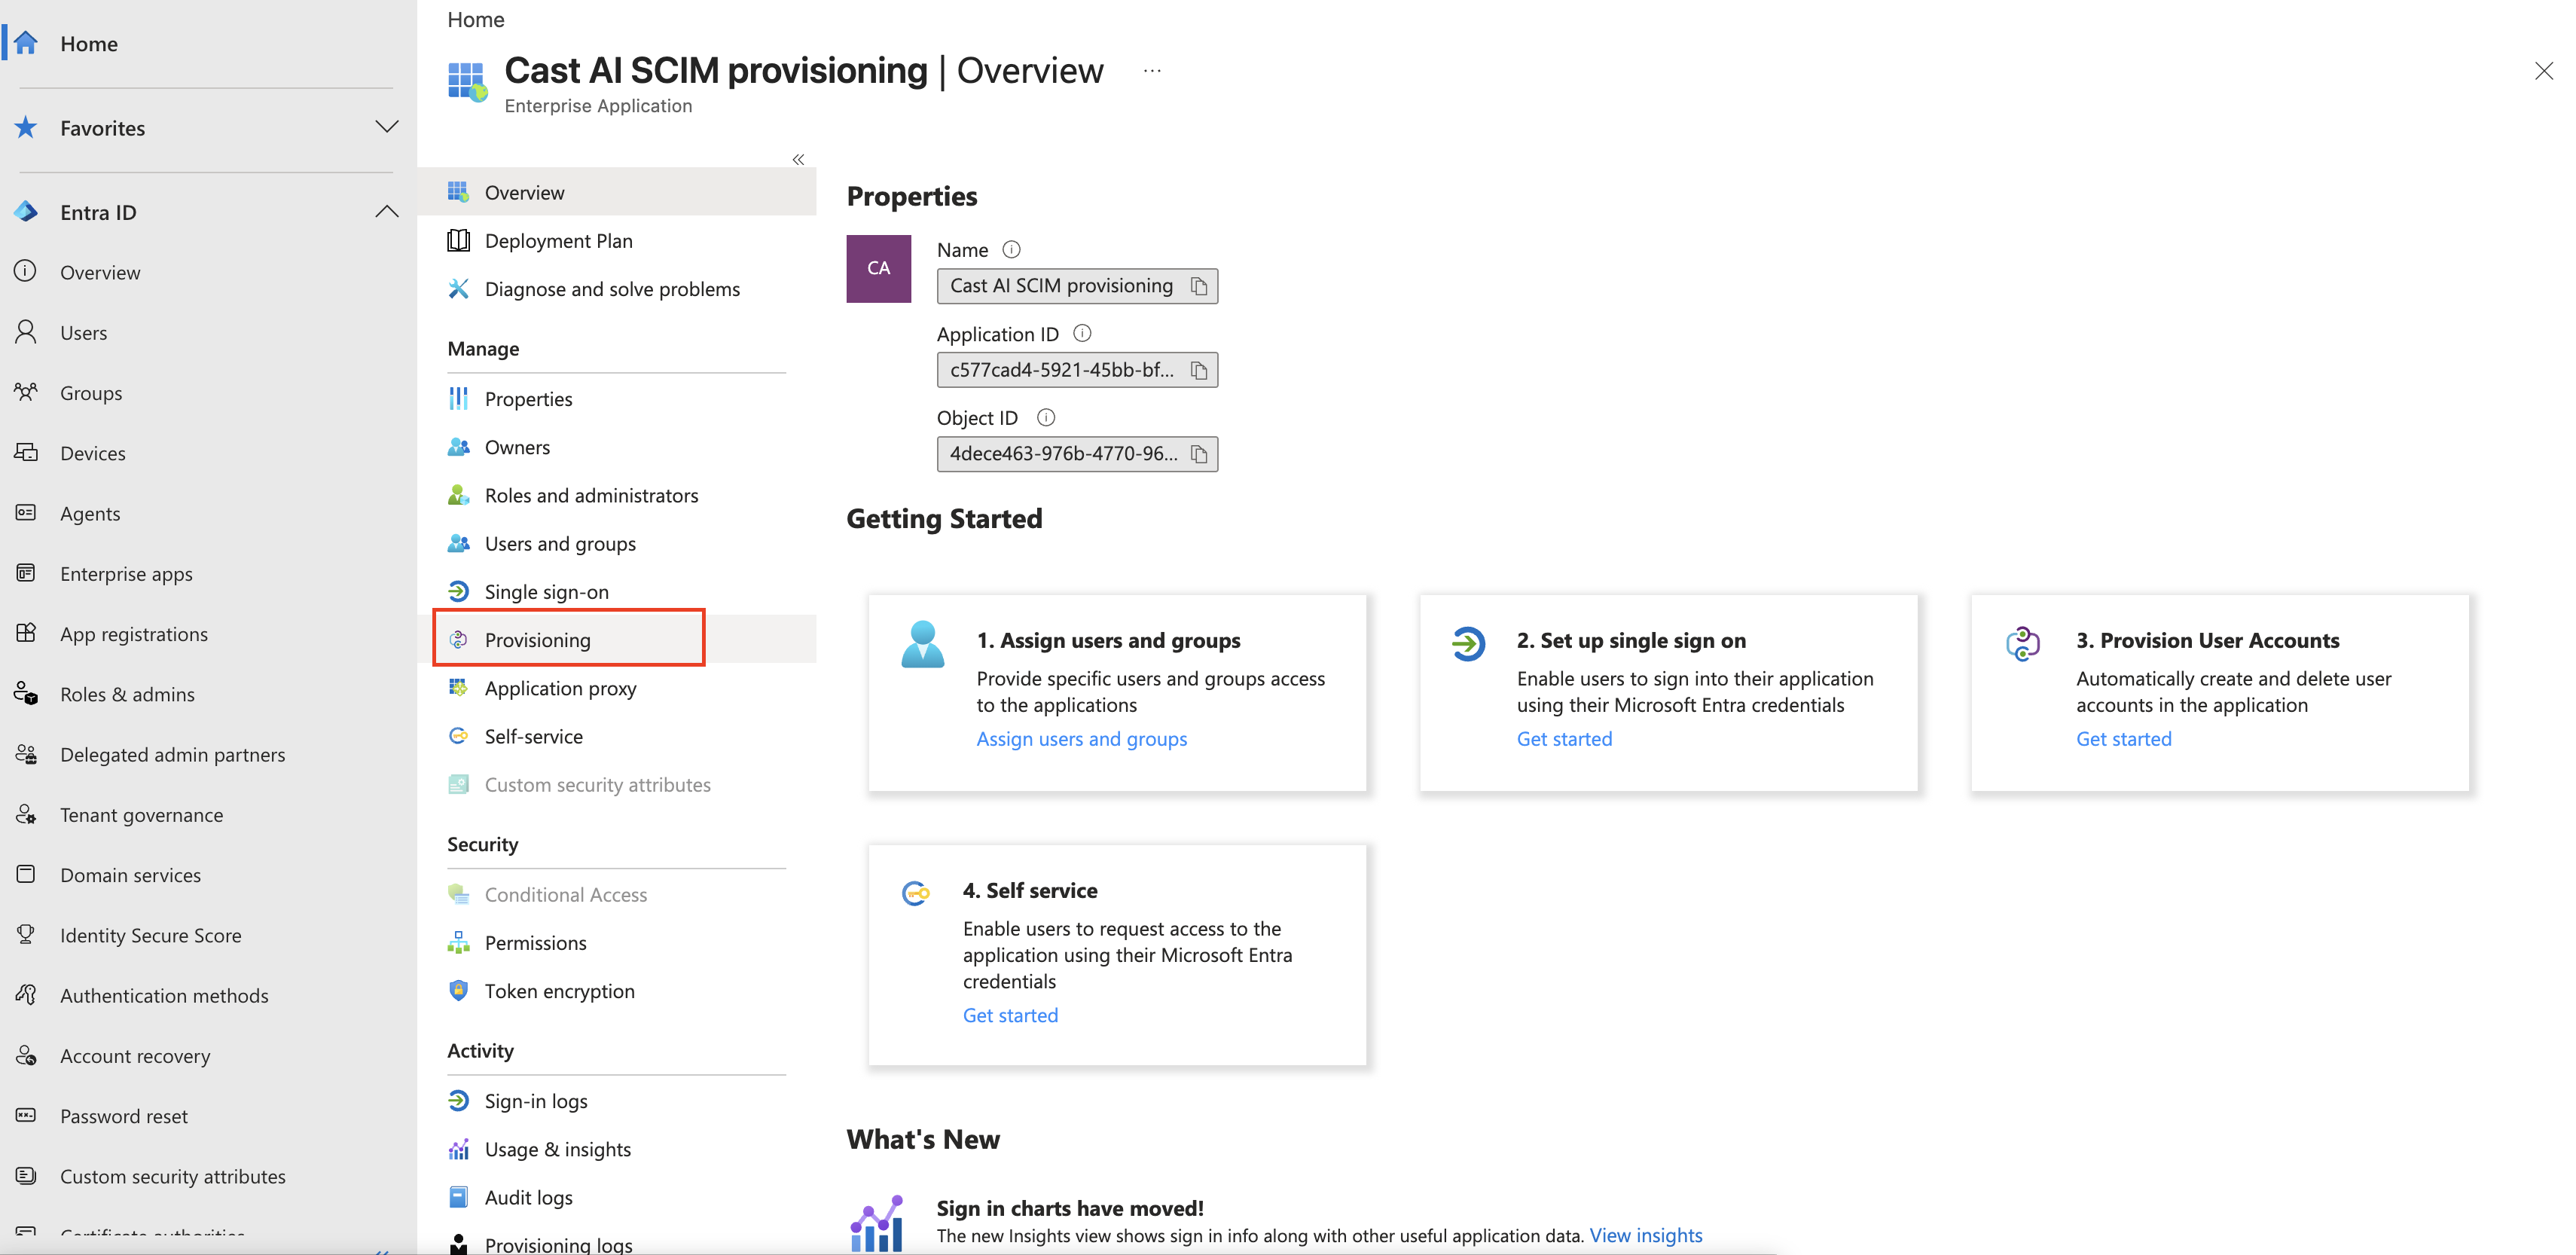
- On the new view, click the New Configuration button
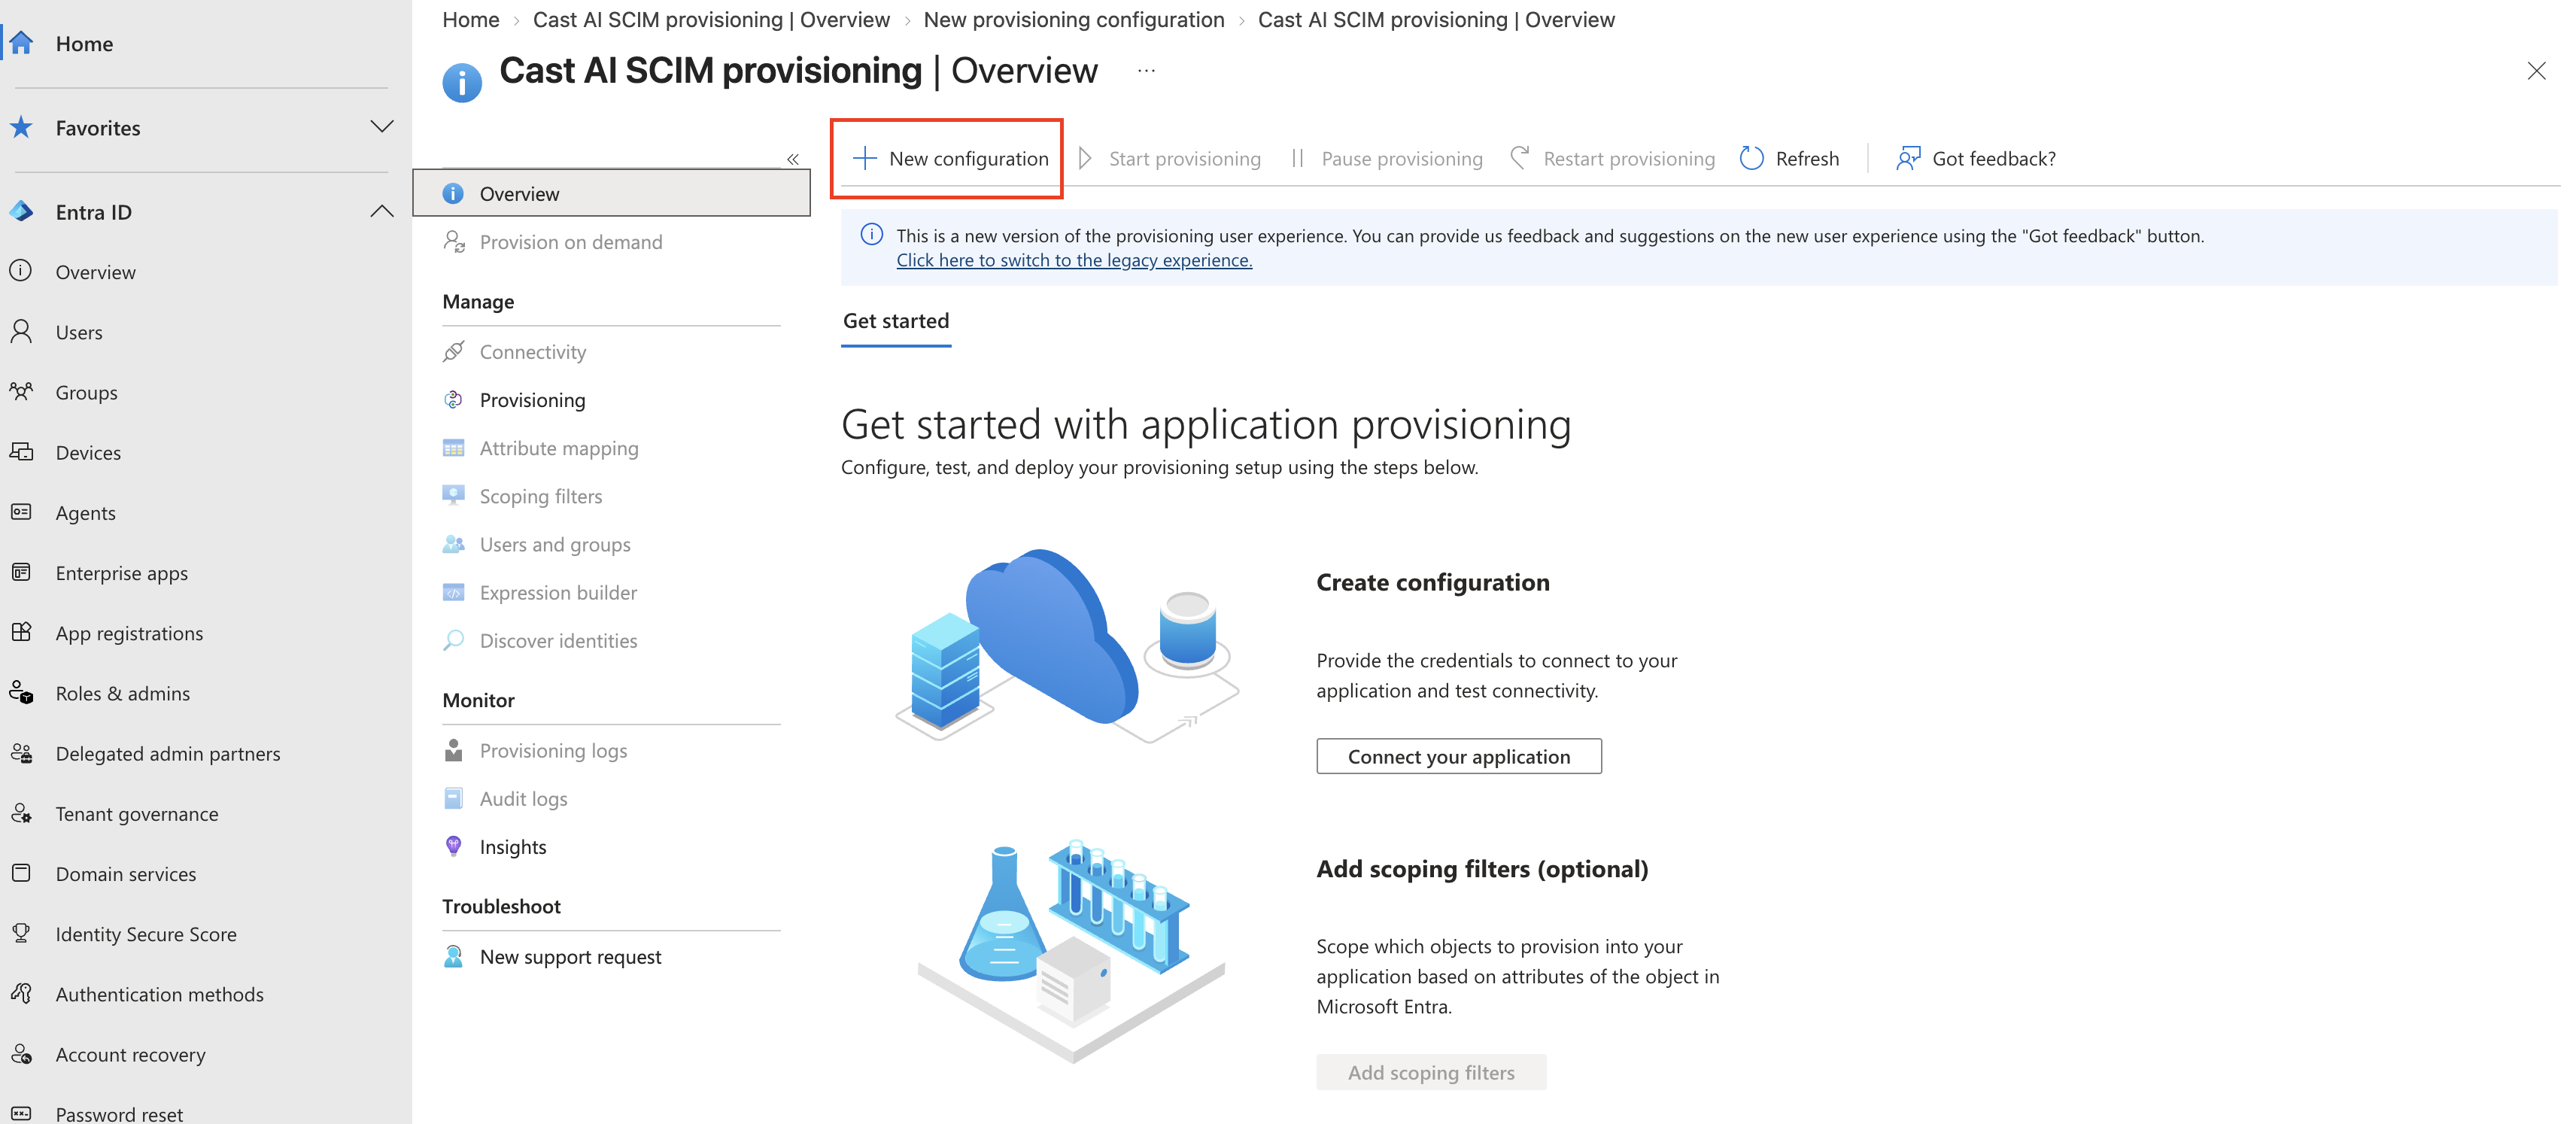
- Under Admin Credentials, enter the following:
- Tenant URL: Paste the SCIM URL from Cast AI
- Secret Token: Paste the bearer token from Cast AI
- Click Test Connection to verify that Microsoft Entra ID can reach the Cast AI SCIM endpoint
ImportantIf the test connection fails, verify that:
- The Tenant URL exactly matches the SCIM endpoint from Cast AI
- The Secret Token exactly matches the bearer token from Cast AI
- After the connection is validated, click Create
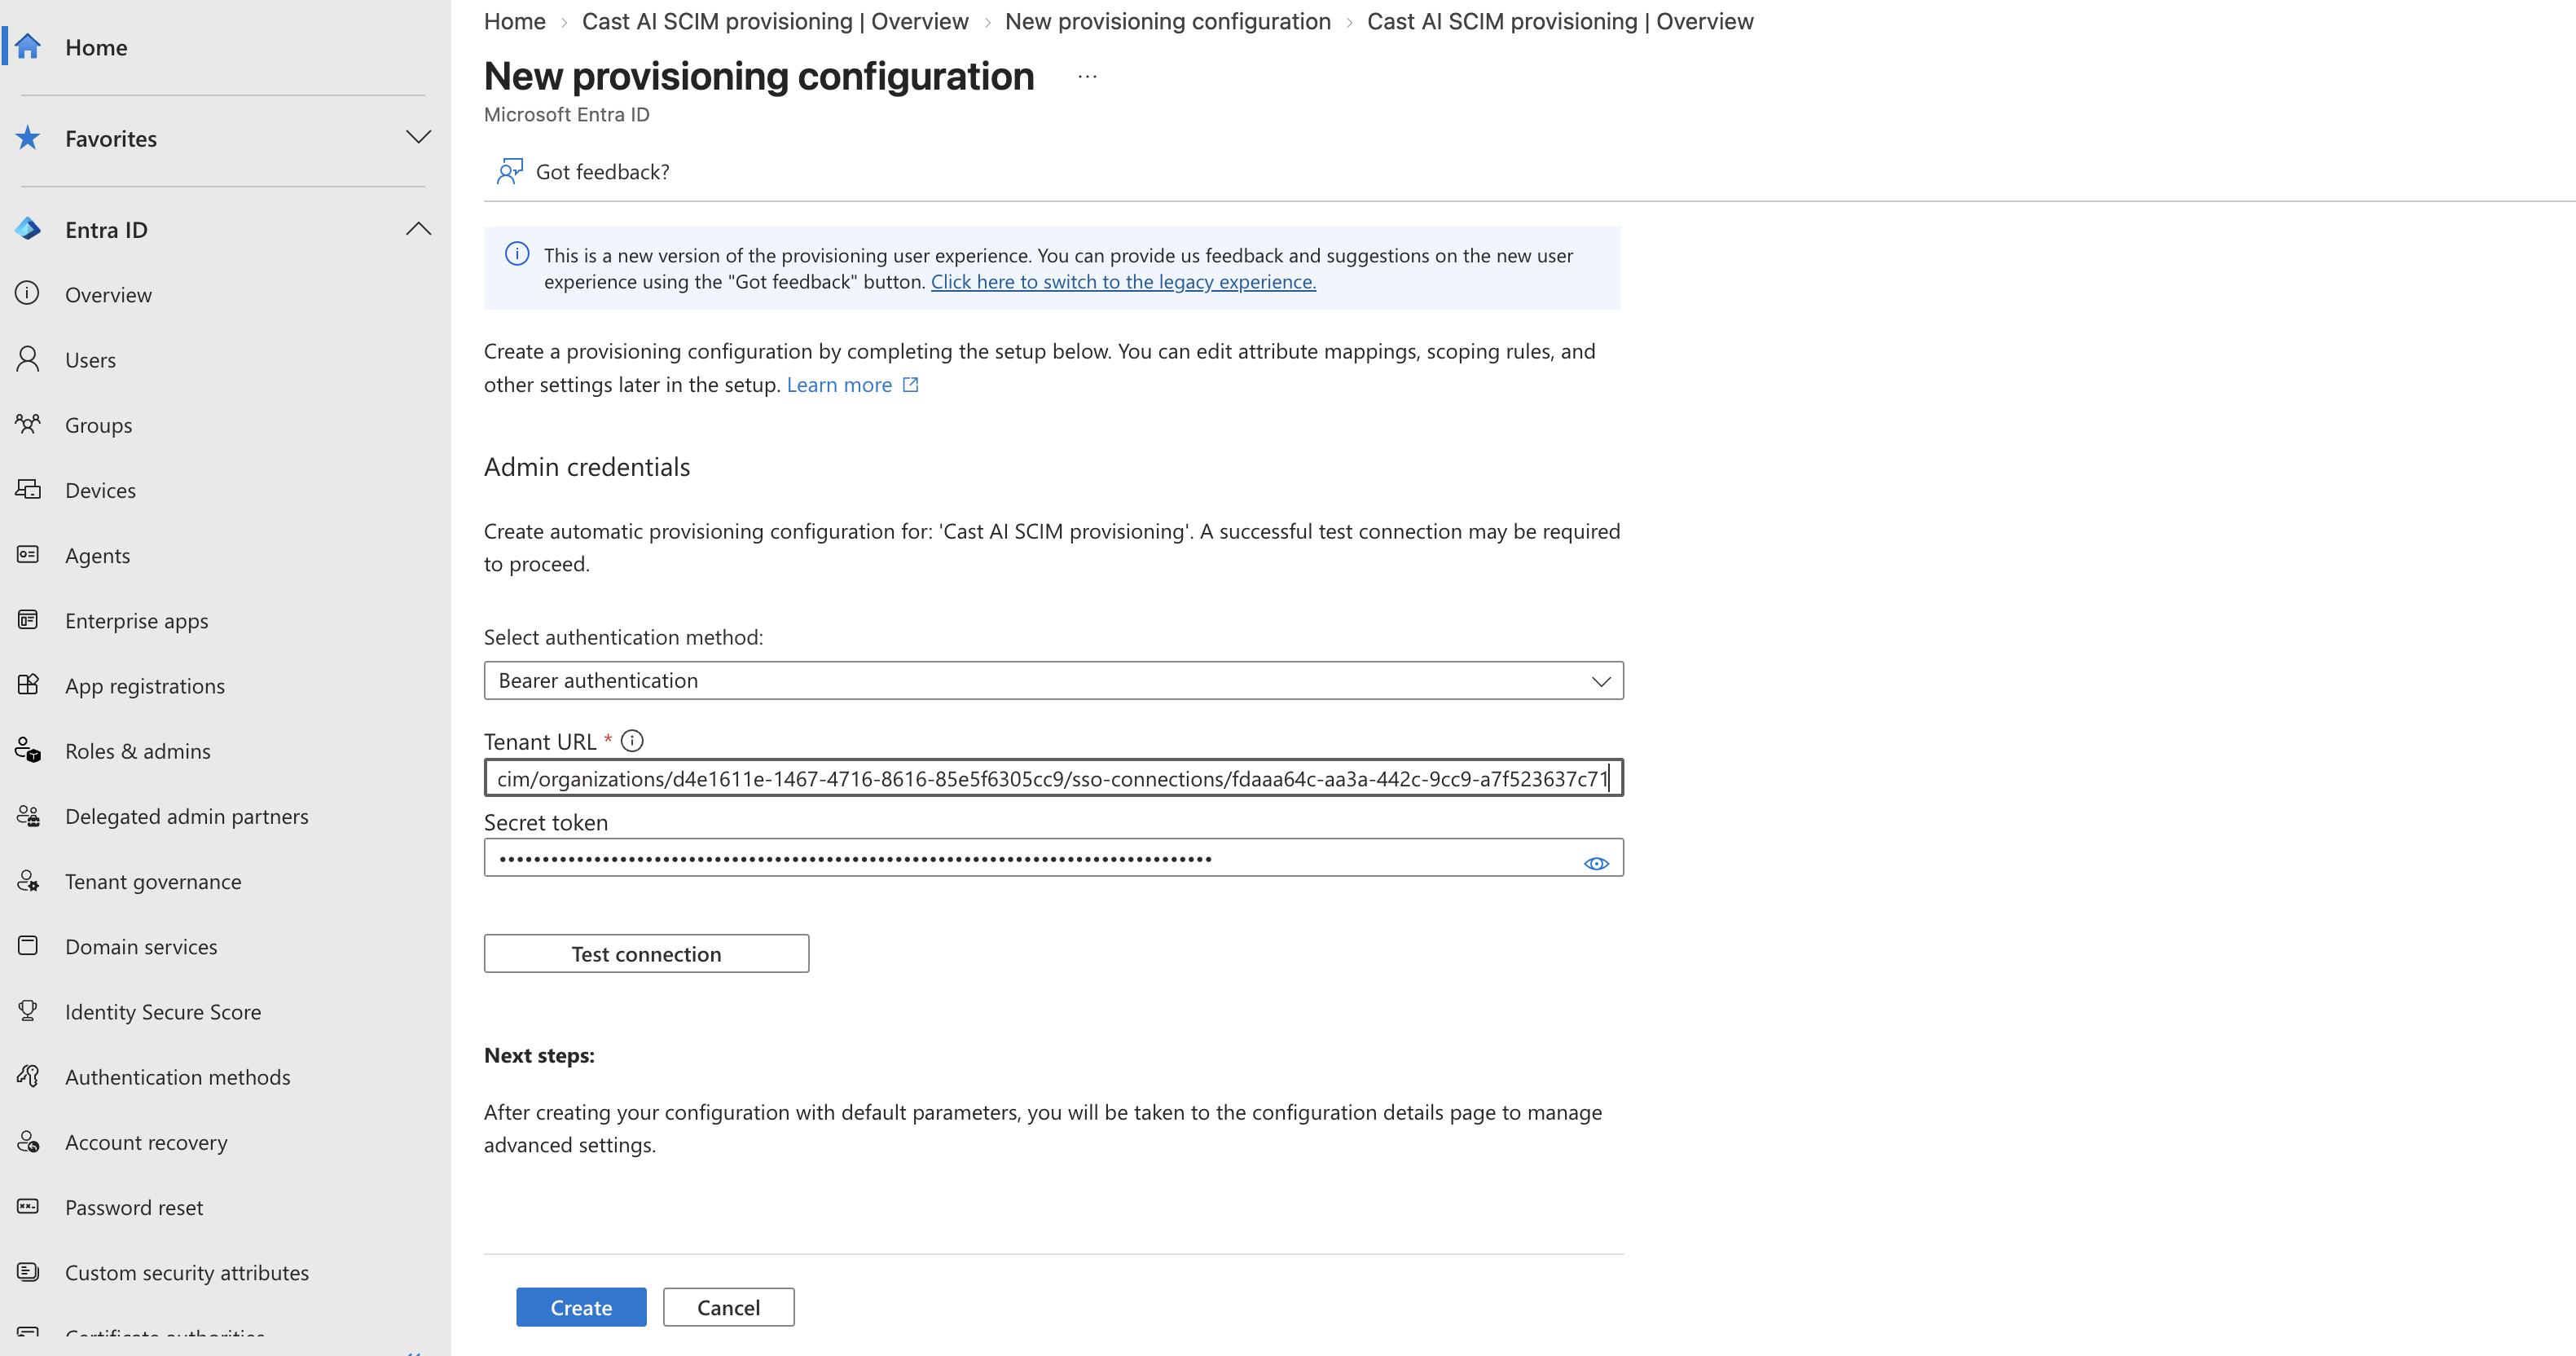
Step 3: Review attribute mappings
Microsoft Entra ID maps user and group attributes to the SCIM standard. Review these mappings to ensure they align with Cast AI's expected format.
-
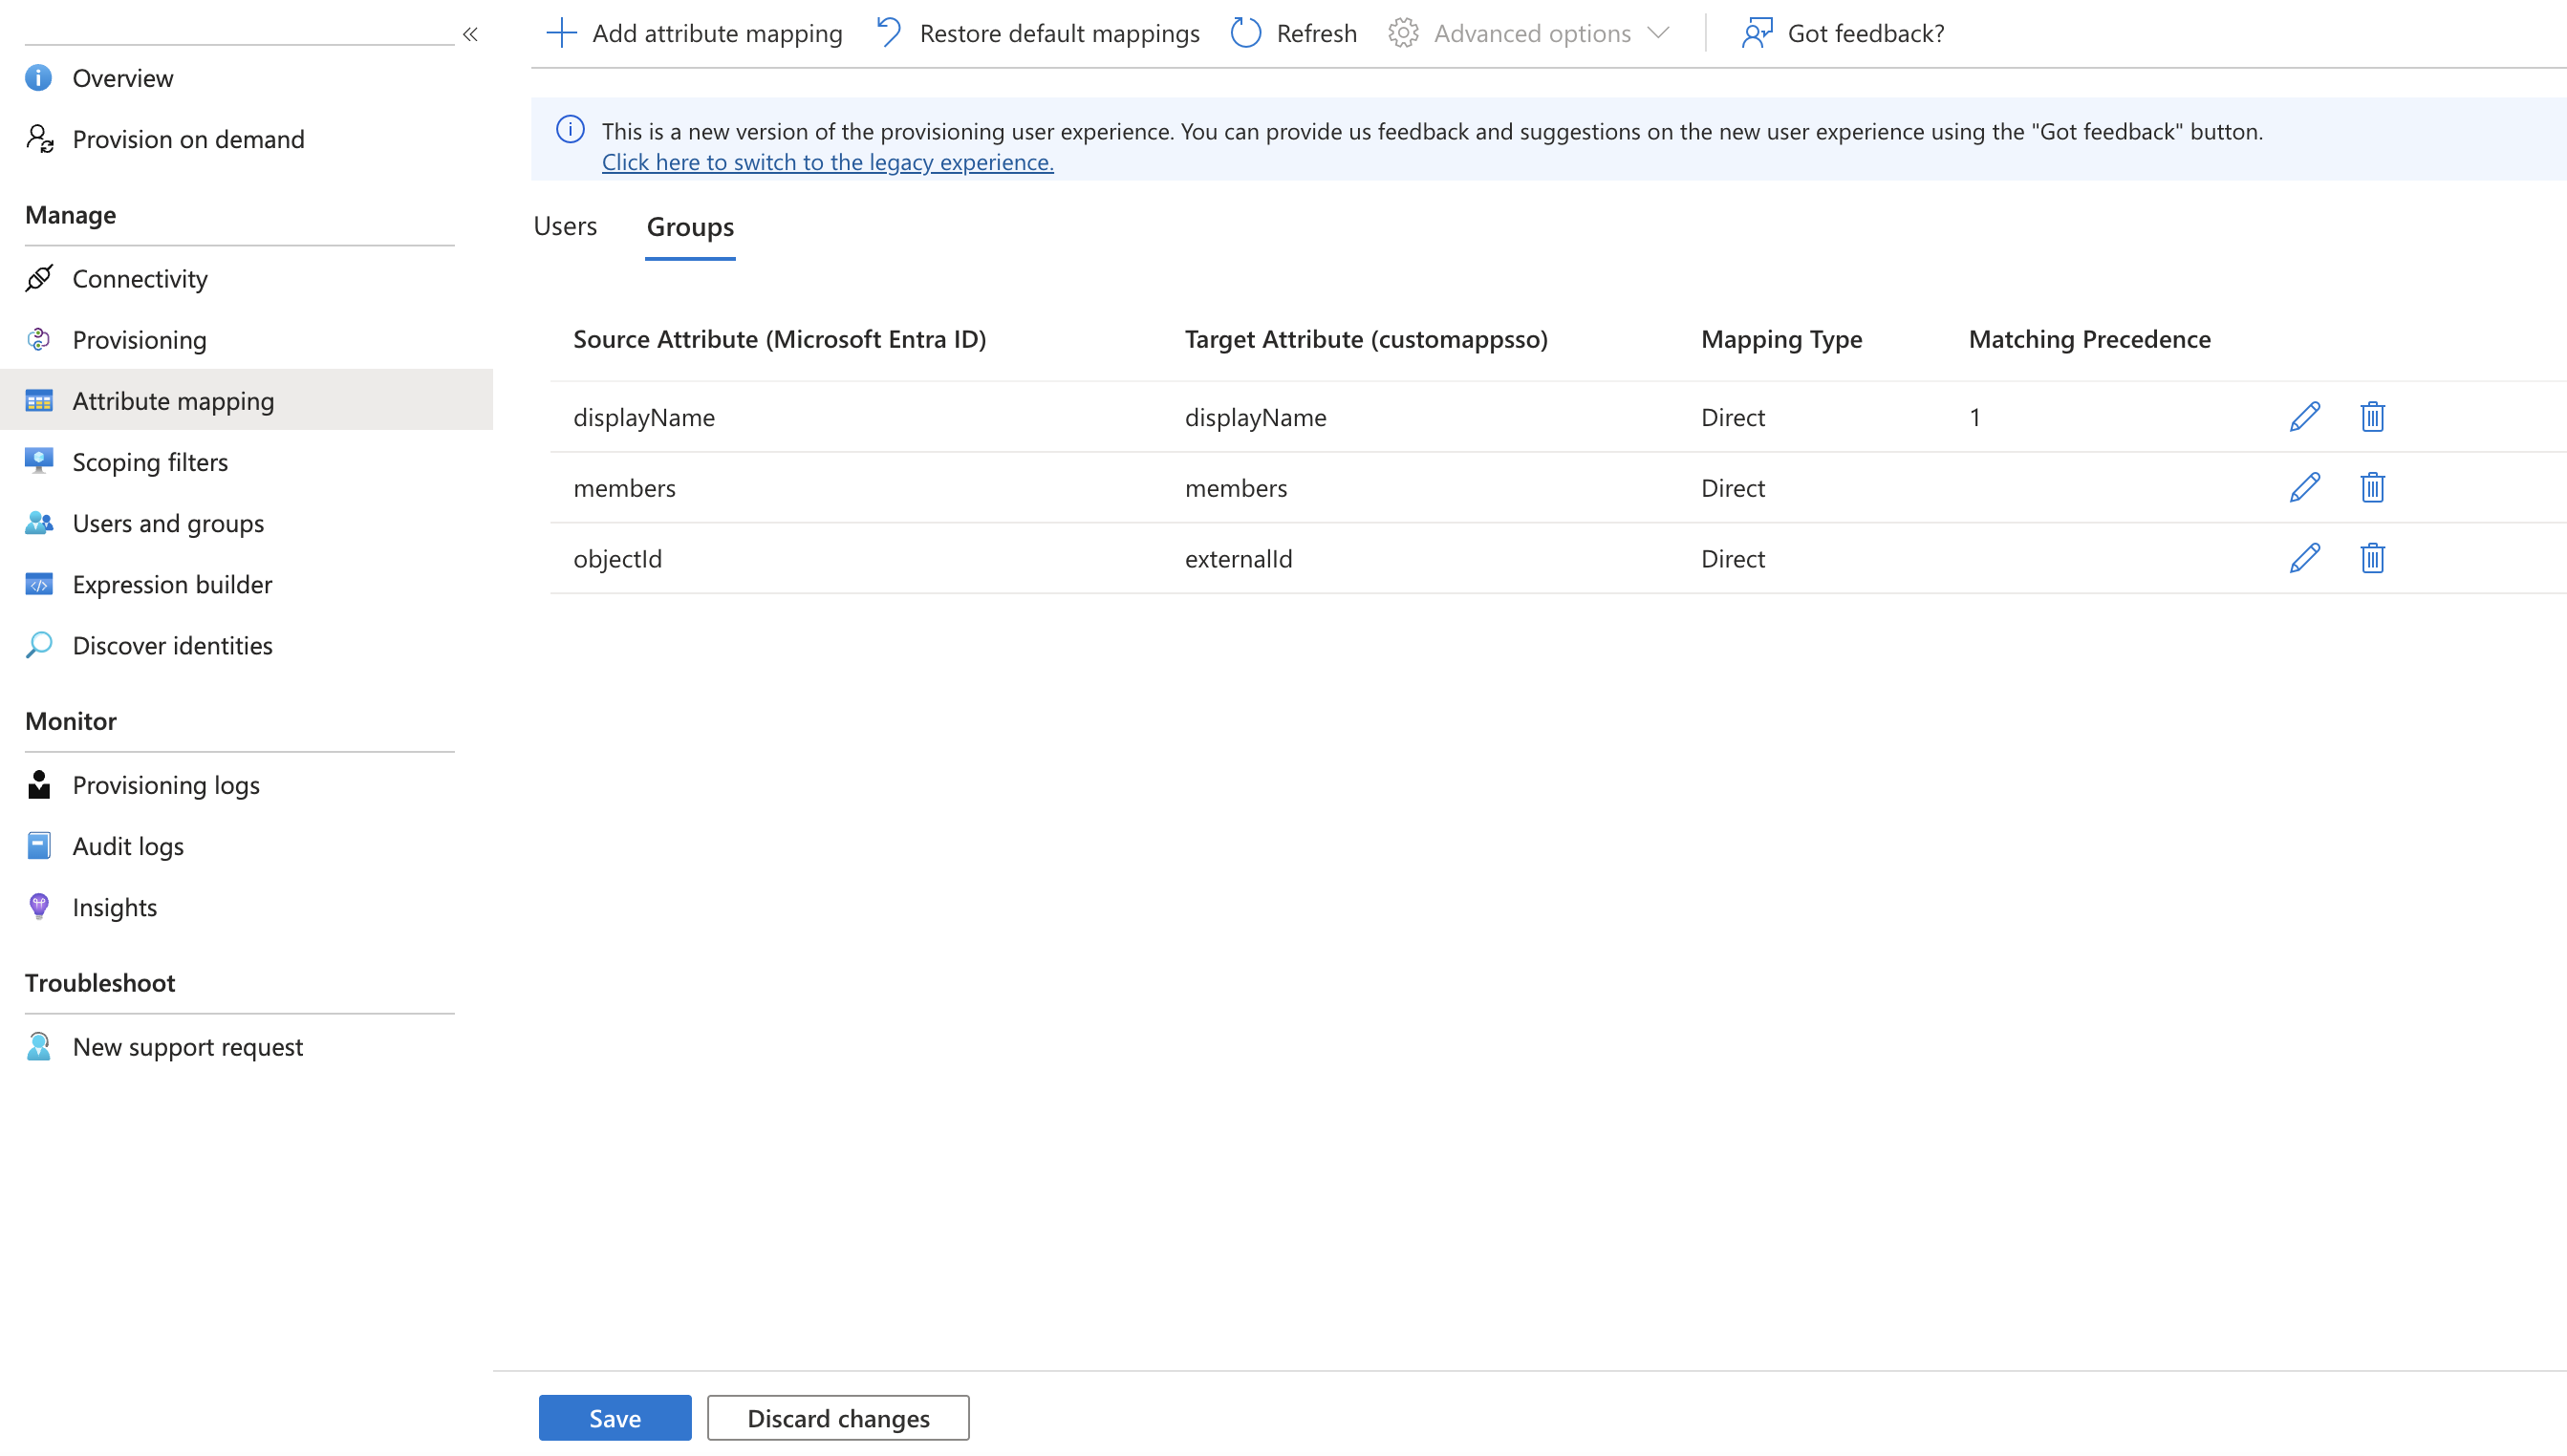
Under Provisioning, click Mappings and select Provision Azure Active Directory Groups
-
Ensure the mapping for Groups is as the picture below.
-
Click Save
-
Go to the Users mapping tab
-
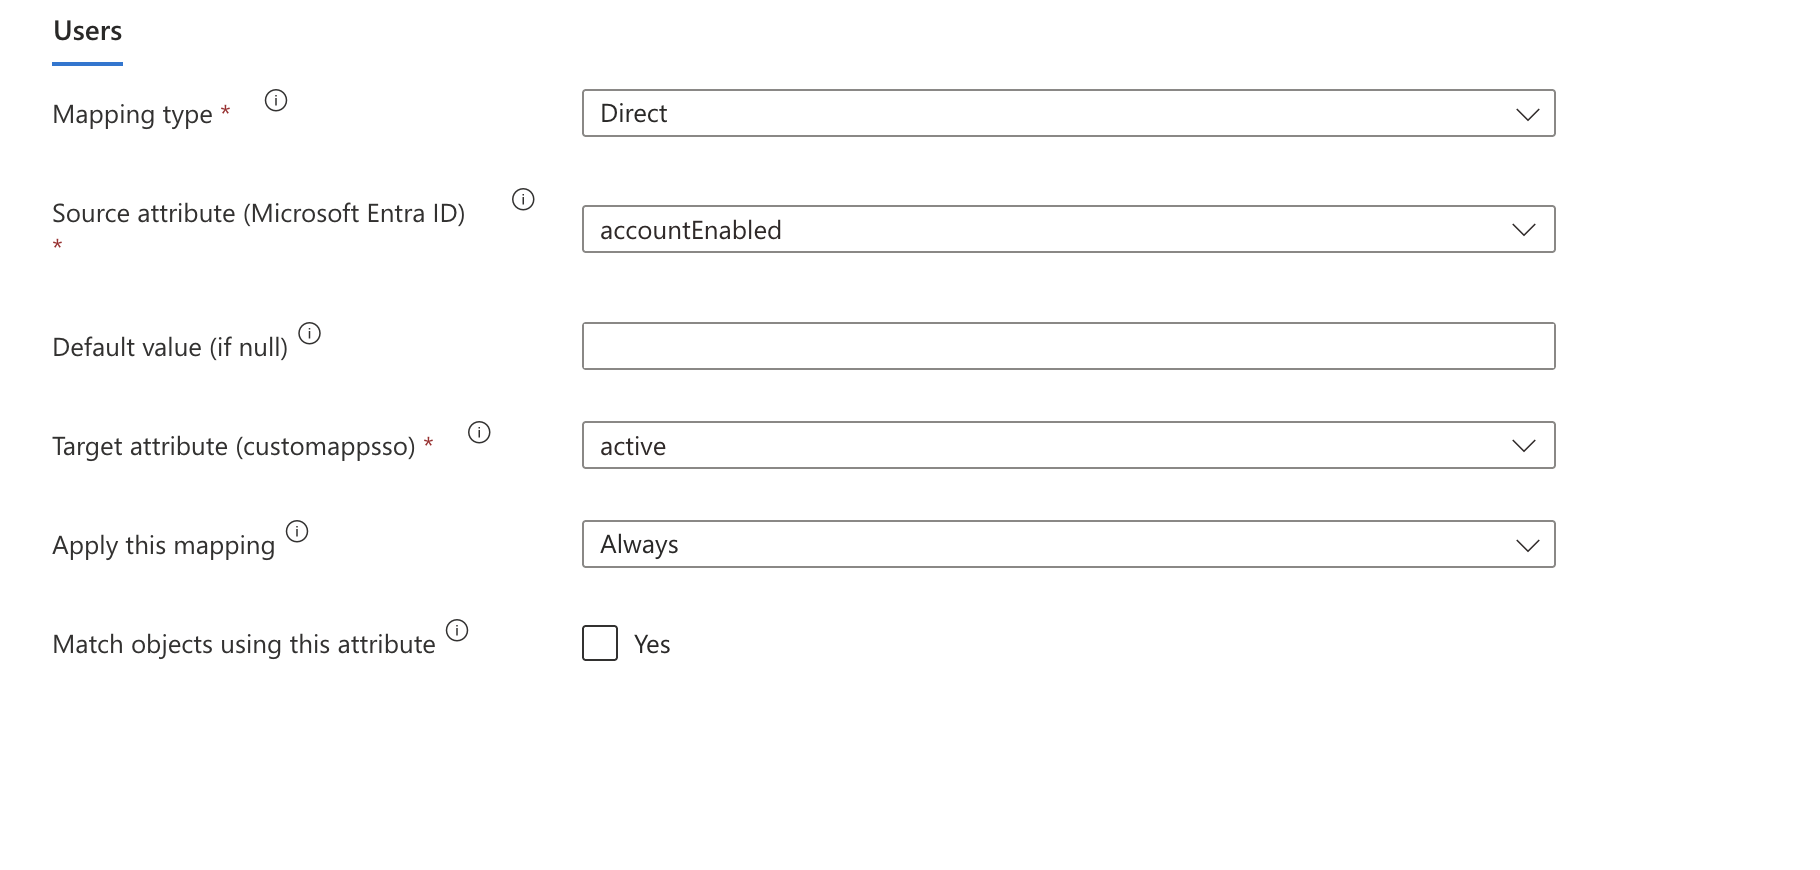
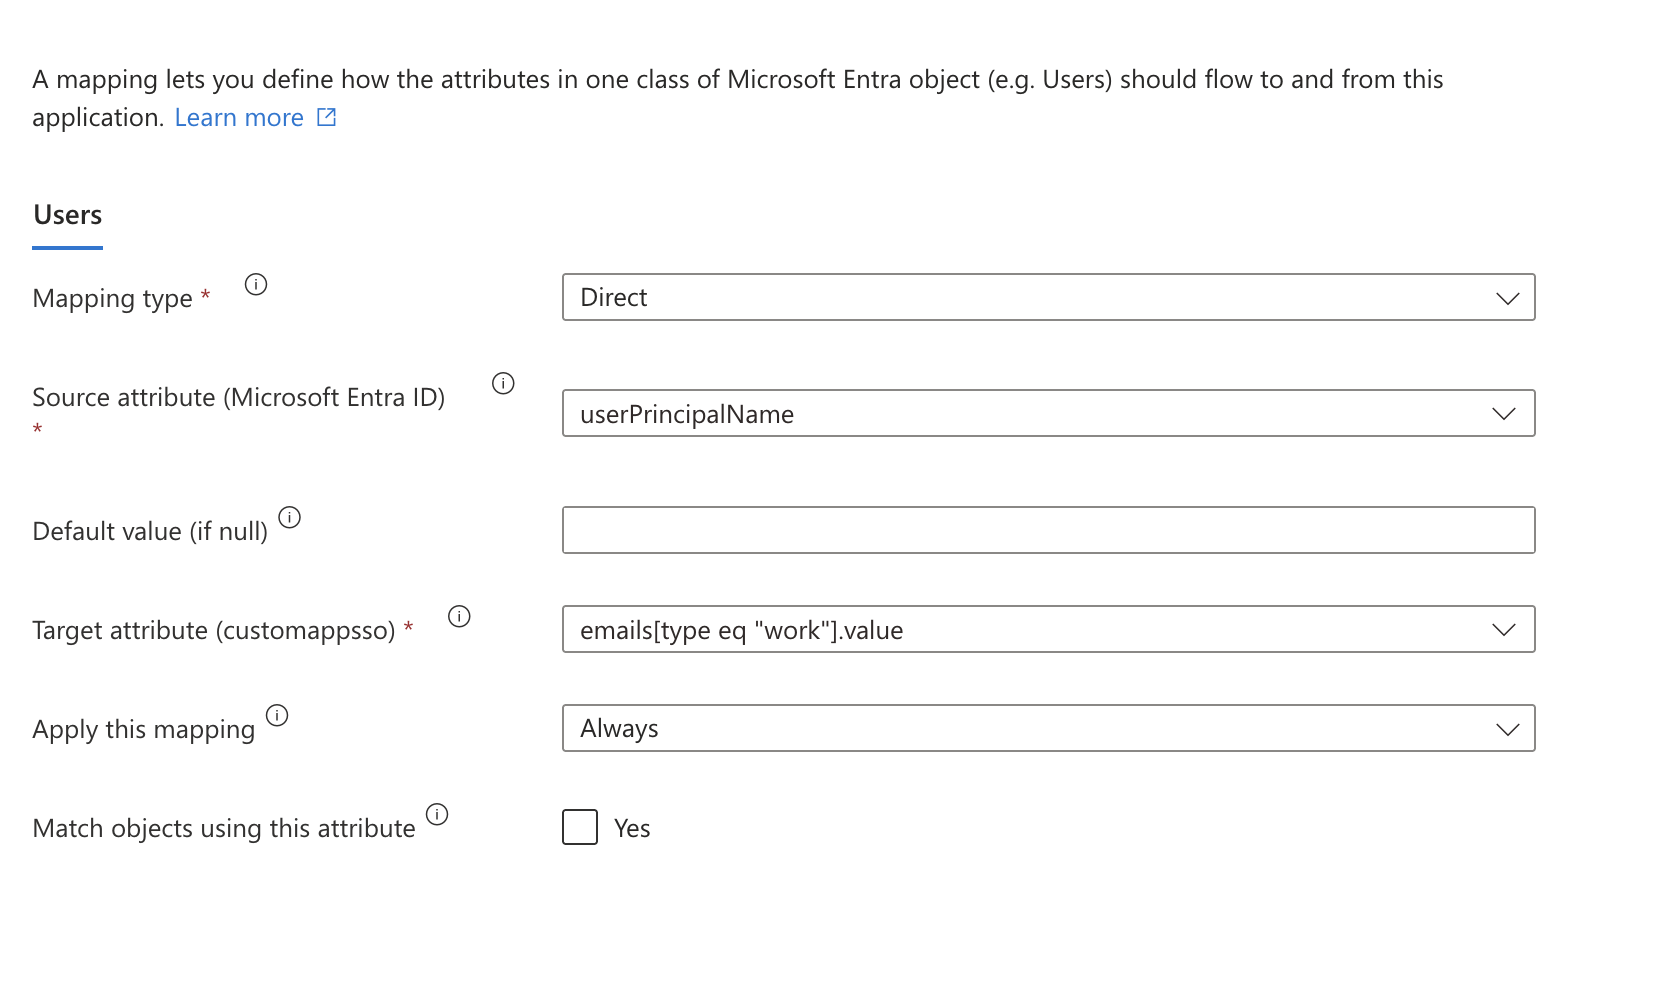
Configure the following user attribute mappings. For each mapping, click the attribute row to edit it:
Azure AD source attribute SCIM target attribute Mapping type objectIdexternalIdDirect mailuserNameDirect activeactiveDirect 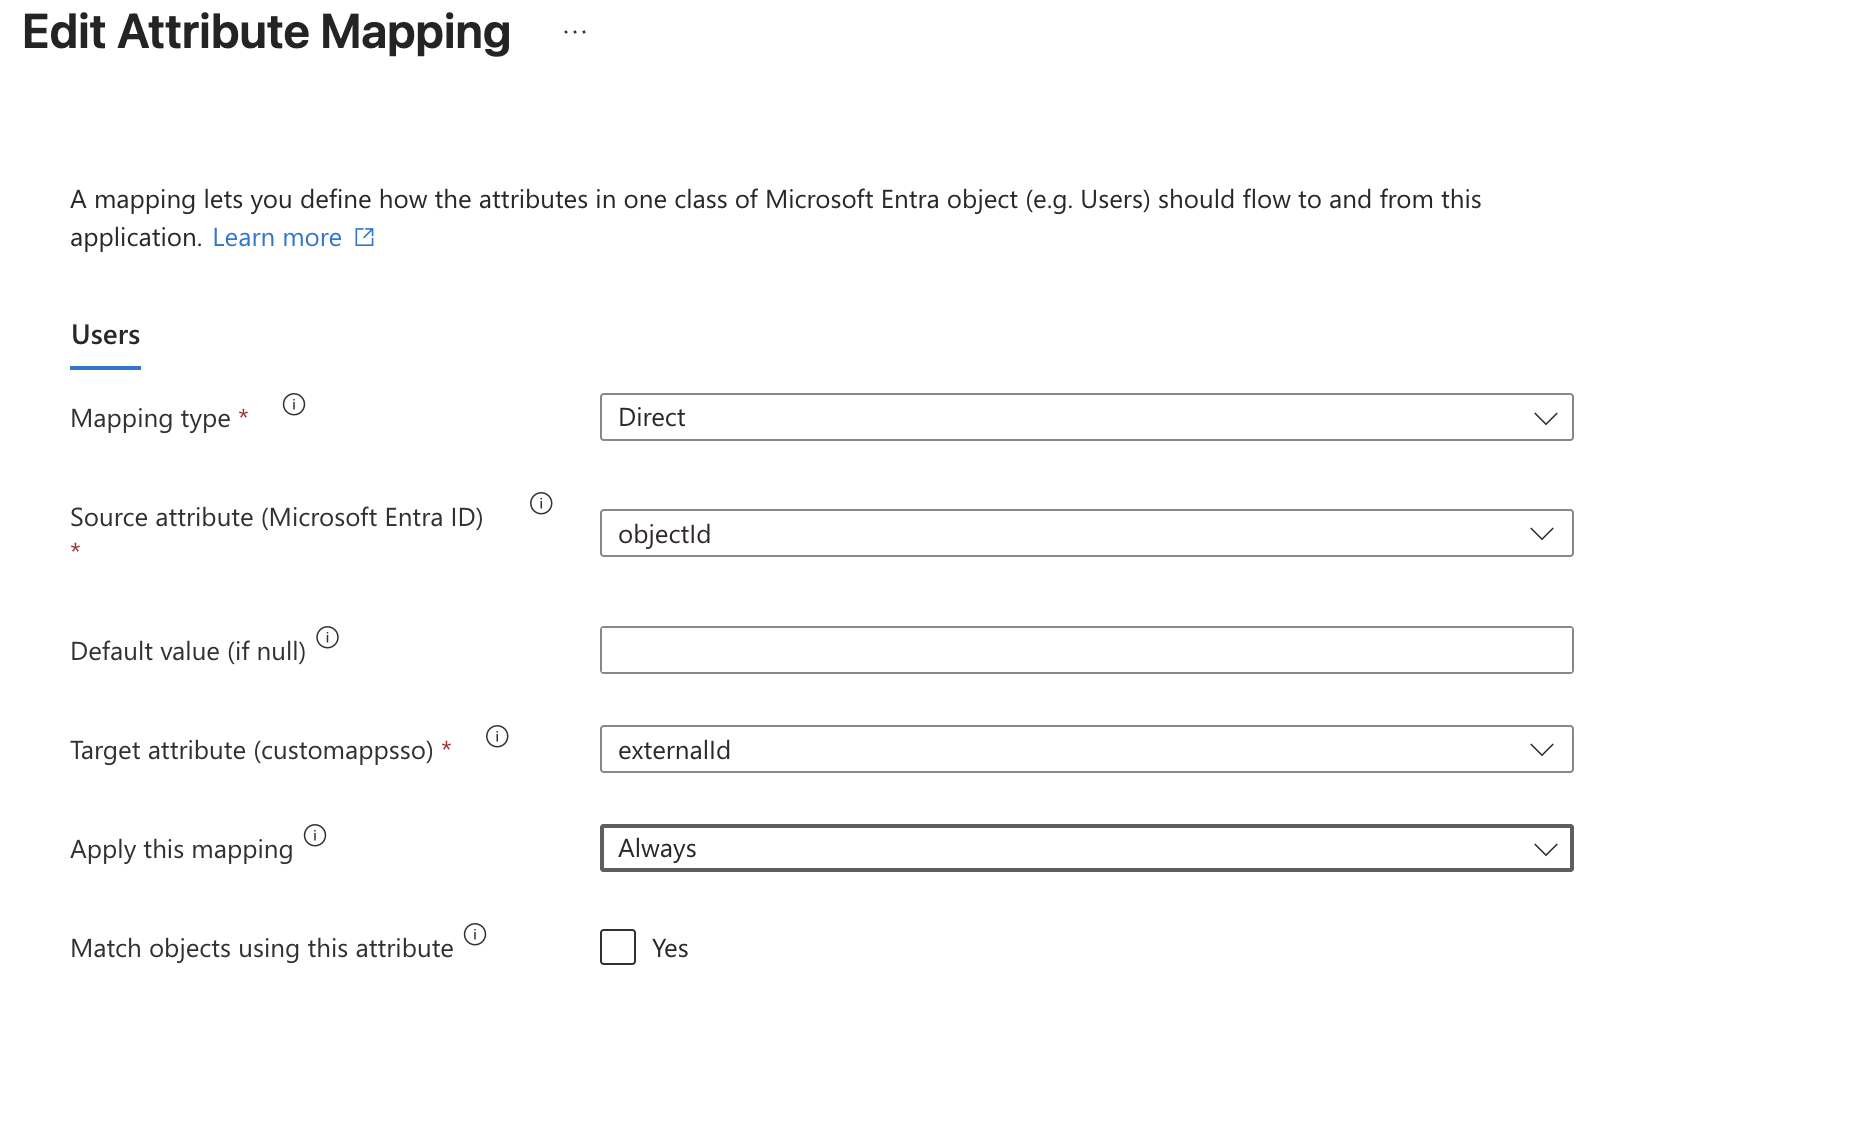
Critical mapping requirementsThe following mappings are mandatory for Cast AI to correctly provision user identities. If any of these are missing or misconfigured, the Cast AI SCIM server will reject the user identity:
objectId→externalId: Cast AI uses the Azure AD object ID to uniquely identify and track users across sync cycles. This mapping is not included in the default Entra ID SCIM template and you must add it manually.
userPrincipalName→emails[type eq "work"].value: Theemailsfield must contain a value in valid email format. Map it from theuserPrincipalNameattribute, or some other field that is always an email address. In order to decide which field might work for you, you can navigate to yourUserssection and click on one of your user's Properties tab and look for a field that's always an email.
If the server receives a
emails[type eq "work"].valuethat is not a valid email, it will reject the identity.
active→active: Set the mapping type to Direct (not Expression). Ensure the mapping is Enabled. This allows Cast AI to correctly reflect the user's enabled or disabled state from Azure AD.

- If any of the mappings listed above do not already exist, click Add New Mapping, set the Mapping type to Direct, select the appropriate source and target attributes, and click OK
- Click Save
Part 3: Assign groups and start provisioning
Step 1: Assign groups to the application
-
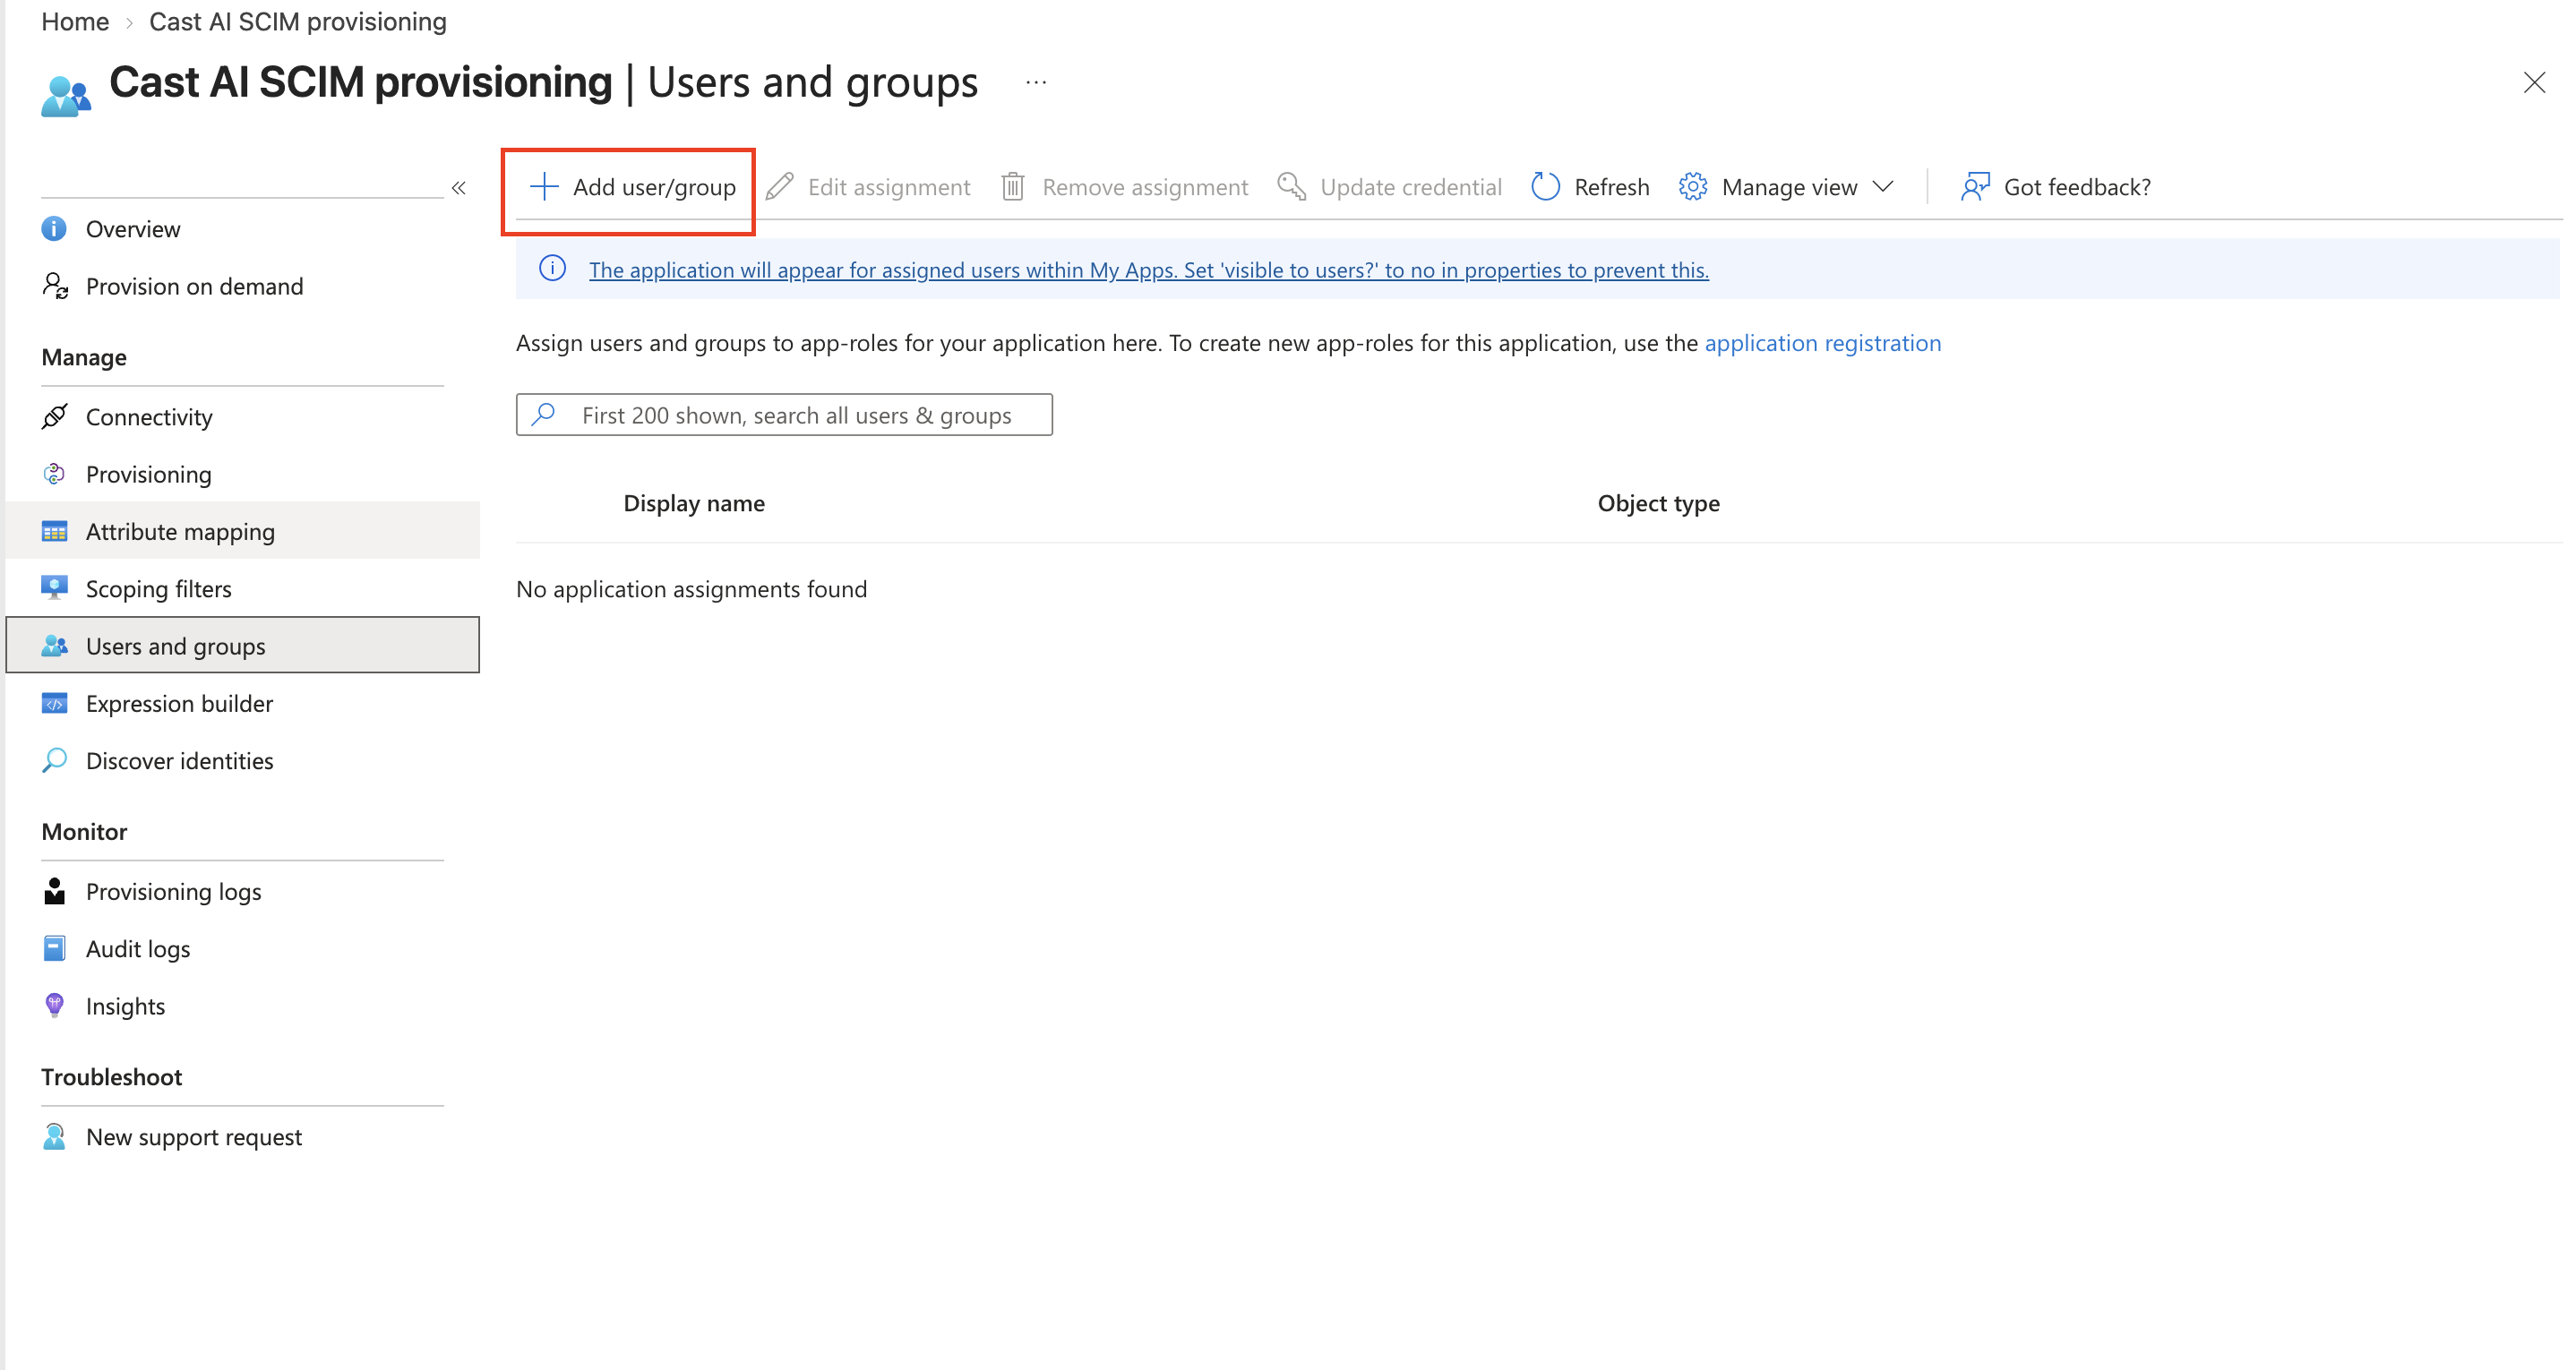
In your Enterprise Application, click Users and groups in the left sidebar
-
Click Add user/group
-
Under Users, leave the selection as None (group membership will drive user provisioning)
-
Under Groups, search for and select the Azure AD groups you want to synchronize with Cast AI
-
Click Select
-
Click Assign
NoteOnly users and groups explicitly assigned to the Enterprise Application will be synchronized to Cast AI. This is why a paid Entra ID plan (P1 or P2) is required — it enables group-based assignment rather than syncing the entire directory.
Step 2: Start provisioning
- Navigate back to Provisioning in your Enterprise Application
- Under Settings, set Provisioning Status to On
- Optionally, set a Notification Email to receive alerts about provisioning failures
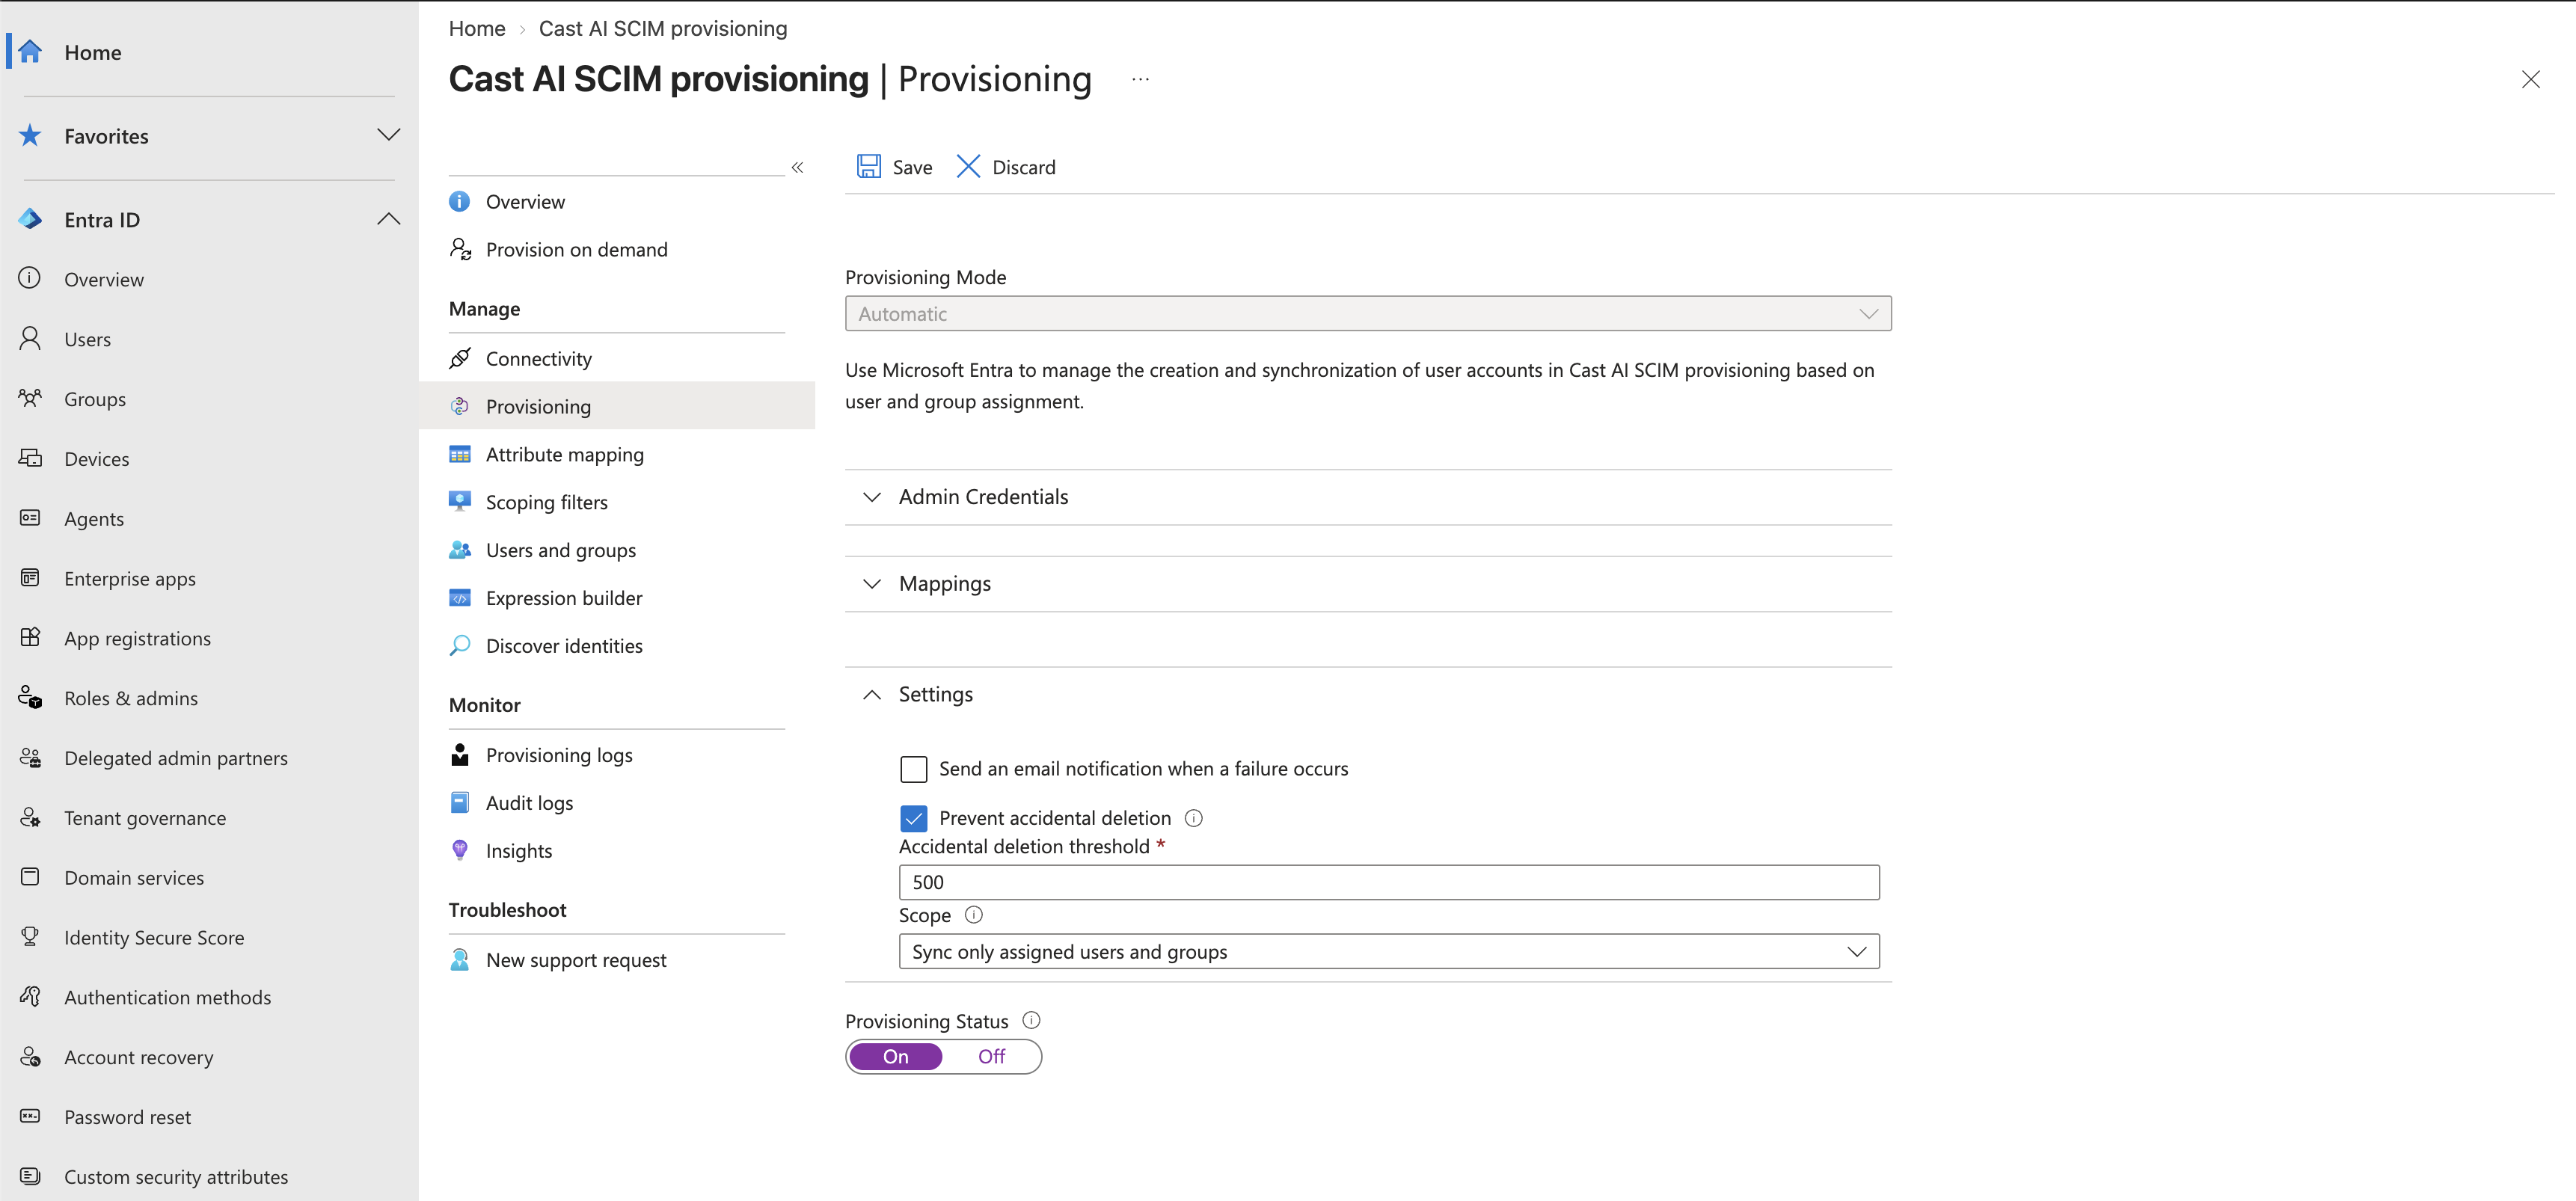
- Click Save
- Click Start provisioning to initiate the first synchronization cycle
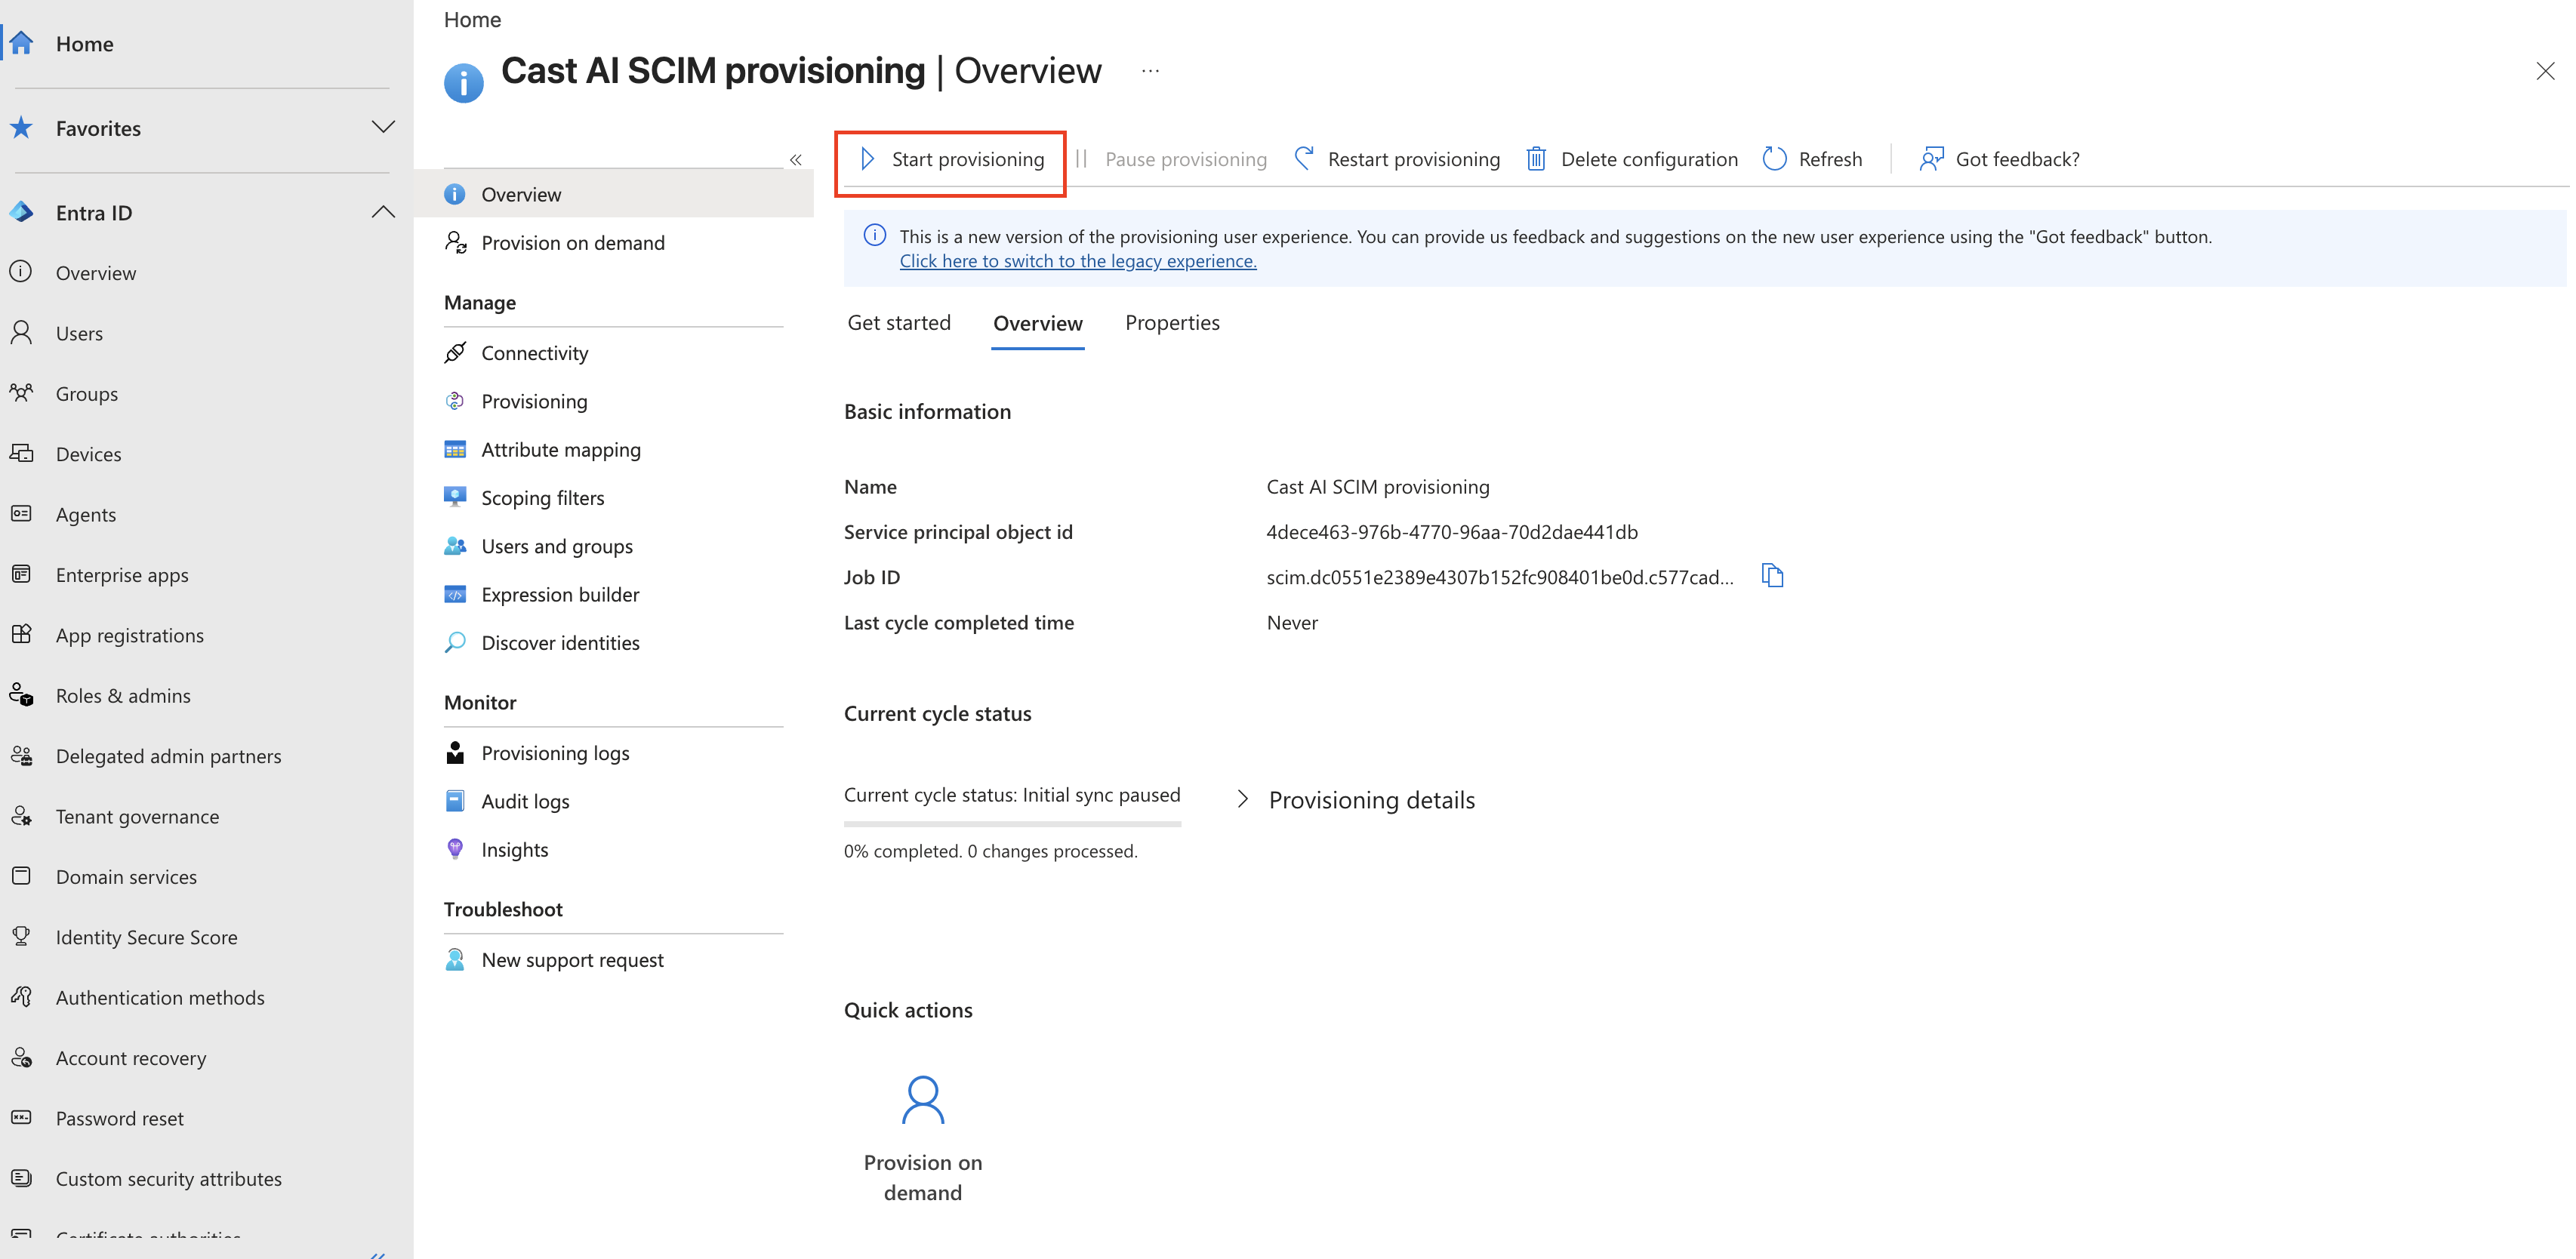
NoteThe initial sync for Azure AD can take up to 40 minutes to complete, depending on the number of users and groups being synchronized. Subsequent incremental syncs are typically faster.
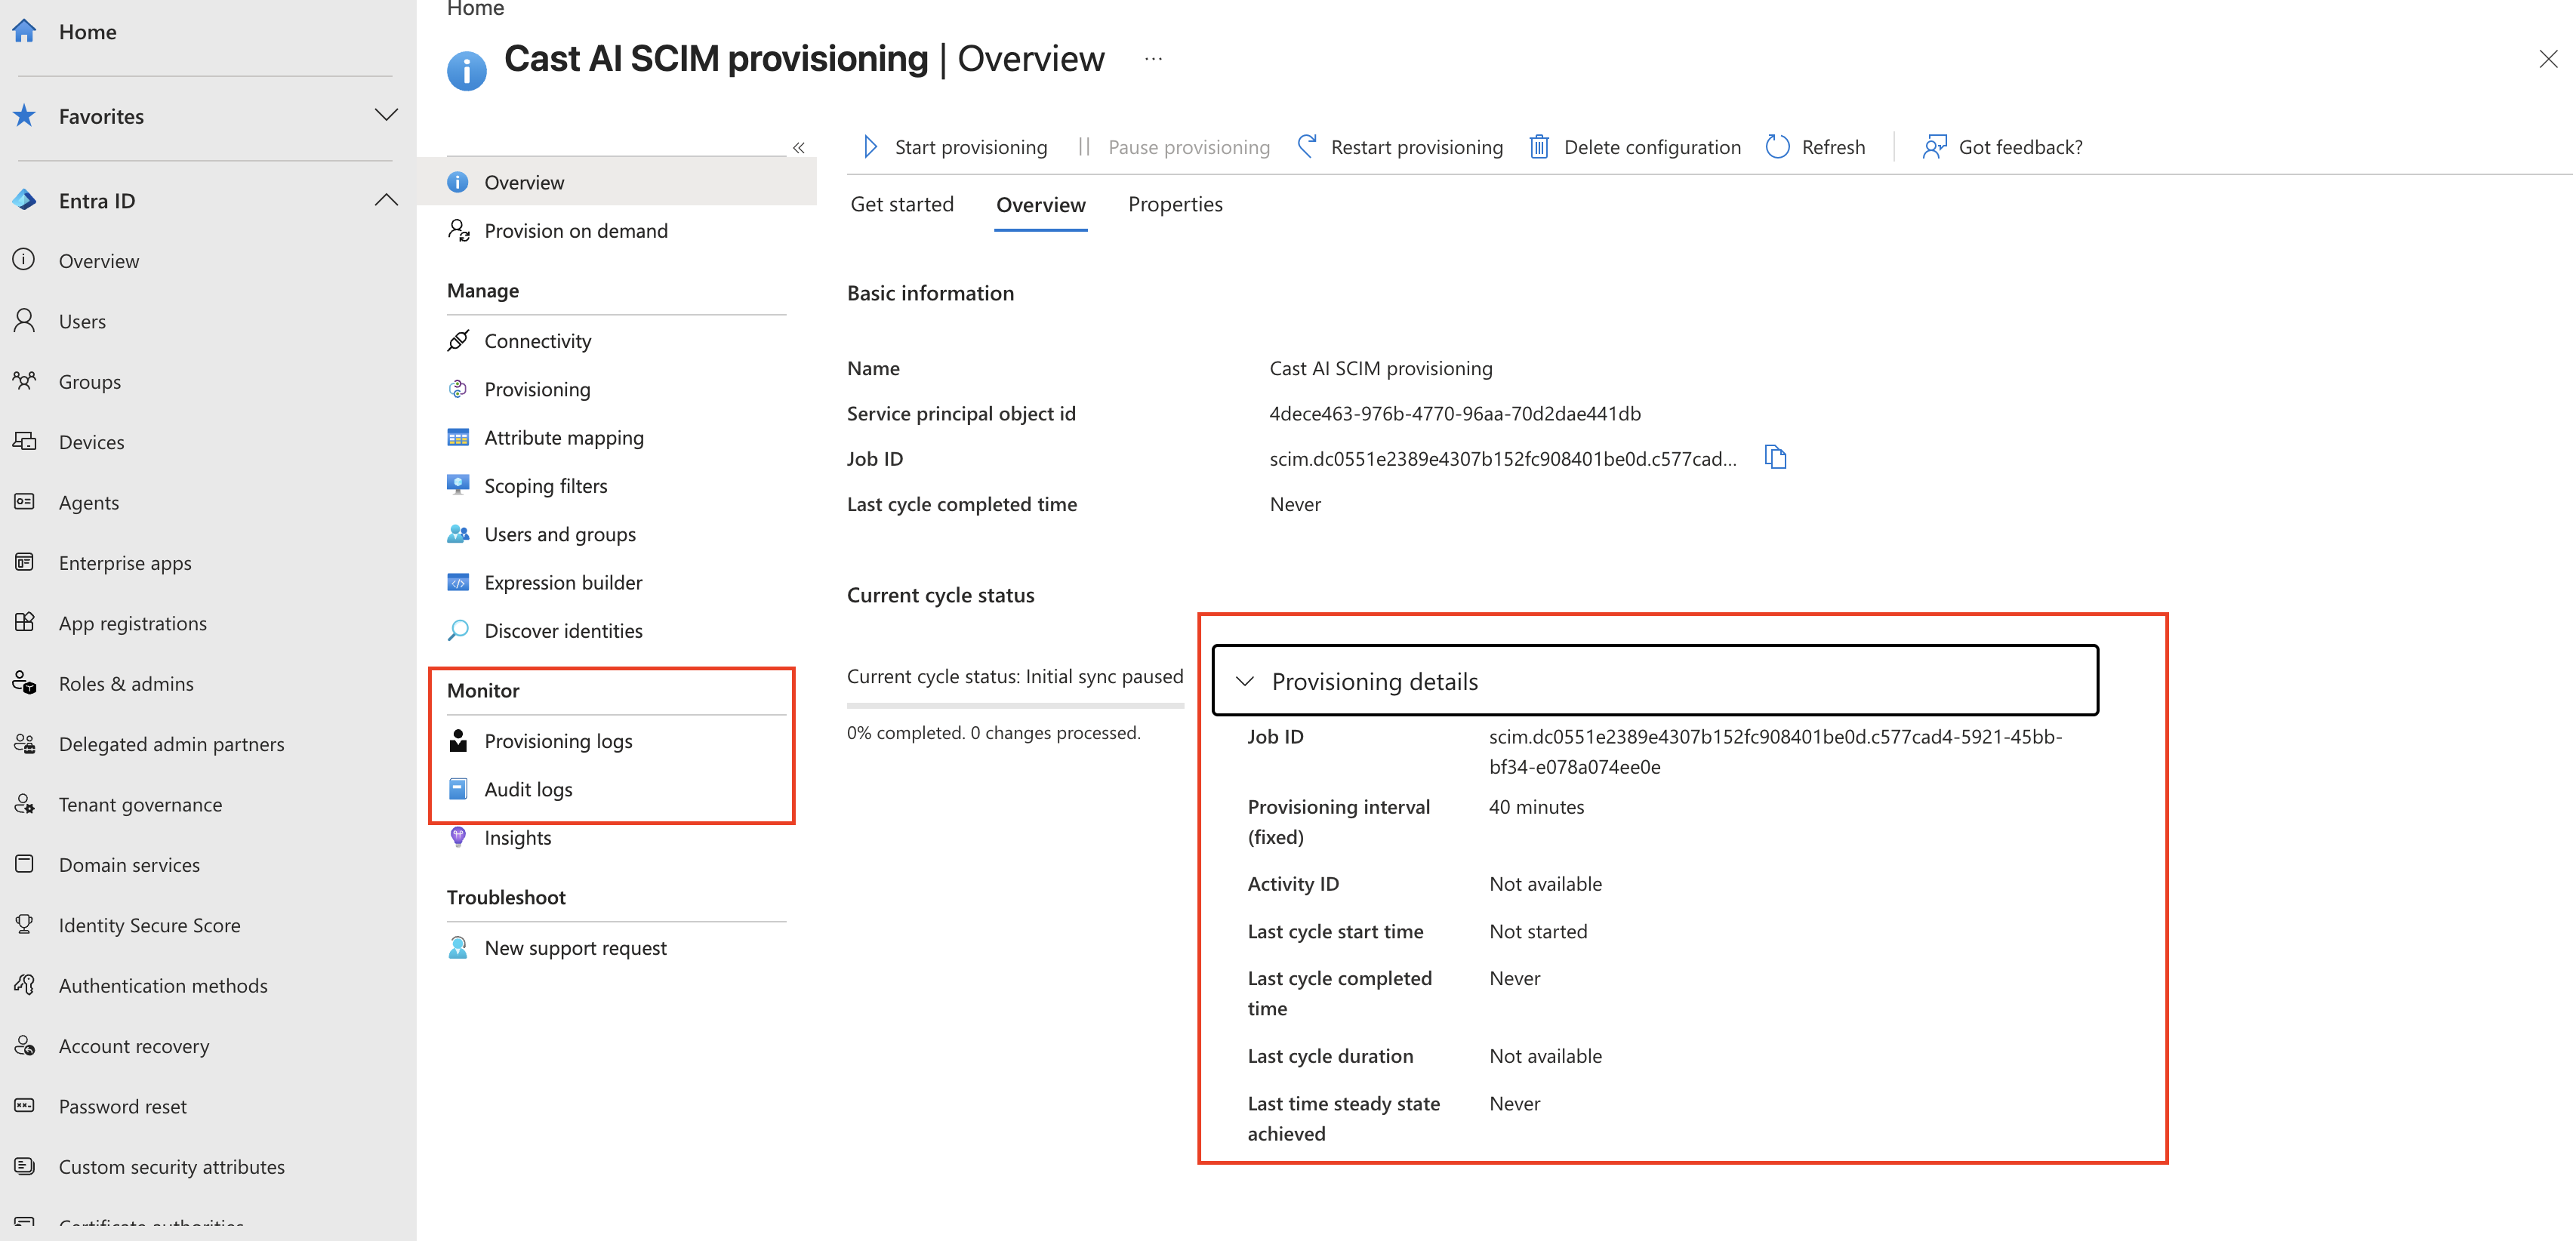
Step 3: Monitor provisioning progress
-
Click View audit logs (or navigate to Provisioning logs) for detailed information about:
- Which groups and users were created or updated in Cast AI
- Any errors or skipped records
-
Wait for the status to show Cycle completed before verifying in Cast AI
Troubleshooting provisioning errorsIf provisioning fails for specific users or groups:
- Check the Provisioning logs for error details — filter by Status: Failure
- Ensure the affected users have all required attributes populated in Entra ID (especially
emailsandexternalId)- Verify that the group is assigned under Users and groups
- For recurring failures, try clicking Restart provisioning to force a full sync cycle
Part 4: Confirm groups in Cast AI
-
Return to the Cast AI console and navigate to Access control > User groups
-
You should see the new groups created from Azure AD
-
Click on a user group and go to the Users tab to see the users that match your Azure AD configuration:

Ongoing synchronization
From this point forward, any changes you make to the synchronized groups in Microsoft Entra ID will automatically be reflected in Cast AI with the next provisioning cycle. This includes:
- Adding users: When you add users to synced groups in Entra ID, they will appear in Cast AI
- Removing users: When you remove users from synced groups or deactivate them in Entra ID, they will lose their Cast AI access
- Updating user information: Changes to user attributes like display names will sync to Cast AI
Keep in mind that synchronization is not instantaneous and may occur in apparent stages. You may notice that:
- A newly added user appears in the Cast AI Users list first
- The same user may take some additional time to appear in their assigned User groups
- Updates typically complete within several minutes, though timing can vary based on group size, the scope of changes, and the Entra ID provisioning cycle
Managing group permissions in Cast AI
While group membership is managed in Microsoft Entra ID through synchronization, permissions and roles are assigned in Cast AI. To configure permissions for a synced group:
- In the Cast AI console, navigate to Access control > User groups
- Find and click on the synced group you want to configure
- Assign roles and resource access following the same process as manual groups
For detailed instructions on configuring group permissions, see:
NoteWhile group membership is controlled by Microsoft Entra ID through synchronization, roles and resource access are managed in Cast AI. Changes you make to permissions in Cast AI will not be overwritten by sync operations.
Disabling group synchronization
To stop synchronizing groups from Azure while keeping your SSO connection active:
- In the Cast AI console, navigate to Access control > SSO
- Click on your Azure SSO connection to open the configuration drawer
- Uncheck the Synchronize user groups from the IAM system to Cast AI box
- Enter your Client secret from Azure (required to save any SSO configuration changes)
- Click Save changes
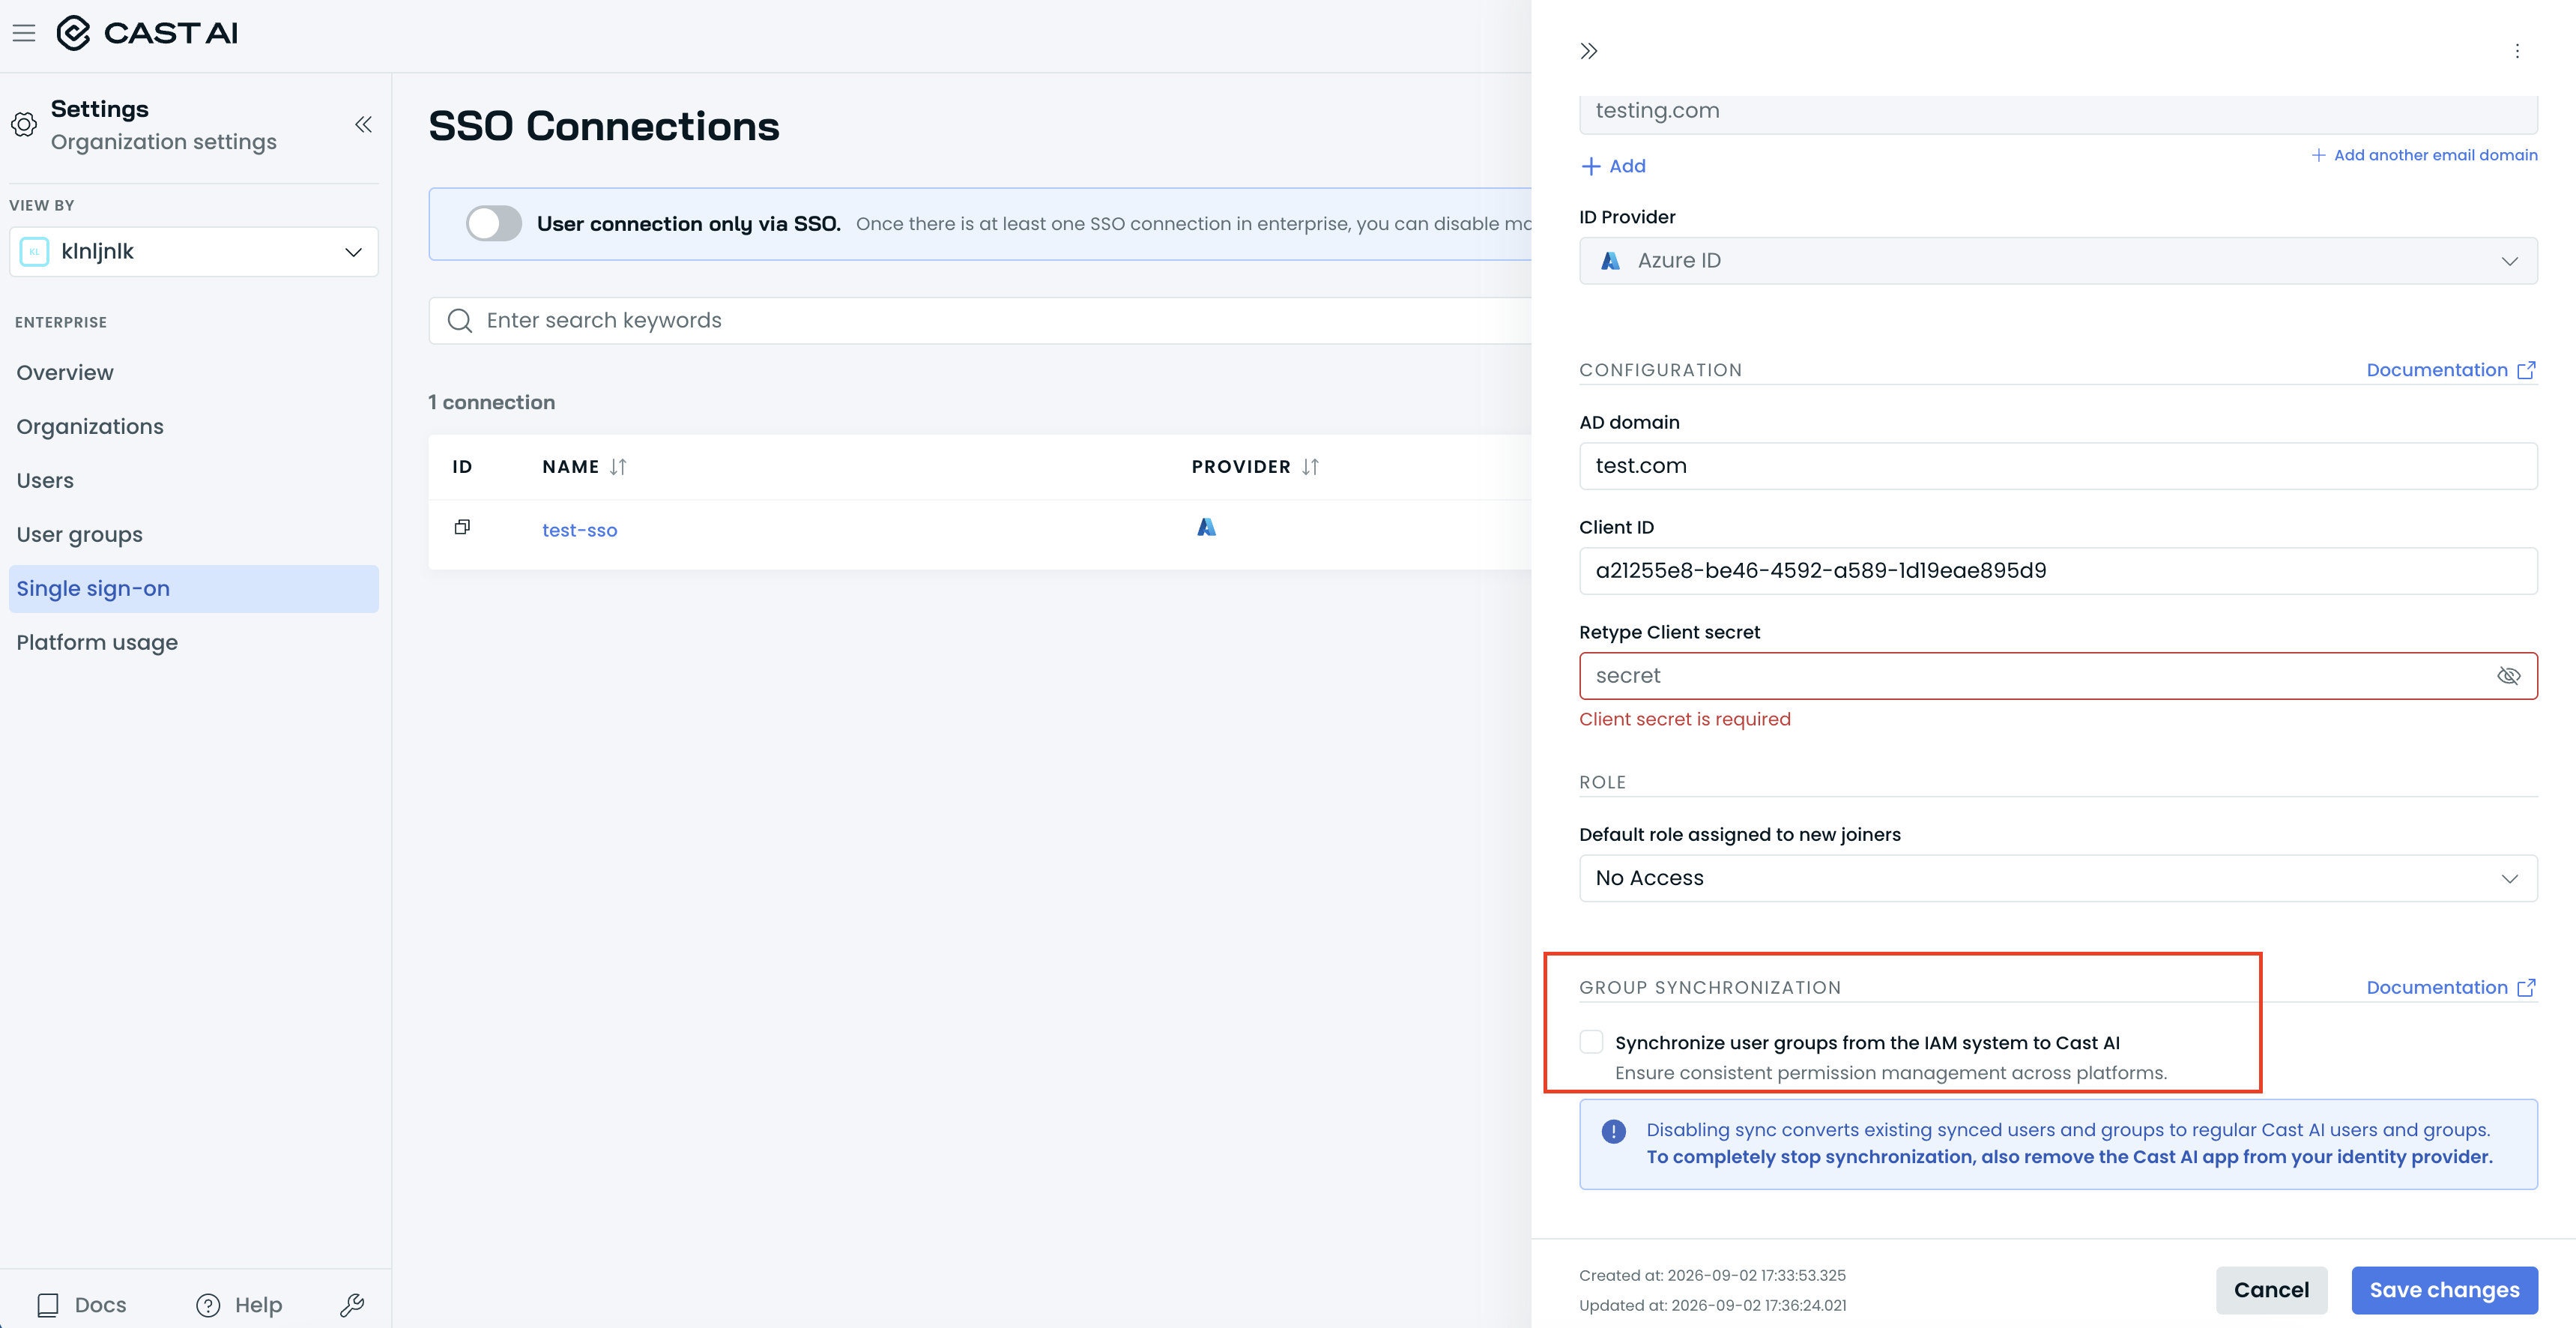
NoteDisabling sync converts existing synced users and groups to regular Cast AI users and groups.
To completely stop synchronization, also remove the Cast AI app from your identity provider.
For additional help
Updated last month