

AWS RDS & Aurora quick start
This quick start connects Cast AI DBO to your Amazon RDS and Aurora databases using auto-discovery. You grant DBO a read-only IAM role, DBO discovers every RDS instance and Aurora cluster in the account, and you deploy DBO's components per instance, first in passthrough mode to collect projections, then with caching enabled.
Prerequisites
- An AWS account with RDS or Aurora instances (PostgreSQL or MySQL).
- Ability to run scripts in AWS CloudShell (recommended) or a local terminal with the AWS CLI configured.
- A Kubernetes cluster where DBO deploys its components, with
kubectl
and
helm
available. - Optionally, RDS Performance Insights permissions; DBO uses Performance Insights for richer AWS metrics and cost analysis.
Phase 1: connect, discover, and monitor in passthrough mode
-
Connect your AWS account. In the Cast AI console, go to Database → Overview → + Connect instance → Connect your cloud → AWS, then copy and run the provided script in AWS CloudShell or a local terminal with the AWS CLI configured.
The script creates an IAM role with read-only permissions and a trust relationship with Cast AI, so DBO can discover your RDS and Aurora instances and read their monitoring metrics. The permissions it requests appear under PERMISSIONS REQUIRED in the dialog, and in the script as:
AWS_PERMISSIONS="rds:DescribeDBInstances,rds:DescribeDBClusters,DescribeDBClusterEndpoints,cloudwatch:GetMetricData,pi:GetResourceMetrics,DescribeDimensionKeys,account:ListRegions,ec2:DescribeAvailabilityZones"This covers RDS instance and cluster details, cluster endpoints, CloudWatch metrics, Performance Insights data, and your regions and availability zones. Nothing in your AWS environment is modified.
-
Click Next and let discovery run. The Connecting to cloud dialog tracks Verify connection, Discover database clusters, and Analyze your environment. Discovery takes up to 10 minutes and continues in the background if you click Close and go to console.
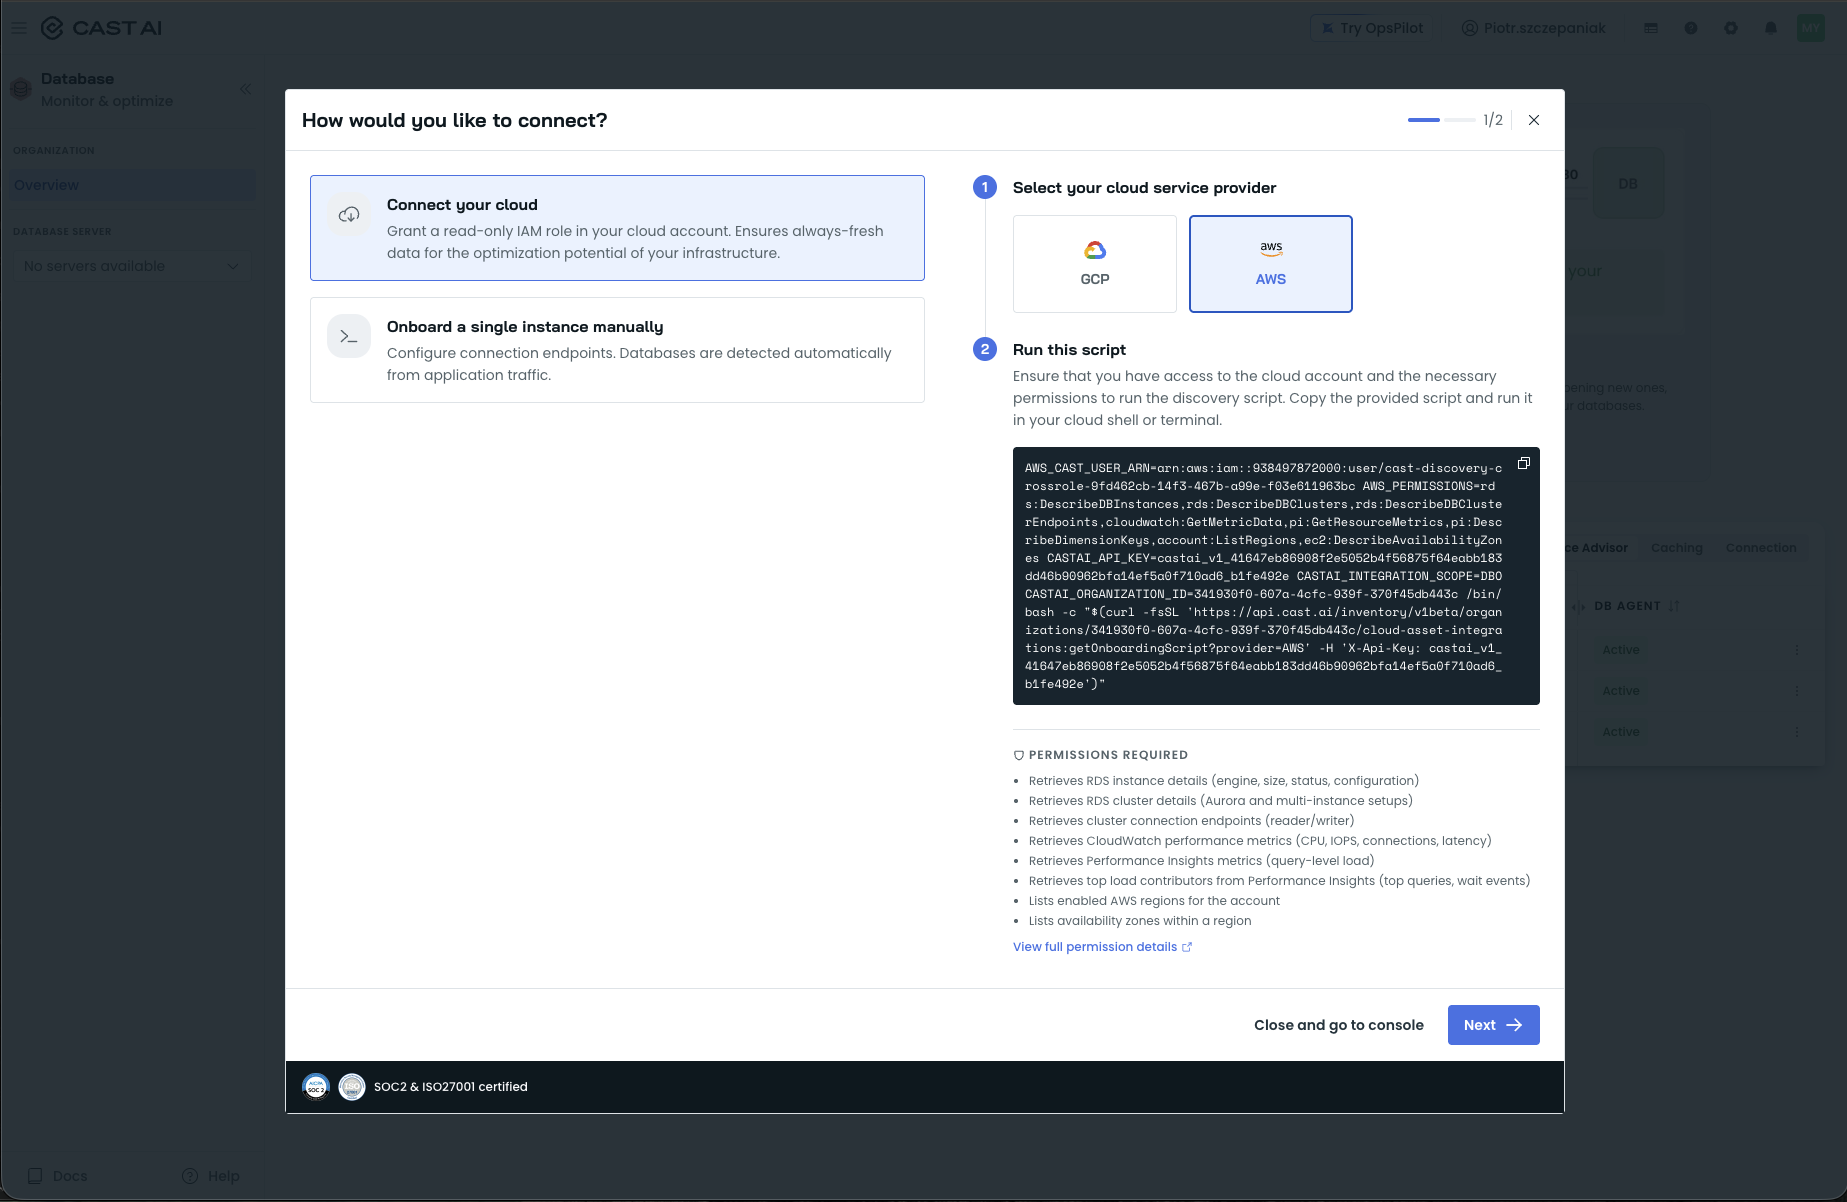
The Connecting to cloud dialog discovery progress.
-
Review discovered instances. DBO scans the account and lists every discovered RDS instance and Aurora cluster on the Overview page, under the Not onboarded tab. Discovery is read-only and needs no action from you.
-
Deploy DBO to the instance. Click Enable database optimizer on the instance's row (also offered on the BEST CANDIDATE card). In the Enable Database optimization dialog, confirm the features under Optimization features (Performance advisor, pre-selected and Recommended, plus Database proxy, Cache manager, and Connection pooling), then pick how to install under Run script below:
- Script gives you a
curlcommand to copy and run; step 1 Configure user permission asks for a read-only database user's Username and Password. - Helm walks you through Configure database permissions (kubectl access to the target cluster), Access repository (request access with Get access), Customize values (download the pre-configured
values.yaml, which already embeds your API key and organization ID, and add your database connection details), and Install, which generates thehelm upgrade --installcommand for you.
- Script gives you a
-
Run the install, then click I ran the script. The script deploys DBO's components (the proxy and the query processor) into the
castai-db-optimizernamespace in your Kubernetes cluster.
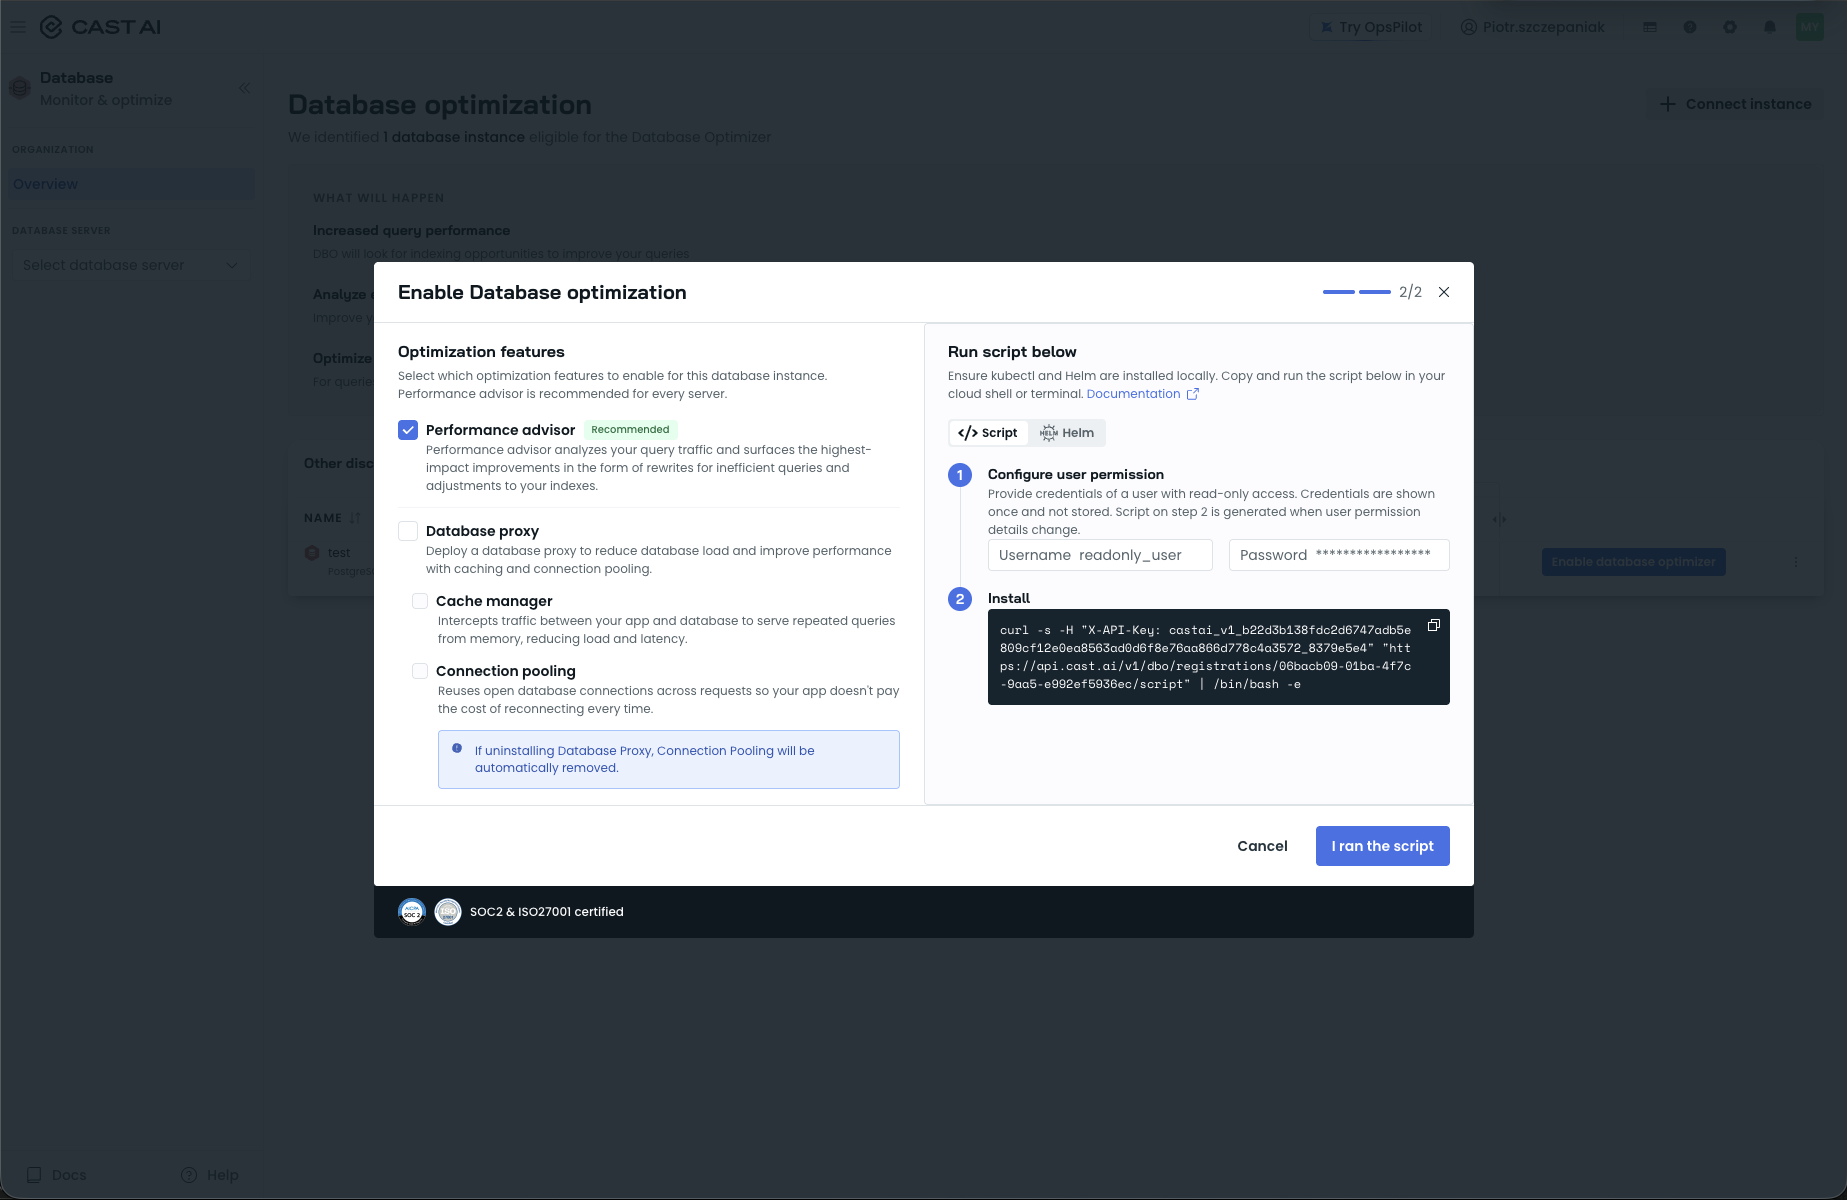
The Enable Database optimization dialog's Script tab.
-
Update your application's connection strings. Point your application at the DBO proxy instead of the RDS or Aurora endpoint: replace the RDS/Aurora hostname with the DBO proxy endpoint and keep every other connection parameter unchanged (database name, user, password, port 5432 for PostgreSQL or 3306 for MySQL, and SSL settings). This is the only application change DBO requires. See Connecting client applications.
-
Verify traffic flow. On the instance dashboard, the status row should show Advisor agent and Database proxy as Active, and Performance advisor, Caching, and Connection pooling as Enabled. From this point DBO monitors your workload in passthrough mode: it caches nothing yet and changes nothing about query results.
Phase 2: enable caching
- Review the projections. While traffic flows through the proxy, DBO measures what caching would achieve. The instance's Caches tab shows the Projected hit rate, Projected cache hits, and projected database time savings collected during passthrough. When the projected gains justify switching, move to the next step.
- Enable caching per database. Open the database's Caching section and set the cache mode to Auto (recommended): DBO's ML engine chooses what to cache and with which TTLs, with no configuration required, and override rules tune the engine's decisions wherever you want different behavior. Once enabled, the Caching page shows a CACHE MODE: Auto badge, and the Cache configuration link exposes the mode and rule settings. See Auto vs. Manual mode and override rules.
What you should see when it works
On an onboarded AWS RDS instance:
- The Health tab shows live instance metrics as charts (CPU utilization, Database connections, Memory usage, and Disk IOPS) with a node filter, and the header tiles confirm the AWS metadata DBO discovered: instance type (for example
db.r6g.2xlarge), region (us-east-1), and account.
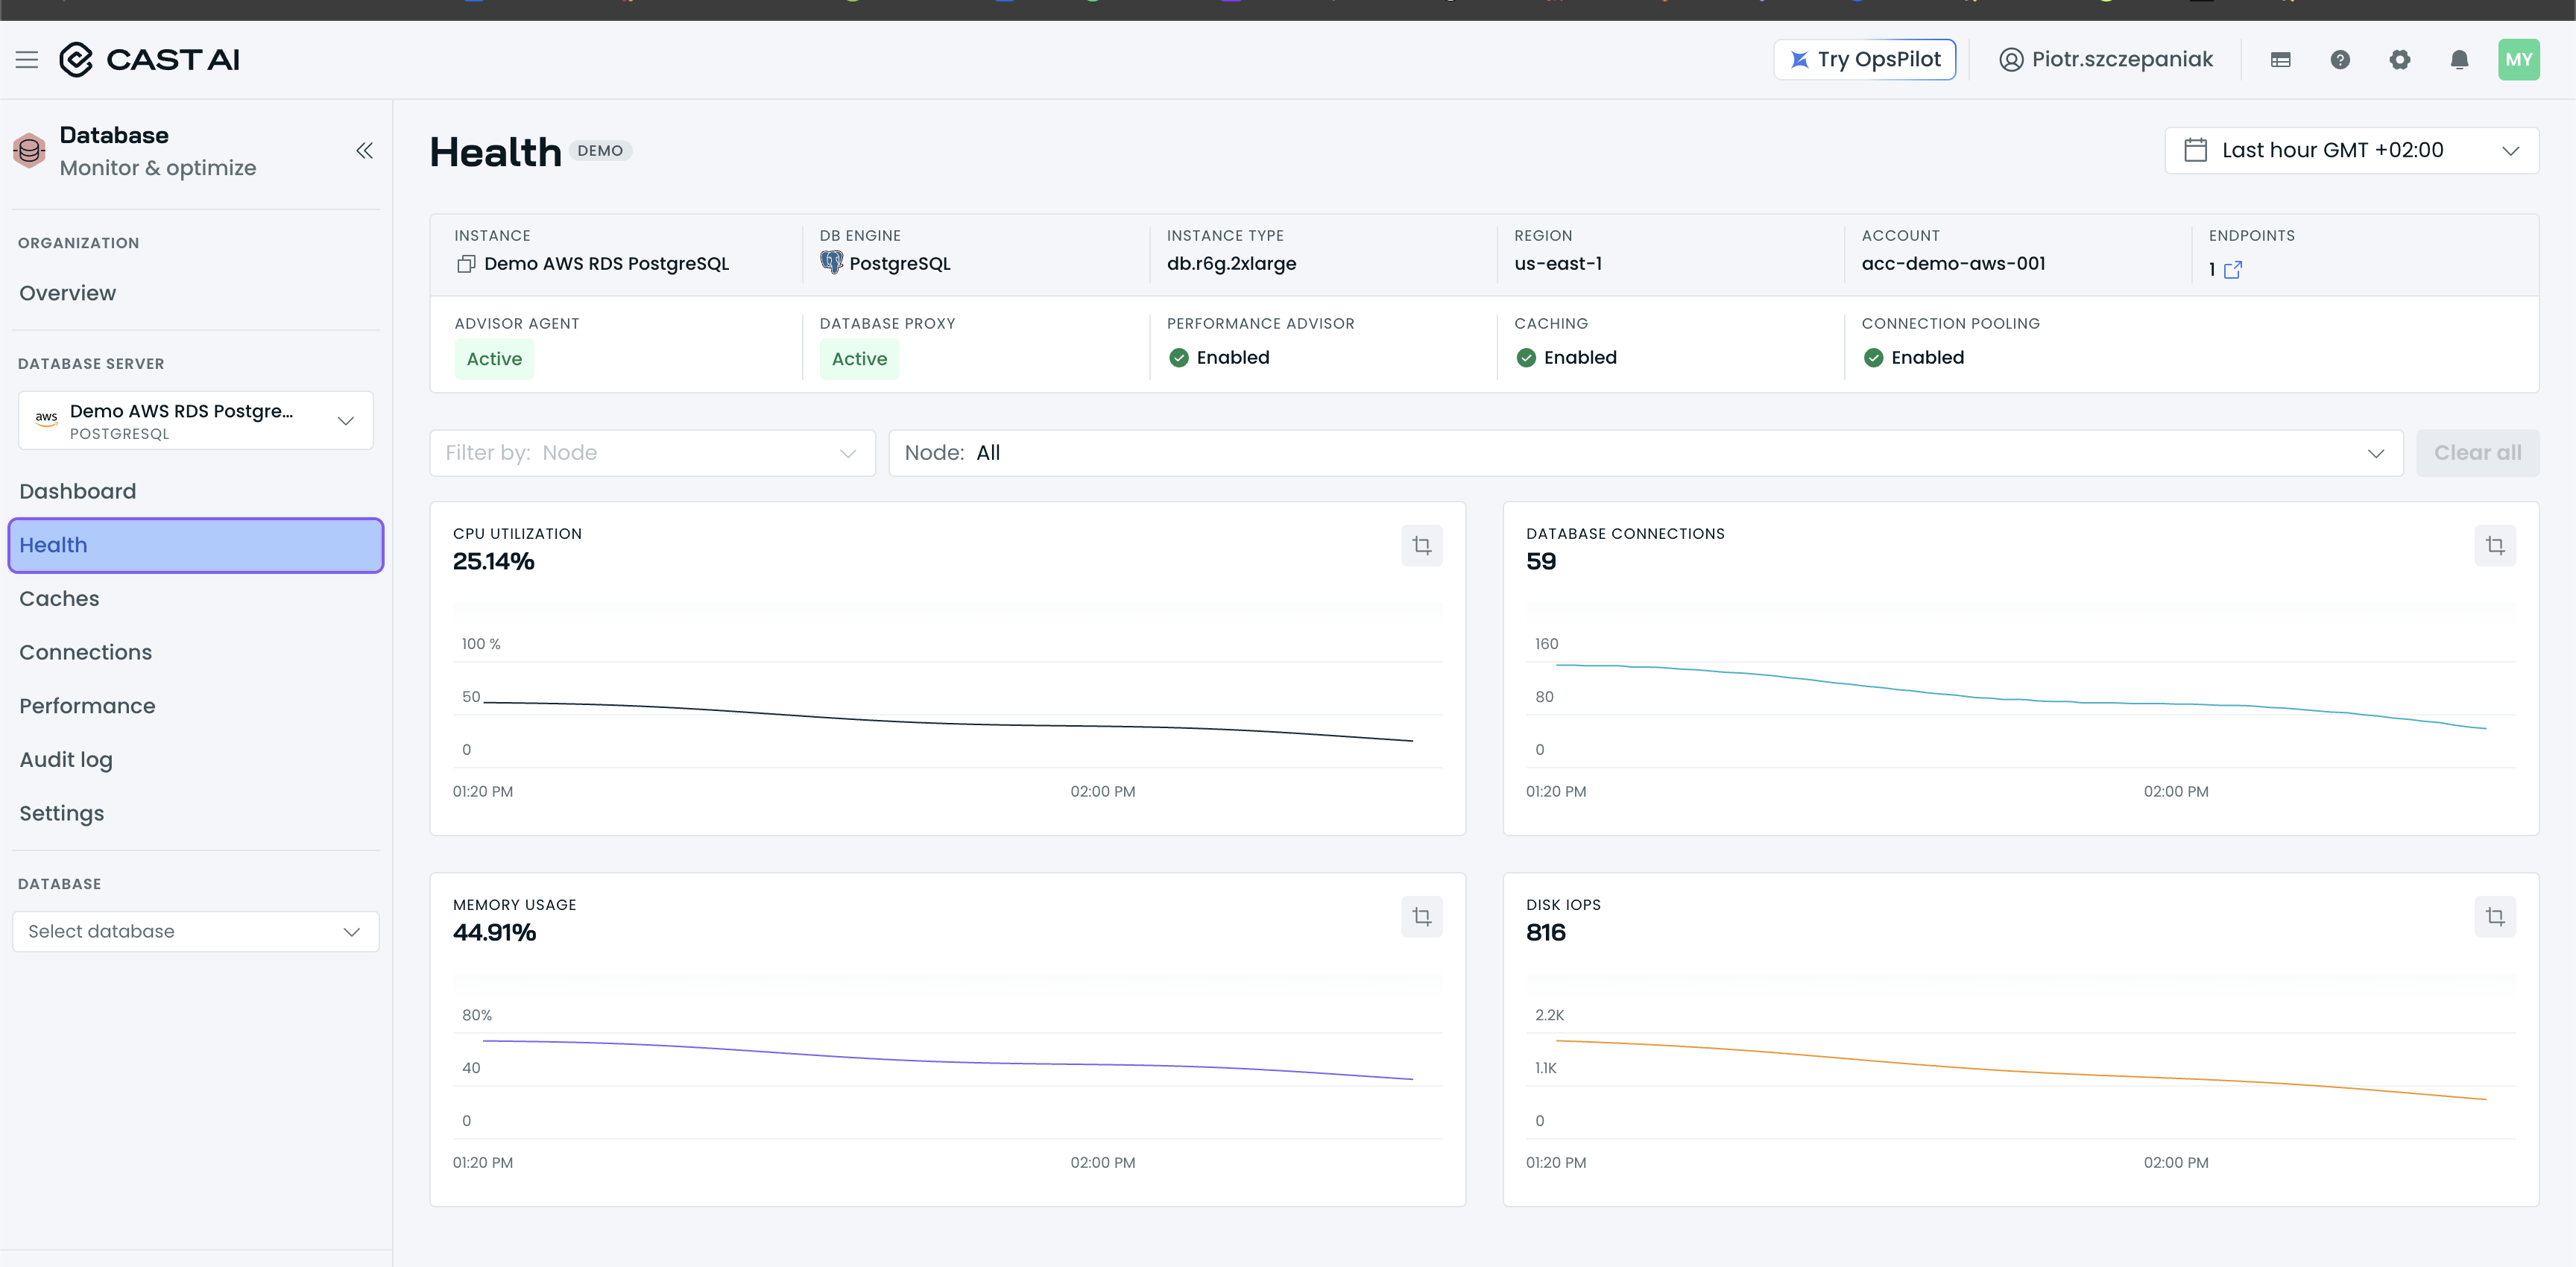
The instance Health tab for an AWS RDS instance, with the live metric charts and the AWS header tiles.
- The Caches tab shows actual results next to the passthrough projections: Hit rate (for example 71.8%) against Projected hit rate (84.3%), Total cache hits (721.45K) plus Projected cache hits (+126.65K more), and Current DB time savings (48.6%) against Proj. savings (61.2%), with the Cache hits overview chart over your selected time range.
Use the gap between projected and actual numbers to tune: if actuals lag the projections, review override rules in Caching or dig into query behavior per query template.
Next steps
Updated 2 hours ago