

Installing the agent for MySQL
Performance Advisor collects its data through a lightweight agent that you deploy as a Kubernetes workload next to your MySQL database. The agent observes your query workload and metadata through read-only access and feeds the recommendations shown in the console. For PostgreSQL, see Installing the agent for PostgreSQL.
Prerequisites
- MySQL 5.7 or later (required for performance schema and query digest support).
- A database user with read-only access to the performance schema and system tables.
- Helm and kubectl configured against the cluster where the agent will run.
Step 1: Create a database user for the agent
CREATE USER 'index_advisor_agent'@'%' IDENTIFIED BY 'your_secure_password_here';Use a strong, unique password. The '%' host wildcard allows connections from any host; restrict it to the agent's IP or subnet in production if needed.
Step 2: Grant required permissions
As a MySQL superuser, grant SELECT on the performance schema, which the agent uses to collect query statistics:
GRANT SELECT ON performance_schema.* TO 'index_advisor_agent'@'%';Then grant REFERENCES on each database you want analyzed. REFERENCES is only used for information_schema lookups; it does not allow reading, modifying, or deleting table data:
GRANT REFERENCES ON your_database.* TO 'index_advisor_agent'@'%';Repeat this grant for each additional database to analyze.
Step 3: Enable Performance Advisor in the console
MySQL instances use the same flow as PostgreSQL: on the organization Overview, click Enable database optimizer on the instance's row (the Not onboarded tab lists discovered MySQL instances with the same action), then tick Performance advisor under Optimization features in the Enable Database optimization dialog. Under Run script below, the Helm tab gives you the installation instructions specific to your instance, with your API key and organization ID already embedded in a downloadable values.yaml (a db-agent: block with enabled: true, apiKey, apiURL, nameOverride, and organizationID); add your MySQL connection details and credentials, then run the generated helm upgrade --install --create-namespace -n castai-db-optimizer ... castai-helm/castai-dbo -f values.yaml command. The Script tab offers a copy-paste alternative that asks for a read-only database user's Username and Password instead. Finish with I ran the script. Your database must be onboarded to DBO first (see Getting started).
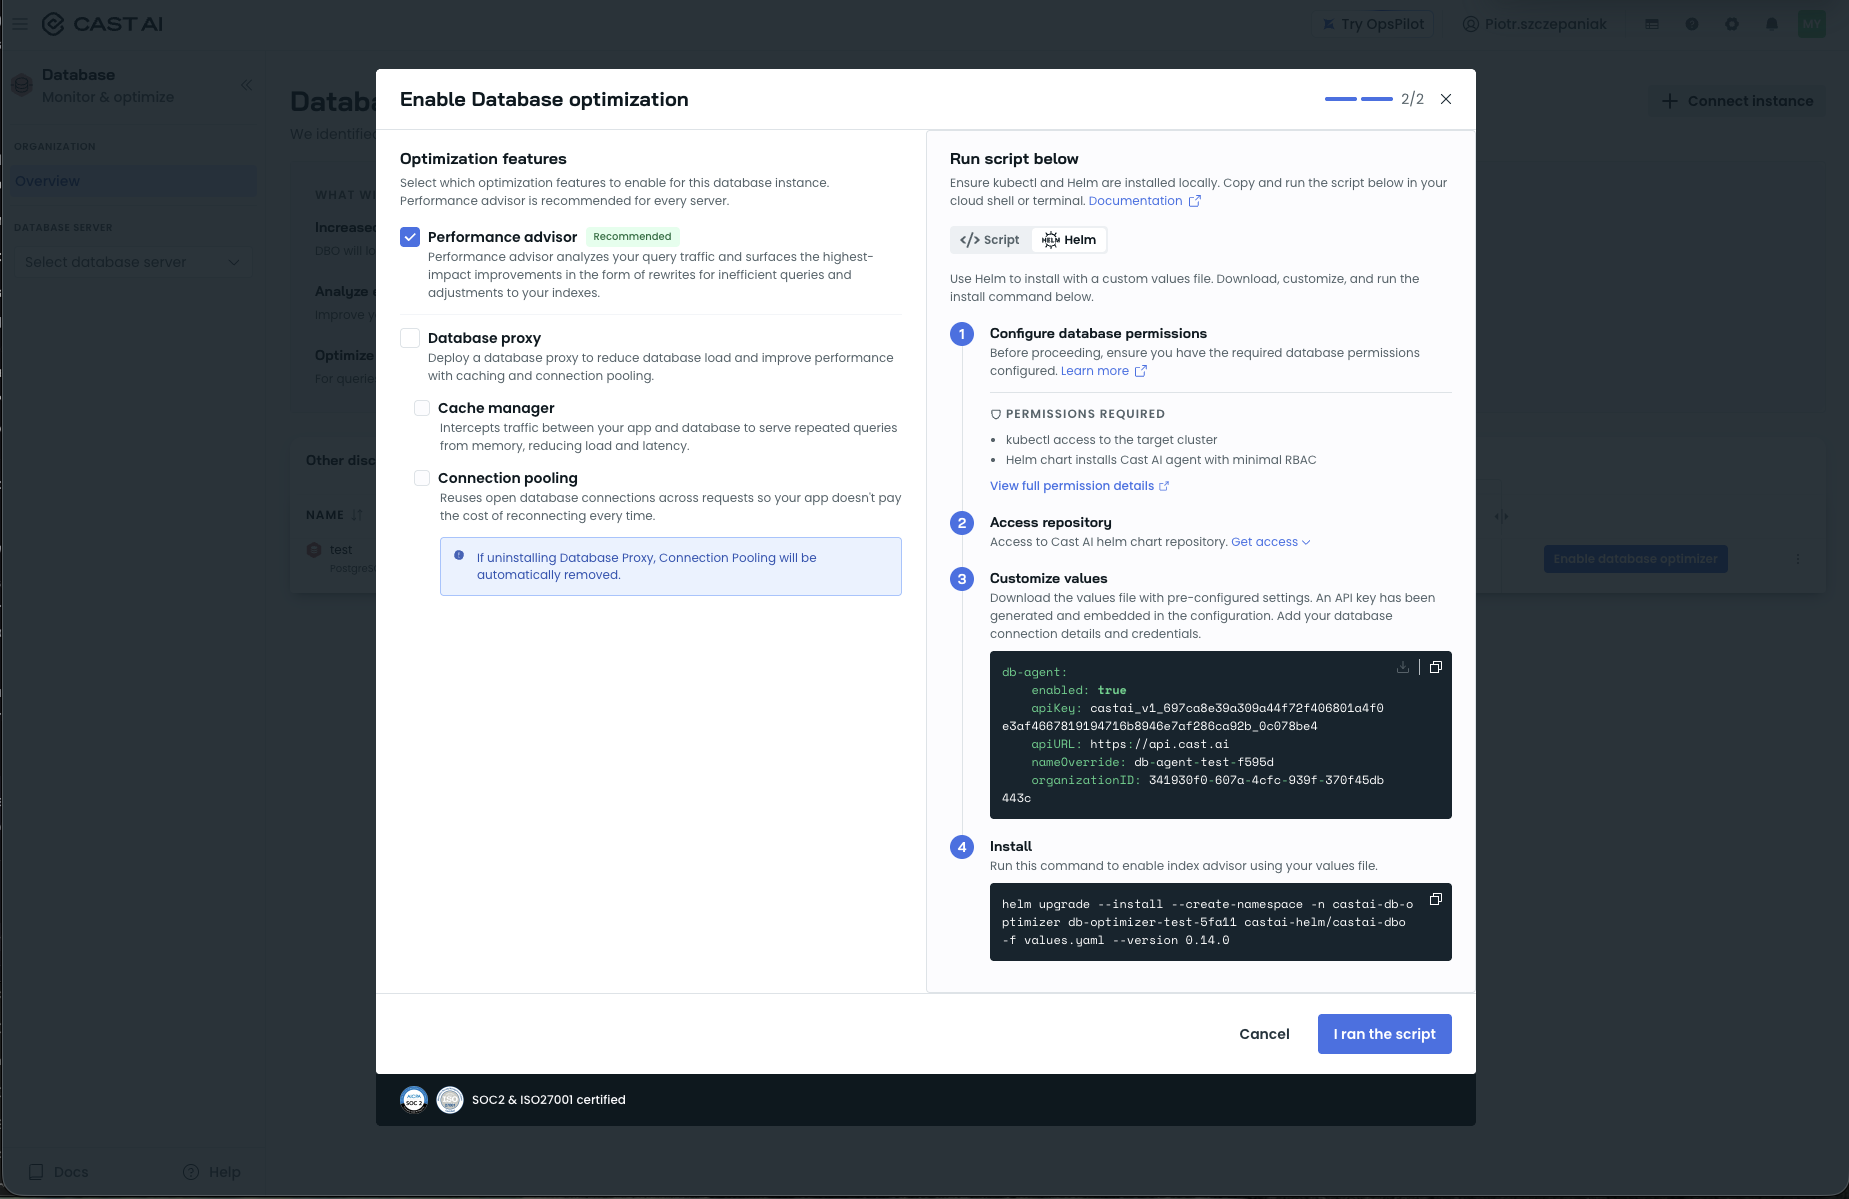
The Enable Database optimization dialog's Helm tab, with the generated values.yaml and the Install command.
Once the agent is installed and healthy, the status row on every instance page shows ADVISOR AGENT Active, and the instance Settings page shows a Performance advisor card with an Active badge.
Step 4: Install the agent via Helm
For production deployments, store credentials in Kubernetes secrets rather than passing them directly to the Helm chart:
kubectl create secret generic castai-db-agent-api-key \
  --namespace castai-db-optimizer \
  --from-literal=API_KEY='your-api-key-here'

kubectl create secret generic castai-db-agent-db-credentials \
  --namespace castai-db-optimizer \
  --from-literal=DATABASE_USERNAME='index_advisor_agent' \
  --from-literal=DATABASE_PASSWORD='your_secure_password_here'
Reference them in values.yaml with apiKeySecretRef and database.credentialsSecretRef (host, port 3306, database name, and protocol mysql). Then add the Cast AI Helm repository and install the agent:
helm repo add castai-helm https://castai.github.io/helm-charts
helm repo update
helm upgrade --install castai-db-agent castai-helm/castai-dbo \
  --namespace castai-db-optimizer --create-namespace \
  --values values.yaml
Verify that the agent is running:
kubectl get pods -n castai-db-optimizerOnce the pods are healthy, recommendations appear in the console within a few minutes.
Managing the agent
To remove the agent, open the instance Settings page and click Uninstall on the Performance advisor card.
Next steps
Updated 2 hours ago