

Getting started
Cast AI Database Optimizer (DBO) is a database optimization product for PostgreSQL and MySQL, organized around your database instances. Onboarding means connecting an instance and deploying DBO's container-based components, then enabling capabilities in the recommended order: the Performance Advisor first, which is read-only, zero risk, and valuable for every workload, and then caching and connection pooling, where the workload fit is there.
Recommended adoption order
- Connect an instance. The guided setup wizard runs the connect script, which creates the required read-only, scoped credentials, and discovers your instances, ranked by optimization opportunity, within about 10 minutes. Instances without auto-discovery can be connected manually.
- Deploy DBO, then start with the Performance Advisor. In the Enable Database optimization dialog, all optimization features are pre-checked: Performance advisor (marked Recommended), Database proxy, Cache manager, and Connection pooling. One script or Helm command deploys the agent and the Database proxy. Once the agent is deployed, the Performance Advisor starts analyzing your workload, read-only, with no proxy routing required, and first recommendations typically appear within about 30 minutes. It changes nothing in your databases and benefits every workload, whether or not you adopt the proxy features.
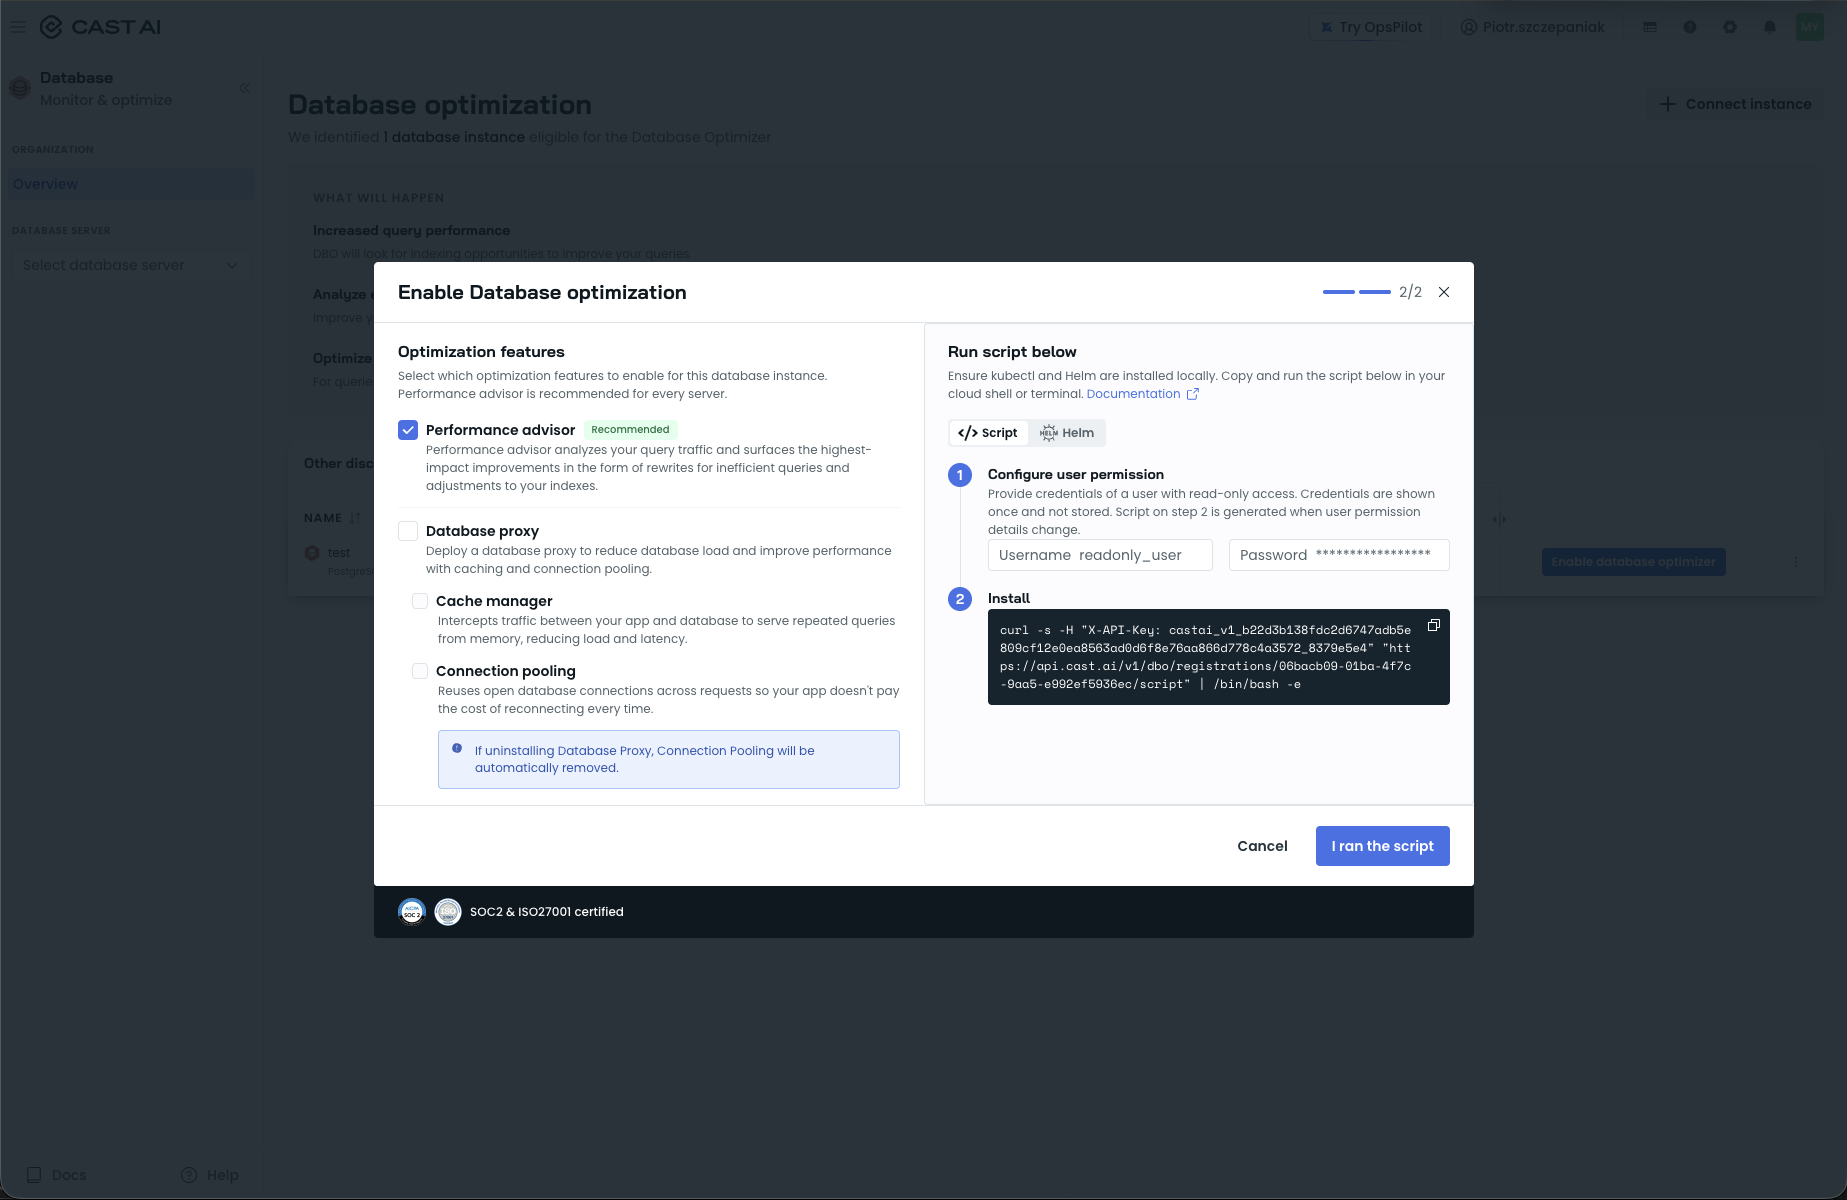
The Enable Database optimization dialog, with the Optimization features checkboxes and the Script tab.
- Then enable the proxy features per workload fit. Caching and connection pooling take effect when you point your application at the proxy with an updated connection string: a configuration change, no code changes. Caching pays off for read-heavy workloads; connection pooling helps where pod autoscaling or connection churn strains your database. When caching is enabled, it starts in passthrough mode: the proxy routes traffic but caches nothing, measuring projected hit rate and database time savings with zero risk to production traffic while it learns your query patterns. Switch to Auto mode (recommended) to let the proxy's ML model decide what to cache and for how long.
Choose your setup path
Pick the path that matches where your databases run. With auto-discovery you connect your AWS account or Google Cloud project by running the connect script, and DBO discovers your database instances automatically; any other instance is connected manually, instance by instance:
- AWS RDS & Aurora quick start: auto-discovery for Amazon RDS instances and Aurora clusters.
- Cloud SQL Proxy quick start: auto-discovery for Google Cloud SQL instances, including private IPs.
- Manual connection, described below: self-hosted PostgreSQL or MySQL and any cloud provider, instance by instance.
All paths deploy DBO's container-based components into your Kubernetes cluster, for example Amazon EKS or Google GKE, or on Amazon ECS. The flows in these guides show the Kubernetes path: components deploy into the castai-db-optimizer namespace, and you need kubectl and helm available. For supported engines, versions, and cloud providers, see Supported platforms.
What each path looks like
In every path, once the components are deployed, start with the Performance Advisor; then adopt caching and connection pooling as a second step, when the workload fit is there, caching for read-heavy traffic, pooling where autoscaling or connection churn hurts.
AWS RDS and Aurora (auto-discovery)
- Connect your AWS account by running the connect script from the console (AWS CloudShell or CLI); it creates the IAM role and attaches the required permissions for you.
- Review the auto-discovered RDS and Aurora instances.
- Deploy DBO to an instance by running the deployment script.
- Update connection strings to route through DBO.
- Enable caching per database when the projections look good.
Cloud SQL on Google Cloud (cloud connect)
- On the Overview page, click + Connect instance, select Connect your cloud, pick GCP, and run the discovery script; it creates the service account and scans your projects for Cloud SQL instances.
- Review the auto-discovered Cloud SQL instances.
- Deploy DBO to an instance by running the deployment script.
- Update connection strings to route through the proxy.
- Enable caching per database when the projections look good.
Manual (any PostgreSQL or MySQL)
-
On the organization Overview page, click + Connect instance.
The How would you like to connect? dialog opens with two paths: Connect your cloud (discover instances through your cloud account) and Onboard a single instance manually. Select Onboard a single instance manually and provide the instance's connection details: pick the database engine (Postgres or MySQL) and enter an Instance name.
Under ENDPOINT CONFIGURATION, fill in Host and Port (prefilled with 5432 for Postgres and 3306 for MySQL) and tick Read Only if the endpoint should only be monitored. Use + Add endpoint to configure additional connection endpoints, then click Next (or Close and go to console to finish later).
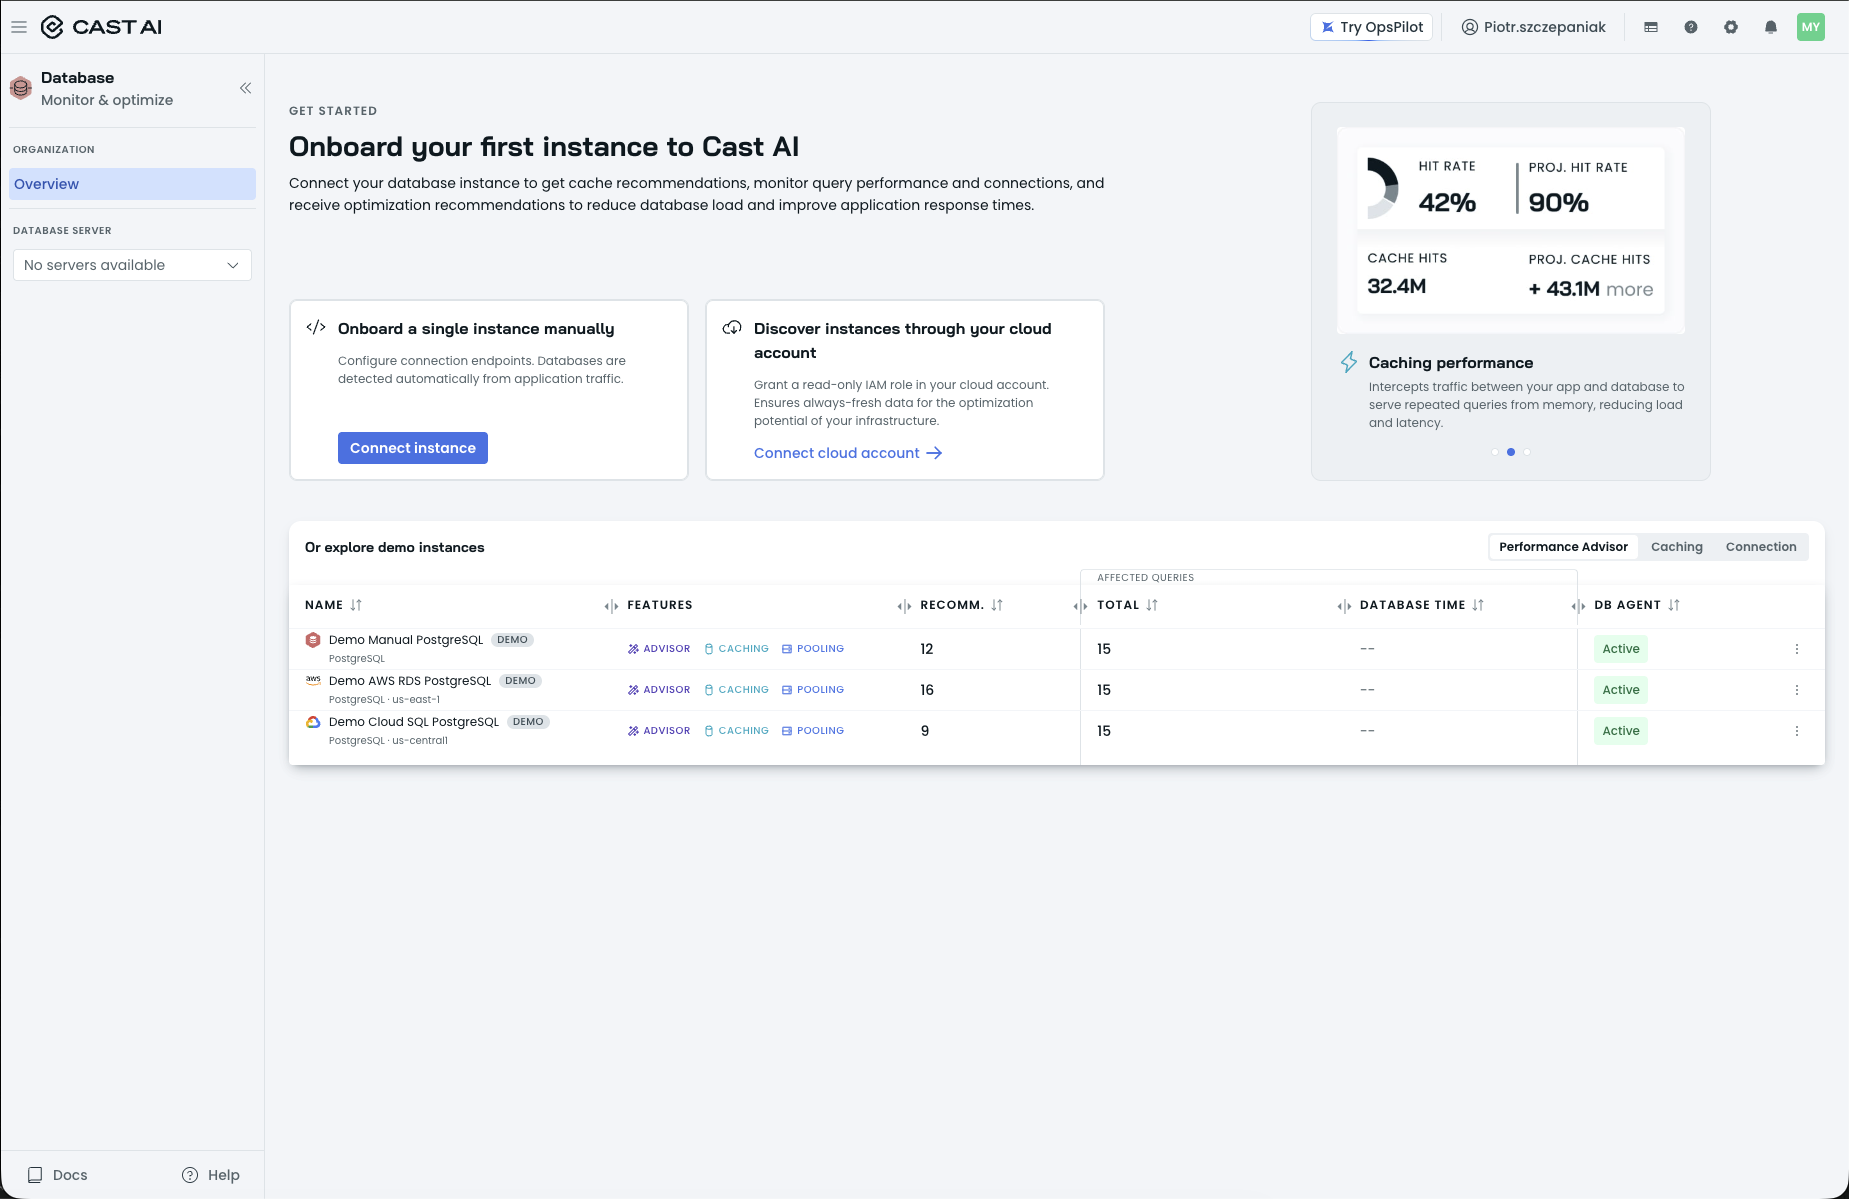
The organization Overview empty state, with the Onboard your first instance panel and the Connect instance button.
Choosing Onboard a single instance manually opens the manual connection form:
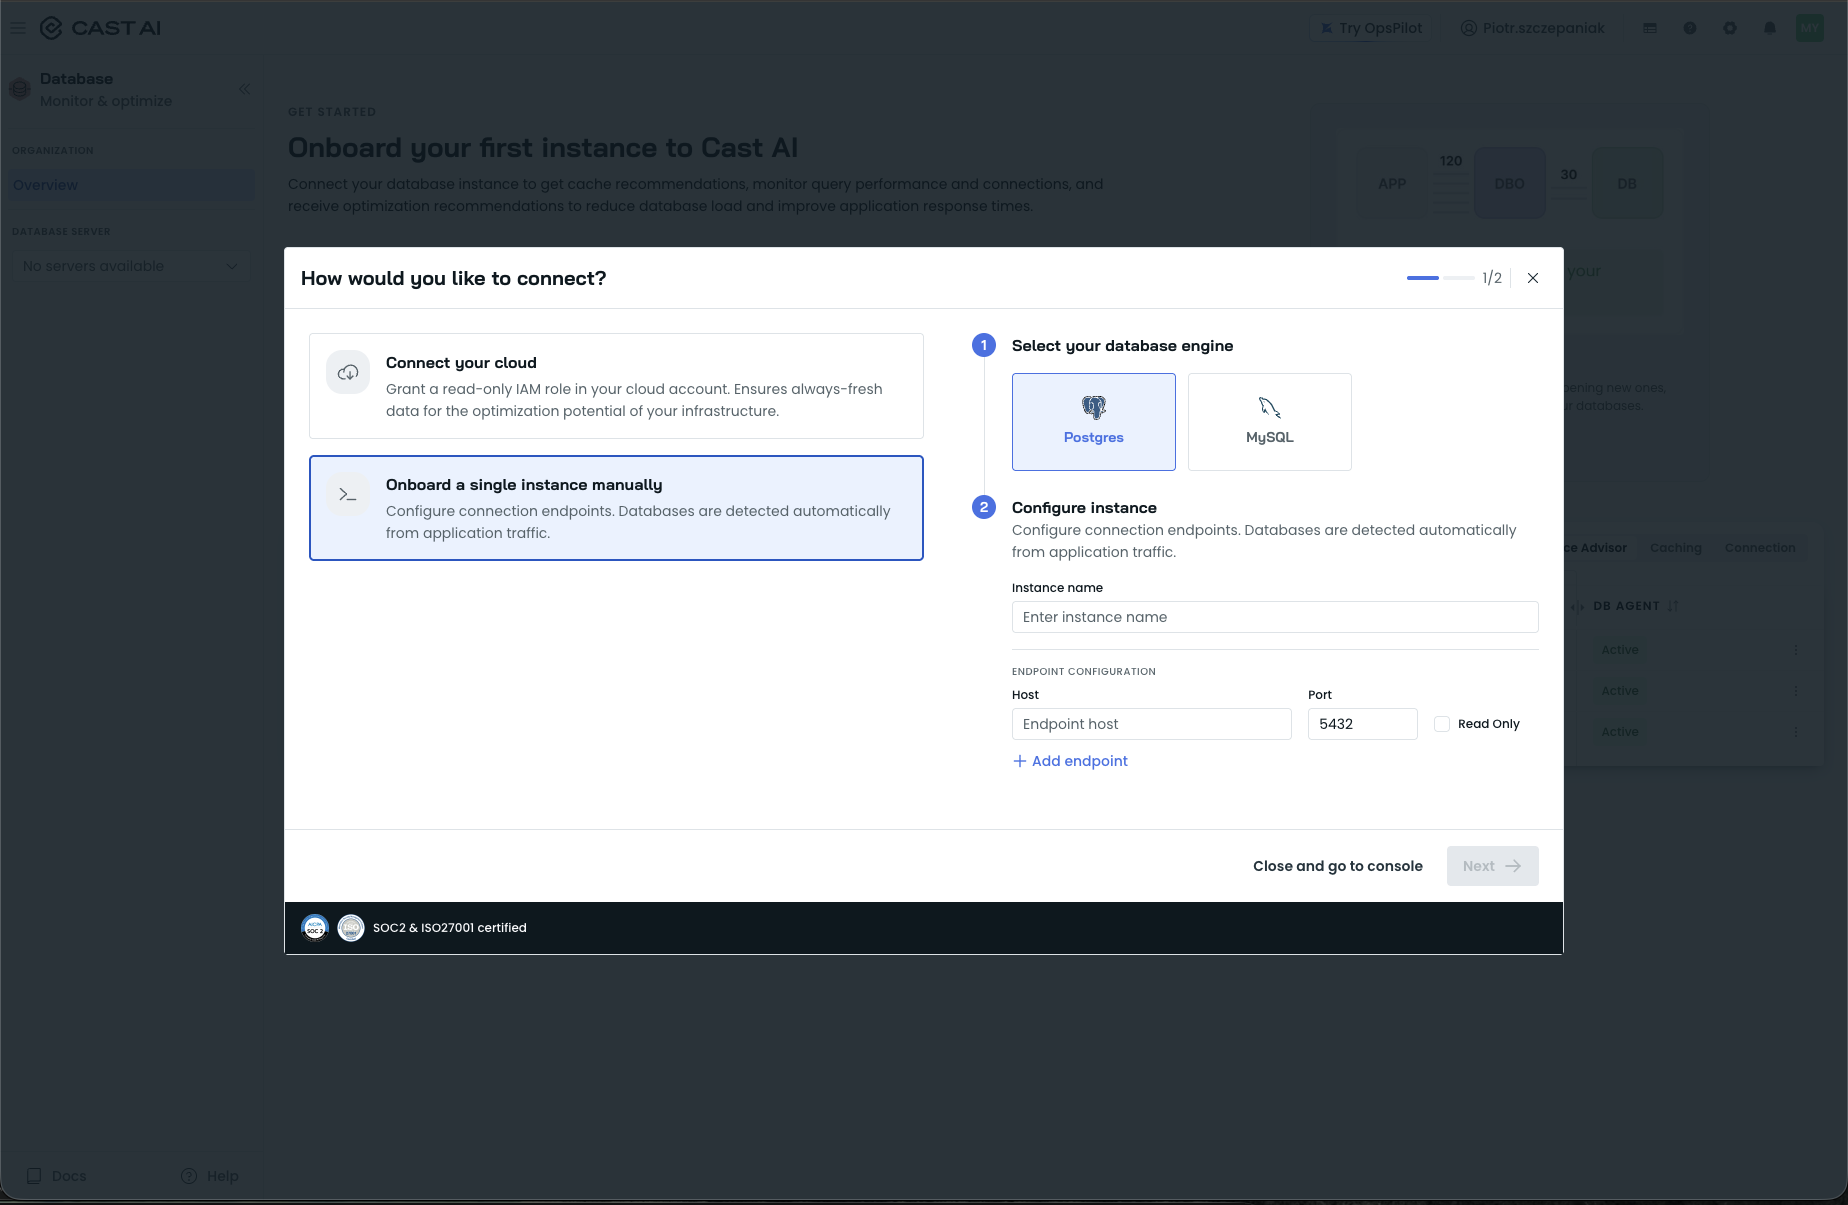
The How would you like to connect? dialog's manual onboarding form, with engine selection, instance name, and endpoint configuration.
- Deploy DBO, update the connection string, and enable the features you want.
Where you land in the console
Everything starts from the Database optimization Overview page (left nav: Database → Overview), which lists instances under Onboarded and Not onboarded tabs and summarizes the fleet-level opportunities. Open an instance from the Select database server picker: Advisor agent and Database proxy show Active, and Performance advisor, Caching, and Connection pooling show Enabled. Use the Select database picker for per-database caching and performance.
Next steps
Updated 2 hours ago