
Create and manage batch jobs
Upload input files, create batch jobs, track progress, and download results using the OpenAI-compatible Batch and Files APIs.
This guide walks through the full batch processing workflow: preparing an input file, uploading it, creating a batch job, monitoring progress, and downloading results. All operations use the OpenAI-compatible APIs exposed by the AI Enabler proxy in your cluster.
For background on how batch processing works, see Batch processing.
Before you start
Before creating a batch job, ensure the following:
- GKE cluster onboarded with AI Enabler — batch processing currently requires a GKE cluster. AWS (EKS) and Azure (AKS) support is not yet available. The cluster must be onboarded through the Cast AI console with the storage component included. The GCS storage bucket is provisioned automatically during onboarding. See Hosted model deployment for setup instructions.
- Hosted model deployed and running — batch processing uses an existing hosted model in your cluster. Deploy one from the Model library tab in AI Enabler > Self-hosted models if you haven't already. See Hosted model deployment for details.
- Tools installed — you need
kubectl(configured for your cluster context),gcloudCLI (authenticated), andcurlor another HTTP client.
To verify that storage is configured, check for the bucket using your cluster ID. The bucket name follows the pattern castai-ai-optimizer-proxy-storage-<CLUSTER_ID_PREFIX>, where the prefix is the first 8 characters of your cluster ID:
gcloud storage buckets describe gs://castai-ai-optimizer-proxy-storage-<CLUSTER_ID_PREFIX>Access the AI Enabler proxy
The AI Enabler proxy is not externally exposed. Port-forward the service to access the APIs from your local machine:
kubectl port-forward svc/castai-ai-optimizer-proxy 8080:443 -n castai-agentAll API calls in this guide use http://localhost:8080 as the base URL. Replace the Authorization header value with your Cast AI API key.
NoteKeep the port-forward session running in a separate terminal while you work through the steps below.
Step 1: Prepare the input file
Create a JSONL file where each line is a JSON object representing one inference request. Every line must include custom_id, method, url, and body with a model field.
   {"custom_id": "request-1", "method": "POST", "url": "/v1/chat/completions", "body": {"model": "llama3.2:1b", "messages": [{"role": "system", "content": "You are a helpful assistant."}, {"role": "user", "content": "Summarize the concept of GPU scheduling."}], "max_tokens": 1000}}
   {"custom_id": "request-2", "method": "POST", "url": "/v1/chat/completions", "body": {"model": "llama3.2:1b", "messages": [{"role": "user", "content": "Translate the following to French: Hello, how are you?"}], "max_tokens": 1000}}
All requests in a single file must use the same endpoint — either /v1/chat/completions or /v1/embeddings.
WarningThe
modelvalue in each request must match a self-hosted model deployed in your cluster. The models list endpoint returns all models the proxy can route to — including SaaS provider models and serverless endpoints — but only self-hosted models are valid for batch processing.The simplest way to find the correct model ID is to check AI Enabler > Self-hosted models > Deployed models in the Cast AI console. The model name shown there is the ID to use in your input file.
Alternatively, you can query the API and look for your deployed model in the response:
curl http://localhost:8080/openai/v1/models \
  --header 'Authorization: Bearer <YOUR_API_KEY>'
This returns all routable models. Match the ID against what you see in the Deployed models list in AI Enabler > Self-hosted models to confirm it's a valid batch target.
Input file limits:
| Limit | Value |
|---|---|
| Maximum file size | 100 MB |
| Maximum lines (requests) | 50,000 |
If you need higher limits, contact Cast AI support.
Step 2: Upload the input file
Upload the JSONL file using the Files API. Set the purpose to batch, which applies a default expiration of 30 days.
curl http://localhost:8080/openai/v1/files \
  --header 'Authorization: Bearer <YOUR_API_KEY>' \
  --form 'purpose="batch"' \
  --form 'file=@"my_batch_input.jsonl"'
The response includes the id you'll need when creating the batch job:
{
  "id": "file_50718733-4ef8-4e25-9fd5-92d8475454b9",
  "object": "file",
  "bytes": 17537,
  "created_at": 1771945452,
  "filename": "my_batch_input.jsonl",
  "purpose": "batch",
  "expires_at": 1774537452
}
The file is stored in your cluster's GCS bucket at gs://castai-ai-optimizer-proxy-storage-<CLUSTER_ID_PREFIX>/openai/files/<FILE_ID>.jsonl. Public access is disabled, so use the Files API to retrieve contents or authenticate directly with GCS.
You can set a custom TTL using the expires_after parameter. See the OpenAI Files API documentation for details.
Step 3: Create a batch job
Create a batch job by calling the Batch API with the uploaded file ID:
curl http://localhost:8080/openai/v1/batches \
  --header 'Content-Type: application/json' \
  --header 'Authorization: Bearer <YOUR_API_KEY>' \
  --data '{
    "input_file_id": "file_50718733-4ef8-4e25-9fd5-92d8475454b9",
    "endpoint": "/v1/chat/completions",
    "completion_window": "24h",
    "metadata": {
      "cast.ai/batch-name": "My content translation batch"
    }
  }'
Required parameters:
| Parameter | Description |
|---|---|
input_file_id | The file ID returned from the upload step. |
endpoint | Either /v1/chat/completions or /v1/embeddings. Must match the url values in the input file. |
completion_window | Set to 24h. This is the only supported value. |
Optional parameters:
| Parameter | Description |
|---|---|
metadata | Key-value pairs for tracking. Use cast.ai/batch-name to assign a custom display name visible in the console. |
The job starts processing immediately after creation. The response includes the batch ID and initial status of VALIDATING:
{
  "id": "batch_46f310d4-8e1c-41a6-a9dc-15f66a7be0d2",
  "object": "BATCH",
  "endpoint": "/v1/chat/completions",
  "input_file_id": "file_50718733-4ef8-4e25-9fd5-92d8475454b9",
  "completion_window": "24h",
  "status": "VALIDATING",
  "output_file_id": "",
  "error_file_id": "",
  "created_at": 1771948236,
  "request_counts": {
    "total": 0,
    "completed": 0,
    "failed": 0
  },
  "metadata": {
    "cast.ai/batch-name": "My content translation batch"
  }
}
WarningIf the job does not complete within 24 hours, processing terminates and the job status becomes
expired. Partial results remain available in the output file.
Step 4: Track job progress
Via API
Poll the batch endpoint to monitor progress. The request_counts field updates periodically during execution:
curl http://localhost:8080/openai/v1/batches/<batch-id> \
  --header 'Authorization: Bearer <YOUR_API_KEY>'
Key fields in the response:
| Field | Description |
|---|---|
status | Current job status. See Batch job lifecycle for all values. |
request_counts | Object with total, completed, and failed counts. |
output_file_id | File ID for the results. Available once processing begins. |
error_file_id | File ID containing only failed request entries. |
usage | Token counts: input_tokens, output_tokens, total_tokens. |
For the full response schema, see the Batch API reference.
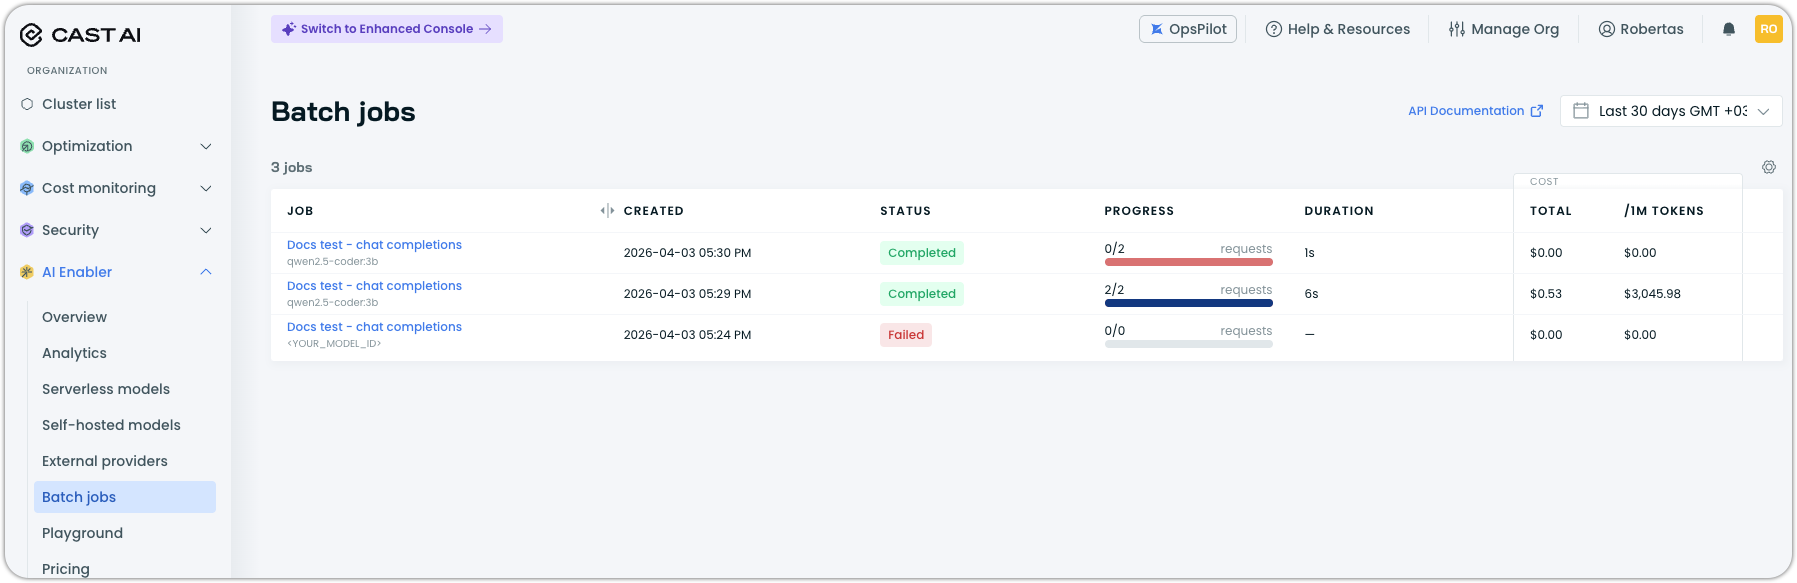
Via console
Navigate to AI Enabler > Batch jobs in the Cast AI console. The list view shows all batch jobs with their status, progress, duration, and cost.
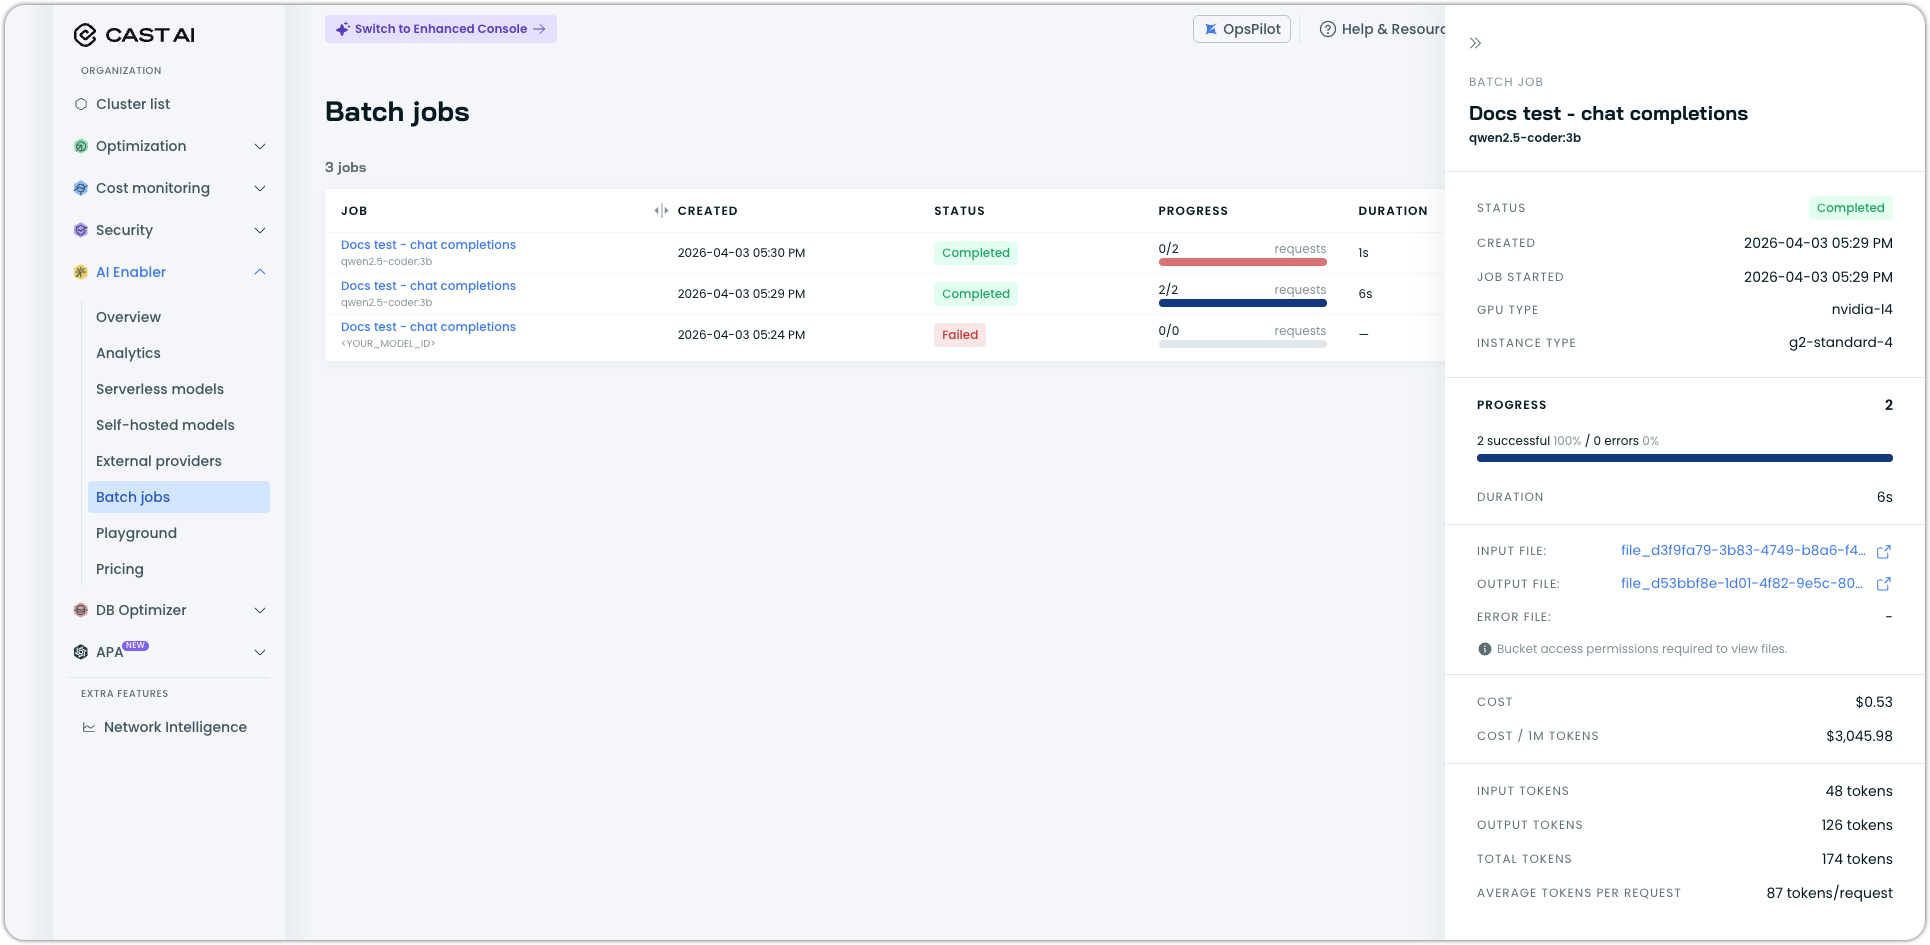
Click a job to open the detail drawer, which includes:
- Status and timestamps (created, started)
- GPU type and instance type used for processing
- Progress breakdown with completed requests, errors, and remaining requests
- Duration and estimated time remaining
- Links to input, output, and error files (requires GCS bucket access permissions)
- Cost (total and per 1M tokens)
- Token statistics (input, output, total, average per request)
Via kubectl
You can also locate the batch job processor running in your cluster:
kubectl get jobs -n castai-agent | grep castai-ai-optimizer-batch-processorThe processor is a short-lived Kubernetes job that restarts automatically if interrupted and terminates upon completion.
Step 5: Download the output file
Once the job reaches completed status (or while it's still in_progress for partial results), download the output file using the file ID from the batch response:
curl http://localhost:8080/openai/v1/files/<OUTPUT_FILE_ID>/content \
  --header 'Authorization: Bearer <YOUR_API_KEY>' \
  --output results.jsonl
Each line in the output file is a JSON object corresponding to one input request:
{"id": "batch_req_123", "custom_id": "request-1", "response": {"status_code": 200, "request_id": "req_123", "body": {"id": "chatcmpl-abc", "object": "chat.completion", "created": 1711652795, "model": "llama3.2:1b", "choices": [{"index": 0, "message": {"role": "assistant", "content": "Hello."}, "logprobs": null, "finish_reason": "stop"}], "usage": {"prompt_tokens": 22, "completion_tokens": 2, "total_tokens": 24}}}, "error": null}Lines are not guaranteed to appear in input order. Use the custom_id field to match results to requests.
You can also download output files from the console. Open the batch job detail drawer and click the output file link. Error files are available the same way through the error file link. Both links point to objects in your GCS bucket, so you need the appropriate bucket access permissions.
If the batch had any request-level errors, the error file contains only the failed request entries. It follows the same JSONL structure, with the error field populated and response set to null.
Cancel a batch job
You can cancel a running batch job at any time. This stops processing immediately, including in-flight requests, and tears down the job deployment:
curl -X POST http://localhost:8080/openai/v1/batches/<BATCH_ID>/cancel \
  --header 'Authorization: Bearer <YOUR_API_KEY>'
You can also cancel a batch job from the console. Open the batch job detail drawer, click the overflow menu (three dots), and select Cancel.
Cancellation may take up to 10 minutes to complete. During this time the job status is cancelling, after which it becomes cancelled.
Partial output files remain available after cancellation. You cannot restart a cancelled job — create a new one instead.
Delete files
Remove input or output files you no longer need:
curl -X DELETE http://localhost:8080/openai/v1/files/<FILE_ID> \
  --header 'Authorization: Bearer <YOUR_API_KEY>'
Files uploaded with purpose: "batch" expire automatically after 30 days unless a custom TTL was specified.