
OpenCode
Tutorial for configuring OpenCode to use Cast AI Serverless Endpoints for AI-assisted coding.
This tutorial walks you through using Cast AI's Serverless Endpoints with OpenCode, an agentic coding tool. You'll configure OpenCode to use MiniMax M2.7 for coding, Kimi K2.5 for image analysis, and GLM 5 for planning, giving you a cost-effective setup for AI-assisted development.
Overview
By the end of this tutorial, you'll be able to:
- Configure OpenCode to recognize AI Enabler as a model provider
- Use GLM 5 for planning and deep reasoning tasks
- Use Kimi K2.5 for image analysis
- Use MiniMax M2.7 for code generation and execution tasks
- Set up a multi-model workflow that uses different models for different tasks
This tutorial is intended for developers familiar with command-line tools and JSON configuration files. It assumes basic knowledge of how LLM-based coding assistants work.
Prerequisites
Before starting, ensure you have:
-
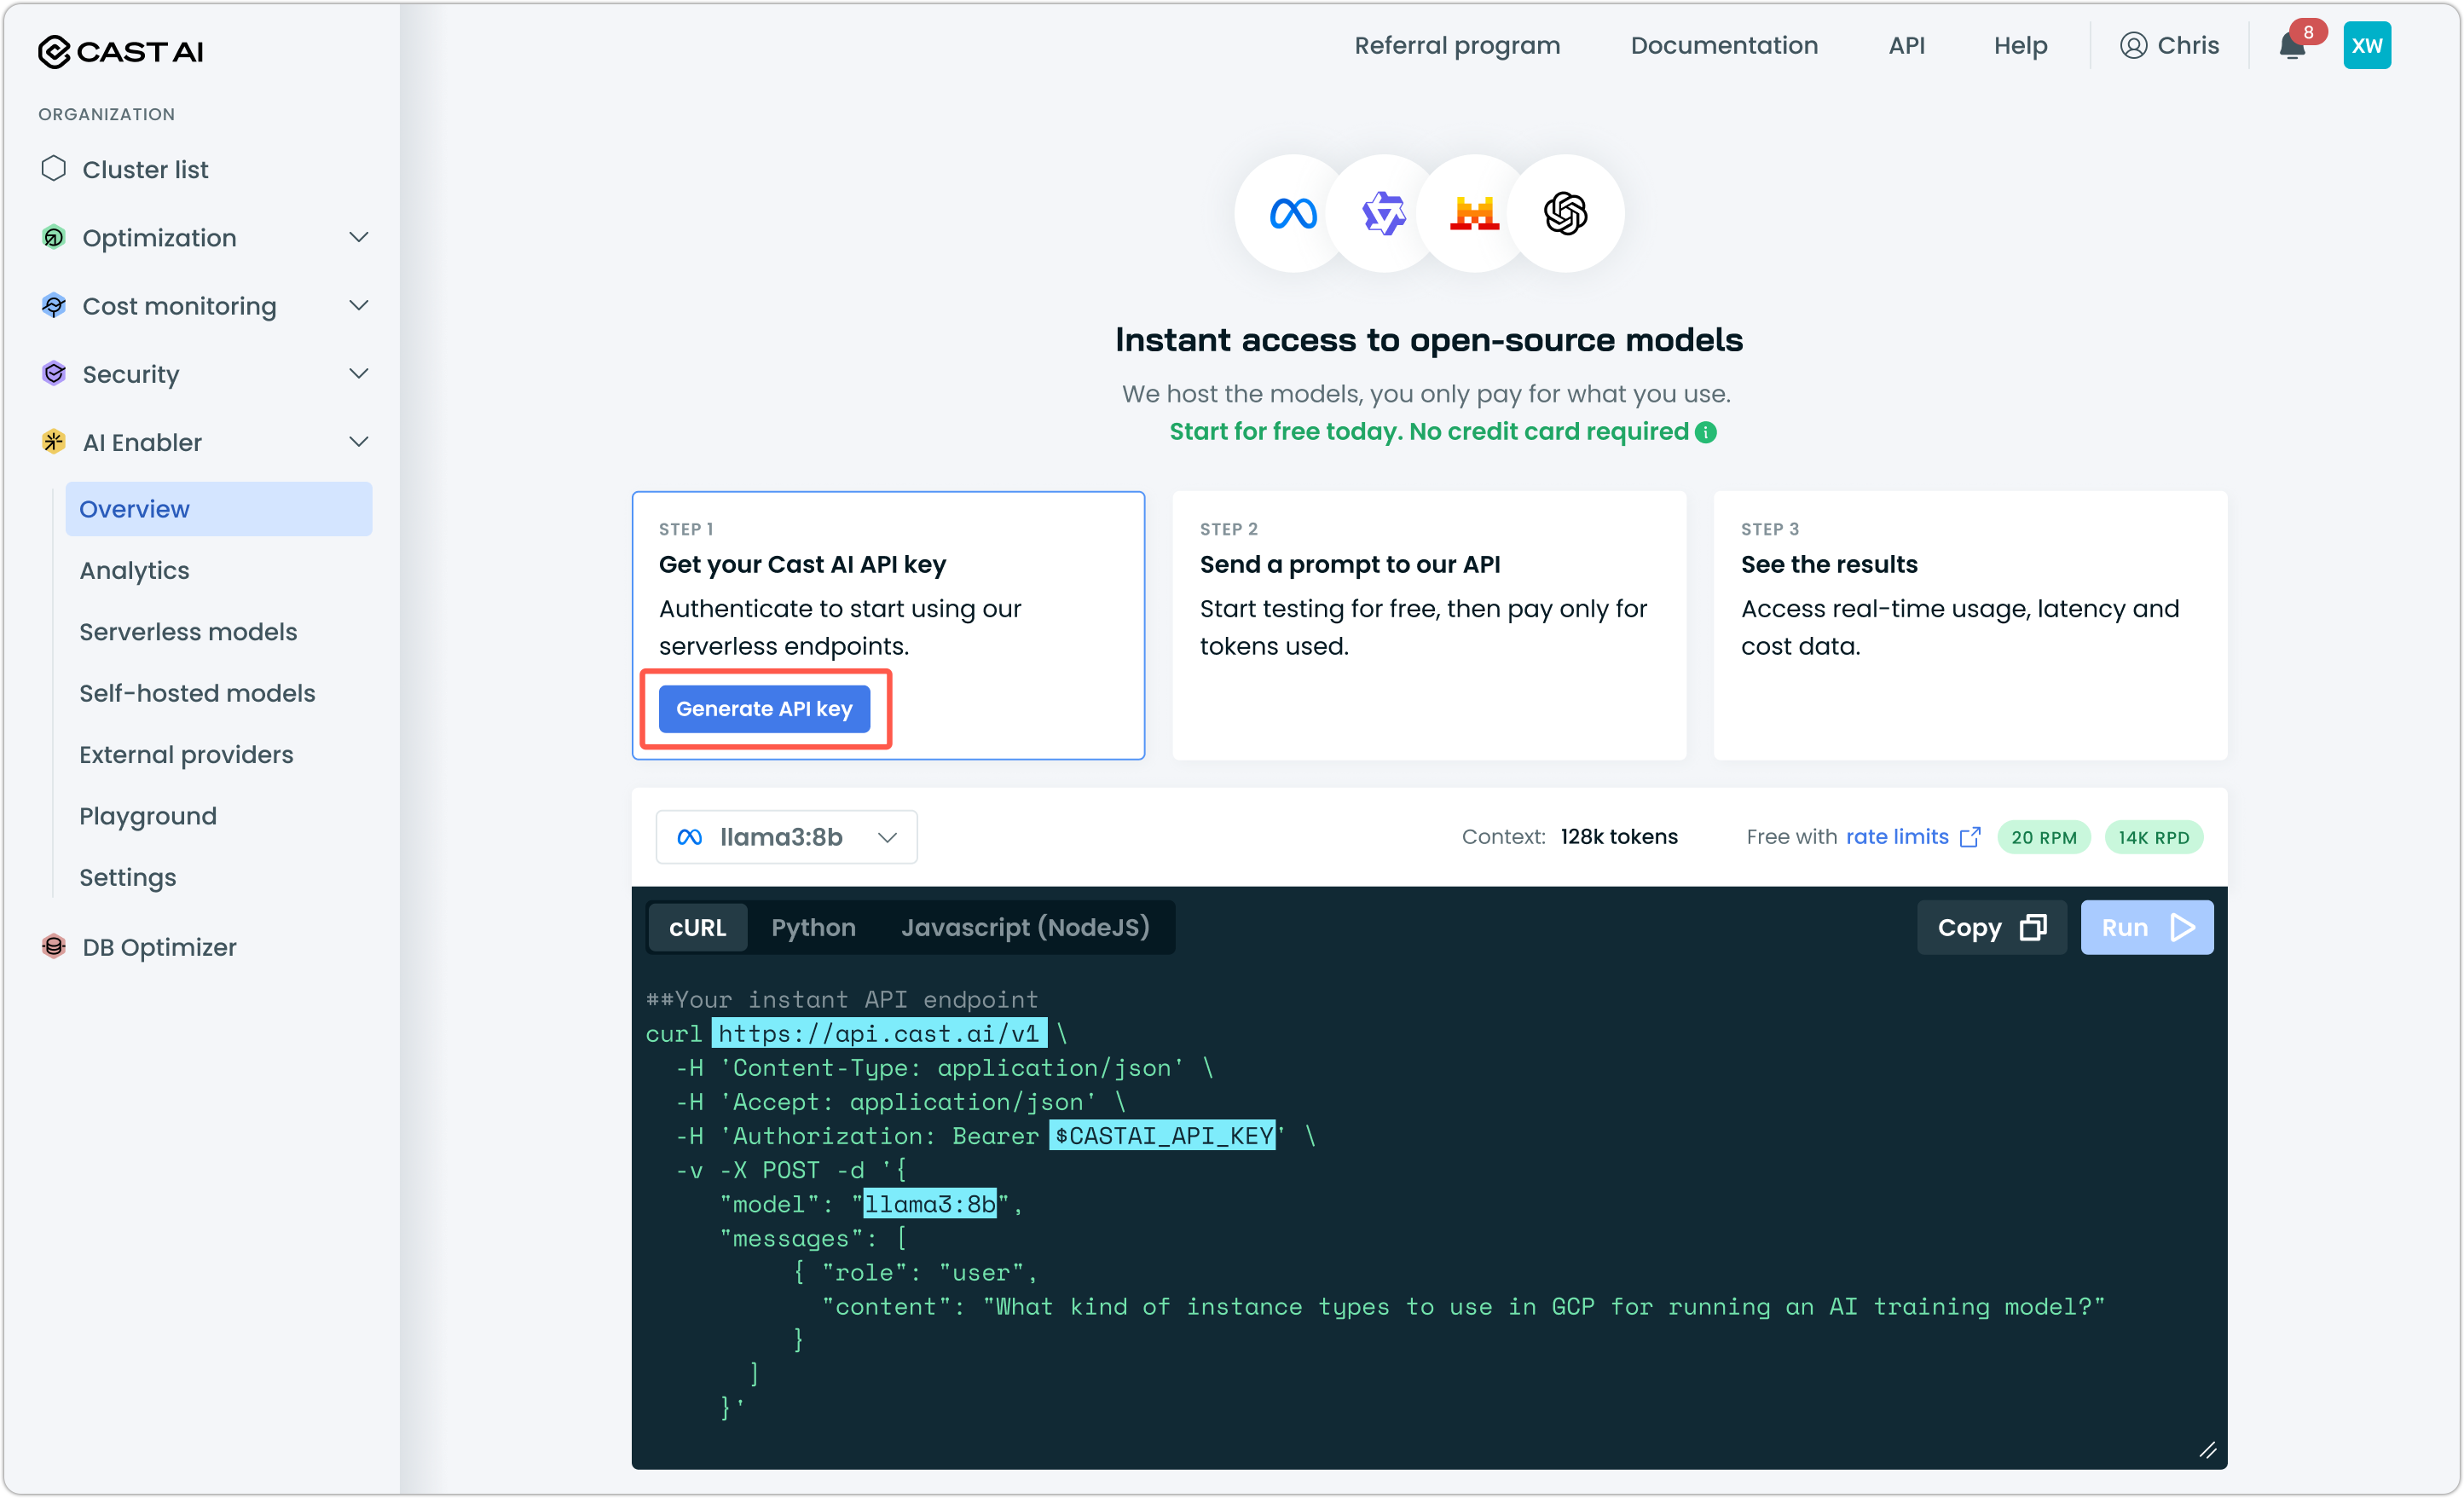
A Cast AI API key — Generate one from the Cast AI console under AI Enabler > Overview
-
OpenCode installed — Install from opencode.ai or run the following in your terminal:
curl -fsSL https://opencode.ai/install | bash
Step 1: Create the OpenCode configuration file
OpenCode needs a configuration file to recognize AI Enabler as a provider. Create or edit the config file at ~/.config/opencode/opencode.json. There are other, more granular options for working with OpenCode config files. You can find more details in OpenCode documentation.
New to terminal and config files? Start here.
OpenCode stores its configuration in a JSON file at a specific location on your system. If this is your first time using OpenCode, neither the folder nor the file will exist yet — you need to create both manually.
1. Create the config directory
The directory ~/.config/opencode/ is where OpenCode looks for its config. The ~ is shorthand for your home folder (for example, /Users/yourname on macOS). Run this command to create the directory:
mkdir -p ~/.config/opencodeThe -p flag tells mkdir to create any missing parent folders along the way, so this works even if ~/.config/ doesn't exist yet.
2. Create the config file
Once the directory exists, create an empty JSON file inside it:
touch ~/.config/opencode/opencode.json3. Open the file for editing
Open the file in a text editor. If you're comfortable in the terminal, use nano or vim:
nano ~/.config/opencode/opencode.jsonIf you prefer a graphical editor, you can open the file from your editor's File > Open menu and navigate to ~/.config/opencode/opencode.json, or run:
open -a "Visual Studio Code" ~/.config/opencode/opencode.json4. Paste the configuration
Copy the JSON configuration from the step below and paste it into the file. Save and close when done (Ctrl+O, then Ctrl+X in nano).
5. Verify the file exists
Confirm everything is in place:
ls ~/.config/opencodeYou should see opencode.json listed.
The following configuration sets up two providers: GLM 5 (for planning tasks) and MiniMax M2.7 (for code execution). This lets you use GLM 5 for high-level reasoning while using MiniMax M2.7 for the actual code generation, which is more cost-effective for high-volume coding tasks.
{
  "$schema": "https://opencode.ai/config.json",
  "permission": {
    "*": "ask"
  },
  "compaction": {
    "auto": true,
    "prune": true
  },
  "model": "ai-enabler/minimax-m2.7",
  "mode": {
    "plan": {
      "model": "ai-enabler/glm-5-fp8"
    },
    "build": {
      "model": "ai-enabler/minimax-m2.7"
    }
  },
  "provider": {
    "ai-enabler": {
      "npm": "@ai-sdk/openai-compatible",
      "name": "AI Enabler by Cast AI",
      "options": {
        "baseURL": "https://llm.cast.ai/openai/v1",
        "litellmProxy": true,
        "apiKey": "$YOUR_CASTAI_API_KEY"
      },
      "models": {
        "kimi-k2.5": {
          "id": "kimi-k2.5",
          "tool_call": true,
          "reasoning": false,
          "modalities": {
            "input": [
              "text",
              "image"
            ],
            "output": [
              "text"
            ]
          },
          "limit": {
            "context": 262144,
            "output": 32768
          }
        },
        "glm-5-fp8": {
          "name": "glm-5-fp8",
          "tool_call": true,
          "reasoning": true,
          "limit": {
            "context": 202752,
            "output": 32768
          }
        },
        "minimax-m2.7": {
          "name": "minimax-m2.7",
          "tool_call": true,
          "reasoning": false,
          "limit": {
            "context": 196608,
            "output": 32768
          }
        }
      }
    }
  }
}
Replace $YOUR_CASTAI_API_KEY with the API key you generated from the Cast AI console.
Step 2: Verify your configuration
Open a terminal, navigate to a project directory, and start OpenCode:
cd ~/your-project
opencode
Try a simple prompt to verify the connection is working:
What security risks can you identify in this project?OpenCode will use GLM 5 for planning the analysis and MiniMax M2.7 for code review.
Advanced: Multi-agent orchestration with GSD
For more complex workflows, you can use the Get Shit Done (GSD) framework to orchestrate multiple agents with different models assigned to each task type.
Install GSD:
npx gsd-opencodeThen update your opencode.json to include agent-specific model assignments:
{
  "$schema": "https://opencode.ai/config.json",
  "permission": {
    "*": "ask"
  },
  "compaction": {
    "auto": true,
    "prune": true
  },
  "model": "ai-enabler/minimax-m2.7",
  "mode": {
    "plan": {
      "model": "ai-enabler/glm-5-fp8"
    },
    "build": {
      "model": "ai-enabler/minimax-m2.7"
    }
  },
  "provider": {
    "ai-enabler": {
      "npm": "@ai-sdk/openai-compatible",
      "name": "AI Enabler by Cast AI",
      "options": {
        "baseURL": "https://llm.cast.ai/openai/v1",
        "litellmProxy": true,
        "apiKey": "$YOUR_CASTAI_API_KEY"
      },
      "models": {
        "kimi-k2.5": {
          "id": "kimi-k2.5",
          "tool_call": true,
          "reasoning": false,
          "modalities": {
            "input": [
              "text",
              "image"
            ],
            "output": [
              "text"
            ]
          },
          "limit": {
            "context": 262144,
            "output": 32768
          }
        },
        "glm-5-fp8": {
          "name": "glm-5-fp8",
          "tool_call": true,
          "reasoning": true,
          "limit": {
            "context": 202752,
            "output": 32768
          }
        },
        "minimax-m2.7": {
          "name": "minimax-m2.7",
          "tool_call": true,
          "reasoning": false,
          "limit": {
            "context": 196608,
            "output": 32768
          }
        }
      }
    }
  },
  "agent": {
    "gsd-planner": {
      "model": "ai-enabler/glm-5-fp8"
    },
    "gsd-plan-checker": {
      "model": "ai-enabler/glm-5-fp8"
    },
    "gsd-phase-researcher": {
      "model": "ai-enabler/glm-5-fp8"
    },
    "gsd-roadmapper": {
      "model": "ai-enabler/glm-5-fp8"
    },
    "gsd-project-researcher": {
      "model": "ai-enabler/glm-5-fp8"
    },
    "gsd-research-synthesizer": {
      "model": "ai-enabler/glm-5-fp8"
    },
    "gsd-codebase-mapper": {
      "model": "ai-enabler/glm-5-fp8"
    },
    "gsd-executor": {
      "model": "ai-enabler/minimax-m2.7"
    },
    "gsd-debugger": {
      "model": "ai-enabler/minimax-m2.7"
    },
    "gsd-verifier": {
      "model": "ai-enabler/glm-5-fp8"
    },
    "gsd-integration-checker": {
      "model": "ai-enabler/glm-5-fp8"
    },
    "gsd-set-profile": {
      "model": "ai-enabler/glm-5-fp8"
    },
    "gsd-settings": {
      "model": "ai-enabler/glm-5-fp8"
    },
    "gsd-set-model": {
      "model": "ai-enabler/glm-5-fp8"
    }
  }
}
Replace $YOUR_CASTAI_API_KEY with your own key.
This configuration uses GLM 5 for planning, research, and verification tasks, while MiniMax M2.7 handles actual code execution and debugging. This balances cost efficiency with quality. Reasoning-heavy tasks go to GLM 5, while high-volume code generation uses the more economical MiniMax M2.7 model.
You can also configure GSD interactively by running /gsd-settings within OpenCode.
Advanced: GSD 2.0
GSD 2.0 no longer integrates with the OpenCode TUI — it comes bundled with its own TUI via the PI harness.
Run gsd config to generate a basic configuration. Then create the following files:
.gsd/agent/models.json
{
  "providers": {
    "aie": {
      "baseUrl": "https://llm.cast.ai/openai/v1",
      "api": "openai-completions",
      "apiKey": "$YOUR_CASTAI_API_KEY",
      "models": [
        {
          "id": "kimi-k2.5",
          "name": "Kimi K2.5",
          "reasoning": false,
          "input": ["text", "image"],
          "contextWindow": 262144,
          "maxTokens": 32768,
          "cost": { "input": 1, "output": 3.2, "cacheRead": 0, "cacheWrite": 0 }
        },
        {
          "id": "glm-5-fp8",
          "name": "GLM 5",
          "reasoning": true,
          "input": ["text"],
          "contextWindow": 202752,
          "maxTokens": 32768,
          "cost": { "input": 1, "output": 3.2, "cacheRead": 0, "cacheWrite": 0 }
        },
        {
          "id": "minimax-m2.7",
          "name": "MiniMax M2.7",
          "reasoning": true,
          "input": ["text"],
          "contextWindow": 196608,
          "maxTokens": 32768,
          "cost": { "input": 0, "output": 0, "cacheRead": 0, "cacheWrite": 0 }
        }
      ]
    }
  }
}
.gsd/preferences.md
---
version: 1
models:
  research: glm-5-fp8
  planning: glm-5-fp8
  execution: minimax-m2.7
  completion: minimax-m2.7
auto_supervisor:
  model: glm-5-fp8
  soft_timeout_minutes: 20
  idle_timeout_minutes: 10
  hard_timeout_minutes: 30
token_profile: quality
budget_ceiling: 500.00
budget_enforcement: warn
git:
  auto_push: false
  merge_strategy: squash
  isolation: branch
  commit_docs: false
skill_discovery: suggest
notifications:
  on_complete: false
  on_milestone: true
  on_attention: true
auto_visualize: true
---
Replace $YOUR_CASTAI_API_KEY with your own key.
Advanced: Superpowers
Superpowers is a lightweight skills-based workflow framework. Unlike GSD, it adds no extra processes or config — it's a set of prompt skills that guide your existing agent, with lower token overhead and less setup friction.
Add the plugin to your ~/.config/opencode/opencode.json alongside the existing AI Enabler provider config:
{
  "plugin": ["superpowers@git+https://github.com/obra/superpowers.git"]
}
Restart OpenCode. Verify by asking: Tell me about your superpowers
Superpowers provides skills for brainstorming, writing plans, test-driven development, parallel subagent dispatch, systematic debugging, and branch completion workflows. Skills trigger automatically based on what you're doing — no slash commands needed.
Next steps
Updated 2 months ago